For today's post you're getting two dresses for the price of one! Although don't get too excited, because they're both repeat versions of recent projects (my Butterick 6556 and Seamwork Bobby dresses) so there I haven't got much revolutionary new information to share about them.
First up, here's my second version of Butterick 6556. I did always intend that my original version would be something of a test run to see how much I enjoyed wearing the dress - while I like the striped cotton that I used, it had been in my stash for ages and didn't cost that much originally so it was a fairly 'low risk' kind of fabric. Thankfully the stripey version proved very successful, so I was happy to cut into slightly more precious fabric.
In this case it's a cotton voile from Seasalt (no longer available, but they do have lots of new autumnal fabric beauties). I do enjoy sewing with Seasalt fabric, but there's a part of me that always feels compelled to sew something that's noticeably different from the garments Seasalt made with the same fabric - if nothing else because it entertains me to confuse their shop assistants when they recognise the fabric, but then not the actual garment (small things amuse me!). The dress Seasalt had made with this fabric was lovely, but definitely different from this square necked beauty so Butterick 6556 got my seal of approval for this fabric.
There's really not a lot more to say about this, because I didn't do anything at all that was different from my first version!
In contrast, my second Bobby dress has a couple of little changes, one which will be obvious if you compare it with my original one, and one which is slightly more subtle.
The obvious difference is that I shortened this one to be knee length. While I love the midi style of my turquoise blue Bobby, it seems like quite a summery length that's best to be worn with sandals. As there probably won't be too much more sandal-wearing weather this year, I thought for this version I'd try it at knee length. I shortened the skirt pattern by about 4.5", and used a one inch hem and it turned out just how I wanted.
The more subtle difference is that I used 1.5" elastic for the waist instead of the 2" called for in the pattern - for no reason other than the fact that I had some 1.5" elastic in my stash and I thought I might as well use it rather than going out to buy 2". For Bobby, you create the elastic casing by stitching a line parallel to waistline so it's easy to alter where you stitch the casing to accommodate narrower elastic.
The fabric that I used for this second version of Bobby is a great quality cotton jersey from Like Sew Amazing that I picked up at Sarah's Bristol shop at her recent summer party. It's a lovely pink - nice and bright, and the kind of colour I'll wear year-round.
On the face of it, making a couple of sleeveless dresses as summer is coming to an end might seem like a slightly odd choice but I fully intend to carry on wearing both of these dresses with cardigans and tights as the temperatures drop. I'll probably also try layering them with long-sleeved shirts/t-shirts underneath, because any dress without sleeves is fair game for use as a pinafore as far as I'm concerned! So making dresses like this is actually a good way of transitioning gradually from summer to autumn sewing for me. Have you switched seasons in your sewing already?
Showing posts with label Patterns by Gertie. Show all posts
Thursday, 19 September 2019
Thursday, 22 August 2019
Butterick 6556 Dress Sewing Pattern Review
The Butterick 6556 dress has been on my radar of patterns I'd probably like to sew for some time now, so when it was included with issue 70 of Love Sewing magazine I took it as a sign that it was meant to be and snapped up a copy. I had some perfectly suited fabric in my stash, so it quickly hopped to the top of my sewing list!
Butterick 6556 is one of the Patterns by Gertie series, and so unsurprisingly has a bit of a vintage feel about it. The pattern is for a close-fitting dress with lined bodice, square front and back neckine, sleeveless or short sleeved options, a very full pleated skirt, pockets (yay for pockets!), and a centre back lapped zip.
While I have myriad patterns with a fitted bodice and full skirt, the square neckline on B6556 is something a bit different and really appealed to me.
Based on the finished garment measurements, I chose to make a size smaller than recommended for my measurements and cut a 14 at the shoulders/bust, blending out to a 16 at the waist. That worked out nicely and my toile fitted well - it was just a tad snug at the waist (fine when I was standing up but a little tight sitting down and considering that I would want to be able to eat when wearing the dress!). In my actual version I used a fractionally smaller seam allowance at the waist (probably about 1.2 instead of 1.5 cm), and that was enough to give me a bit of breathing space.
I also chose to sew the neckline with a 1 cm seam instead of 1.5 cm just to raise it ever so slightly and bring the shoulders in a touch. I'm gradually coming to the realisation that I probably have proportionately narrow shoulders, and that extra half centimetre on each side helps the shoulder straps to stay in place.
As you may have noticed, I also removed the cut-out/notch/whatever-you-want-to-call-it from the centre front neckline. This was possibly slight laziness on my part because I thought that it would take a bit of effort to get that looking crisp and perfectly symmetrical, and I didn't think it necessarily added much to the dress. I think I actually prefer the unadulterated square neckline.
I also lengthened the bodice by 2.5 cm as is standard for me. Another note on length - the skirt in the pattern is probably a bit longer than most. I often have to lengthen skirts by a couple of inches, but this is the skirt length straight out of the packet and it's bottom-of-the-knee length on me (I'm about 5'9").
The instructions were typical commercial pattern instructions - clear but brief. I did think it was a bit odd that they had you leave a gap at the shoulders when sewing the outer bodice to the lining. That's presumably to make turning the bodice/lining the right way out easier, but I managed to turn mine out perfectly well without leaving a gap and that meant that I then didn't have to hand sew the gap closed.
The fabric I used is one of the longer-term residents in my stash. It's a cotton shirting that I bought a couple of years ago, I'm fairly sure from Fabworks. It was the victim of my over-ambitious seasonal sewing plans and didn't get sewn up before the end of one summer, then got put away and has only just found its way to my sewing table. I think this pattern works quite well with the stripes. Obviously making sure they all matched up nicely took a little bit of time and patience, but I'm happy with how it turned out - especially across that centre back seam and lapped zip.
The only thing I'm not too crazy about is that the fabric creases and wrinkles as soon as you look at it, and it seemed to conspire with my camera to make the dress look a bit ill-fitting in places even though in real life it looks great. I can deal with a few creases though, and let's face it what it looks like in real life is more important than photos.
I'm really pleased with how this dress turned out. The ultimate sign that a project has been successful is when you immediately start dreaming up future versions of the pattern, and I've definitely got a few more Butterick 6556 dresses in my head already. They may not all come to fruition, but a second version is already waiting to be made using some beautiful Seasalt cotton voile - watch this space for that one!
Butterick 6556 is one of the Patterns by Gertie series, and so unsurprisingly has a bit of a vintage feel about it. The pattern is for a close-fitting dress with lined bodice, square front and back neckine, sleeveless or short sleeved options, a very full pleated skirt, pockets (yay for pockets!), and a centre back lapped zip.
While I have myriad patterns with a fitted bodice and full skirt, the square neckline on B6556 is something a bit different and really appealed to me.
Based on the finished garment measurements, I chose to make a size smaller than recommended for my measurements and cut a 14 at the shoulders/bust, blending out to a 16 at the waist. That worked out nicely and my toile fitted well - it was just a tad snug at the waist (fine when I was standing up but a little tight sitting down and considering that I would want to be able to eat when wearing the dress!). In my actual version I used a fractionally smaller seam allowance at the waist (probably about 1.2 instead of 1.5 cm), and that was enough to give me a bit of breathing space.
I also chose to sew the neckline with a 1 cm seam instead of 1.5 cm just to raise it ever so slightly and bring the shoulders in a touch. I'm gradually coming to the realisation that I probably have proportionately narrow shoulders, and that extra half centimetre on each side helps the shoulder straps to stay in place.
As you may have noticed, I also removed the cut-out/notch/whatever-you-want-to-call-it from the centre front neckline. This was possibly slight laziness on my part because I thought that it would take a bit of effort to get that looking crisp and perfectly symmetrical, and I didn't think it necessarily added much to the dress. I think I actually prefer the unadulterated square neckline.
I also lengthened the bodice by 2.5 cm as is standard for me. Another note on length - the skirt in the pattern is probably a bit longer than most. I often have to lengthen skirts by a couple of inches, but this is the skirt length straight out of the packet and it's bottom-of-the-knee length on me (I'm about 5'9").
The instructions were typical commercial pattern instructions - clear but brief. I did think it was a bit odd that they had you leave a gap at the shoulders when sewing the outer bodice to the lining. That's presumably to make turning the bodice/lining the right way out easier, but I managed to turn mine out perfectly well without leaving a gap and that meant that I then didn't have to hand sew the gap closed.
The fabric I used is one of the longer-term residents in my stash. It's a cotton shirting that I bought a couple of years ago, I'm fairly sure from Fabworks. It was the victim of my over-ambitious seasonal sewing plans and didn't get sewn up before the end of one summer, then got put away and has only just found its way to my sewing table. I think this pattern works quite well with the stripes. Obviously making sure they all matched up nicely took a little bit of time and patience, but I'm happy with how it turned out - especially across that centre back seam and lapped zip.
The only thing I'm not too crazy about is that the fabric creases and wrinkles as soon as you look at it, and it seemed to conspire with my camera to make the dress look a bit ill-fitting in places even though in real life it looks great. I can deal with a few creases though, and let's face it what it looks like in real life is more important than photos.
I'm really pleased with how this dress turned out. The ultimate sign that a project has been successful is when you immediately start dreaming up future versions of the pattern, and I've definitely got a few more Butterick 6556 dresses in my head already. They may not all come to fruition, but a second version is already waiting to be made using some beautiful Seasalt cotton voile - watch this space for that one!
Thursday, 18 April 2019
Another Butterick B6563 shirt
The other Sunday evening, I was at a loose end and felt like starting a new sewing project. I'd been planning to make a project case for my embroidery but realised I was missing one of the key supplies. With that idea scuppered, I decided to move on to trying out the Sew Over It Ultimate Trousers (one of my Make Nine projects) but when I went to trace out the pattern I found that I'd run out of tracing paper, and I definitely didn't want to cut into the pattern because I was very unsure about what size I'd need to make.
Having been thwarted once again, I went back to the drawing board hoping that it would be third time lucky. The one advantage of having a pile of fabric sitting in the corner of my flat is that there were a few pieces left over from other projects that were therefore already prewashed and ready to sew. One of those pieces was a decent-sized chunk of Liberty tana lawn in the Suzy Elizabeth print left over from a Granville shirt that I made last year (which I now realise made it to my Instagram account, but not onto my blog for some reason).
While this fabric was left from another project so was sort of a "freebie", it is still Liberty and therefore demands a bit of respect and is also potentially my favourite fabric print ever (there's a closeup of it on my Instagram here) so I didn't want it to go to waste. A tried-and-tested pattern was therefore definitely required! Enter Butterick 6563, one of the Patterns by Gertie range.
I made two versions of this cute little shirt pattern last year, so I knew that it wouldn't disappoint. As with my previous two, for this B6563 I also used the cap sleeves from view B and the Peter Pan collar from view C. I fully intend to use the other collar and the sleeveless/puffed sleeved options at some point, but this time I wanted to stick with what I knew would work.
Unsurprisingly, given that I've made this pattern twice before, the sewing process was a breeze. The instructions are clear, and the pattern is relatively simple but still produces a nicely finished garment. As I said in my post about my previous versions, I made a size down from what is recommended for my measurements and that fits me nicely.
Considering the fact that this is a pattern that I've already road-tested and a fabric that I know and love, it's also not a shock that I'm really happy with the finished garment.
Just to prove how much I love this fabric, here's my current collection of garments made using it! In my defence, there are two different colourways and the two tops on the left were both made using leftovers from two of the other garments. And fabric for four of the five garments came from an ebay seller that used to sell precut lengths of Liberty fabrics at significantly reduced prices (sadly they no longer do!). That all makes having five garments in one print acceptable doesn't it? I'm not the only one who uses the same print repeatedly am I?!
Wednesday, 29 August 2018
Butterick 6563 Shirt
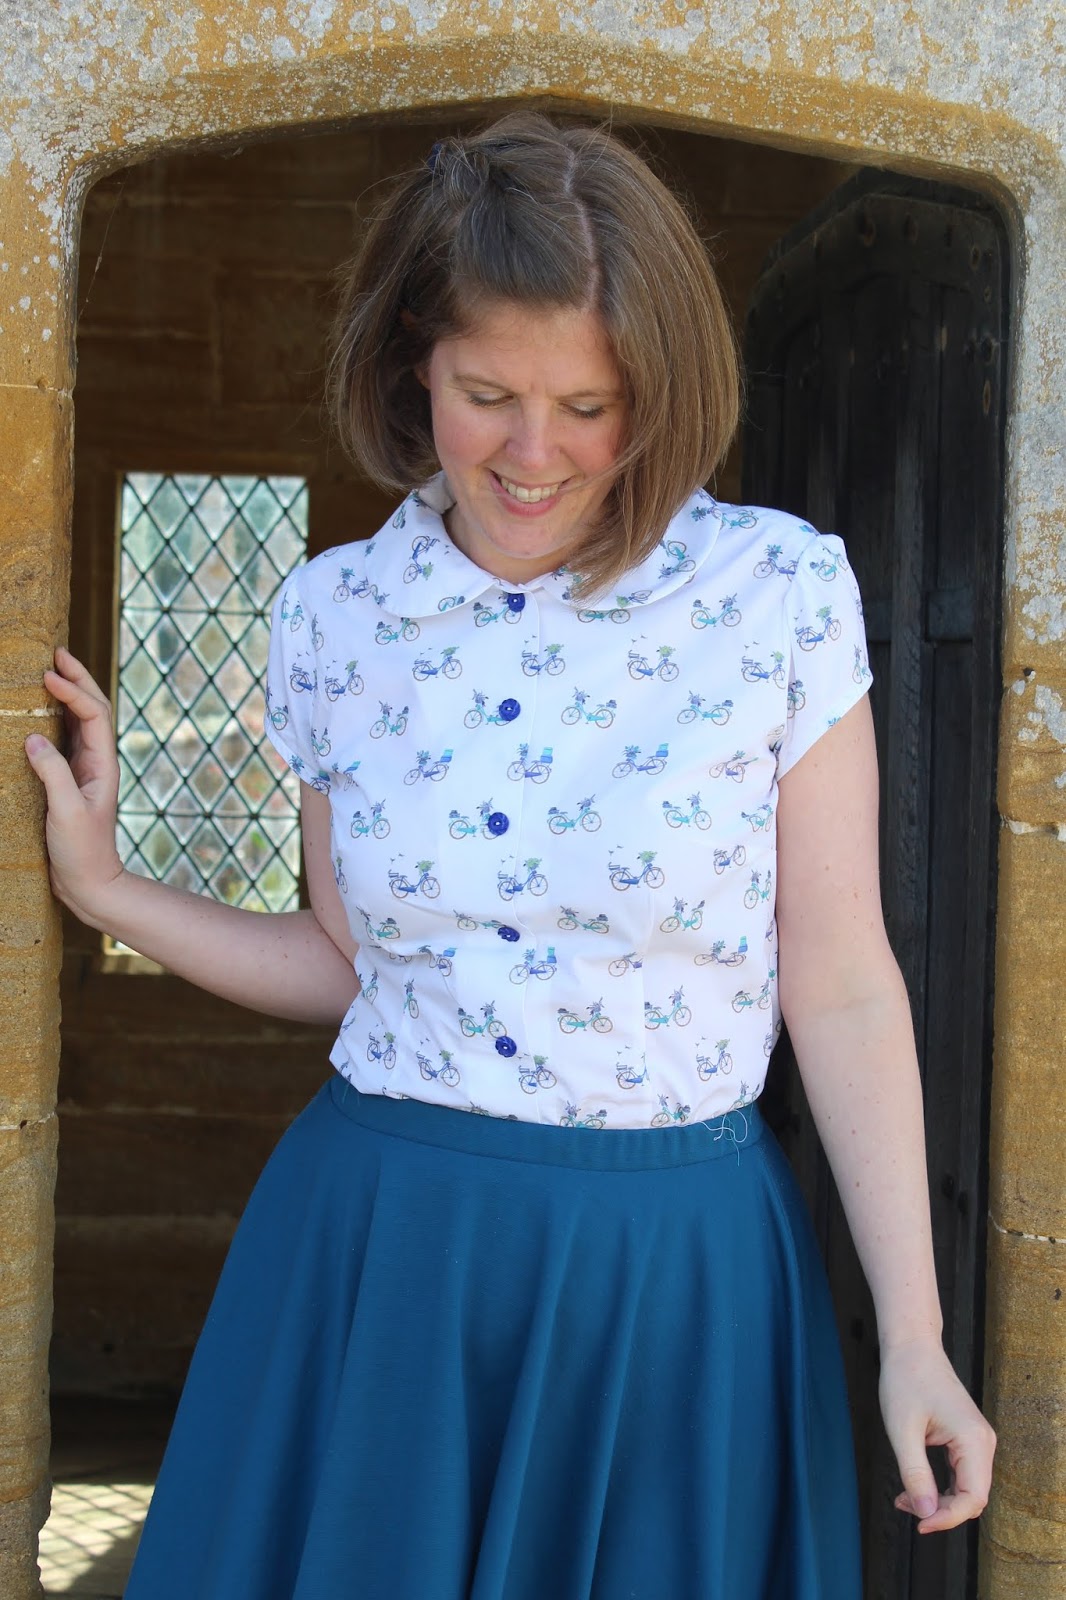
Some projects start with a pattern, and some start with fabric. Today's garments definitely fall into the second category. I've been trying to sew through some stash fabrics recently, but when I saw this cute bicycle print cotton lawn (which now seems to be out of stock, but is available in black) from Fabric Godmother I just had to treat myself to enough to make a top. Butterick 6563 had fairly recently caught my eye, and seemed like it would be the perfect partner for my newly acquired fabric.
Butterick 6563 is from the Patterns by Gertie line, and is for a loose-fitting button front top with shaped hemline featuring collar and sleeve variations. For both of the versions that I made here, I combined the cap sleeves of view B with the Peter Pan collar of view C. While the shirt isn't closely fitted, long waist darts in the front give it a flattering shape.
As the bicycle print lawn was so pretty, I wanted to make sure that I was using it for the right project so I decided to use some fabric from my stash to make a trial version first (thus also partly keeping up my aim of using stash fabric too!). The check shirting I used for my first B6563 came from Sew Loco, and is really lovely. Full disclosure: Lucy from Sew Loco was kind enough to include this as a little extra with some fabric I ordered from her a while back, but it didn't come with any requirement to blog about it attached, and it honestly is great quality fabric.
Based on the finished garment measurements, I made the shirt in a straight size 14. This is a size down from the size recommended for my bust measurement, and two sizes down from my waist/hip measurements. I'd definitely always recommend checking the finished garment measurements to get the fit that you want for commercial patterns in particular. I was happy with how my first version turned out so it was time to cut into the bicycle print.
Thankfully, the pattern was fairly straightforward and I enjoyed sewing the first one, so was only too happy to make another version immediately afterwards. As with most commercial patterns, the instructions were succinct but perfectly clear and I didn't feel the need to do anything differently after sewing my first version. There are some nice features in the pattern such as a sleeve facing (essentially a bias strip), and a self-facing on the front of the shirt which keep the pattern fairly easy to sew whilst giving it a nice finish on the inside.
One thing that I initially wasn't sure about was the size of the Peter Pan collar. I tend to wear shirts with the top button open, and when I did that with B6563 the collar looked comically large, but I think that it looks just fine with the top button done up. And I like the look of the top button done up a lot more than I do on other shirts, so it's all good!
All in all, I'm really happy with these two shirts. They were both fun projects to sew, and will be lovely shirts to wear in warmer weather without being so summery that they can't also be worn under a cardigan when things get cooler. And I managed to buy new fabric whilst still also sticking to my goal of using up my stash, so it's a win all round don't you think?!
As the bicycle print lawn was so pretty, I wanted to make sure that I was using it for the right project so I decided to use some fabric from my stash to make a trial version first (thus also partly keeping up my aim of using stash fabric too!). The check shirting I used for my first B6563 came from Sew Loco, and is really lovely. Full disclosure: Lucy from Sew Loco was kind enough to include this as a little extra with some fabric I ordered from her a while back, but it didn't come with any requirement to blog about it attached, and it honestly is great quality fabric.
Based on the finished garment measurements, I made the shirt in a straight size 14. This is a size down from the size recommended for my bust measurement, and two sizes down from my waist/hip measurements. I'd definitely always recommend checking the finished garment measurements to get the fit that you want for commercial patterns in particular. I was happy with how my first version turned out so it was time to cut into the bicycle print.
Thankfully, the pattern was fairly straightforward and I enjoyed sewing the first one, so was only too happy to make another version immediately afterwards. As with most commercial patterns, the instructions were succinct but perfectly clear and I didn't feel the need to do anything differently after sewing my first version. There are some nice features in the pattern such as a sleeve facing (essentially a bias strip), and a self-facing on the front of the shirt which keep the pattern fairly easy to sew whilst giving it a nice finish on the inside.
One thing that I initially wasn't sure about was the size of the Peter Pan collar. I tend to wear shirts with the top button open, and when I did that with B6563 the collar looked comically large, but I think that it looks just fine with the top button done up. And I like the look of the top button done up a lot more than I do on other shirts, so it's all good!
All in all, I'm really happy with these two shirts. They were both fun projects to sew, and will be lovely shirts to wear in warmer weather without being so summery that they can't also be worn under a cardigan when things get cooler. And I managed to buy new fabric whilst still also sticking to my goal of using up my stash, so it's a win all round don't you think?!
Wednesday, 2 September 2015
Butterick 6217 Blouse & Veronika Skirt
Today you get the second (and final) installment of blog-photos-that-I-took-on-holiday, which sees me twirling around the picturesque surroundings of Alnwick Garden showing off a Butterick 6217 blouse and a denim Veronika skirt.
I got some funny looks when we were taking these photos - you could see people wondering why we were focussing on me instead of all the pretty plants and landscaping - but I've got to the point now where I don't mind as long as the onlookers aren't the kind of people who are going to start shouting comments at me. The average garden visitor tends towards the more decorous end of the scale so I was safe here!
Anyway, back to the sewing itself...
Butterick 6217 is one of the Patterns by Gertie line, and it instantly appealed to me when it was released because I liked the shape of the neckline. I then realised it needs very little fabric, especially if you make view C as I did here, so it seemed like it would be a good way to use up some of the larger remnants I have from other projects. Regular readers may recognise the fabric I've used here as the leftovers from the Vintage Shirt Dress that I made earlier this year.
I made this a couple of weeks ago now, so some of the details of sewing it are a little hazy in my mind, but I know it was a quick project and I didn't make any notes in the notebook I keep by my machine so I assume it was all relatively straightforward and pain-free!
I really like the shape of the blouse, although it's worth noting that to get the fit shown on the pattern envelope you'd definitely need to size down. My measurements put me ever-so-slightly above a 16, but when I made a toile of the 16 it was bordering on tent-like. I sized down to a 14, which fits nicely but I still feel like my version has more ease than shown on the envelope.
The photo above is meant to show the nice shape created by the darts in the back before I tucked the blouse in for the day, but in reality I just think it makes my back look odd!
Now, on to the skirt! This is my second version of Megan Nielsen's free Veronika pattern (version 1 here), and I can tell already that this one is going to get worn a LOT! I don't wear trousers really so denim skirts do the job for me that jeans do for most people, but this one will be a particular favourite because it has the practical goes-with-everything side, but at the same time is also beautifully twirly and fun!
The fabric is a lightweight denim that I got a couple of months ago from The Splendid Stitch. It doesn't seem to be in stock anymore, which is a shame because it's the perfect denim for this kind of skirt. I'd definitely recommend ordering from The Splendid Stitch though - Amy has put together a gorgeous range of fabrics, and dispatched both my samples and fabric order really quickly.
I don't think you'd want to make a circle skirt in any old denim. I know I've worked with some which would be far too stiff and heavy, but this one really is a different kettle of fish. I did cut the inner waistband and pocket linings from a thinner cotton just to keep down bulk, but for the rest the denim has great drape and the finished skirt is gloriously swishy as I walk in it. The only problem is it makes me want to twirl about excessively, which is probably annoying to those around me!
For this version of Veronika, I stuck with the narrow waistband but also added on the scalloped pockets too - they're lovely deep pockets and have proven quite useful when trying to hold down the skirt on breezy days! I also added my own simple belt loops on the waistband, because I knew I'd want to wear belts quite a bit with this skirt.
In case it's not already obvious, I'm really pleased with how these both turned out! I'll definitely make more versions of B6217 as I identify suitable candidates in my stash, and I know this version of the Veronika skirt will become a bit of a wardrobe workhorse. In fact Veronika may fast be becoming a TNT and at some point in the not-too-distant future I'd really like to try a knit version. Have you discovered any TNTs recently?
I got some funny looks when we were taking these photos - you could see people wondering why we were focussing on me instead of all the pretty plants and landscaping - but I've got to the point now where I don't mind as long as the onlookers aren't the kind of people who are going to start shouting comments at me. The average garden visitor tends towards the more decorous end of the scale so I was safe here!
Anyway, back to the sewing itself...
Butterick 6217 is one of the Patterns by Gertie line, and it instantly appealed to me when it was released because I liked the shape of the neckline. I then realised it needs very little fabric, especially if you make view C as I did here, so it seemed like it would be a good way to use up some of the larger remnants I have from other projects. Regular readers may recognise the fabric I've used here as the leftovers from the Vintage Shirt Dress that I made earlier this year.
I made this a couple of weeks ago now, so some of the details of sewing it are a little hazy in my mind, but I know it was a quick project and I didn't make any notes in the notebook I keep by my machine so I assume it was all relatively straightforward and pain-free!
I really like the shape of the blouse, although it's worth noting that to get the fit shown on the pattern envelope you'd definitely need to size down. My measurements put me ever-so-slightly above a 16, but when I made a toile of the 16 it was bordering on tent-like. I sized down to a 14, which fits nicely but I still feel like my version has more ease than shown on the envelope.
The photo above is meant to show the nice shape created by the darts in the back before I tucked the blouse in for the day, but in reality I just think it makes my back look odd!
Now, on to the skirt! This is my second version of Megan Nielsen's free Veronika pattern (version 1 here), and I can tell already that this one is going to get worn a LOT! I don't wear trousers really so denim skirts do the job for me that jeans do for most people, but this one will be a particular favourite because it has the practical goes-with-everything side, but at the same time is also beautifully twirly and fun!
The fabric is a lightweight denim that I got a couple of months ago from The Splendid Stitch. It doesn't seem to be in stock anymore, which is a shame because it's the perfect denim for this kind of skirt. I'd definitely recommend ordering from The Splendid Stitch though - Amy has put together a gorgeous range of fabrics, and dispatched both my samples and fabric order really quickly.
I don't think you'd want to make a circle skirt in any old denim. I know I've worked with some which would be far too stiff and heavy, but this one really is a different kettle of fish. I did cut the inner waistband and pocket linings from a thinner cotton just to keep down bulk, but for the rest the denim has great drape and the finished skirt is gloriously swishy as I walk in it. The only problem is it makes me want to twirl about excessively, which is probably annoying to those around me!
For this version of Veronika, I stuck with the narrow waistband but also added on the scalloped pockets too - they're lovely deep pockets and have proven quite useful when trying to hold down the skirt on breezy days! I also added my own simple belt loops on the waistband, because I knew I'd want to wear belts quite a bit with this skirt.
In case it's not already obvious, I'm really pleased with how these both turned out! I'll definitely make more versions of B6217 as I identify suitable candidates in my stash, and I know this version of the Veronika skirt will become a bit of a wardrobe workhorse. In fact Veronika may fast be becoming a TNT and at some point in the not-too-distant future I'd really like to try a knit version. Have you discovered any TNTs recently?
Subscribe to:
Posts (Atom)