Thursday 26 October 2023

French Navy Patterns Belinda Button Up Shirt

It appears that I've been in a shirt making mood of late so, hot on the heels of my recent Belle shirt, here's my version of the French Navy Patterns Belinda Button Up Shirt.

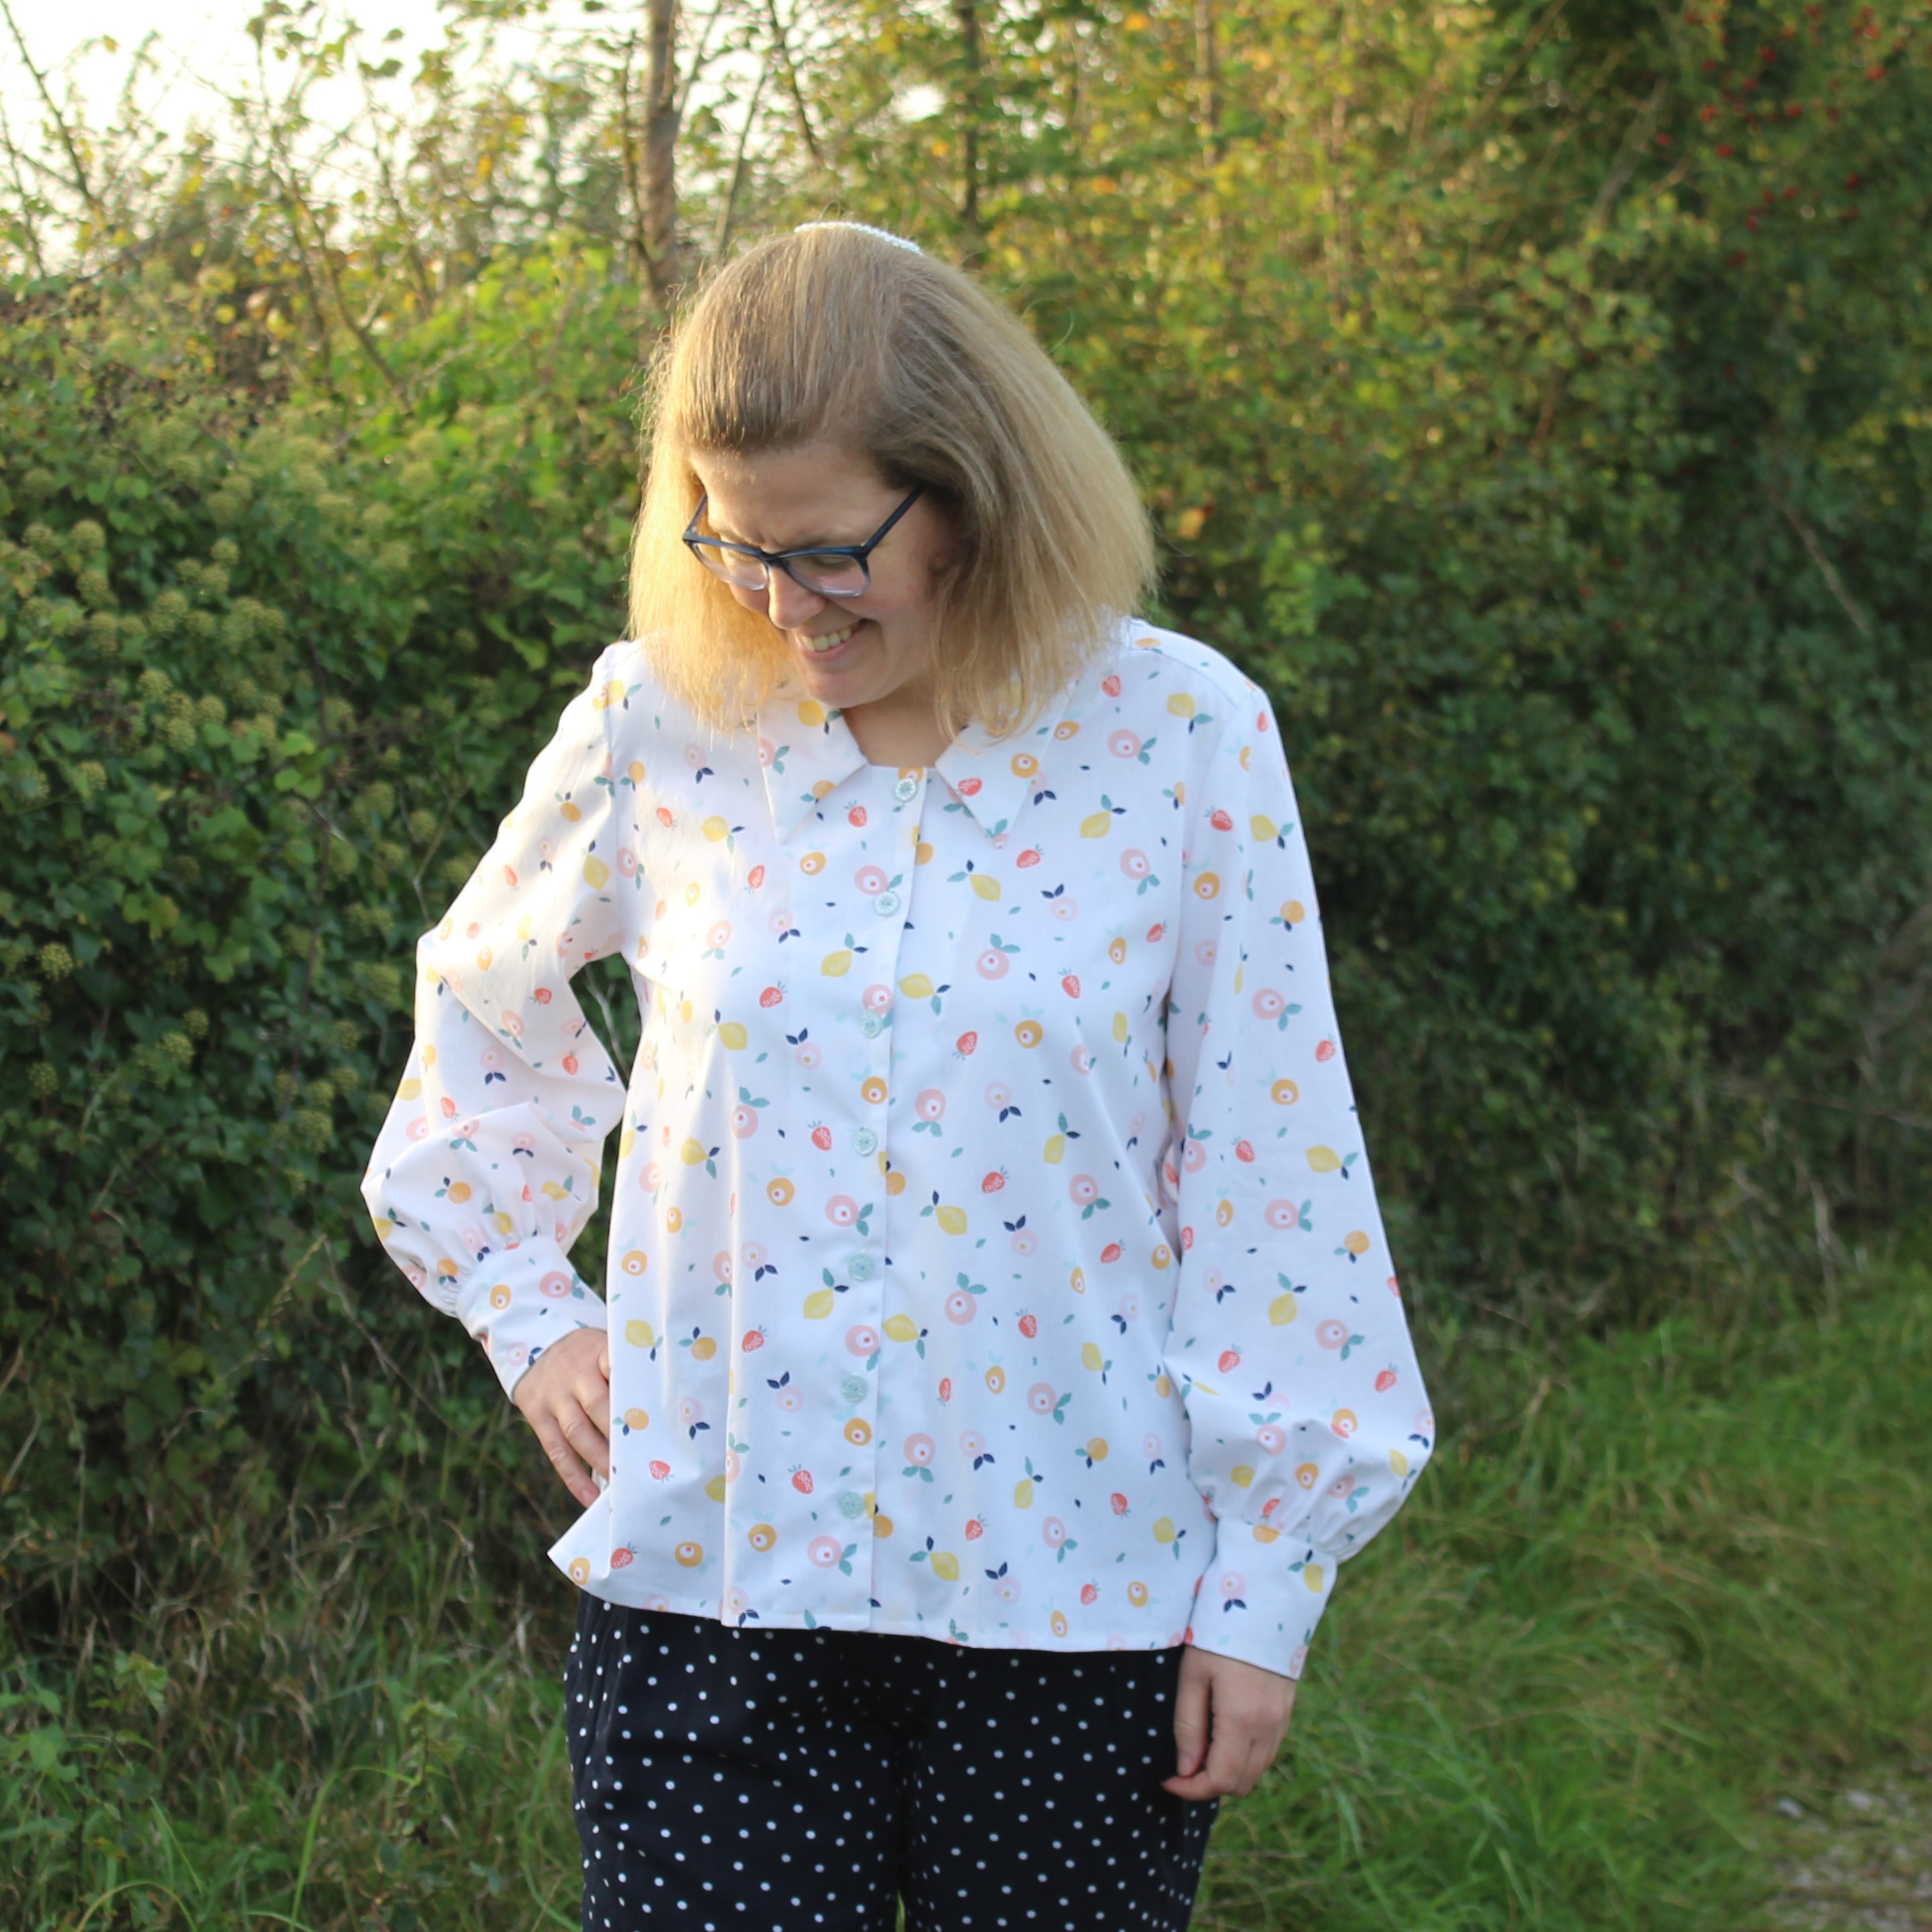
The Belinda Button Up is a long-sleeved shirt with collar and cuff options. View A has a neat, narrow collar and plain cuffs, while view B has a rounded ruffled collar and ruffled sleeve cuffs. Both versions feature a breast pocket. For my Belinda, I used the plain cuffs of view A, the ruffled collar of view B and omitted the breast pocket.

The pattern is sized for bust measurements from 31.5" to 59.5" and hips from 34.5" to 62.5".

As with all collared and cuffed shirt patterns, the Belinda is a slightly involved project that takes a bit of time. I enjoyed working through the steps gradually and didn't find any of the individual processes particularly complicated. The instructions were really good and explained everything with a good level of detail, and they're accompanied by clear diagrams.

Admittedly, I have made a few shirts in the past so there wasn't anything unfamiliar to me, but even if this had been my first attempt at a shirt I think the instructions are good enough to ensure that sewing the Belinda would be a fairly smooth experience.

My (high/full) bust/waist/hip measurements vary between a size E and F and halfway between the two. Having looked at the finished garment measurements, I decided to make a straight size E for my toile and go from there. That was mainly because my high bust is the right measurement for the E so I thought that would hopefully mean the shoulders/neck should fit.

My toile turned out nicely and the only fit adjustment I made was to lengthen the shirt by 3 cm, which is a standard alteration for me (I'm about 5'9"). I also used an extra button, partly because I'd lengthened the shirt and partly because I always position a buttonhole at my bust point to try to prevent gaping and I needed an extra button to make even spacing work around that.

The fabric that I used is a floral cotton poplin that I bought locally from a shop that doesn't have it available online. It's a pretty print and I think the fabric works really well for this shirt.

I really enjoyed sewing my Belinda Button Up shirt, and I think it turned out nicely. I particularly like the ruffle collar - it's cute without being twee, and gives the shirt a bit of a distinctive character. I could definitely see myself sewing this pattern again, and that's always a good verdict isn't it?!

Thursday 12 October 2023

Peppermint x Modern Sewing Co Belle Blouse

Every now and then I like to get my teeth into a slightly more involved sewing project, and shirts are often top of the list. Especially if those shirts happen to have some interesting details to make them a bit unique. The Belle shirt, which was recently released by Peppermint magazine in collaboration with Modern Sewing Co., definitely fits that description!


The Belle shirt is a relaxed fit blouse with a slightly A-line shape. It has a dropped front collar and voluminous sleeves that are gathered into the sleeve cuff. The pattern has shirt and dress options.

The pattern is drafted for a C cup and 5'8" height. The size range covers bust measurements from 29.5" to 55.5" and hip sizes from 32.7" to 58.7".


I enjoyed sewing my Belle shirt, and the instructions were generally very good. They give you a good level of detail and are accompanied by clear diagrams. I like the fact that they result in a nice neat finish on the inside. All the seams apart from the armholes are French seamed, the edge of the facing is hemmed, and the back facing is top-stitched down from the outside to keep it in place.


I will say that I noticed a few oversights/errors in the instructions, which I emailed Peppermint magazine about. I received a reply very quickly saying that they're in the process of correcting them. The issues didn't cause me any major problems (they were more obvious omissions or typos rather than anything being incorrect) and because of that and the fact they're being fixed, I won't go into too much detail. The only thing I will say (because it might be helpful for someone buying supplies for the shirt) is that the pattern actually calls for 7 buttons for the shirt and 9 for the dress - the supplies list in my version of the instructions says 5 and 7 respectively.


It seems a bit strange to me that the pattern includes a dress option, but that's not shown on any of the photos or line drawings. In case you're interested in that option, the dress is a lengthened version of the shirt (i.e. there's not a separate skirt piece), and I think it would be a fairly short dress. For my size, the dress is 22.5 cm longer than the shirt, so it would definitely be well above knee length.


My measurements put me pretty much exactly half way between a size F and G. I consulted the finished garment measurements and decided to try a straight size F. This worked well for my toile and I made my finished shirt with no fit adjustments. As the pattern is drafted for 5'8" height, I didn't even have to lengthen it - hurrah!


The only alteration I made was to change the button spacing so that I have a button positioned at my bust point to prevent gaping. To get a sensible spacing around that point, I've also used more buttons than the pattern calls for.


The fabric I used is a fruit print cotton (with added glitter!) that I bought from Simple Life Fabrics. It's in their bargain section, and at £5.60 per metre it really is a bargain! It's also great quality, was a pleasure to sew and is lovely to wear. It's a great fabric for a shirt.


All in all, I'm really happy with my Belle shirt. Yes, there were a couple of issues with the instructions, but they've been recognised and they're being fixed. I enjoyed sewing the Belle and I'm pleased with the end result. I particularly like the collar and the full sleeves. I think it'll be great to wear with dungarees this autumn!

Thursday 24 August 2023

Embroidered Tilly & the Buttons Stevie Top

I bought the Tilly & the Buttons Stevie pattern quite a while ago, and it's been floating around on my sewing list ever since. I finally got around to making it, and decided to embellish the simple top with some pretty embroidered flowers.

The Stevie is a boxy fit top or tunic dress with a round neckline and grown-on sleeves. It closes at the back neckline with ties or a button and loop, and there are options to use patch pockets or sleeve cuffs (I didn't use either of them this time). There's also an add-on pack that you can buy to give you the possibility to add longer sleeves or turn the top into a dress with a gathered skirt.

The pattern covers hip sizes from 33" to 61".

Stevie is simple to sew - it would be a good pattern for beginners, or it's a nice relaxing project if you've got more experience. The instructions are detailed and very easy to follow, helped by the fact that they're illustrated with clear, bright photos.

I enjoyed sewing my Stevie top, and didn't have any problems at all as I was making it. I like the way the neckline facings are topstitched down - I think it gives a nice neat finish. Everything came together easily and it was a relatively quick project.

In terms of sizing, I made a size 6. My bust and waist measurements are currently between a 5 and a 6 in Tilly & the Buttons sizing, and my hips are bang on the measurement for the size 6. I looked at the finished garment measurements and decided that the 6 would probably be the best bet. I'm happy with how it turned out.

After making a toile, I decided to lengthen the top but my finished top then felt a bit long so I actually ended up taking my top back to the original length from the pattern.

The fabric that I used is a white and grey-blue striped cotton (or at least I think it's cotton!) that I found in a charity shop. I bought it thinking that it would be a good base for embroidery, and the simple shape of the Stevie top seemed like it would be a good canvas for some embroidery too.

I decided to design the embroidery myself and sketched out a couple of ideas before eventually deciding to use this idea of flowers trailing from one shoulder. My flowers have satin stich petals with accents added in straight stitch and French knots in the centres. The leaves are done in fishbone stitch, and for the stems I (appropriately!) used stem stich. It turned out just how I was hoping it would!

I enjoyed both sewing and embroidering my Stevie, and I really like the finished top. It's nice and easy to wear, but the embroidered flowers make it feel a bit more special to me. The pattern would be great for showing off a fun print so I suspect I may make more in future!

Friday 14 July 2023

Cedar Quilt Co. Playful Placemats

Much though I love sewing clothes, it's always nice to have a bit of a break from garments to make something different every now and then. Recently I tried a little bit of quilting and made a couple of Playful Placemats.


The Playful Placemats was the first pattern released by Cedar Quilt Co. (owned by Helen of Helen's Closet). It's available for free when you sign up to their newsletter, and it's specifically intended to be suitable for quilting beginners. 


I would definitely class myself as a beginner in terms of quilting - I've made a couple of small quilted projects over the years, but nothing very big or particularly complicated. 

The placemats appealed to me because they seemed like they would be a manageable project, plus the finished results looked lovely and I fancied some new placemats to brighten up my mealtimes. I also have a small collection of fat quarters of quilting cotton that I've accumulated over the years that deserve to be put to good use!


The placemat tops are pieced from 24 half square triangles (HSTs), and the pattern gives you 24 different possible arrangements so you can choose the one that appeals most to you. I have to say, it took me a while to decide which ones to use because there are lots of nice options.

The pattern explains everything with a good level of detail, accompanied by great diagrams to provide added clarification. I really enjoyed gradually working through the steps, and piecing and quilting the placemats was a nice relaxing project. 


I used the ¼" foot on my machine, which makes it much easier to sew the seams precisely when piecing - although I wouldn't want a quilting expert to examine the accuracy of some of my joins too closely! It was fun seeing my chosen patterns gradually emerge as I joined the HSTs together.


I don't have a walking foot for my machine so I just did the quilting using a normal foot and that worked out fine. As the placemats are fairly small, they were no trouble to quilt. I don't know that I'd fancy trying to wrangle anything big through my regular machine to quilt, but this kind of project is absolutely fine - as long as you don't mind sewing lots of straight lines of course!


The fabrics that I used all came from my stash. The prints I used for the tops were from a fat quarter pack that I got in a goodie bag at a sewing meetup, the white background is some mystery cotton that I acquired somewhere along the line, and the binding and my backings (which I now realise I didn't photograph!) are some chambray that I bought super cheap in a charity shop and have gradually used up in various projects. I also had some batting left over from another project a few years ago. So between all that and the free pattern, this was a very economical project and only cost my time!


If you're interested in giving quilting a try, I'd definitely recommend having a look at the Playful Placemats pattern. I really enjoyed working on the project over a couple of evenings, and I'm very happy with how my placemats turned out. I'm keen to try some other small-scale quilting projects now - I'm quite tempted to give the pillow size of Cedar Quilt Co.'s recently released Whale's Tail a go. I'll be sure to post it here if I do!

Thursday 29 June 2023

Friday Pattern Company Donny Shirt

When it was released, the Friday Pattern Company Donny shirt seemed like a nice enough pattern, but it wasn't one that I felt the need to buy instantly. Then I started seeing more and more lovely versions appearing in my Instagram feed, and I wanted to join the party so I purchased it and added it to my sewing queue.

The Donny shirt is a boxy, pull-on dartless top with a lapel collar, patch pocket and short sleeves. I omitted the patch pocket from my version.

The pattern is drafted for a dressmaker's B cup and covers chest sizes from 32"-60" and hips from 34"-63".

The pattern has great instructions. They are really detailed, easy to follow and have very clear diagrams. I didn't have any trouble at all making my shirt and enjoyed gradually working through the pattern. Some of the steps are the kind of thing that are best if you take your time to make sure you get a neat, precise finish, but there's nothing that I found too complicated and everything turned out nicely.

Alongside the main instructions, the booklet also includes a brief overview of the steps without as much detail, and I think that's a nice touch - if you're experienced or have made the pattern before and basically know what you need to do, it'd be quicker to refer to that than read through all the details. 

In terms of sizing, Donny is intended to have a boxy fit. I looked at the finished garment measurements and decided that the size recommended for my measurements would probably be a bit too boxy for my liking, so I went down a size and made an M instead of the recommended L. I like the fit that gave me - it's relaxed and comfortable to wear without feeling too big. 

The only alteration I made was to lengthen the top by 1", which is very standard for me.

If you're a regular reader of my blog, you may recognise the fabric that I used because it's the same one that I used for the Emporia Patterns Alice trousers that I made recently. It's a leopard print chambray that I bought from Dalston Mill. I intentionally bought enough to make a top to go with the trousers so I could have a co-ord set/fake jumpsuit. I'm looking forward to wearing the two of them together. 

I'm really pleased with my Donny shirt. It was an enjoyable project to sew, and it's a really nice top to wear. As an added bonus, it doesn't need too much fabric to make and I realised that the leftovers from my Helmi blouse are just big enough to cut out a Donny, so I'll be making a second version in the not too distant future!

Monday 19 June 2023

Sew Liberated Joanie Top

When the Sew Liberated Joanie top was released not long ago, I'd already recently bought a couple of new patterns so I almost passed this one by but the more I saw photos of it on Instagram, the more it appealed to me. Eventually, I caved and bought the pattern and added it to my summer sewing plans.

Joanie is a button front top with a breast pocket and various sleeve, collar and length options. View A has a camp collar, split side seams that finish at high-hip length, and cuffed short sleeves. View B has a shawl collar, is tunic length with a shirt style hem, and has long sleeves with tower plackets. Both views have bust darts, a back yoke and back princess seams.

The pattern is drafted for dressmaker's cup size C and covers bust measurements from 31" to 58.5" and hip sizes from 33.5" to 61".

For my version, I essentially made view A, but used the shawl collar from view B. I also omitted the breast pocket. 

I've made a few shirts of various styles in the past and I've always found them to be satisfying projects, and the same was true for the Joanie top. The instructions were detailed and easy to follow, with very clear diagrams to help along the way. Like most collared shirts, it's a slightly more involved project with a few steps to complete. However, none of them are particularly complicated and I enjoyed gradually working through the stages.

I deviated slightly from the instructions when it came to the hem - instead of turning up the whole hem, I first turned the facing right sides together with the front of the shirt and sewed across the bottom to created the hem of that section, then turned it back right sides out. I then folded up the rest of the hem and stitched the whole way around, including top stitching down the facing. It's a technique I've learned from other patterns, and I think it produces a cleaner finish at the centre fronts than simply turning up the whole hem.

I liked the fact that the pattern doesn't include button markings and instead instructs you to position the first buttonhole based on your bust point and then space the rest of the buttonholes evenly working from the bust point buttonhole. I usually do that anyway because I often have to lengthen tops so button placement from the pattern doesn't work, but I also think it helps to prevent gaping.

The sizing of the Joanie top seems good to me. It's intended to have a comfortable fit and I think it achieves that. I made a 14 at the bust and blended out to a 16 at the hips as recommended for my measurements. The only alteration I made was to lengthen the top by 1", which is a very normal adjustment for me. I'm pleased with how the top has turned out - it's comfortable to wear but still has nice shaping from the bust dart and back princess seams.

The fabric I used is a lemon print cotton that I bought from Oh Sew Crafty. It's a nice crisp cotton and was a pleasure to work with. I also got it on sale for £5 which made it even better - it's always good to find a bargain! It was a really nice fabric to use for a shirt as it's very easy to handle. 

I would also like to make a Joanie in something lighter like a cotton lawn because there's a tutorial for a cute puff sleeve hack on the Sew Liberated blog that I'd love to try, but I thought this cotton would have too much body.

Obviously I had to pose with the lemon tree in my lemon print top!

The Joanie top was a really successful sewing project for me. It was a lovely pattern to make and I'm really pleased with the finished top. What more could you want?!

Tuesday 13 June 2023

Emporia Patterns Alice Trousers

Welcome to the latest instalment in my on-going quest to add more trousers to my wardrobe. This time I've made a pair of Emporia Patterns Alice trousers, a pattern which I was lucky enough to win in a giveaway the Emporia Patterns held on Instagram last year.

The Alice trousers are a loose-fitting pair of trousers with cut away pockets, an elasticated waist and elasticated ankles. It's a fairly simple pattern that makes a nicely relaxed pair of trousers.

The pattern covers hip sizes from 38" to 50".

Alice was a nice, easy project to sew and the trousers came together quickly. The instructions are clear and I found them easy to follow, although beginners might not find them as detailed as some other indie pattern company instructions. It's a relatively straightforward pattern with no zips, buttons or any particularly complicated steps though, so there's nothing that really needs a lot of explanation.

One thing that wasn't included that I thought would have been helpful was some guidance on how long to cut the elastic for the ankles and the waist. I've used elastic in waistbands quite a bit so I had a good idea what to do there, but I wasn't sure how long to cut the elastic for the ankles to ensure that were gathered enough to look right without cutting off circulation to my feet! In case it's helpful, I cut my elastic to match the circumference of my leg at my ankles, so it ended up slightly shorter than that measurement once I'd sewn the ends of the elastic together. 

I made a size 14, which is the size recommended for my current body measurements. The only alteration I made was to lengthen the legs by 1.5" (relatively standard for me as I'm 5'9"). As the Alice trousers are designed to be loose, they're fairly forgiving in terms of fit. I'm pleased with how my trousers turned out - they're loose without feeling big and baggy.

The fabric that I used is a leopard print chambray that I bought from Dalston Mill. It's a nice quality fabric and a good weight for the Alice trousers. I think this is a good print for trousers for me - it's more interesting than a solid colour, but still kind of neutral enough (I count most blue and white prints as semi-neutral!) to be worn with lots of patterned tops. You'll be seeing this fabric again here in the not-too-distant future because I intentionally bought enough to make a matching top.

The recommended fabrics for Alice also include viscose, and I think I'd like to give that a try at some point. It would be nice to see how they work on me in a drapier fabric, and I think a viscose pair would be really great for summer.

I'm really happy with my Alice trousers. They were an easy, quick pattern to sew and they're really comfortable to wear. I'll be keeping my eye out for the right fabric to make another pair!