Showing posts with label Sewing Pattern Review. Show all posts

Monday, 29 June 2026

Embroidered Helen's Closet Orbit Bag

The project I'm sharing today has been quite a long time in the making. It started with some embroidery that I mostly finished last summer, and then I did the final touches and sewed it into its final form – a Helen's Closet Orbit bag – over the last few weeks.

The Orbit bag has always appealed to me because it's a bit different to other patterns. It's a circular quilted cross-body bag. It includes instructions for sewing a patchwork star for the front and stripes for the back, or there's an option to use solid fabric (which means you can also use pre-quilted fabric). 

The bag has a zipped closure at the top, and there are options to make either a fixed length or adjustable strap. The bag is finished on the inside with bound seams.

It occurred to me last year that the circular shape of the bag would make it the perfect way to show off an embroidery project, as they're often designed to fit circular hoops. I've long admired Bloom and Floss's beautiful embroidery patterns and at around the time I had my idea about the bag, they released a cherry pattern, which seemed perfect for the bag.

The intended size of the design seemed a little small for the bag, so I printed out the pattern at 120% (I think! I can't find where I noted down the details now) to get it closer to the size I wanted for the bag. 

My thread colours may also differ slightly from the ones called for in the pattern – I have a big box of mostly unnumbered threads that I got partly from an auntie and partly from a charity shop, so I used what looked like the best colour matches for the pattern from those.

I really enjoyed stitching the cherries. I love the different textures created by the various stitches used in the embroidery pattern, and they combine together cleverly to create a really interesting design.

Once I had my finished embroidery, it was time to turn it into a bag! That was also a mostly enjoyable process – personally, I liked sewing the Orbit bag, but my sewing machine definitely wasn't always keen on sewing some of the thicker seams!

The instructions for the Orbit bag are very thorough and are accompanied by clear diagrams. If you haven't done any quilting before, they'll tell you everything you need to know to sew the optional patchwork star front and to quilt the pieces. 

The pattern gives you options and recommendations for quilting, but you can choose what you want to do. For my front panel, I chose to quilt in circles around the cherries to highlight the embroidered design. For the back outer pocket piece, I used straight line quilting, and I used diamonds for the main back piece.

The outer fabric of my bag is a lightweight denim that I found in a charity shop. I think it looks great as the background of the embroidery and as the finished bag, but it probably didn't make my life easy. While it is fairly lightweight denim, it is definitely heavier than a quilting cotton would be so made my seams bulkier – which undoubtedly didn't help with the sewing machine issues I mentioned above! If I make another Orbit bag, I think I'd stick to lighter weight fabrics.

I decided to continue the cherry theme on the inside of my bag and used some cherry print cotton left over from the Simplicity 8384 dress that I made last year. I also used up some of the binding that I had left over from making my Wildwood jacket. I love how the inside looks – I'd happily use the bag inside out too if it weren't for the fact that it would be difficult to use the zip that way!

I'm really pleased with how my Orbit bag turned out. I think the embroidered cherries are really effective, and the bag feels nicely finished and seems surprisingly spacious. It'll be the perfect little bag to use for summer!

Thursday, 25 June 2026

Just Patterns Devon Skirt

When I was switching over my winter and summer clothes in my wardrobe recently, I realised that I have lots of lovely summery tops and blouses, but not many skirts, trousers or shorts to pair them with. At around the same time, Just Patterns released the Devon skirt pattern. I loved the look of it and decided it was just what my wardrobe needed.

The Devon skirt is a relaxed midi skirt that sits at the natural waist. It has eight inverted box pleats at both the front and back, creating lovely volume, and an elasticated waist. It also has slanted pockets and a deep hem.

The pattern covers waist measurements from 23 to 49 inches, and hips from 33 to 59 inches.

The Devon skirt is a fairly simple pattern, and it has excellent instructions. I think it would be perfect for beginners. The steps are all quite straightforward, and the instructions will explain anything that might be unfamiliar. 

If you've got more sewing experience like me, it's a nice satisfying project that comes together quickly, whilst still being interesting.

I liked the fact that the instructions include directions for finishing the skirt with overlocked, bound or fully enclosed seams. I also think the deep hem is a nice touch and makes the finished skirt hang really nicely. 

I made the size recommended for my waist measurement, and it turned out nicely. It has to be said that the elasticated waist makes fitting a breeze – the main thing is to make sure you cut your elastic to the right length. 

I always try to test the actual elastic I'm using before cutting it – I've found that some elastics are much stretchier than others, and that could affect the fit of your finished skirt.

The fabric that I used is a lovely vibrant yellow cotton twill. It was the last fabric I bought from Jenny Stitches before the shop closed recently. It is a bit heavier than the fabrics recommended for the pattern (the instructions call for lightweight wovens, and this is definitely medium weight), but having used and really liked other colours of the same fabric before, I was fairly confident it would work. I wouldn't want to use fabric any heavier than this though.

The colour of the fabric is great! It feels really summery, and will go nicely with lots of my tops (in the photos, I'm wearing it with my Sew Liberated Joanie shirt). Who knew that lemon yellow would be a good "neutral"?!

I'm really pleased with my Devon skirt – it was a joy to sew, it's lovely to wear and it's a very good start to filling that gap in my wardrobe.

Thursday, 18 June 2026

Style Arc Hampton Woven Dress

Today's project mainly came about because of a sale that Style Arc had on their patterns a little while ago. Ever the bargain hunter, I was browsing their site to see if I "needed" to take advantage of the discount and was reminded that I've always liked the look of the Hampton Woven Dress, so I decided to give it a try.

The Hampton dress is a modern take on a classic shirtdress, featuring princess seams, a curved high/low waist seam and a gathered mid-calf skirt. It has a classic collar and collar stand, button plackets, in-seam pockets and a hem facing. There's a long-sleeved option in addition to the sleeveless version that I made.

The sizing covers bust measurements from 30.3" to 67.75, and hips from 32.6" to 70.1".

All the shirtdress features are lovely, but they do mean that this isn't a quick project. That's completely fine by me though – I like a slightly more involved project every now and then. I enjoyed gradually working through all of the steps and seeing my dress slowly take shape.

I'd say the instructions are on the brief side, and they're the kind that can sound confusing if you read them through before starting your project, but I found them perfectly detailed enough and easy to follow during my sewing process. I'd say the diagrams are fine as a support for the written instructions, but if you're someone who prefers to use visual instructions then they might not be the best.

The only real problem that I had when making my dress was when I was tracing my pattern pieces – I found it really difficult to distinguish between the sizes. I eventually realised that when I ordered the printing of the A0 pattern, I'd asked for colour printing but for some reason the printing company printed it in greyscale, which obviously wasn't very helpful! So make sure you have the pattern in colour to make life easier for yourself than I had it!

I made a size 12 as recommended for my bust measurement. My waist and hips would be in the size 14 according to the size chart, but I could tell from the finished garment measurements that there was no need to blend out to the larger size. I think the fit turned out nicely – it's shaped but still very comfortable.

The only fitting alteration that I made was to take a triangular wedge out of each bodice side seam going from a centimetre at the underarm and rejoining the original seam line just above the waist. I find that I often need to do this on bodices of dresses with sleeved and sleeveless options that don't provide different armscyes for the sleeved/sleeveless versions.

The fabric that I used for my Hampton dress is a pretty printed chambray that I bought from Croft Mill. I'm a big fan of printed chambray, and Croft Mill have a lovely range of them. I thought it would be a great option for the pattern, and I'm pleased to report that I think I was right. It was very easy to work with and hangs nicely as the finished dress.

I'm glad that the sale prompted me to buy the Hampton Woven Dress pattern – I enjoyed sewing it and I think I'll wear my finished dress a lot!

Wednesday, 29 April 2026

Wardrobe by Me Dukke Blouse

I've wanted to make the Wardrobe by Me Dukke blouse since I first saw the pattern last year, but somehow it has taken until now for it to find its way onto my sewing table. Better late than never though!

The Dukke blouse is a relaxed-fit button-up blouse with a flat Peter Pan collar, gently curved hemline and  or ¾ sleeves (I used the  option). It's designed to be worn either as a blouse or open layered over another top as an overshirt.

The pattern covers bust measurements from 30" to 50", and hip measurements from 32" to 53.25".

I enjoyed sewing my Dukke blouse. It's a relatively straightforward pattern, and didn't contain any steps that I wasn't already familiar with. 

The instructions were fairly easy to follow, although I found it a bit irritating that they contained quite a few typos and little mistakes (I was using a printed version of the pattern). It has to be said that I spend a significant part of my working hours proofreading, so it's likely that this might be less annoying to other people!

One point that I did notice is that the line drawing for the pattern and the diagram accompanying the instructions is wrong – the instructions tell you to sew the buttonholes on the right of the blouse (as is normal for women's clothing), but the line drawing and diagrams show the buttonholes on the left and the buttons on the right. So trust the instructions and your instincts, not the diagrams!

The fabrics that I used for my Dukke blouse are yarn dyed cottons that I bought from The Fabric Boutique. Both fabrics are the same colourway, but I used the checked version for the front and back and stripes for my sleeves and collar. I love how they look together!

In terms of sizing, I sewed a 10 at the bust blending out to a 12 at the hips. Those are the sizes recommended for my current measurements, and I didn't make any fitting changes – the relaxed fit is fairly forgiving. I think that it worked out well and I'm happy with the fit.

One thing that I did slightly differently was to ignore the buttonhole placement recommended in the pattern. Placing buttons at different points within the check pattern looked a bit odd, so instead I decided to use more buttons than recommended and just place a button in the middle of each lighter square down the centre front.

I'm glad that I finally got around to making a Dukke blouse, and I'm pleased with how this version turned out. I think the pattern would be great as a summer cover-up, so I'm already keeping an eye out for some nice white fabric to make another version – that's always a good verdict on a pattern, isn't it?

Tuesday, 3 February 2026

Summer Haus Patterns Spero Skirt

It's been a while hasn't it? At the end of each year, things tend to go quiet on my blog because I'm busy making Christmas presents. Now we're into a new year, I'm happy to report that I'm back to making things for myself, starting with the Spero skirt from Summer Haus patterns.


The Spero skirt is designed for knit fabrics, and is a simple high-rise, pull-on skirt. It has a relaxed silhouette and an elastic waistband, and falls to midi length. It has a slit at the centre back, which means that there's plenty of room for movement so you're not restricted when walking.


The pattern covers waist measurements from 23 to 58" and hips from 32 to 67".

Proceeds from the pattern go to supporting causes that are important to the designer. As I'm writing this post, they're going to Community Aid Network MN.


Spero is a fairly simple pattern, with just two pattern pieces – one for the front (cut on the fold), and one for the back (cut as two pieces). The waistband is formed by folding over the top of the skirt.

As a result, it's no surprise that the skirt sews up quickly and effortlessly. The instructions are very good; clear and easy to follow, with just the right level of detail and helpful diagrams.


The sizing is good. The pattern recommends that you choose a size based on your hip measurement, which I did. My hips are 42" so I made a size 10 – my waist is 32.5", so between an 8 and a 10, but it's easy to adjust the waist a bit by cutting the elastic to your preferred length. Personally, I think the skirt has the perfect amount of ease to make it comfy and relaxed for everyday wear, without being baggy or shapeless.


The skirt is drafted for a height of 5'5" (side note: I love that this information is stated clearly in the instructions, often it's the kind of thing you have to hunt down on a designer's website). I'm closer to 5'9" so I lengthened my skirt by 2". 


There is a lengthen/shorten line on the pattern (another plus point; they're often not included), but it's in the lower half of the skirt below the slit. I thought that I'd probably want the extra length above the slit so I drew in my own lengthen line in the top half of the skirt, and I'm glad I did that. The slit (and the skirt as a whole) falls at pretty much the perfect length for me now.


The fabric that I used is a French terry that I snapped up in the Threadquarters closing down sale. This fabric is now out of out of stock, but there are some other beauties still available at the moment if you're after a bargain.


My Spero skirt is so comfy to wear, and I love the colour. All in all, it was a really enjoyable project and I could definitely see myself making another Spero or two in the future!

Thursday, 30 October 2025

Itch to Stitch Clemente Top

Sometimes a pattern and fabric appear at the same time and demand to be combined together. That's just what happened a couple of weeks ago when Itch to Stitch launched the Clemente top, and a couple of days later Hey Sew Sister released a particularly lovely yarn-dyed cotton gingham that seemed perfect for the pattern.


The Clemente top is a relaxed fit top for woven fabrics. It features front and back yokes with soft gathers, a bias bound neckline, button and loop closure at the centre back neck, and the choice of short, three-quarter or long sleeves with elasticated hems.

The pattern has A, B, C, D and DD cup sizes, and covers bust measurements from 30" to 63" and hips from 33" to 62".


The pattern instructions have a good level of detail and are very easy to follow, with clear diagrams illustrating the steps too. I've made a few Itch to Stitch patterns and they always have great instructions.


Clemente is a fairly simple pattern and comes together relatively quickly, but the yoke offers a bit of interest – particularly if you use a gingham/plaid or striped fabric and play with the pattern placement on the yoke. 

As you can see, I cut my yoke on the bias. The pattern recommends using stay tape around the neck and yoke seam if you do this to prevent the yoke stretching. I followed that recommendation and it seems to have worked nicely.


I made a size 10 and used the B cup pattern piece as recommended for my measurements, and I think the fit is good. It's relaxed as intended, but not overly loose or baggy. 

The only adjustment I made was to lengthen the pattern by an inch (standard for me). When I tried on my toile, which I hadn't hemmed, it felt like just the right length so I added the extra inch so I'd be able to hem the top and keep the length that I wanted.


The only other very slight change I made was to use ½" elastic in the sleeve hems instead of the " called for in the pattern, which was just because that was what I had in my stash.


As I mentioned above, the fabric that I used for my Clemente is a yarn-dyed cotton gingham from Hey Sew Sister. It's a lovely quality fabric, and was a pleasure to sew. I think this fabric is perfect for a Clemente – it has just enough structure and stability to make the sewing process a breeze, but it's also light enough to suit the relaxed shape. 

I took the time to match the back yoke pieces, and I'm glad I did that – it's always satisfying when pattern matching works out!


I'm pleased that the Clemente and this lovely gingham appeared together and "forced" me to combine them. It was an enjoyable project to sew, and my finished top feels lovely to wear. I quite fancy making a Clemente with an embroidered yoke, so I may well be using this pattern again.

Monday, 30 June 2025

Sew Hello St Mawes Top

A couple of weeks ago I made myself another Waves & Wild Kinjarling dress (you can see that on my Instagram profile, and there's a blog post about my original version of the pattern here) and after cutting it out, I realised I had enough fabric left over to make a top. I had a look through my collection of patterns that I haven't used yet, and chose to make the Sew Hello St Mawes top.


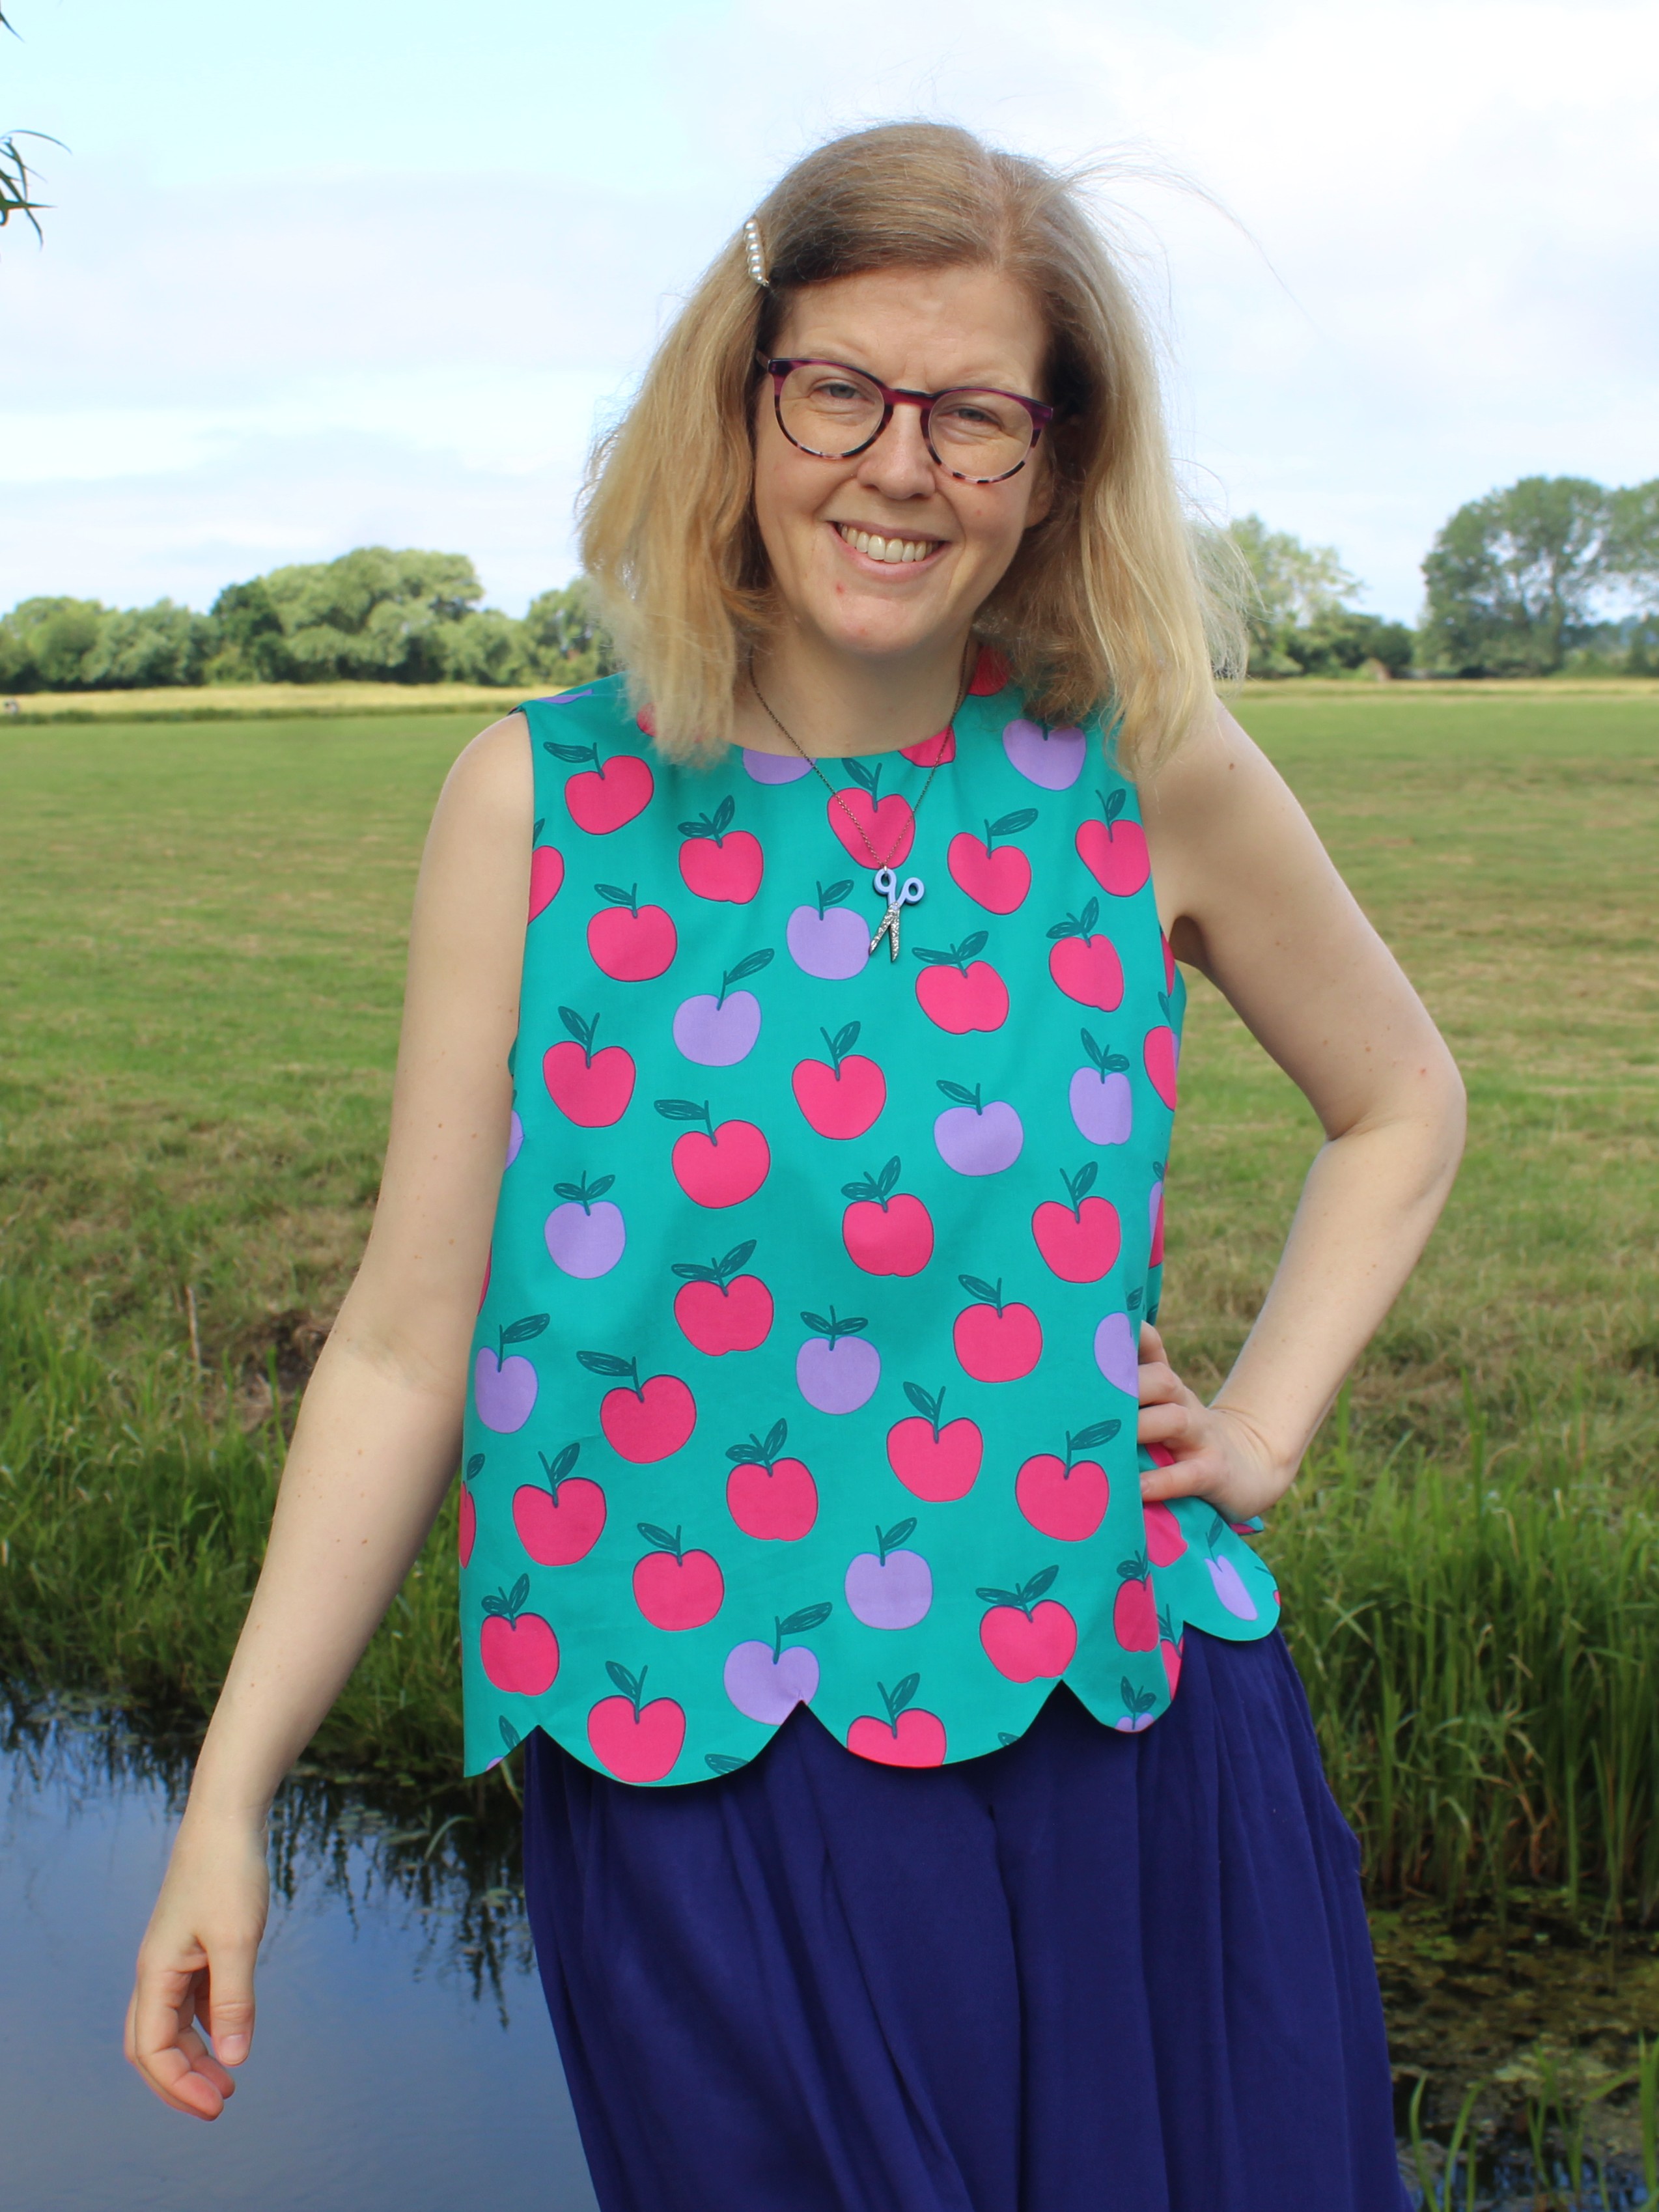
The St Mawes top is a cropped or long-length top with a scalloped or straight hem. The top can be made sleeveless, with straight short sleeves or with three-quarter length balloon sleeves. The sleeveless version has an all-in-one neck and armhole facing, while the neckline of the sleeved versions is finished with binding. The pattern also uses a hem facing in both the scalloped and straight versions.

The pattern caters for bust sizes from 31.5" to 59.5", and hip measurements from 34.75" to 62.5".


I enjoyed sewing my St Mawes top. It's quite a satisfying project to work on and the pattern seemed to be well drafted – everything came together with no trouble at all. I like the all-in-one neck/armhole facing (which is sewn using the burrito method). It gives a nice clean finish and means that there's no chance of the facing flipping to the outside as you're wearing the top.


The scalloped hem is a fun feature, and was nice and simple to sew with the facing. My top tip would be to mark the seam allowance at the top points between the scallops to make sure all of your pivot points are in the right place and are even.


The instructions are generally fine, although if I'm honest I don't think they're the best I've used. There were a couple of points that I think I might have found confusing if I hadn't already been fairly familiar with the processes. For example, the instructions refer to the facing as both a facing and a lining, and I think that the steps for the burrito method could have been a bit clearer. The diagrams are good though, and definitely help to clarify the steps.


I made a size 14, which is what is recommended for my measurements. I think the sizing is quite generous. I ended up sewing the side seams with a larger seam allowance at the underarm, tapering out to meet the intended 1 cm seam allowance at the hem. My top is fairly loose, but I quite like that in this sleeveless version and it was nice to wear on a hot day this weekend.


I made the long version, and that's a nice length on me – although I wouldn't say it's particularly long. The cropped version would have been very cropped on me, but I am 3" taller than the pattern is designed for.

One point I would mention is that when I made a toile I could only just get the top over my head. In my "proper" version, I used a 1.5 cm seam allowance around the neckline instead of 1 cm and that has helped. I do have an abnormally large head (all those hats that claim "one size fits all" are lying!) so it may not be an issue for most people, but it would be worth checking.


The fabric that I used is a lightweight cotton poplin that I bought a few months ago from a shop that has since closed. I did see it for sale in a few online shops at the time though, so it may still be around somewhere if you need some apples in your life!


All in all, I think my St Mawes top turned out quite nicely. I particularly like the scalloped hem, and it'll be a nice breezy top to wear on summer days. Plus, I always enjoy getting a bonus extra project out of a piece of fabric!