Monday 23 April 2018

Closet Case Patterns Carolyn Pyjamas

The Closet Case Patterns Carolyn Pyjamas have been on my sewing list for a long time now. I bought the pattern getting on for two years ago, and included it on my #2017makenine list. I didn't get round to making it last year so it was the first choice for this year's make nine list, and I'm happy to say that I've now finally sewn some fancy new pyjamas.


The Carolyn pyjamas feature a notched collar button up top, with a curved hem, breast pocket and sleeve options, with straight legged trousers or shorts, which both have an elasticated waist, pockets and faux fly. The pyjamas are also designed to use pretty contrasting piping details.

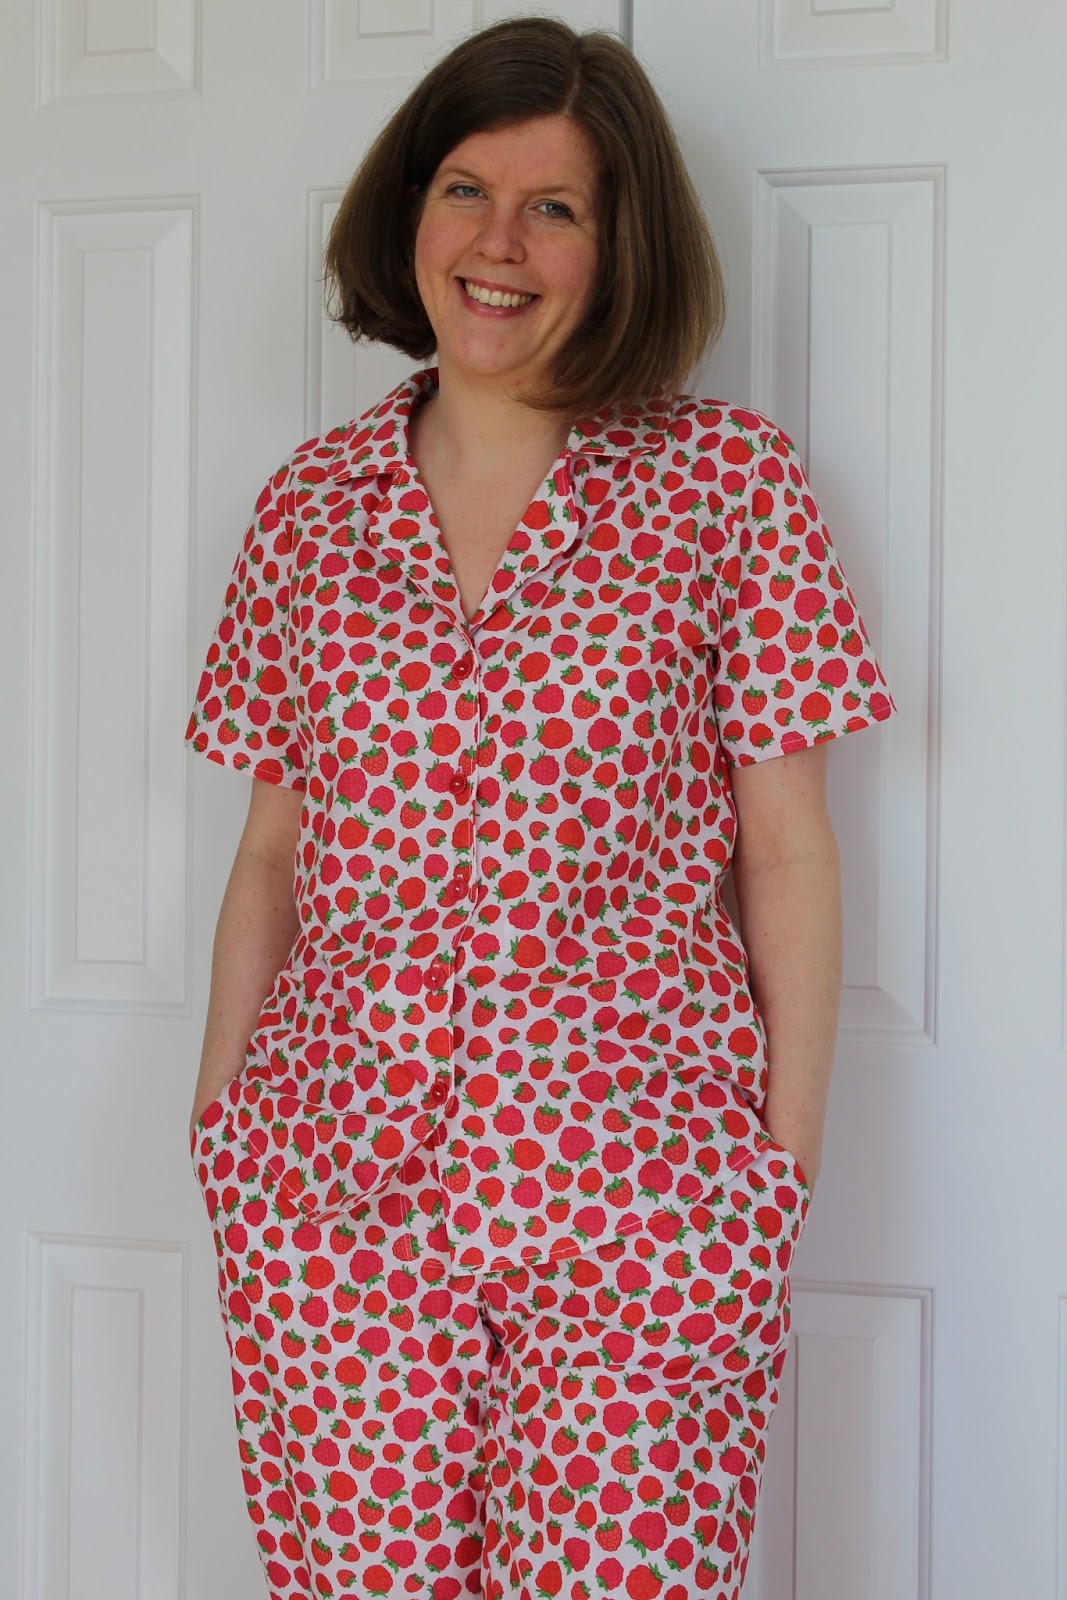
I used the short sleeved top from view C and I had masses of fabric so was actually able to make both the cuff-free trousers from view A and the shorts from view C.


In some ways, my version is a bit of a minimalist version of the Carolyn set. I was treating this as a (very) wearable toile and because of that, I didn't want to spend ages making piping (I couldn't find any in quite the right colour) and adding it this time - although I fully intend to make some more with piping now that these have turned out to be a success.

As I wasn't using piping, there didn't seem much point in using the cuffs because they wouldn't stand out properly so I just lengthened the pattern pieces for the sleeves and shorts so that they included the extra length that would have been provided by the cuffs. I also didn't use the breast pocket on the top because I knew that I'd never use it and I think my print is busy enough that it doesn't need a decorative pocket.


In terms of sizing, I followed my measurements and made a size 12 for the top and size 14 for the waist and hips of the trousers/shorts. I've heard some other people mention that the trousers/shorts are closer fitting through the legs so I blended out to a size 16 through the thighs because my thighs are proportionately quite large (a genetic 'gift' that I apparently have my Grandpa to thank for!). Let's face it, fit isn't as important on PJs as it would be on some other garments, but I think they've turned out to be the right combination of comfortably loose without being shapeless and tent-like.


The fabric I used is a fun raspberry print cotton and, depending on your bed linen purchasing preferences, may be familiar to some people because it's actually from an Ikea duvet cover (hence having masses of fabric!) from a couple of years ago. I originally bought it intending to make a dress, but I think it's actually better as pyjamas.


Sewing the Carolyn pyjamas was a really enjoyable process. They're a nice combination of the simplicity that you would usually expect from sewing pyjama trousers with the addition of the slightly more interesting faux fly, and the notched collar and buttonholes/buttons of the top. And of course the piping if I hadn't chosen to omit it!

They're perhaps not as beginner-friendly as some other pyjama patterns, but the instructions are very thorough and mean that even the slightly more challenging elements of the pattern are in no way tricky or daunting if you just take everything step by step.


I love how my Carolyn pyjamas turned out. It may seem like a small thing, but one of my favourite parts of the pattern is that it uses thicker waist elastic than some other PJs, which makes them really comfy. You'll hopefully be seeing some more pyjamas from me at some point soon-ish -  my pyjama drawer had got a bit neglected and I've got the Nina Lee Piccadilly pattern and a fun cotton print waiting to be combined together. Wish me luck!

Wednesday 4 April 2018

Home: Craft Drawer

The project I'm sharing today is something that I've been wanting to make for a few years after seeing the idea in an old issue of Homemaker magazine. It's taken me this long to get around to it because the main item on the list of supplies needed was "Old wooden drawer". I don't know about you, but I don't generally have that many old wooden drawers sitting around so knew I'd just have to keep my eye out for one and put the project to the back of my mind until something came along. A little while ago I found just what I was looking for - here it is...


At this point I should say that, while I said in my post about my chest of drawers that I wanted to paint all the furniture, there are some things that I think are too nice to be repainted. Had this drawer still been in its chest with some fellow drawers, I suspect it would have fallen into that category because it is lovely wood. On its own, on the other hand, I decided that most people wouldn't want it so it was fair enough for me to adulterate it a bit, namely by painting it bright pink and putting some legs on it.


This might look like a slightly strange item of furniture, but when I saw the original project in the magazine I instantly thought that it would be great for sitting next to my sofa and holding all of my various crafting projects (knitting, crochet, EPP etc.).


I sanded the drawer down, and then painted it using V33 Easy Ultra Pink Gloss furniture paint. While I'm happy with the colour and finish that I've ended up with, I wouldn't particularly recommend this paint if you're aiming for a strong, solid colour. The coverage really wasn't great and the colour was quite watery - I ended up having to do five coats on the drawer. That's not a problem necessarily, but other furniture paint I've used as given a much better coverage and only needed one or two.

The legs that I've used came from Peter Cook International, and I would happily recommend them! They're just right for this project, and arrived really quickly. I would tell you about attaching the legs, but my Dad helpfully volunteered to take on that job and I'm not actually sure what he did.


The last step for the drawer itself was to line the bottom with some pretty paper. This is some children's wallpaper from Homebase, and is actually the same that I used to line the drawers of my chest of drawers too.


The only problem then was that, in my humble opinion, sofa-based crafts generally need a cup of tea and an occasional sweet treat to accompany them and the craft drawer didn't have any space for them. Thankfully, my parents had an old wooden tray that my Mum had sanded down a while ago, but then hadn't actually got around to painting. I painted it white, and then my Dad attached some dowels to the bottom to help it sit securely in place on top of the drawer. It's now the perfect place for refreshments (or flowers) to sit.


My craft drawer has now been in place next to my sofa for a couple of weeks, and I'm so pleased with it. It means that all of my knitting and crochet projects, and hand sewing supplies, are kept nice and tidy but within easy reach whenever I want to pick one of them up to work on for a while. And it's bright pink - who doesn't love a bit of cheery colour?! If you happen to have an old drawer lying around and lots of craft projects to keep in order, I'd definitely recommend giving this a go!