Wednesday 29 April 2020

Jennifer Lauren Asteria Dress

Recently the urge to make myself a pretty dress had become a bit of an itch that I needed to scratch. Dresses are what originally kick-started my sewing journey and, however much I've enjoyed my recent experimental projects, there's nothing like a new favourite dress to put a smile on my face. So when Jennifer Lauren released the Asteria dress it was just begging for me to make it.


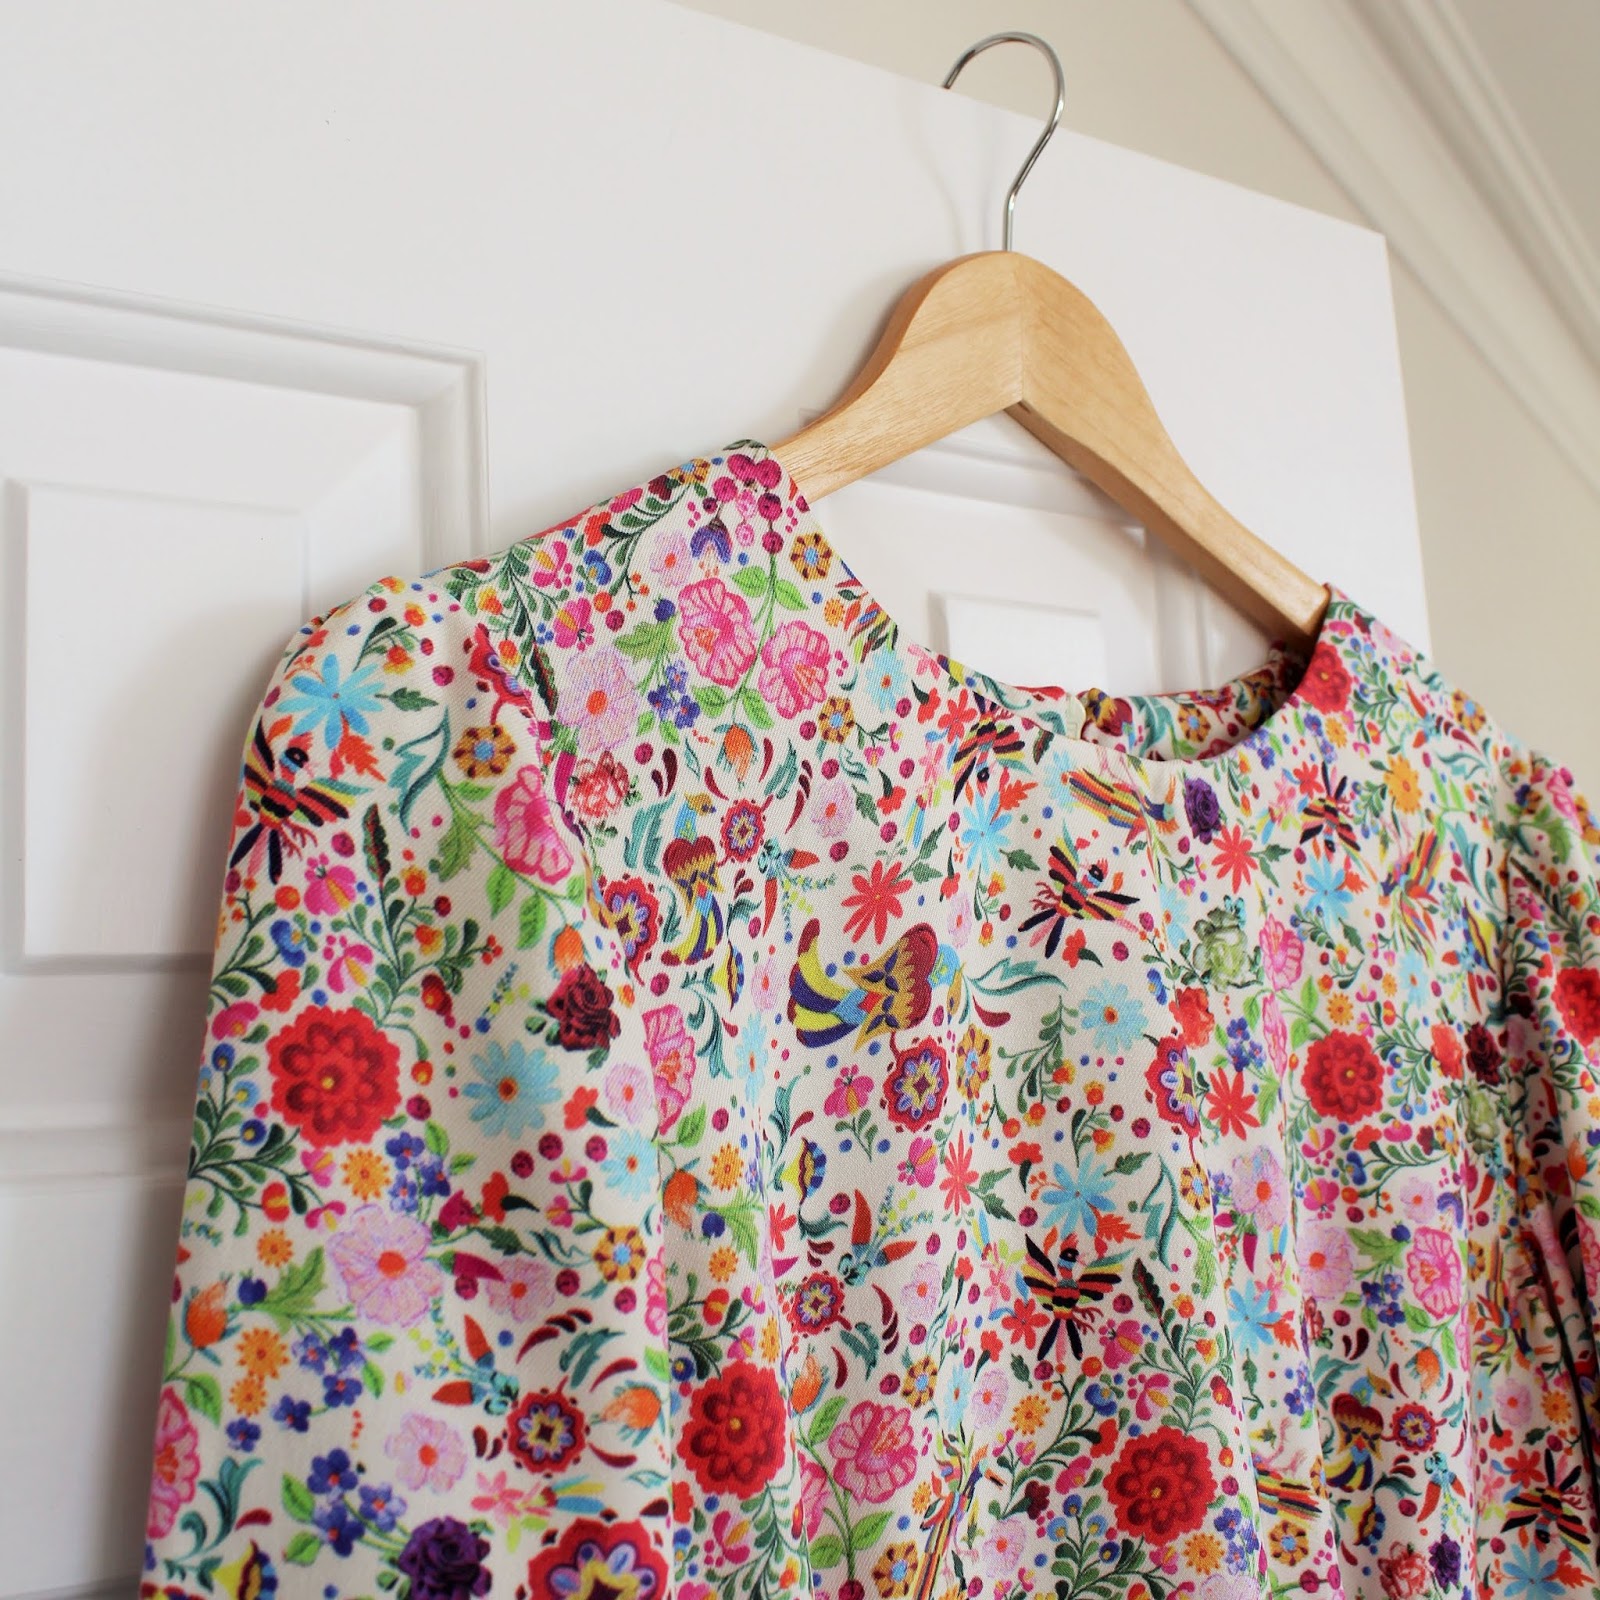
The Asteria dress pattern was always going to appeal to me - it has a hint of vintage style but will also easily fit into my daily life.

The Asteria is a short-sleeved dress with a lovely square neckline. It's semi-fitted from the bust down, shaped with ties at the natural waist. There's an optional collar, as well as the possibility to make a button down bodice, or one cut on the fold (as I did). The full skirt is shaped with box pleats and has generously-sized side seam pockets. The pattern also has separate bodice pieces for cup sizes A to D.


I think one of the nice things about the Asteria is that it has no fastenings so it's a fairly simple project to sew. Often the thing that new sewists fear is inserting zips or making buttonholes, and this pattern gives you the ability to make a fairly impressive looking dress whilst not having to tackle those processes that can initially seem a bit "scary" (although, there's really nothing to be afraid of about them!).


The fact that the Asteria has more ease than normal through the waist and is shaped with ties also means that it's more comfy than dresses of this style can sometimes be. I love wearing my other waisted dresses, but they can occasionally feel a bit tight on particularly hot days (or after a big meal!), but with the Asteria you could have a very similar look but just loosen off the waist ties a bit if you wanted to.


As with other Jennifer Lauren patterns I've made in the past, the instructions for the Asteria are very thorough and clear throughout. It includes extra little tips to make the process easier, such as advising you to press the sleeve hem up and then unfold it again before sewing the sleeve seam so you have lines there ready for when you get to the hemming. I tend to do this anyway (it's definitely easier to press a hem on a flat pattern piece than on a tube of fabric), but I haven't seen many patterns recommend this step.


In terms of sizing, I made a 14 and used the A cup bodice. My measurements are currently B 38", W 32", H 42" and my full bust/under bust difference puts me at the top of the A cup range. The 14 A cup is technically meant to be for a slightly smaller bust measurement than mine, but from the finished garment measurements I was pretty sure that would be the best option for me. I made a bodice toile to check and thankfully it looked pretty good! I just needed to lengthen the bodice by 1", and I also lengthened the skirt by 2" (I'm about 5'9").


The fabric that I used is a textured cotton from Seasalt a couple of years ago. It's a really gorgeous quality and I was lucky enough to find a five metre piece of it in one of their outlet shops for a particularly bargainous price (I can't remember exactly what it was now, but I think it was something around about £25). Obviously I didn't need five metres for this dress, so my mum is now looking forward to me making something for her with the leftovers!


All in all, I love my Asteria dress! It was a real joy to sew, and is a lovely dress to wear. It's possibly slightly overdress for mooching about my flat in lockdown, but it's nice to feel fancy every now and then isn't it?! It probably won't surprise you to know that I'm keeping my eye out for some bright and colourful fabric to make another version. Anyone got any suggestions to tempt me?!

Thursday 23 April 2020

By Hand London Sarah Shirt

Apparently extra time at home during the current lockdown is making me more prone to sewing experimentation! I've always been intrigued and tempted by the look of the By Hand London Sarah shirt, but I was never quite sure if the swingy style would be quite "me". However, I realised when looking through my stash the other week that I had the perfect fabric match for this pattern so I decided that I might as well give it a try.


According to By Hand London's own description, "Sarah is a button-up swing shirt with plenty of ease that clings and skims in all the right places." It has options of long, billowy or short, cuffed sleeves, and rounded or pointed collars. It's definitely no ordinary shirt, and is very feminine and fun.

The version of the pattern that I used is the one that was included with Simply Sewing magazine a while ago. I assume that it's the same as the version directly from By Hand London, but I thought I'd mention it just in case there are any differences.


I enjoyed sewing the Sarah shirt. There were steps that I was familiar with from sewing other patterns, such as the lined yoke and bound cuffs, but also some slightly different features. The collar construction is quite interesting as there's no facing, so when the under collar is attached it simultaneously finishes the neckline.


The instructions are very thorough and mostly easy to follow. I had to read the instructions for the collar attachment steps a couple of times to make sure I was doing the right thing, but I made sense of them in the end. I don't think that step was helped by the fact that the Simply Sewing version of the pattern has photographs of the construction rather than diagrams (as far as I remember from sewing BHL patterns in the past, they usually use diagrams) and the fabric used in the photos didn't have a particularly obvious wrong side.

If I made the Sarah shirt again, I would make a slight change from the instructions and press under the neckline seam allowance of the under collar and the seam allowance on the inner side of the cuffs before attaching the collar/cuffs to the shirt. It's not a major change, but I think it would be considerably less fiddly to do it that way.


My measurements put me between a 14 and 16 at the bust, and in a 16 at the waist and hips. I decided to make a toile of a straight size 14 as I suspected that would be the best size for me as the main fitted area is the shoulders and my shoulders are proportionately smaller than the rest of me so I thought the smaller bust size would be best. Luckily I was right! The only alteration that I made to the pattern was to lengthen it by 2 inches (fairly standard for me - I'm 5'9"), and I'm pleased with the fit.


The fabric I used is probably the garment-sized piece that has been sitting in my stash the longest. I bought it a good few years ago from a shop that has long-since closed. It's a denim-look cotton and I ordered it with the intention of making a dress, but when it turned up it was far too lightweight and soft for what I was planning. It sat on my shelf and every now and then I'd pick it up thinking I'd found the perfect project for it, but then decide that it wasn't quite right and put it back. Thankfully I finally matched it with a pattern! Although I have a fairly sizeable chunk of it left so I might need another project too - I'm wondering about a pyjama top with some shorts made from a different fabric.


The buttons I used have also been in my button jar for a while. They're really fun because they have pictures of various sewing notions on them - and they're still available on Etsy. They're another thing that needed the right project, and again I think they're a good pairing for this fabric and pattern. I love that I have all different pictures running down the front of the shirt.


The instructions have you use poppers/press studs for fastening the cuffs, and I did that but added a decorative button too - partly to use more of the buttons and partly because I thought the cuffs looked a bit naked without buttons!


All in all, I'm happy with my Sarah shirt - it was fun to make and I'm very glad to have finally cut into this fabric. I'm not sure how many options other than these super-thick leggings (they're RTW from my pre-sewing days) I currently have in my wardrobe to show off the shirt in all its swingy glory, but it looks good under a pinafore or tucked into a skirt too so it will get worn one way or another. So a successful experiment really! Have you tried any new styles recently?

Wednesday 15 April 2020

Make It Simple Safiya Dungarees Sewing Pattern Review

Hot on the heels of my first project from the book Make It Simple by Tilly Walnes, here's my second. These are the Safiya dungarees, and I'll give you a spoiler from the outset - I love them!


Safiya was the pattern that first tempted my to buy the book. The main version of the pattern in the book is for wide-legged slightly cropped trousers with an elasticated waistband, and there are variations of a fun wrap-front playsuit and these easy-fitting dungarees.

The dungarees have a relaxed fit with no fastenings, darts in the bodice section for a little shaping and a tie belt for as much or as little waist definition as you want.


When I ordered the book, I'd intended to get some light denim/chambray to make the dungarees so that they'd go with everything, but then I realised I had a much more interesting fabric option already sitting in my stash waiting to be used!

It's a cotton viscose twill from Seasalt (no longer in stock, but their other fabrics are here), and the combination of an excellent sale discount and a gift voucher that I'd been given for my birthday made it somewhat irresistible even though I wasn't sure what I'd do with it at the time. For a while now I've been trying not to buy fabric without a project in mind, but sometimes you have to bend the rules don't you?!


Anyway, it occurred to me that the weight of the fabric would be perfect for these dungarees. I had a feeling that the somewhat bold print might make them a bit of a love-it-or-hate-it kind of garment, but I was fairly confident that I'd end up loving it so I was willing to take the risk. Plus, spending lots of time at home due to being on coronavirus lock-down is a good time for sewing risk-taking I think!


The Safiya dungarees are slightly more time-consuming than some of the other projects in the book, but simply because there's more to sew rather than because they're complicated. If you've made a pair of pyjama trousers and can sew a dart, then there's nothing to be scared of about making the dungarees.


The instructions are very thorough and easy to follow. I did make a couple of small changes though - just for personal preference really. I've always found turning small tubes of fabric the right way out to be a bit of a hit and miss process (it either works perfectly or takes ages!), so when it came to making the straps I pressed the pieces in half WS together, pressed the seam allowances to the inside and then just topstitched them together. I also made fabric belt loops instead of the thread loops in the instructions, just because I prefer them on garments.


Sizing is a bit interesting for this pattern if, like me, your bust measurement puts you in a smaller size than your hips. As the dungarees are a pull-on style and have no fastenings, the bodice needs to be able to fit over your hips. Tilly recommends in the book that you don't grade between pattern sizes but I knew that if I did that then the top would end up being too big for my liking. My bust measurement is a size 5 and my hips are between a 5 and 6 so I thought it was worth trying grading between the sizes and making a toile. Thankfully it worked nicely - I can just get the dungarees on over my hips. If I couldn't, I'd probably rather make the pattern more complicated and put a zip in the side seam than make the top any bigger, as I think it would just look baggy on me.

Other than blending between sizes, I also lengthened the bodice by 1.5 inches and added 3 inches to the legs to make them full length. I really should have lengthened the legs a bit more though - they have a teeny tiny hem on them and are just about long enough. Next time I'd add at least an extra inch or maybe a bit more.


As I said at the beginning of the post, I love how these dungarees turned out! I wore them for the first time the other day and they're so comfy. My only slight problem as that I don't seem to have any short-sleeved t-shirts that go with them, but thankfully I found a piece of jersey in a charity shop a little while ago that I think will help to solve that problem! Isn't it good when that happens?!

Thursday 9 April 2020

Tilly & The Buttons Bertha Cardigan

During these times of social (sewcial?!) distancing, I'm finding that being creative in various ways is one of the things that's keeping me vaguely calm and I'm making sure that I've got a couple of projects on the go or lined up in my head so that I always have something to work on that fits my mood. One of the projects that I worked on last week is the Bertha cardigan by Tilly & The Buttons.


This is one of the patterns from Tilly's latest book Make It Simple, which I treated myself to the other week as part of my own version of panic buying (can't risk running out of projects!).

In Tilly's own words, "Bertha is a slouchy, open cardigan, cropped at the waist and with dramatic batwing sleeves. The deep cuffs and hem band add definition to the silhouette". I also added the optional pockets following the instructions in the book.


While it was initially the Safiya trousers/playsuit/dungarees that attracted me to the book, Bertha ended up being the first pattern that I made up because I wanted to use the leftover fabric from the Sheridan sweater that I made earlier this year, and this seemed like the perfect pattern to do that.

As with all of the patterns in Make It Simple, the Bertha cardigan is an easy project to sew. Even with adding the pockets, it was still a quick pattern to make and came together in just a few hours from start to finish over the course of a couple of evenings.


The instructions are very thorough, and help to make the sewing process quicker and easier by, for example, not telling you to press seams after each step but leaving pressing until you have a few things that you can press all at the same time. I found the instructions very easy to follow throughout, and the only thing I did slightly differently was to catch stitch the seam allowance of the neckband to the various other seam allowances around the neck edge. The instructions don't tell you to do that, but with my fabric (French terry) I felt like it would be a good idea to make the seam allowances sit nicely.


My measurements put me in a size 5 at the bust and between a 5 and 6 at the waist and hips. Being as Bertha has a relaxed fit and is designed to be worn open, I decided to make a straight size 5 and I'm happy with the fit that gives me.


As I already mentioned, the main floral fabric is French terry left over from my Sheridan sweater and came from Loubodu Fabrics (now sold out). I had just under a metre left, so far too much to let it go to waste but I knew whatever I used it for would need some colour-blocking and the Bertha cardigan seemed like a good project for that. I debated what colour to use as the contrast but in the end settled on a light pink, also from Loubodu Fabrics and also sold out, but they have other plain French terrys here. I'm happy with how the two fabrics look together, and thankfully they played nicely with each other while I was sewing.


All in all, I'm pretty pleased with my Bertha cardigan. The style is more slouchy than I usually go for so it might take me a while to work out exactly how to best pair it with other garments in my wardrobe, but it's super comfy and feels lovely to wear. Plus it's definitely good to have another way to wear this beautiful floral fabric - I wouldn't have wanted to leave that sitting in my stash would I?!

Thursday 2 April 2020

Tilly & The Buttons Orla Top Sewing Pattern Review

I'm back again today to share another project that I can tick off my Make Nine list for the year, namely the Tilly & The Buttons Orla top. These are also the first blog photos that I've taken in these new times of social distancing and self-isolation - I won't be seeing my mum (my usual photographer) for the foreseeable future, so you can enjoy my efforts to find places around my flat to take photos with a tripod and timer. I'm very much appreciating the fact that I have large windows that let in lots of light!


At first glance, the Orla top looks like a fairly simple shift top but that simplicity hides some interesting features such as a dipped hem finished with a facing, a pretty snowdrop collar option and an exposed back zip (more on that later!). The top also has a lovely shape, provided by curved French darts in the front and contour and shoulder darts in the back.

I've liked the look of Orla for a while, so I dropped some not very subtle hints that my parents might like to buy the pattern for me for Christmas. They kindly obliged! As my Christmas presents were sitting all around me when I picked my Make Nine projects, it was an obvious choice to include in the list.


Having said that Orla has some nice added details, I actually left most of them out for this one leaving it plain to let the fabric do the talking. 

I like the idea of the collar but I didn't think this fabric needed it, and I think I may be in the minority in this opinion but I've never been completely convinced about exposed zips. I'm not sure why really - they look nice in some garments, but I think they have a tendency to look a bit clunky on a drapey fabric like this one.


I did contemplate giving an exposed zip a try here, but I couldn't find anything that looked like a good colour match in any local shops and I didn't want to order a zip online and have that turn up and also be the wrong colour so I decided to use an invisible zip instead. As I was using an invisible zip, the easiest thing seemed to be to cut the back in two pieces (adding a seam allowance to the centre back) instead of on the fold as in the pattern. I also adjusted the back neck facings accordingly, and did my own thing (basically following the methods I've used when making other tops/dresses) in terms of attaching the facing.


Sewing the Orla top was a breeze. The instructions were clear and easy to follow as far as I could see (although it has to be said that the back neck facing and zip are probably the most complicated part of this pattern and I didn't use those instructions). I particularly like the hem facing - it's a nice touch and makes it really easy to get the nice curved hem. 


In terms of sizing - my measurements put me in a 5 at the bust blending out to a 6 at the hip, and that's the size I used. I also lengthened the top by an inch, just because I liked the length of the unhemmed top when I made a toile so I just wanted to add a little bit extra. I'm happy with the fit - it's nicely shaped but with enough ease around the hips for my liking.


The fabric I used is a viscose twill from Sewisfaction (sadly no longer in stock). It's a gorgeous riot of colour so I'll be able to pair it with lots of things in my wardrobe. It also feels just as good as it looks, which is an added bonus!


As you can probably tell, I'm really happy with my Orla top. It's a lovely style and I think that I'll get a lot of wear out of it. Putting it on makes me smile, and that's definitely very welcome at the moment!