Thursday 14 October 2021

Me Made on Holiday

Last week I was lucky enough to escape on holiday to the north of England. I took the advantage of having a willing photographer on hand to take some photos of my me-made outfits - I don't know about you, but I always like to see handmade garments being worn as well as being shown off when they're new!

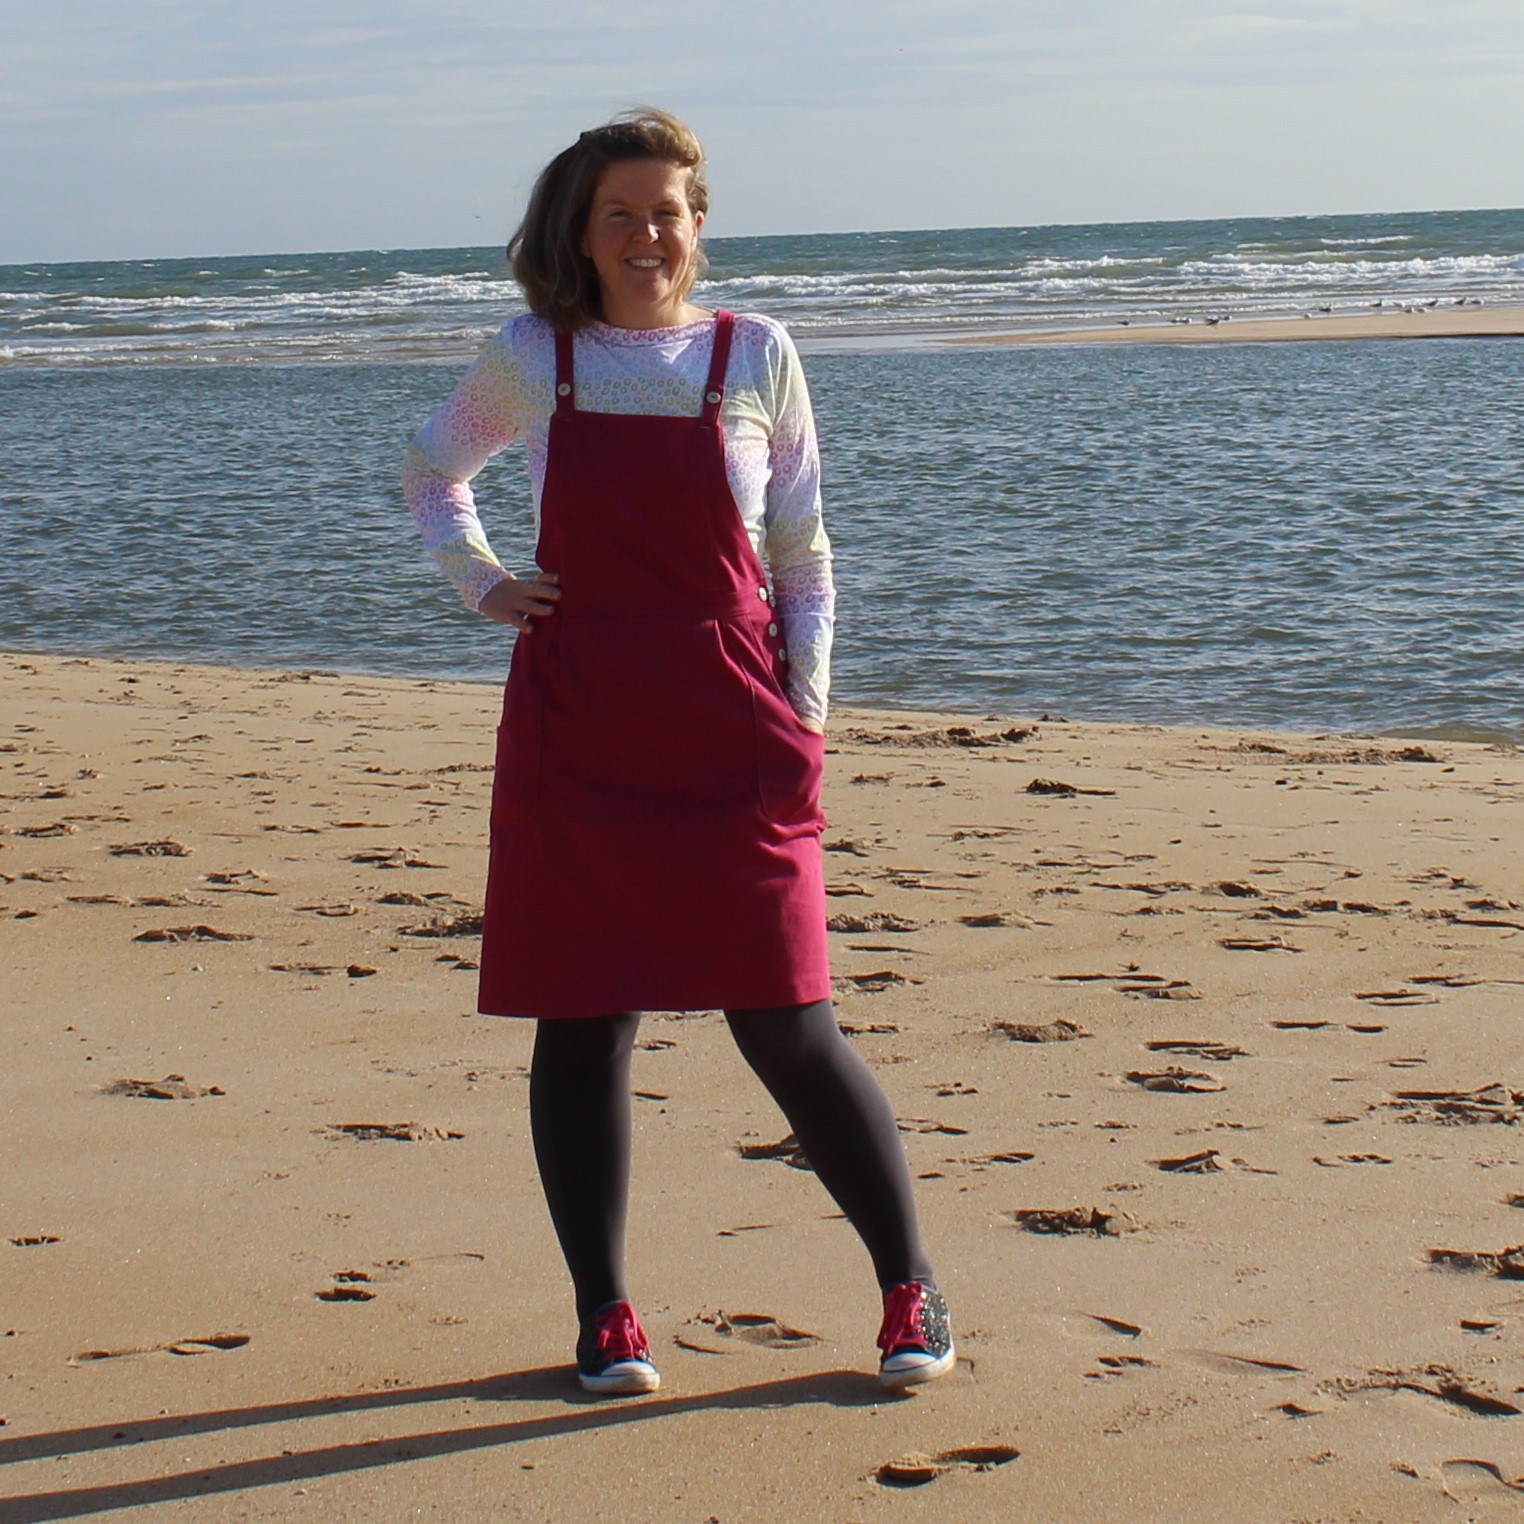
The first is a staple combination for me at this time of year and features two Jennifer Lauren patterns - the Pippi pinafore and Gable top (click here to see my original post about my Pippi pinafore or here for my Gable top review). These two patterns work really well together to make a comfortable outfit - perfect for a walk on the beach.

Secondly you might recognise my recently made Tilly & the Buttons Indigo dress (my blog post is here). I've already worn this dress quite a few times since I finished it. It's so comfortable and as you can see it works really well paired with a cardigan and tights.

I quite often wear tights with culottes during the autumn/winter, so I decided to give tights and shorts a try. I think I like it! These are a denim pair of Seamwork Dorian shorts that I made earlier this year (my original Dorian review is here), with my embroidered Hey June Sheridan sweater.

My fourth outfit features another of this summer's creations, namely my Helen's Closet Reynolds dress. This dress is super comfy and I suspected when I first made it that it would work well as a pinafore - I was right! Here I've combined it with a staple white top (a mash-up of the Tilly & the Buttons Agnes and the Sew Over It Molly top) and a shawl that I recently finished knitting.

The final outfit I have to share with you is another summer-to-autumn crossover - the McCall's 7948 dress that I made in September. I really like this dress layered with the t-shirt (it's the same one as in the previous photo) underneath, so much so that I'm wondering whether I might keep an eye out for some nice needlecord to make a version of the dress specifically to wear as a pinafore. Watch this space!

So that's my me-made holiday wardrobe - I hope you enjoyed seeing how I wear my creations in real life!

Wednesday 6 October 2021

Jennifer Lauren Esme Top

As I mentioned in my post about my Itch to Stich Glenelly top, I always like t-shirt patterns with a bit of a twist. It was therefore no surprise that I treated myself to the Jennifer Lauren Esme top pattern as soon as it was released!

The Esme top has gentle batwing sleeves with cuffed long or short sleeve options, and either a shawl collar or V-neckline. It also has regular and long-line bodice options. The pattern has multiple cup sizes (A to D in the original pattern, and C to F in the curve version), and the two size ranges cover hip measurements from 35.25" to 62.75".

I really like the shawl collar option and think that will be really nice for a long-sleeved top for winter, but I decided to try the V-neckline first.

The top above is the first version of the Esme that I made. It was actually intended to be for me, but when I tried it on it just didn't feel quite right. It was a little clingy around the waist, and although I really like the fabric itself, the colours didn't completely suit me when I was wearing it for some reason. I think if I'd only had one of those two issues, I'd probably have got over it fairly quickly and worn the top, but with the combination of the two I just wasn't feeling it.

Thankfully all was not lost and my sister happily agreed to adopt the top instead. She's slimmer than me so it's a little bigger on her than the pattern intends, but I think we can all agree that it's perfectly wearable and it's better for her to have it and enjoy it rather than it sitting in my drawer while I convince myself to like it!

Although my first version of the Esme didn't quite work out, I liked the overall shape so I decided to make another version of my own. For this one I blended out from a 14 at the shoulders/bust to a 16 at the hips. In contrast, my first version was a straight size 14. That's pretty much what's recommended for my measurements (my waist measurement is just fractionally above the 14, but is much closer to the 14 than the 16) and it did fit me, but it was just slightly clingy for my liking. Blending out to a 16 gives me that little bit of extra room to make me more comfortable.

Given that I've made two versions of the Esme now, I'm happy to report that it's a really nice pattern to sew! The instructions are very thorough. I'd say the only slightly tricky bit of the pattern is making sure that you get a nice neat finish on the V-neckline, but the steps are set out very clearly and I found that they made it a lot easier than I was expecting it to be. 

The fabric that I used for my top is a lovely cotton jersey from Like Sew Amazing - I really like the colours and the combination of stripes and florals!

The fabric for what is now my sister's top was from the Sew Hayley Jane outlet shop last year. It's a viscose jersey and so is a bit lighter weight - I think it still works OK for this pattern, but on balance the cotton jersey was better when sewing the V-neckline in particular.

I really like the Esme pattern, and I'm glad that I persevered and got the second version that works for me. In a funny way I'm also glad that the first one didn't work out quite right for me because I think it looks really nice on my sister. I'd happily recommend the pattern if you're in the market for an interesting jersey top, and I'll definitely be making a shawl collar version at some point soon!

Wednesday 29 September 2021

Tilly & The Buttons Indigo Dress

 Continuing on from a theme of my last post, I've made another dress that will hopefully work well across different seasons. Here's my Tilly & The Buttons Indigo dress....

The Indigo pattern has been around for a few years now, and I have to admit that when it was released it didn't initially appeal to me that much for some reason. But I kept seeing lovely versions of the pattern on Instagram and blogs, and then the add-on pack was released to offer even more options for Indigo. All of that combined meant that I decided I needed to jump on the bandwagon!

Indigo is a smock dress or top pattern with no fastenings. It has an empire waistline, floaty gathered skirt and pockets. There are options to use classic gathered seams or exposed frill seams. Between the original and add-on pack, there are a variety of sleeve options, and the add-on pack also offers a button back bodice and the possibility of making a midi dress by adding an extra tier to the skirt.

As you can probably see, I used the short sleeves and midi tier option from the add-on pack.

Sewing my Indigo dress was a breeze. The instructions are very detailed and give you plenty of help along the way. It's also a fairly simple pattern anyway, and it felt like it came together pretty quickly. Although it has to be said that all the gathering on the skirt tiers took a little while! The sewing level is rated as 'confident beginner', which I think is fair - or it makes a nice simple project if you have more experience.

In terms of sizing, I chose to make a size 5 - that's the size recommended for my bust and waist measurements. My hips are between a 5 and 6, but there's plenty of room in the hips so I just made the size 5.

I made a couple of fitting alterations. The first was very standard for me - adding 2" to the bodice length. I'm about 5'9" so I have to lengthen almost all patterns. 

When I made a toile it looked fine when I was standing still, but it was too tight across the back if I tried to move my arms so I did a broad back adjustment. I used a tutorial from Deer & Doe for making the adjustment, and added a total of 1.5" (0.75" on each side of the back bodice). That sorted the problem nicely and I can now wave my arms around as much as I want!

I also added some slim waist ties (they're hard to see in the photos, but they are there!). I've generally found that with looser fit dresses, I like the looseness in theory but in practice I think it works better for me if there's the option to add a bit of extra definition at the waistline with ties. 

The fabric I used is a star print viscose that I got from Oh Sew Crafty. I wanted a fabric that will hopefully work OK across different seasons, and star prints are one of my favourites so this was always going to appeal to me. Plus it was a bargain price so it seemed like a good option for giving this dress a try in case the style wasn't quite me.

Thankfully I needn't have worried about the Indigo dress not suiting me - I love how it turned out! It's beautifully swishy as you walk around, and the loose style means that its super comfy. I definitely think I'll wear this a lot, and I'm already on the lookout for fabric for a second version. After all, there are a lot more styles of Inidgo to try! Have you made any of the other versions of the pattern?

Thursday 16 September 2021

Floral M7948 dress

The McCalls 7948 dress that I made earlier this summer is definitely one of my favourite recent creations. It also seems to be popular with other people - I've had strangers in the street compliment me on it which is always nice! It's very distinctive (I've taken to calling it my unsubtle dress), and I think it's probably the kind of thing that you might either love or hate, but thankfully I'm very firmly in the love category.

It's lovely to wear too, so I thought that I might need to revisit the pattern. For my second M7948, I decided to use one of the other options in the pattern. I stuck with the sleeveless bodice of view C that I'd used before, but this time used the pleated skirt of views A/B instead of the tiered gathered skirt. 

I do love that gathered skirt, but I wanted the dress to look noticeably different from my first version, and the pleated skirt definitely achieves that. Plus it has the added bonus that the pleated skirt has pockets. I think the tier seam in the gathered skirt overlaps with where a pocket would sit so that option doesn't have pockets - its one downside!

I used the same adjustments as my first version - lengthened the bodice by 1.5", redrew the armholes (there isn't a separate armhole line for the sleeveless bodice in the pattern), and for this version I also lengthened the skirt by 2". I go into more details about the adjustments in my post about my first dress, which you can read here.

I added waist ties to this version too, although in this case I prefer them tied at the front rather than the back. They are there I promise, they're just getting a bit lost in the busy print of my fabric!

Talking about the fabric - isn't it lovely?! I bought it semi-locally to me at Yandles. They don't have the best website, and this fabric isn't listed online, but they do have more fabrics in store (albeit more craft cottons than dressmaking). They also somehow manage to sell most of the things in their arts and crafts shop for less than RRP, so it's worth a trip if you're near Martock in Somerset!

I really like this fabric - it's a lovely cotton, and with all those colours and flowers it was always going to appeal to me! It's also the kind of fabric that I like to sew with as the seasons change because it allows me to keep sewing pretty summer cotton dresses, but the dark background means that it'll also work well layered with cardigans and tights as the temperatures drop. Win win!

As you can probably tell, I'm really pleased with how this second M7948 turned out. Have you made this pattern before? Have you started sewing for autumn, or are you still clinging on to summer projects?!

Wednesday 8 September 2021

Some recent knitting projects

It's been a while since I shared any knitting and I've recently finished a couple of projects so I thought I'd pop in to show them to you.

I'll start with the one I finished most recently and that's taken the longest time - this is a top that I knitted for myself using a pattern called "Peaceful" from a King Cole pattern booklet that was included with issue 125 of Knit Now magazine

It's the kind of pattern that could look a little intimidating due to the all-over lace texture, but it was actually relatively simple to knit. It's only a four row pattern, and the pattern repeats over just six stitches so I had it memorised relatively quickly. I also found that once I had the pattern established it was fairly easy to read my knitting to see what I should be doing and fix any mistakes quickly. All of that combined meant that it was a more relaxing pattern to knit than I was initially expecting it to be.

I used the yarn recommended for the pattern - King Cole Cotton Top and chose the teal colourway. It's a DK acrylic and cotton blend and was nice to knit with. I haven't worn it that much yet because it's been too warm, but it felt good to wear on the walk when we took these photos.

One thing to mention if you happen to be thinking of knitting this pattern is that I actually ran out of yarn and needed to buy an extra ball, whereas I usually always have more yarn than I need. Thankfully I was able to get a ball from the same dye lot as the rest of my yarn so it wasn't too much of an issue, but you might want to be a bit generous when buying yarn.

My second project is actually also from the same King Cole pattern booklet from Knit Now - essentially I couldn't decide which I'd rather knit when I got the booklet and the yarn for both was very affordable so the obvious choice (?!) seemed to be to knit them both!

This one is called "Time Out" in the booklet and is a sweet and simple pattern which is knit in pieces and seamed (like all of the patterns in the booklet) and is just a lot of stocking stitch with rib at the waist, sleeve cuffs and neckband. It was definitely good mindless knitting, and that combined with the colour changes in the yarn meant that it seemed to grow quite quickly as I worked on it.

For this one I again used the recommended yarn - King Cole Drifter 4-ply in the colourway Bluebell. It's an acrylic, cotton and wool blend. I would say this felt a little more plastic-y to work with than the Cotton Top did, but it knits up fairly nicely and feels fine to wear. 

I'm quite pleased that I managed to get both of these finished within the appropriate season for wearing them! I think they'll both work well with layers as well as on their own though, so hopefully I'll be able to enjoy showing them off on into the autumn as well. And now I need to get planning my next garment knitting project! Have you knitted anything recently?

Wednesday 25 August 2021

Itch to Stitch Glenelly Top

A good t-shirt is a wardrobe staple, don't you agree? While they're a classic piece, it's always nice to have a slightly different twist on the standard t-shirt shape so I was keen to give the recently released Itch to Stitch Glenelly top a try.

The Glenelly pattern has top and dress options and features a square neckline and short raglan sleeves. The dress option has a slightly raised front waistline and gathers in the centre front and back waist. 

The pattern has regular or full bust options and hip sizes from 33 to 62 inches.

While the square neckline was one of the main things that attracted me to the pattern, when it came to sewing it was also the part that I was slightly concerned about. It looked like the sort of thing that could be easy to mess up when in fact you need to sew it accurately or else the top just isn't going to look right. 

Thankfully I needn't have worried because the instructions are really good in general, and are especially thorough when it comes to sewing the square neckline in particular. They break the process down into really small steps and I found that they made it straightforward to get a nice finish on the neckline - it is a little bit fiddly, but if you take your time and follow the instructions it's really not too tricky.

Another thing that attracted me to the Glenelly top other than the square neckline was the fact that it has raglan sleeves, because I think raglan sleeves lend themselves particularly well to colour-blocking and therefore are good for using up leftovers. 

The fabrics that I used for this top are both remnants from past projects - the striped floral that I used for the front is from a Gable top that I made earlier this year and originally came from Threadquarters, while the navy contrast is from a large piece that I bought in a charity shop and has gradually been used for various projects. Thankfully they're the perfect match for each other and work really well for this top. It also means that I can contribute this project to the #RecyclingRemnants challenge that Elle @elleandthestitches is currently hosting on Instagram (if you have remnants you want to use up - check it out! It's running until 11 September).

As I mentioned above, there are quite a good range of sizes in this pattern. I used the regular bust option and blended from a 10 at the bust out to a 12 at the hips. They are the sizes recommended for my current body measurements and they worked out nicely. My top is nicely fitted without being too tight at all.

I'm really pleased with how my Glenelly top turned out - it's obviously super comfy but it feels a little bit more fancy than a standard t-shirt thanks to the lovely square neckline. I'd happily recommend this pattern if you're looking for a slightly different knit top or dress pattern with great instructions. I can definitely see myself making more!

Friday 20 August 2021

McCalls 8067 shirt

Have you ever found a fabric that you like so much that you buy it twice? That's what happened to me with this star print cotton that I bought from Threadquarters!

I originally bought a length of the fabric back at the end of last year and used it to make a Vogue 8772 shirt. If you're interested in seeing it, there's a photo on my Instagram, and you can find my thoughts on the pattern in this blog post from a couple of years ago. It's a lovely fabric and the print and its colours are so "me" that when it was on offer recently, I decided that I deserved to treat myself to another piece so that I could make a summery top and enjoy wearing the fabric all year round.

Having bought the fabric, I then needed to settle on what pattern to use. I contemplated making the short-sleeved view of Vogue 8772, but I decided that I wanted something a bit looser and more relaxed. In the end I opted for McCalls 8067.

McCalls 8067 features four different views for loose-fitting V-necked button-front tops with pockets, sleeve and length variations. Two of the four views also have a collar. It's available in two different size ranges covering bust sizes from 30.5 to 44 inches.

I went for view A - the shortest top length with short sleeves and no collar, but I kept it super simple and omitted the breast pockets.

Sewing the shirt was pretty simple. The instructions were fairly standard for a commercial pattern - they assume a certain level of knowledge and understanding and don't hold your hand too much, but if you understand basic sewing terms then they're easy enough to follow. The view of the pattern that I chose is also not the most complicated, so it was actually a fairly speedy project. 

In terms of sizing - I made a straight size 14. That's a size down from what is recommended for my actual bust measurement, and two sizes down from my waist and hip measurements. While this is intended to be a loose fitting pattern, I think if I'd made the size recommended for my measurements it would have just ended up being a bit too baggy as I've got plenty of room in the shirt as it is. I'd definitely recommend checking the finished garment measurements (on the pattern paper itself) and judging what size would be best for you based on those.

The only alteration I made other than sizing down was to alter the button placement and use a couple of extra buttons. The pattern only calls for four buttons for this view, and that looked a bit too spaced out to me personally so I used six instead. I also needed to alter the spacing a bit to make sure I had a button level with my bust point to prevent gaping.

I really like how this top turned out - it's easy to wear and will be nice and breezy for hot weather. I think the shape could be nice worn open as a cover-up over strappy dresses so I might be making a plain version at some point for that purpose. And I like the look of the long-sleeved version too, so you may well be seeing more M8067 shirts from me in the future!

Thursday 12 August 2021

Helen's Closet Reynolds Dress Review

As I mentioned in my previous post, having finished my first version of the Helen's Closet Reynolds pattern in the shape of the top for my Ankara two-piece set, I liked it so much that I almost immediately started working on a Reynolds dress. Thankfully the dress is just as good as the top!

The Reynolds top and dress is described as "your go-to summer garment", and I would definitely agree with that. It's a pull-on top or dress (in either knee or full length) with wide shoulder straps and, for the dress versions at least, in-seam pockets and a side slit with mitred corners at the hem. It comes with 0-22 (B-cup) and 12-34 (D-cup) size ranges, which together cover hip measurements from 33 to 62 inches.

I was initially drawn to the Reynolds pattern because it seemed like it would be a great dress to throw on in hot weather. I liked the fact that it has a loose, relaxed fit but with the added bonus that there's shaping in the side and centre back seams, meaning that it's not boxy or baggy.

For my Reynolds dress and top I used the smaller B-cup size range and made a 12 at the bust blending out to a 16 at the hips (for my top, I made a 12 at the bust blending out to a 14 at the hem). They're pretty much the sizes recommended for my measurements (my hips are actually between a 14 and 16 but I'd rather have more room at the hips than less!). 

I'm only including photos of my dress in this post - if you want to see my top, there are plenty of photos in my post from last week.

I lengthened the top by 1 inch, and the dress by 1 inch above the waist and 2 inches in the skirt section - this is fairly standard for me, and is only to be expected as I'm about 3 inches taller than the height the pattern is drafted for.

Sewing both the dress and the top was no trouble at all. With no closures, they're fairly simple garments to sew and the instructions are very detailed and full of helpful tips to make the process even easier. The sewing level is rated is being advanced beginner, which I think is fair - there's nothing particularly complicated about the pattern, but there are a couple of steps that might be a bit challenging for an absolute beginner. 

There are some nice touches in the way that the pattern is sewn, such as turning the bottom of the facing under and topstitching around the facing for a clean finish and the side slit with mitred corners at the hem.

The fabric I used for my dress is a cotton sateen that I got from Sew Me Sunshine last year (unsurprisingly, it's no longer available). It's probably on the heavier side of the fabrics recommended for Reynolds, and it has slight stretch whereas non-stretch fabrics are called for, but it is only slight stretch and the fabric has reasonably good drape so I thought it should work out OK. Thankfully I think I was right. 

It's worth noting that as my print was non-directional, I was able to cut the dress out of just over 1.5 metres of 150 cm wide fabric, which is less than suggested in the instructions.

I'm really pleased with how my Reynolds top and dress have turned out, and think I'll be wearing both of them a lot. It's the kind of garment that allows fabric to shine so could look very different depending on what print or fabric base you used. I can definitely see myself using this pattern again!