Friday, 30 July 2021

Coordinating Safiya Trousers & New Look 6217 top

It's a measure of how my style has changed in the last couple of years that I bought the fabric featured in today's post to make a swishy summer dress, and instead it has become a coordinating set of Tilly & The Buttons Safiya trousers and a New Look 6217 top.

A couple of years ago, my wardrobe was mainly full of dresses, with a few skirts and tops for a little bit of variation. While I do still love dresses and skirts, particularly if they have a good twirl factor, gradually more trousers, jumpsuits and shorts have been infiltrating their way into my garments of choice. It has to be said, this is in no small part due to me moving to a coastal town and getting fed up of battling against the wind to prevent skirt-related wardrobe malfunctions on breezy days!

Anyway, the reason for this shift isn't really important, but it doesn't show any sign of stopping yet. Having bought this fabric for a dress, the more I thought about it I just couldn't shake the feeling that it would get more wear if I turned it into a coordinating top and trouser set, a kind of fake jumpsuit - all of the ease that a jumpsuit brings of having a ready-made outfit with the added benefit of not having to get almost completely undressed whenever you need the loo, and of being able to combine the two pieces with other garments as well.

I debated various pattern combinations for a while - the Winslow culottes and M7131 were both strong contenders for the bottoms, and I considered the new Helen's Closet Reynolds and the Sew Over It Silk Cami for the top - but in the end I decided on the Tilly & The Buttons Safiya trousers and the New Look 6217 top.

The Safiya trousers are one of the patterns from the book Make It Simple. I blogged about making the dungaree version of Safiya last year, and also made a pair of Safiya trousers but apparently they never made it to my blog. They're definitely on my Instagram though. Anyway, I knew it was a nice, simple pattern to sew and that the trousers fit me well and are comfortable to wear.

The New Look 6217 top is one of my most used patterns - although the pattern itself is one of the commercial patterns that features a collection of separates and I've only actually made the top (view B) and not any of the other three garment options. I've definitely got my money's worth out of the top though and by now I've lost count of the versions that I've made for both me and other people since I first made it back in 2016 (enjoy the old photos there!). It's a great simple top for showing off a pretty print, and works particularly well with viscose fabrics.

The fabric that started this little experiment is a light blue leopard print viscose (still a bit in stock as I write this!) that I got from Like Sew Amazing. I'm not much of a fan of traditional leopard print fabrics because the colours just don't suit me, but in these shades of blue and off white it's definitely something I can get on board with! The fabric is that lovely kind of viscose that has great drape, but isn't horrifically slippery to work with. 

So what's the verdict on the finished set? I think the Safiya trousers and New Look 6217 top work well together and pull off the fake jumpsuit look I was going for. There is a small part of me that's slightly concerned that they might look a bit like pyjamas, but the majority of me feels great in them and doesn't particularly care about that! So much so, that I've already got another coordinating set underway - albeit with different patterns and very different fabric. Stay tuned for more soon!

Friday, 23 July 2021

Friday Pattern Company Sagebrush Top Review

There are some patterns that take on a bit of a cult status in the sewing community, and I think the Friday Pattern Company Sagebrush top is definitely one of those! It's a bit different to anything else in my wardrobe and seems to look good on everyone so I've been meaning to try it out for a while - finally I found time for it!

The Sagebrush top has some distinctive features that I think have probably contributed to its popularity - the ruffle front, puff sleeves and tie back are all fun details that probably make the top look more complicated to sew than it really is. In actual fact, it's a relatively simple project - if you're happy with gathering fabric and sewing bias binding then you'll have no trouble making the top. 

The instructions are also really thorough and explain everything very clearly, so that should give you an extra helping hand if you need it. It would probably be a fairly good pattern for slightly adventurous beginners because none of the techniques are particularly complicated, but I think it's a bit more interesting than lots of beginner patterns and the finished top probably looks a bit more impressive as well.

Fitting the top also shouldn't be too much of a challenge because it's fairly loose so doesn't need to be fitted precisely. At the same time it's not too baggy - I think it's just the right balance of being loose and breezy without ending up looking tent-like.

I made a size M at the shoulders blending out to a L at the hip. My bust measurement is on the smaller end of the L size bracket, but I think my shoulders are proportionately slightly small so I wanted to use the M at the shoulders. I blended out to the L from the underarms downwards, so the bust measurement of my top will be somewhere between the M and L. I think it worked out quite nicely - the shoulders fit well and there's plenty of space throughout the rest of the top.

The pattern is available in bust sizes from 32"-33" to 59-60".

The fabric that I used is a cotton shirting that was left over from a shirt that I made for my Dad a couple of years ago. I'm not quite sure how I ended up with quite so much fabric left over, but past Ruth had a definite tendency to be over-cautious when ordering fabric and I always ended up with more than I needed. It's worked out OK in this case though because it's lovely fabric and now I can wear it too!

So I think, all in all, it's fair to say that I'm the latest member of the Sagebrush top fan club! I enjoyed sewing the pattern, and the finished top is fun to wear. I've already got my eye on another leftover piece of cotton in my stash to make a second version, and that's always a fairly good verdict on a pattern, isn't it?

Wednesday, 7 July 2021

Waves & Wild Emi T-Shirts

 When I was sorting my fabric stash recently, I unearthed some pieces of child-appropriate jersey left over from other projects and I decided to use them to make some tops for my nephews and niece. Here they are in their Waves & Wild Emi t-shirts.

The Emi pattern gives you lots of options for jersey garments. For a start it comes in sizes from newborn to age 12 so you can get plenty of use out of it. There are also options for a t-shirt, peplum top or dress with a circle skirt, as well as short sleeves, long sleeves and grown on sleeves. Lastly, there's the option of pockets for the dress. You're definitely not short of choice!

For my nephews I made the short-sleeved t-shirt, and my niece has the short-sleeved peplum top.

The instructions seemed to be good - I say "seemed" because I only really skimmed through them, but they contained plenty of detail and looked like they explained everything thoroughly. 

I actually did my own thing a bit because I've made a few similar t-shirts (albeit on a bigger adult-sized scale!) so I'm familiar with the steps you need to work through and the order in which I like to do them. For example, I prefer to sew neckbands after sewing the shoulder seams whereas the pattern has you sew them later. I don't think either way is necessarily better, but sewing the neckband is my least favourite part of making a t-shirt so I like to get it out of the way early!

I also made a slight change due to the fact that I was using leftovers and didn't want to buy extra supplies. The sleeves and body are designed to be finished with ribbing, but I didn't have any so instead I lengthened both the sleeves and the body so that I could hem them instead without ending up with tops that were too short. 

The sizing seems to be fairly accurate. For both of my nephews I had to use sizes that were a year or two above their actual ages, but they are both quite tall. My niece is more averagely sized, and her top is the size recommended for her age.

They were all really pleased with their tops when I handed them over, and as you can see proved to be quite exuberant models! The Emi pattern was easy to sew, and I'll definitely be making it again - not least because having made these three tops I probably owe my littlest niece a top too!

Wednesday, 30 June 2021

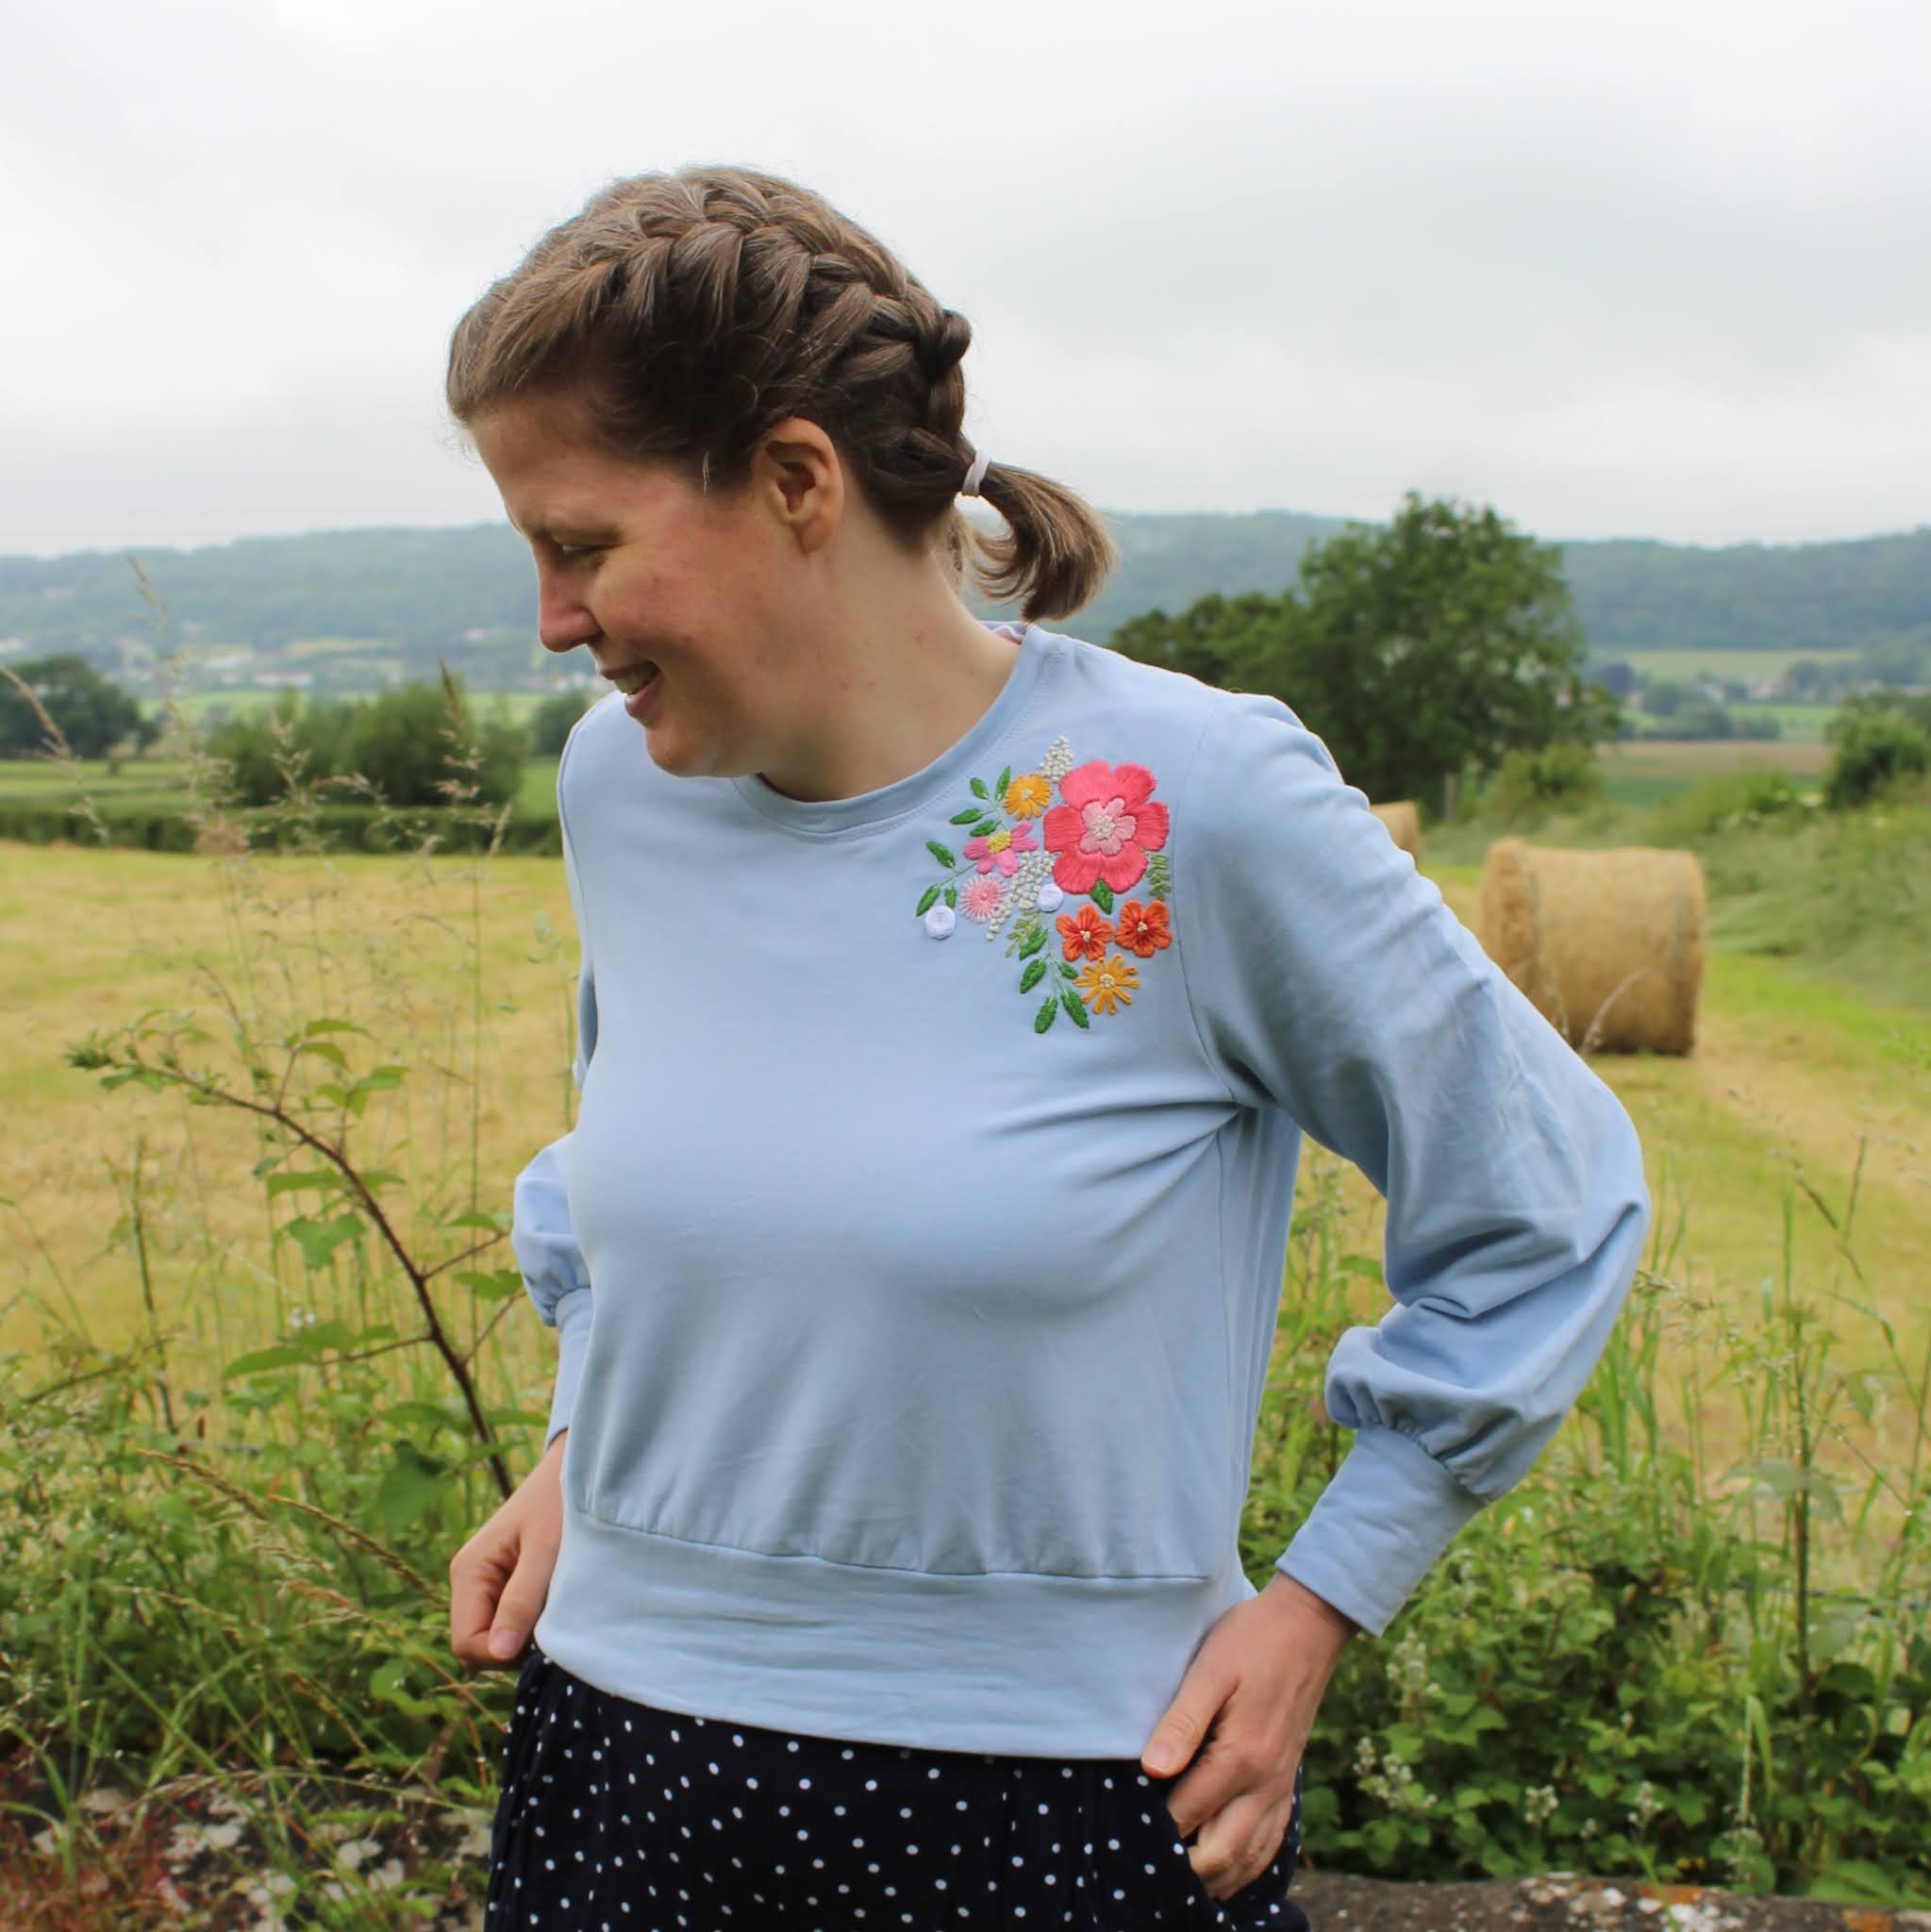
Embroidered Hey June Sheridan Sweater

Over the last year or so I've been enjoying dabbling in a bit of embroidery. I've made a few pieces that I'm planning on turning into a wall of hoop art, but with my love of sewing it was only a matter of time before I gave embroidering clothes a try, wasn't it?

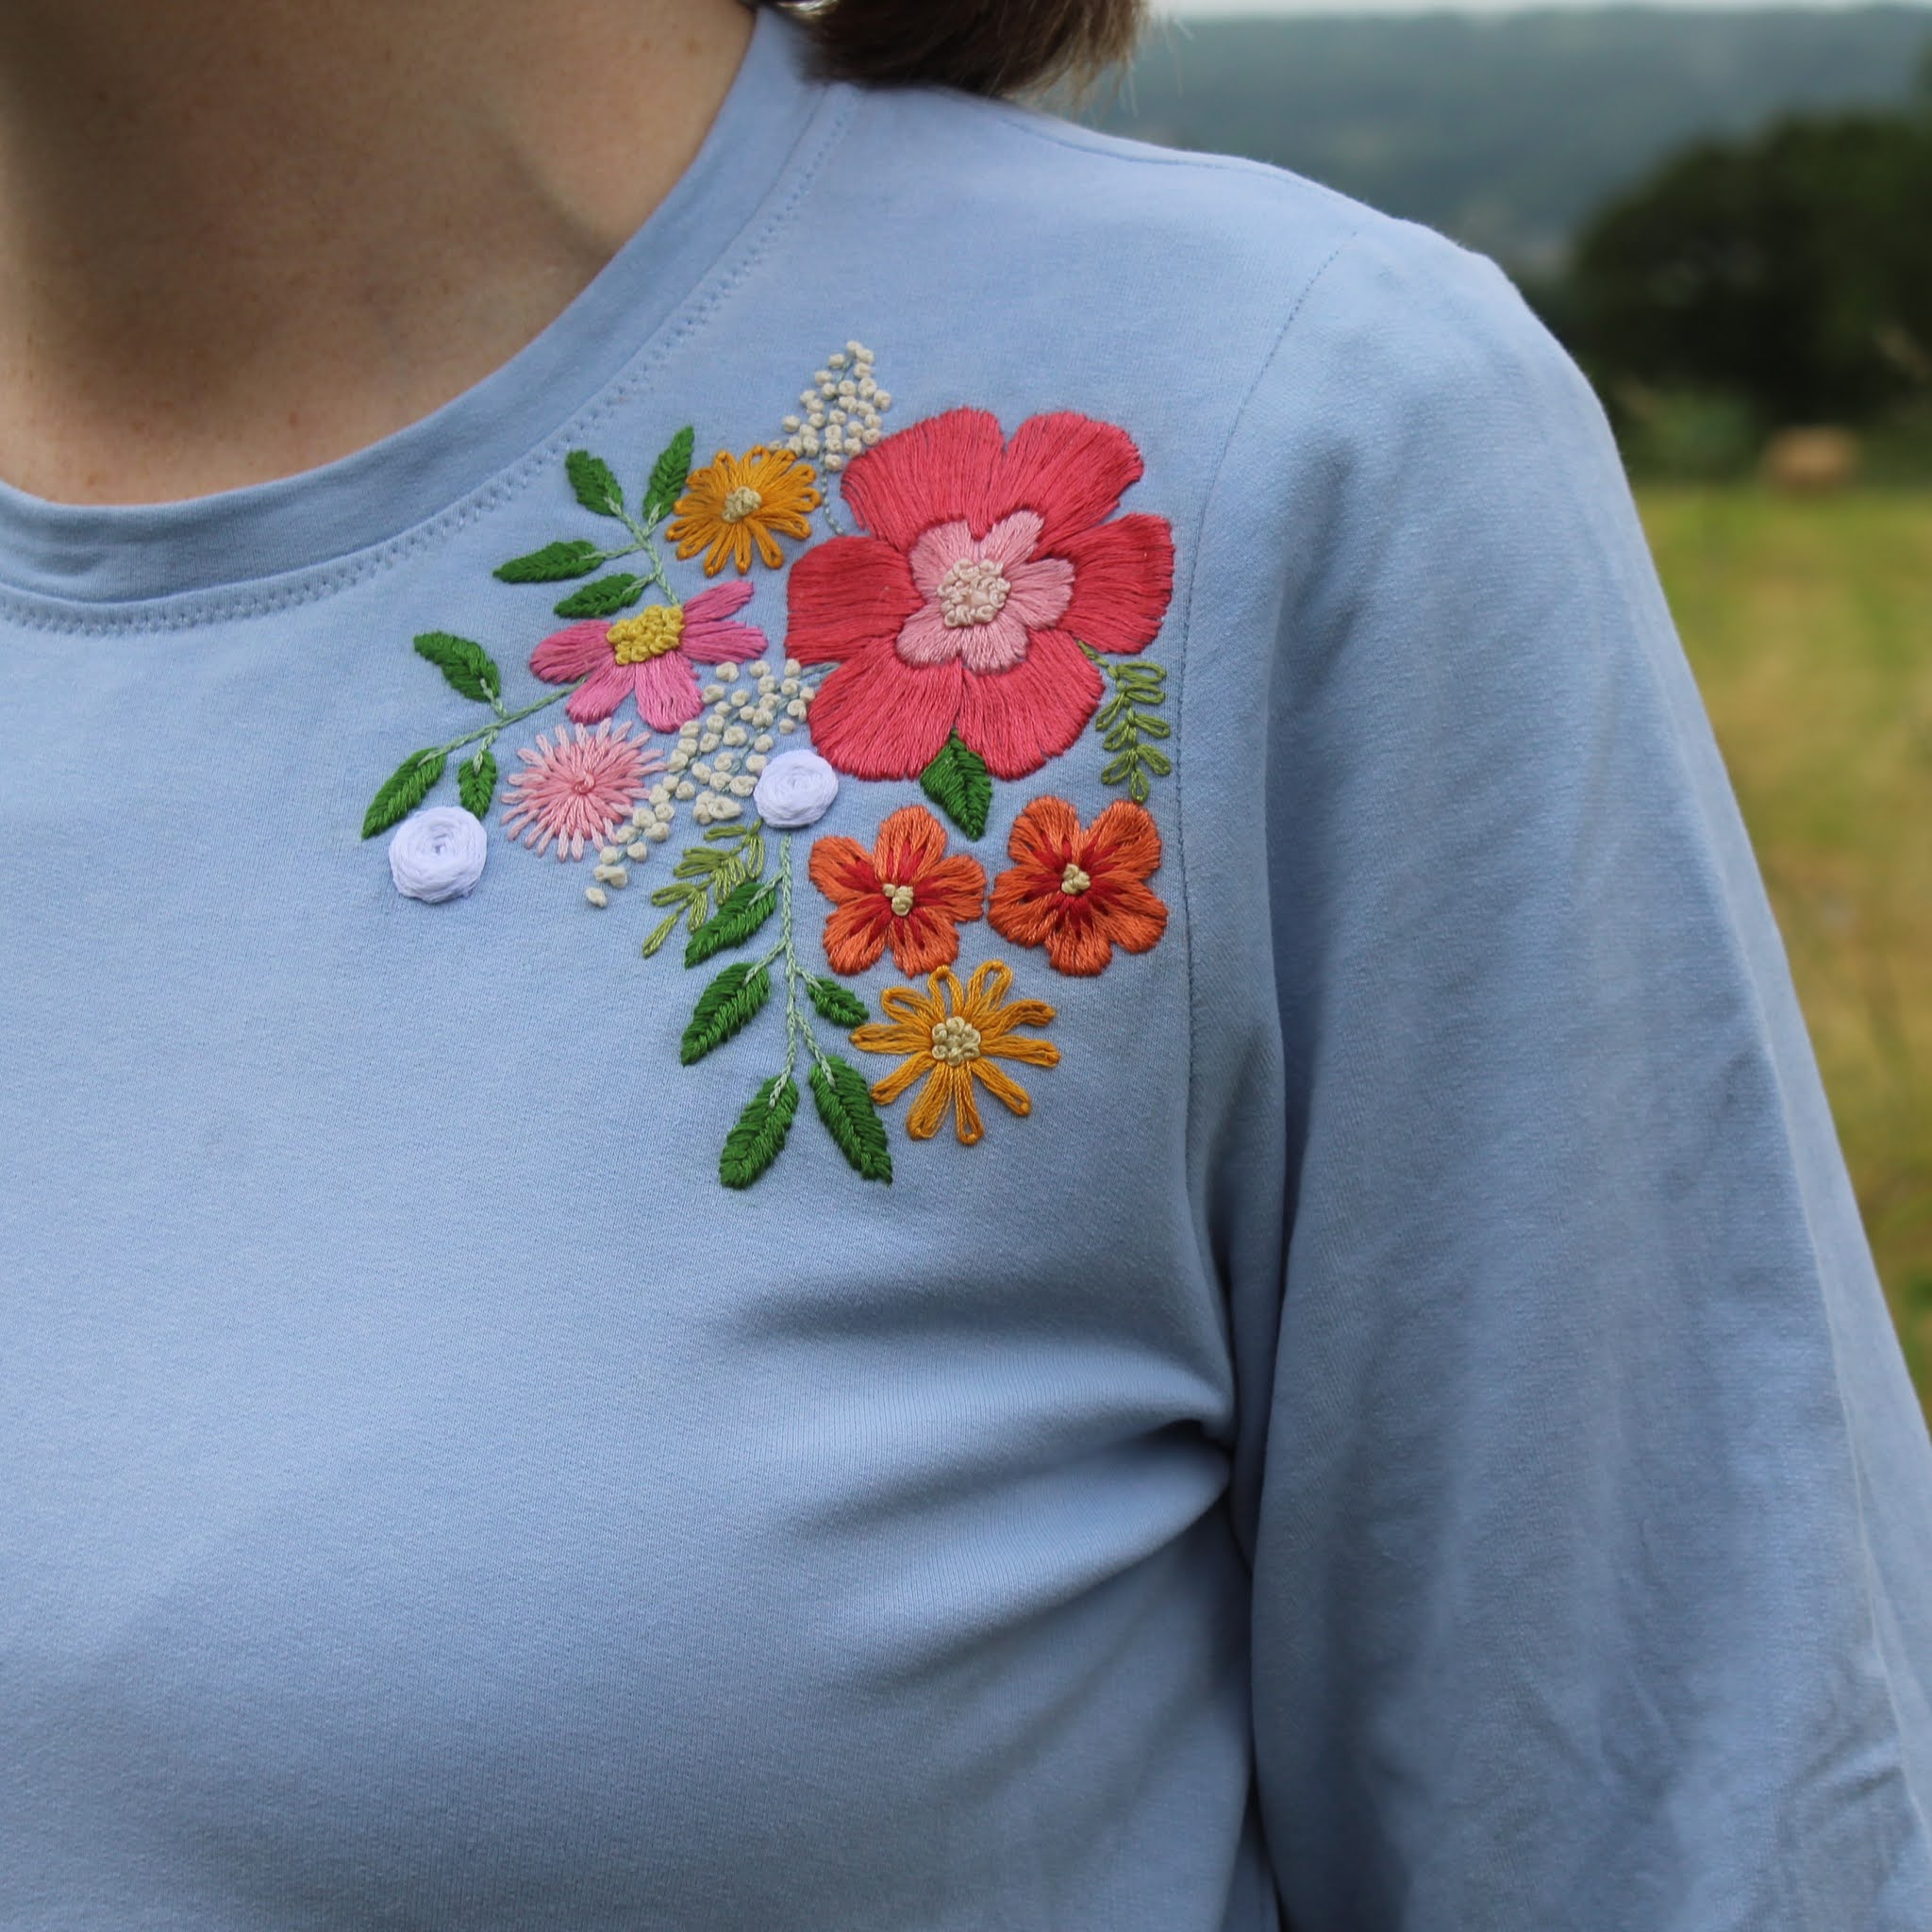
I've been considering what I could try for a while, but then Love Embroidery magazine solved the problem for me. As soon as I saw the embroidered sweatshirt on the cover of their issue 12 (available to buy here), I knew I had to give it a try. The lovely floral design by Jenny Billingham of Flynn & Mabel is just my cup of tea!

I considered whether I had anything in my wardrobe already that I could use, but I only have one or two plain sweatshirts and I wanted to keep them plain so they're more neutral. My favourite sweatshirt that I've made is the Hey June Sheridan sweater so that seemed like the best bet to use. If you're interested, you can read my review of the Sheridan sweater here.

I had a look around for some suitable fabric in a blue or turquoise colour (which seemed like the best options to complement the floral design), and in the end settled on a pale blue lightweight sweatshirt jersey from Plush Addict.

Once the sweater was finished, I then started to consider the embroidery. Having never embroidered on clothing before, I wasn't entirely sure what the best stabilisers to use would be. I then saw a recommendation for DMC Magic Paper (if you're in the UK, I got mine from Wool Warehouse) on Instagram (I can't remember who it was from now), so I decided to give that a try. 

It's really easy to use - you just draw your design onto the paper, peel off the backing and stick it straight to your garment. Once you've finished stitching, the stabiliser can be dissolved in water. Although I will say that it took longer than it was meant to for my stabiliser to dissolve, and having worn the sweatshirt I think there might still be a bit of residue there.

When I came to transfer the pattern, I realised that the space between the neckline and shoulder seams is obviously much narrower on my Sheridan sweater than on the sweatshirt used for the magazine sample so I had to adjust/omit a couple of small details on one side in order to make it fit.

As for the colours, mine aren't quite the same as recommended in the pattern. I'm lucky enough to have quite a plentiful supply of embroidery thread that used to belong to an auntie who was no longer using it so I used the closest equivalents to the pattern from what I had available.

I really enjoyed embroidering the pattern - it was fun to see the flowers and foliage gradually emerge stitch by stitch. All of the stitches were ones I've used before so it was fairly relaxing, although I did find that I had to restrict myself to short periods working on the embroidery because the weight of the sweater and the thickness of the fabric made my wrists hurt a bit if I worked on it for too long.

I'm really pleased with the finished sweater. There's room for improvement in my embroidery, but I think it looks good from a distance and most people won't inspect it in as much detail or be as critical about it as I would! I'll definitely be trying embroidering on clothes again in the future - have you ever given it a try?

Wednesday, 23 June 2021

Peppermint Loungewear Set Sewing Pattern Review

Recently I had a big sort out of my fabric and uncovered a few gems that I'd packed away in a bag and slightly forgotten about, including this pink and white checkerboard print. I decided that I should get it sewn up and chose to try out a new-to-me pattern - the Peppermint Loungewear Set.

If you haven't come across Peppermint magazine before, it's an Australian quarterly publication that focuses on "style, sustainability and substance". Most importantly for us sewists, they also have a whole library of sewing patterns that are free to download or you have the option of making a voluntary donation.

The magazine works with different pattern-makers, and the Loungewear Set that I made was designed by Common Stitch. The set is made up of a short-sleeved drop shoulder top with a high-low hem, and a pair of relaxed-fit cropped trousers with pockets. It's available in hip sizes from 34" to 52".

The pattern is quite straightforward to sew. I'd say the instructions are clear and easy to follow, but they maybe don't hold your hand quite as much as some independent pattern companies would. That said, I didn't have any trouble sewing up the set. 

I like the fact that the pattern has a couple of details that make it a bit different from other pyjamas/loungewear. The high-low hem on the top is a nice feature and results in an interesting shape, and of course pockets in the trousers are always going to be a welcome addition! I also liked the fact that that the instructions have you top-stitch the neckline facing down - it gives a clean finish to the top.

As you'd expect with pyjamas, the sizing is generous and there's plenty of wearing ease built into the pattern. I'd say the fit on the top is particularly oversized so you might want to have a look at the finished garment measurements to decide quite how big you want it. I went down two sizes from what is recommended for my measurements on the top, and as you can probably see from these photos it's still plenty big enough. I also lengthened the top by about an inch and a half, which is very standard for me.

The sizing for the trousers is a more standard pyjama style fit - I made the size recommended for my measurements and it's comfy without being baggy.

As I mentioned at the start, I've had this fabric in my stash for quite some time. I essentially got it free - I'd ordered a different colourway of the same print in a clothing company's deadstock fabric sale years ago, but was sent this one instead. When I contacted them about the error, they sent the correct fabric and said I could keep this one. Bonus! I initially thought I'd make a dress, but could never quite decide on what pattern to use and that's how it ended up getting packed away and forgotten about. 

When I got it out again, I couldn't shake the feeling that making a dress out of it might end up looking like I was wearing a tablecloth, and not necessarily in a good way! As I had 3 metres of wide fabric, I had plenty to play with so pyjamas seemed like a sensible option - I think that was the right decision.

I'm glad I rediscovered this fabric, and that it's finally been put to good use. I enjoyed sewing the Peppermint loungewear set, and I'm really pleased with how it turned out. I might have to see if I can unearth any other large lengths of unused fabric to make some more!