Showing posts with label Pyjamas. Show all posts

Wednesday, 23 June 2021

Peppermint Loungewear Set Sewing Pattern Review

Recently I had a big sort out of my fabric and uncovered a few gems that I'd packed away in a bag and slightly forgotten about, including this pink and white checkerboard print. I decided that I should get it sewn up and chose to try out a new-to-me pattern - the Peppermint Loungewear Set.

If you haven't come across Peppermint magazine before, it's an Australian quarterly publication that focuses on "style, sustainability and substance". Most importantly for us sewists, they also have a whole library of sewing patterns that are free to download or you have the option of making a voluntary donation.

The magazine works with different pattern-makers, and the Loungewear Set that I made was designed by Common Stitch. The set is made up of a short-sleeved drop shoulder top with a high-low hem, and a pair of relaxed-fit cropped trousers with pockets. It's available in hip sizes from 34" to 52".

The pattern is quite straightforward to sew. I'd say the instructions are clear and easy to follow, but they maybe don't hold your hand quite as much as some independent pattern companies would. That said, I didn't have any trouble sewing up the set. 

I like the fact that the pattern has a couple of details that make it a bit different from other pyjamas/loungewear. The high-low hem on the top is a nice feature and results in an interesting shape, and of course pockets in the trousers are always going to be a welcome addition! I also liked the fact that that the instructions have you top-stitch the neckline facing down - it gives a clean finish to the top.

As you'd expect with pyjamas, the sizing is generous and there's plenty of wearing ease built into the pattern. I'd say the fit on the top is particularly oversized so you might want to have a look at the finished garment measurements to decide quite how big you want it. I went down two sizes from what is recommended for my measurements on the top, and as you can probably see from these photos it's still plenty big enough. I also lengthened the top by about an inch and a half, which is very standard for me.

The sizing for the trousers is a more standard pyjama style fit - I made the size recommended for my measurements and it's comfy without being baggy.

As I mentioned at the start, I've had this fabric in my stash for quite some time. I essentially got it free - I'd ordered a different colourway of the same print in a clothing company's deadstock fabric sale years ago, but was sent this one instead. When I contacted them about the error, they sent the correct fabric and said I could keep this one. Bonus! I initially thought I'd make a dress, but could never quite decide on what pattern to use and that's how it ended up getting packed away and forgotten about. 

When I got it out again, I couldn't shake the feeling that making a dress out of it might end up looking like I was wearing a tablecloth, and not necessarily in a good way! As I had 3 metres of wide fabric, I had plenty to play with so pyjamas seemed like a sensible option - I think that was the right decision.

I'm glad I rediscovered this fabric, and that it's finally been put to good use. I enjoyed sewing the Peppermint loungewear set, and I'm really pleased with how it turned out. I might have to see if I can unearth any other large lengths of unused fabric to make some more!

Tuesday, 2 January 2018

The Last Sewing of 2017 & Plans for 2018

Happy New Year! I hope that 2018 is off to a good start for you, and that you had a lovely festive period before that if you were celebrating. Before Christmas becomes too much of a distant memory, I thought I'd pop by to share some of the presents that I sewed for my family, and also talk about some of my crafty plans for the next 12 months.


First up we have a couple of dresses for my little niece. I used patterns from Puperita for both of these. The one on the left is the Duckie dress, but without the front pocket and shortened so that it's more of a long top/tunic length for wearing with leggings. On the right is a pinafore dress, which is reversible (the other side is some aqua blue needlecord). I shortened this dress as well - it's still pretty much knee length on my niece (who's 1 and average height), but I cut it at the 3 month length instead of 12 months so you might want to check the length if you're using this pattern - it would have been really long if I'd used the 12 month length. Other than that, these patterns were both really nice to sew and I'm sure I'll be using them again in the future.


For my nephew, I made a pair of pyjamas. He loves vehicles of any kind, so this jersey from Fabrics Galore went down well with him! The pattern I used is New Look 6237. I've made both the trousers/shorts and t-shirt separately for my nephew before so I was familiar with the pattern and could stitch it up fairly quickly - always good when there are lots of presents to make!


Continuing on the pyjama theme, I made a pair of pyjama trousers for my sister-in-law using some spotty jersey from Maud's Fabric Finds. I used Simplicity 2116, the same pattern as when I made a whole stack of pyjama trousers last Christmas. These trousers came in handy for my sister-in-law to change into after we got drenched in pouring rain on a Christmas afternoon walk!


For my sister, I whipped up a New Look 6217 top. This one really looks a lot better when worn than when on the hanger, but I didn't get a chance to get a photo of my sister modelling it. If you want to get an idea of what it looks like on, I made three different versions of this back in 2016 - the blog post is here. The viscose I used this time was from Sew Over It, but it doesn't seem to be in stock anymore unfortunately.


Lastly, I made a Tilly & the Buttons Françoise dress for my mum. Helpfully, my mum is a similar size to me so she she could try on my stripey Françoise dress, which meant that I didn't have to worry that it wouldn't fit. The fabric for this one is a dogtooth ponte roma from Sew Essential - it's really nice quality and perfect for this pattern. I really love the Françoise made in ponte roma; it means that the dress is super comfy, but it can also look quite smart at the same time.

Now that we've got last year's sewing out of the way, let's talk a little bit about some of my plans for 2018 - here's my #2018makenine list:


1. Closet Case Carolyn Pyjamas - these were on my Make Nine list last year, but I didn't quite get time to make them. Hopefully I'll be able to put that right this year!

2. Finish my scrappy hexagon quilt - another project carried over from 2017! I made good progress last year, so hopefully I will actually be able to finish it this year.

3. Vogue 8577 - another one that's been in my stash for a while and needs to be used!

4. Cloth Habit Watson Bra - I've got a bra making kit waiting to be used and plenty of knit scraps, so there's no excuse not to give this a try.

5. Butterick 6446 - I've got a wedding to go to later in the year, and I think a maxi version of this could be fun to make for that.

6. Knickers! This is the free Megan Nielsen Acacia pattern. See previous comment about knit scraps!

7. Lovely cardigan by Kim Hargreaves - way more cables than I've knit in one project before, so this could be a challenge.

8. Wainthropp cardigan by Andi Satterlund - I struggled with the only other cardigan I've knit seamlessly because it seemed to make my wrists hurt, but I love pretty much all of Andi Satterlund's designs and I've altered how I knit in the past year (I used to knit in a particularly awkward self-developed manner!) so I'm going to give it another try and hope it goes better this time.

9. Colourwork yoke sweater from Simply Crochet magazine issue 66 - I've never done any crochet colourwork before so this might be a bit ambitious, but you don't know if you don't try!

So there we go! I may have bitten off more than I can chew (with number 9 in particular), but at the moment I'm excited to give them all a go. Have you got any exciting plans for 2018?

Friday, 30 December 2016

Christmas presents

Hello hello! I hope you're all having a happy festive season. Before this nice little in-between period that we're now in turns into 2017, I thought I'd share the Christmas presents that I made this year.


First up is this bag that I made for my Mum. The pattern is the Maker's Tote by Noodlehead which, as the name suggests, is designed to be a project tote bag for makers and creatives. There's plenty of space in the main compartment of the bag, and lots of pockets for keeping bits and pieces safe. Because of all those pockets, this was easily this year's most time-consuming present, but I think it was definitely worth the effort.


The instructions are very detailed and easy to follow so it wasn't a difficult project (I found that the only tricky part was applying the binding around the bottom edges, and even that wasn't as problematic as I'd suspected it might be), it just took a bit of time to sew all the various sections.

The outer fabric is Painterly Wash Art Gallery denim, and the inside pocket fabric is Tulip in Turquoise from the Cloud 9 Vignette collection. The rest of the fabric is a combination of various remnants from my stash.


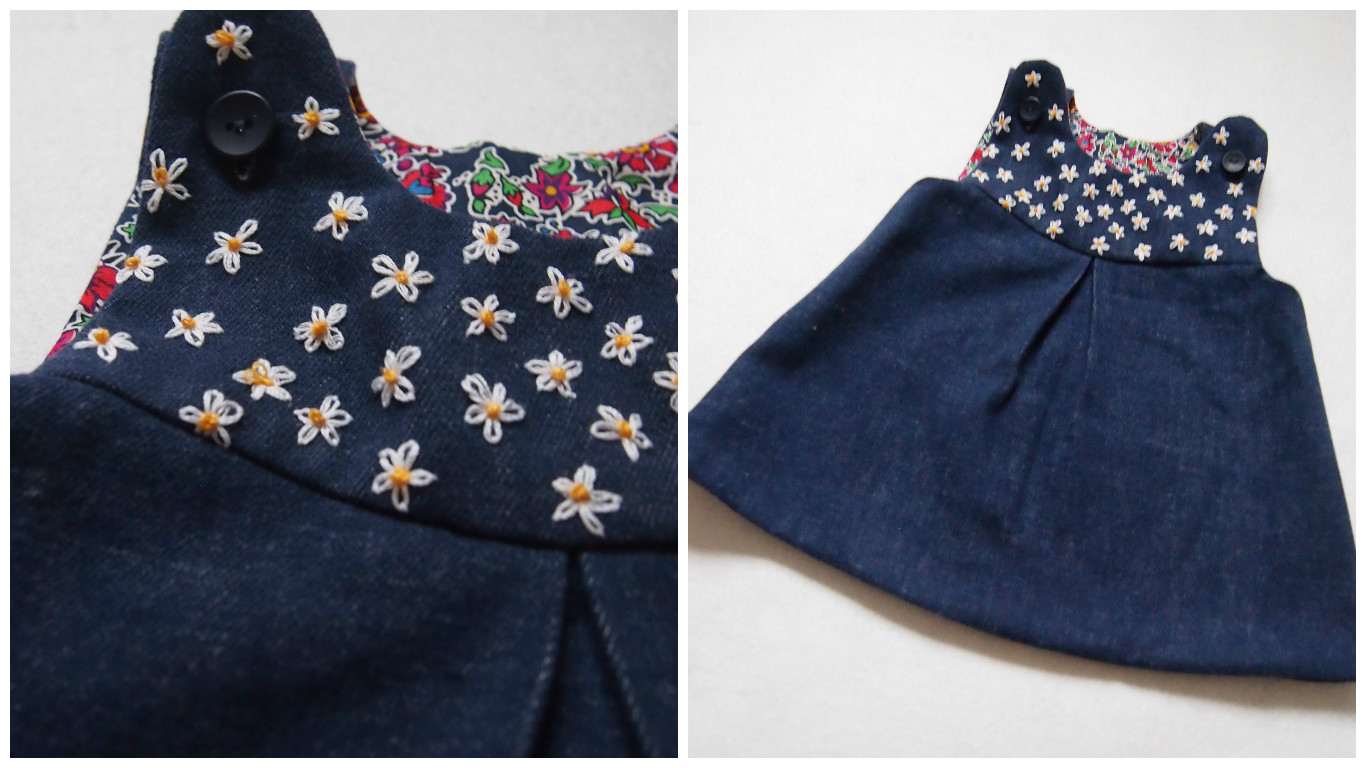
Over the years I've learned that it's better to keep things simple when making presents, so all of my other projects were much quicker. First up is a dress for my niece who was born a couple of months ago. It's a baby pinafore pattern from Puperita - a sweet, simple dress that I sewed up in a couple of hours. The outer fabric is a soft denim repurposed from a skirt, and the inside is left over from my latest Susie blouse. I did make it slightly more complicated by deciding to embroider the yoke with little daisies, but that was a nice relaxing project to work on in front of the TV so it was fine.


Her Christmas present was actually the second version of the pattern I've made for her - I made the red version above for her when she was born. I really like the fact that the dress is reversible, so I could make this red version with Christmas fabric on one side and plain babycord on the reverse so that she'll be able to wear it outside of the Christmas season too.


Next up was an apron/smock for my nephew, which I think will definitely come in useful because he likes 'helping' my sister with cooking and baking but has a tendency to end up covered in half of the ingredients. This is a very simple pattern from the book Sew a Metre. The main fabric is the same denim as my niece's dress, with added red binding and a scrap of fabric from my stash for the 'J'.


Last, but by no means least, I made a five pairs of pyjama trousers for my Dad, siblings and siblings-in-law. I intended to take a photo of them all modelling them, but that got a bit overlooked in the excitement of present opening, so all I have is this picture of the stack of them waiting to be wrapped - sorry about that!


I can show you this photo of my brother sporting another pair of pyjama trousers that I made him earlier this year, using the same pattern (in this spectacular beetle print jersey). There are many basic pyjama patterns, but this particular one is Simplicity 2116. Unsurprisingly, given that pyjama trousers are one of the simplest things to sew, this was a nice easy project. By the end of the fifth pair I was definitely ready to sew something else, but I'd happily use this pattern for pyjamas again the future.

So there we go, that's what's kept me busy for the past few weeks! Did you make any presents? I really enjoyed it, but it's also great to be back sewing for me again now!

Tuesday, 6 September 2016

Megan Nielsen Reef PJs

My summer pyjama selection has started to look a bit sorry for itself. Winter sleepwear has a regular annual replenishment in the form of cosy Christmas presents, but most of my warmer-weather PJs have been worn so much that they're verging on falling apart and really need replacing. I've considered various summer PJ patterns before, but none of them ever seemed quite right - apparently I'm quite picky in my loungewear requirements. Then Megan Nielsen released the Reef camisole and shorts set, which ticked all my boxes.


The camisole is cut on the bias, has a V neckline, a cross-over back yoke and a high-low hem. The shorts come in two versions - one with pockets and a curved hem, and a second shorter version with no pocket and a straight hem. I made the first version, but omitted the pockets because I wasn't sure how they'd work with this fabric and, much though I love pockets in my daytime clothes, I didn't think I'd use them much in pyjamas.


One of the first things to point out about my version is that I did something a bit wrong when constructing the back - mine doesn't cross over as much as it should. I think I must have matched up the wrong notches or something, but everything seemed to be working out fine so I only noticed once I was a bit further down the line. Being as they're pyjamas, and so it wouldn't matter if the fit was a bit off, I decided just to plough on and not go back and unpick things. Happily, the camisole still fits nicely, although I'll make sure that I get it right next time because I do like the cross-over yoke.


I would say that this mistake is entirely down to me, and in no way a reflection of the instructions or the pattern. I'll openly admit that I was reading the instructions pretty quickly as I went along. When you're actually paying attention to them, the instructions are perfectly clear and easy to follow, with helpful added tips along the way like block fusing the interfacing instead of cutting out the interfacing and fabric pieces separately and then fusing afterwards.


In terms of sizing, for the camisole I graded between a medium at the bust and a large at the waist. Due to the loose shape, I could probably have got away with making the whole camisole in a medium, but I wanted to stay true to the breezy, flowing shape intended in the pattern. I made the shorts in a straight size large, and they fit nicely.

I'd say that both the camisole and the shorts have just the right amount of ease to make them nice and comfortable (as you want pyjamas to be), whilst not being so baggy that they become sack-like and unflattering.


The fabric I used is a pretty viscose that I picked up on a whistle stop tour through the rag market in Birmingham. My uni friends (none of whom are into sewing) and I have a habit of converging on Birmingham to meet up for the day from our various areas of the country, and I always seem to arrive before everyone else, which really just "forces" me to go and look at fabric while I'm waiting. It's a tough old life, isn't it?!

Anyway, this is lovely and drapey and was only £2 a metre. Perfect for trying this pattern out for the first time. I'm happy to make toiles for actual clothes, but it would seem a bit over-the-top for pyjamas to me, but at the same time I wouldn't want to commit expensive fabric to a pattern and end up disappointed. This way, it wouldn't be a disaster if things went a bit wrong. Thankfully that didn't happen!


I really love my Reef set. For me, they're pretty perfect as summer pyjamas - small enough to be nice and cool to wear, whilst still being covered up enough for me to be able to wander round my flat in them quite happily without having to worry about the fact that my neighbours can see right into most of my windows. The only thing I regret about this is that I didn't get round to sewing them earlier in the summer. I think I probably won't fit in sewing a second set this year, but another Reef set will definitely be high on my sewing list for next summer.

Thursday, 31 July 2014

Book Review: And Sew To Bed

If you’ve been reading my blog for the last couple of months, you’ll probably have seen the various nightwear projects that I’ve made from the book And Sew To Bed by Caro London (not to be confused with this book of the same name by Vanessa Mooncie – although this one looks nice too!). As I’ve now used a few of the patterns, I thought I’d write a more detailed review of the book itself to share with you.


The book includes 30 sewing projects for nightwear and accessories, for both women (S, M and L sizes, for UK sizes 10-18 – I’ve used M for all my projects) and children (ages 3-4, 5-6 & 7-8) – 12 patterns for women’s nightwear, 4 girl’s nightwear, 2 boy’s nightwear (the “boy” patterns could probably be used for girls too, but the “girl” patterns are definitely girly), and 12 accessories (ranging from a headband, to a jewellery roll, to pillows). In addition to this, there’s a section at the back of the book with instructions for the techniques used, such as French seams, using bra sliders, piping etc.

There are tear-out pattern sheets included for 18 full-size patterns. You have to trace the patterns, and the sheets are a little bit confusing because there are a lot of different lines overlapping. Each pattern is drawn in its own colour though, and personally I haven’t had any problems with tracing, but I read a couple of reviews on Amazon from people complaining that the sheets were too confusing. For the projects that don’t have a pattern, there are instructions for the size of simple shapes that you need to cut.

Pyjama trousers

I’ve now sewn up three different projects from the book (pyjama trousers, dressing gown, short pyjamas), and the instructions have been fairly clear and easy to follow, if sometimes a bit brief. As some of the projects reuse the same methods, and also the techniques from the back section, the instructions will quite often refer you to other pages rather than writing out the same sections repeatedly. I can see why they’ve done this, and it probably means that you end up with more projects in the book than if everything was written out in full for all of the projects, but flipping backwards and forwards between pages can get a bit annoying, and I think there’s a risk that doing this will lead to missing out steps.

My least favourite thing about the book is the diagrams used to accompany the instructions, which I think suffer from the same problem as lots of craft books by seeming to focus more on trying to be pretty than being clear. Yes, the book needs to be nice to look at, but there are photos of the finished projects that can do that job, so I think it would be better to stick to line drawings for the diagrams as sewing patterns would.

Summer pyjamas

Those are really just niggles, but I thought I’d put them out there in case any of them would be deal-breakers for anyone thinking about buying the book!

There are plenty of positives about the book. There are a nice range of different styles in the women’s section (4 nightdresses, 4 pyjama sets and 4 robes/dressing gowns), with nothing too complicated but still a few interesting details. The patterns come together really nicely and the instructions are clear and generally easy to follow. It’s also pretty good value for money if you compare it to how much you’d have to pay for individual patterns to make all the projects included in the book. Really, if you’ve got this book, then you’re probably not going to need to buy any other nightwear patterns ever (provided that you stay within the slightly limited size range obviously!).

Dressing gown

All in all, I probably wouldn’t want to give And Sew to Bed to someone who was completely new to sewing, but I’d be happy to recommend it to anyone who has a bit of confidence in what they’re doing, and there are still plenty more projects that I’m planning to make from the book - looking through it again to write this review has reminded me quite how much there is in there!

Friday, 4 July 2014

Summer pyjamas

This week I've managed to be sensible with my sewing, and make something that I actually definitely need, instead of something that I just want. What's more, this project cost me next to nothing - never a bad thing! Here are my new summer pyjamas....


(You'll be glad to hear I'm not modelling for you today - the shorts are just a bit too short for me to want to do that! Also, sorry about some of the colour differences going on between the photos, this shade of blue seems to be particularly tricky to photograph accurately!)

So how did I manage to make pyjamas almost for free? The pattern is the third one I've used from And Sew To Bed (my pyjama trousers are here, and summer dressing gown is here), which I got for Christmas from my sister, so that cost me nothing. As for the material, it's the leftovers from my Sureau dress (I just had enough to squeeze out all the pieces, yay!), so although I did have to pay for it at some point I think I've already got my money's worth out of that piece of material from the amount I've worn my Sureau dress, so I'm counting the material as being free too! Plus it means there's one less thing in my growing material stash, which is probably not a bad thing.


The set is pretty easy to sew up, but with enough interesting details to still keep it nice and not boring - like these pretty pintucks on the camisole top. The pattern also includes instructions for adding lace edging along the neckline and around the bottom of the shorts which would make things even prettier, but I didn't have any and was being impatient and didn't want to wait till I could get some, so I left it out, and I think my set looks just fine without it. 

The camisole is slightly wider at the bottom than I had expected it to be based on the photo in the book, but that may partly be down to the material I used - the pattern recommends lightweight cotton, whereas mine's probably somewhere between lightweight and mediumweight and not particularly drapey, so maybe the wideness at the hem would be less pronounced with a different material.


The camisole straps are secured using a bra loop and slider set, which is nice because it means they're adjustable and I think makes the finish look a bit more professional. The instructions in the book weren't 100% clear on what should be attached where for the slider, and the diagrams are also not the best in the world, so I ended up getting out one of my bras to check that what I thought I needed to do was definitely right - thankfully it was so maybe the instructions were OK after all!


The shorts are just a shortened version of the pyjama trousers that I've already made, so that made things nice and simple for me. The back of the waistband is elasticated and then there's a drawstring at the front, which you're meant to make fabric ties for. At this point I decided to have a rummage in my little stash of ribbon and see if I had anything that might be suitable, and happily came upon this length of blue ribbon. Not only was it pretty much the perfect shade, but there was exactly the amount left that I needed for the drawstring - obviously it was meant to be! 


All in all, the pyjamas are comfy and cool to wear, which is the most important thing for summer pyjamas, and have some nice little details thrown in to keep them pretty and interesting. So, I think for something that cost me almost nothing, this project has got to be a winner! And now I might get back to the pretty dresses...

Monday, 10 February 2014

Cosy pyjama trousers

While a nice new pair of pyjamas is usually a good Christmas present, this year just gone I decided it would be more fun to be able to make them for myself so I added the book And Sew to Bed by Caro London to my wish list, and being as this wish list was not so subtly emailed to my family, I was a lucky girl and the book was there waiting for me on Christmas morning!


And here's my first completed project from the book - a cosy new pair of pyjama trousers. They're the trousers from the classic pyjama set in the book, and they've already been getting a lot of use!


They were fairly simple to sew, and as I pretty much stick to wearing skirts and dresses in everyday life, this is probably about as technical as I'm ever going to get when it comes to sewing trousers for myself. 

The insides are all finished with French seams, and the waistband is part elasticated and fastens with fabric ties, so they're nice and comfy.


I was amazed that the buttonhole feature on my sewing machine decided to cooperate when it came to making the holes for the waist ties. The last couple of times I tried to use it (for cushion covers in my life before dressmaking) my machine refused to do anything at all, but this time they both worked completely fine first time - yay!

The material is a cosy and colourful brushed cotton that I got from Calico Laine but they don't seem to have any of it on their website anymore. 


That's about all I have to say about this project at the moment, but I'll probably write a more detailed review of the book once I've had a chance to make one or two more of the projects - there are lots of lovely options so I'm spoilt for choice!