Thursday, 22 August 2019

Butterick 6556 Dress Sewing Pattern Review

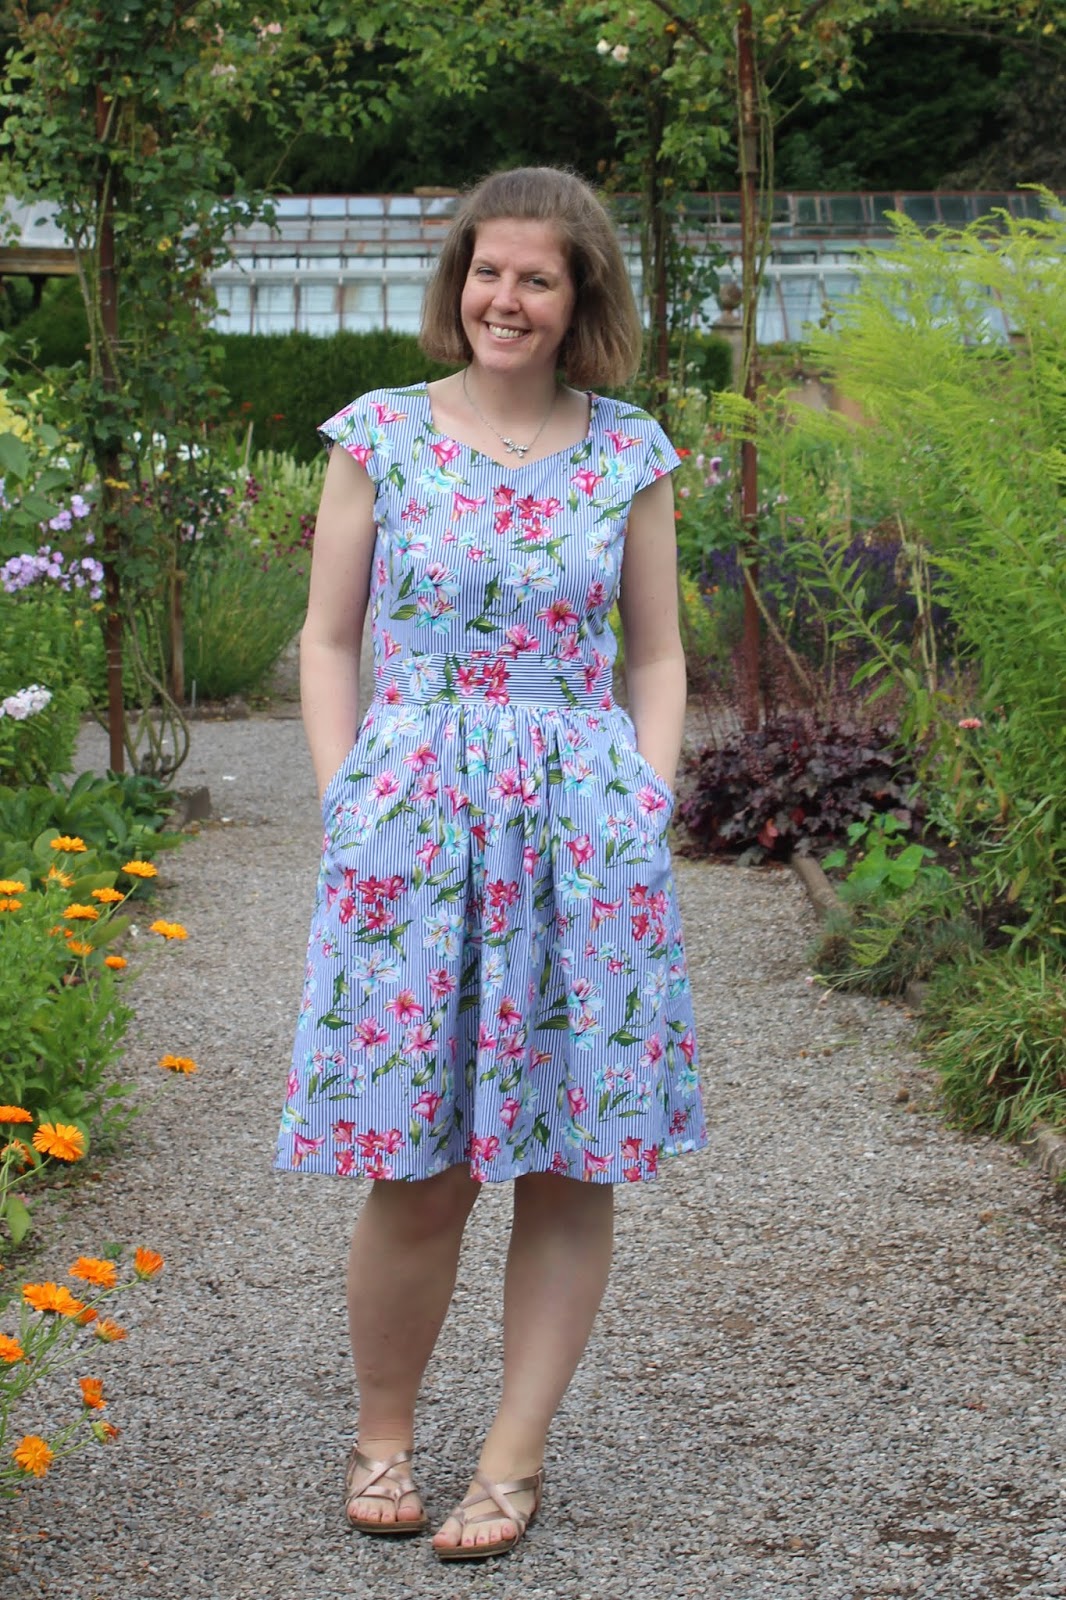
The Butterick 6556 dress has been on my radar of patterns I'd probably like to sew for some time now, so when it was included with issue 70 of Love Sewing magazine I took it as a sign that it was meant to be and snapped up a copy. I had some perfectly suited fabric in my stash, so it quickly hopped to the top of my sewing list!


Butterick 6556 is one of the Patterns by Gertie series, and so unsurprisingly has a bit of a vintage feel about it. The pattern is for a close-fitting dress with lined bodice, square front and back neckine, sleeveless or short sleeved options, a very full pleated skirt, pockets (yay for pockets!), and a centre back lapped zip.

While I have myriad patterns with a fitted bodice and full skirt, the square neckline on B6556 is something a bit different and really appealed to me.


Based on the finished garment measurements, I chose to make a size smaller than recommended for my measurements and cut a 14 at the shoulders/bust, blending out to a 16 at the waist. That worked out nicely and my toile fitted well - it was just a tad snug at the waist (fine when I was standing up but a little tight sitting down and considering that I would want to be able to eat when wearing the dress!). In my actual version I used a fractionally smaller seam allowance at the waist (probably about 1.2 instead of 1.5 cm), and that was enough to give me a bit of breathing space.


I also chose to sew the neckline with a 1 cm seam instead of 1.5 cm just to raise it ever so slightly and bring the shoulders in a touch. I'm gradually coming to the realisation that I probably have proportionately narrow shoulders, and that extra half centimetre on each side helps the shoulder straps to stay in place.

As you may have noticed, I also removed the cut-out/notch/whatever-you-want-to-call-it from the centre front neckline. This was possibly slight laziness on my part because I thought that it would take a bit of effort to get that looking crisp and perfectly symmetrical, and I didn't think it necessarily added much to the dress. I think I actually prefer the unadulterated square neckline.


I also lengthened the bodice by 2.5 cm as is standard for me. Another note on length - the skirt in the pattern is probably a bit longer than most. I often have to lengthen skirts by a couple of inches, but this is the skirt length straight out of the packet and it's bottom-of-the-knee length on me (I'm about 5'9").


The instructions were typical commercial pattern instructions - clear but brief. I did think it was a bit odd that they had you leave a gap at the shoulders when sewing the outer bodice to the lining. That's presumably to make turning the bodice/lining the right way out easier, but I managed to turn mine out perfectly well without leaving a gap and that meant that I then didn't have to hand sew the gap closed.


The fabric I used is one of the longer-term residents in my stash. It's a cotton shirting that I bought a couple of years ago, I'm fairly sure from Fabworks. It was the victim of my over-ambitious seasonal sewing plans and didn't get sewn up before the end of one summer, then got put away and has only just found its way to my sewing table. I think this pattern works quite well with the stripes. Obviously making sure they all matched up nicely took a little bit of time and patience, but I'm happy with how it turned out - especially across that centre back seam and lapped zip.

The only thing I'm not too crazy about is that the fabric creases and wrinkles as soon as you look at it, and it seemed to conspire with my camera to make the dress look a bit ill-fitting in places even though in real life it looks great. I can deal with a few creases though, and let's face it what it looks like in real life is more important than photos.


I'm really pleased with how this dress turned out. The ultimate sign that a project has been successful is when you immediately start dreaming up future versions of the pattern, and I've definitely got a few more Butterick 6556 dresses in my head already. They may not all come to fruition, but a second version is already waiting to be made using some beautiful Seasalt cotton voile - watch this space for that one!

Thursday, 15 August 2019

Knitting: socks and shawls

I've finished a few smaller knitting projects since my last round-up post, so I thought it was probably time for another review. I never seem to have as much to say about knitting projects (especially accessories as opposed to garments) as I do about sewing, but I still want them all to have their place on the blog so it seems sensible to group them all together. I hope that's OK?


So, we'll start off with a shawl (Ravelry project here)! This is the Reyna shawl by Noora Backlund, which is a free pattern on Ravelry. The yarn that I used was a birthday present from my parents and came from Woolly Mama Yarns.

The Reyna shawl is a lovely relaxing pattern to knit, with alternating sections of garter stitch and a simple mesh stitch. It's specially designed for using single skeins of beautifully colourful sock yarn so it's no surprise that it worked out as a great match for my yarn. I enjoyed making this shawl and could see myself making more because it could look very different depending on the yarn you used.


Next up we have a handy little cowl. This was made solely based on the yarn, which was one of three different skeins that I was lucky enough to win in a giveaway from Mina of the Knitting Expat podcast. When it arrived, the Blue Sky Fibers cotton felt so lovely that I wanted to use it immediately. A quick Ravelry search revealed that the main viable options for the single skein that I had would be a dishcloth/washcloth or a cowl, and the yarn felt too nice to be used for washing so it had to be a cowl. I chose the Cha Cha Cowl by Jody McKinley - another freebie and another simple but effective pattern. It was a speedy project so worked up quickly, which meant I got to wear it a couple of times before the weather warmed up.


The final neckwear item for this post is my Amulet shawl. It's a pattern from The Shawl Society (I was given the book for Christmas) by Helen Stewart. I've used Helen's patterns before and really like the format that she uses - in case you're not familiar, she has a percentage checklist system so you know just how much progress you've made. It makes knitting them a real pleasure, and that was true again for the Amulet. I liked the fact that there are four different textures to knit so you get a bit of variety throughout the shawl.

The yarns I used this time both came from Little Stone Cottage Yarns (the colourways are 'I'm Blue' and 'Ocean') and I love how they work together. A blue shawl will definitely be a very useful addition to my wardrobe once the temperatures cool down.


Now onto some socks! First up we have the Precious Metal socks. This is a pattern by Louise Tilbrook, which I got free as a newsletter subscriber. It seemed to take me longer to knit these than socks would normally take me, mainly because I did have to keep referring to the pattern/chart, but it was still an enjoyable project.

I used John Arbon Exmoor Sock in the colour Mackerel Sky. I'm not entirely sure whether I'm going to be able to wear these (it's been too warm really since I finished them) because they felt a bit itchy when I put them on to take photos, but we'll see how they are once it's colder. And if I can't wear them then I'm sure they'll be gratefully received by someone with similarly sized feet and less sensitive skin!


The second pair of socks I have to share today are the Fernweh socks - a pattern by Mina of Knitting Expat. I used two yarns left over from other projects - Bert by Tracey Mustard (from my Sockhead Hat) and some West Yorkshire Spinners Signature 4 ply in Blueberry Bonbon (which I've used in several projects already). I really enjoyed knitting these socks and I love how they turned out - they're a welcome addition to my box of socks.


And, last but not least, my Nemesis socks. This is a pattern by Ambrose Smith, and I think it's actually surprisingly simple compared with what I thought it was going to be. It's not a mindless knit exactly, but you can memorise the pattern easily enough and that means that knitting them isn't too taxing. This time I used Coop Knits Socks Yeah in the colour Larimar. I really enjoyed knitting with this yarn and it feels really nice so I'd like to use it again at some point.

So that's all the knitting I have to share for now! There are more photos of each project (in case that interests you!) on my Ravelry project pages, which I've linked for in each case.

Have you been enjoying any knitting projects lately?


Thursday, 8 August 2019

Agnes/Molly tops

As I mentioned when I posted my Seamwork Rory top a couple of months ago, my wardrobe has been in need of some new summer t-shirts. When this beautiful floral jersey popped up in my Instagram feed one day from Material Girl Laura (sadly it no longer seems to be in stock), I snapped some up to help boost my t-shirt collection.


The only question then was what pattern to make with it. While I really like my Rory top, I wanted this to be more of a "normal" t-shirt. I considered the patterns that I've already made and, while none of them seemed to be quite right, they weren't far enough from being right to justify buying another pattern so I decided to do a bit of low key pattern hacking to make something to my exact specifications.


The Tilly & The Buttons Agnes top is very close to what I wanted, the only problem was that I wanted the neckline to be a little bit higher. While I like the Agnes neckline in general, on me I think t-shirts with slightly higher necklines look better when I wear them with pinafores. Thankfully I have the Sew Over It Molly top (I think I got it free with a magazine), which has a neckline more like what I was looking for, so I simply redrew the neckline on my Agnes pattern pieces using my Molly pattern, and also used the neckband from the Molly top.


While this was a fairly simple pattern hack, I didn't want to cut straight into my pretty floral jersey without being sure that it would be what I wanted so I dug out this bird print jersey for a trial run. While it's Art Gallery jersey, so it's not exactly cheap fabric in itself, it's the leftovers of a piece that I won in a giveaway a couple of years ago (therefore it didn't cost me anything) and I'd already used part of it to make my first Gable top (therefore I'd already got a very successful and much worn garment out of it) so it felt like it was fairly low risk fabric to experiment with.


As you can probably already guess, my plan worked out nicely so I went ahead and made a second version of the top in the floral jersey and had a lovely Sunday afternoon sewing it up at a leisurely pace. While I enjoy tackling more complicated projects sometimes, often my favourite sewing sessions are ones spent working on simple projects where you can relax a bit without too much risk of having to reach for the seam ripper!


I'm really happy to be able to add these two into my t-shirt drawer. They're great basics so they'll definitely be worn a lot, the floral version is super pretty and the trial run version has put another piece of leftover fabric to good use. What more could you want?

Wednesday, 31 July 2019

Seamwork Bobby Dress Pattern Review

In my continuing quest to use up my fabric stash, the piece I've used for today's project is one that had been causing me a bit of a headache. It's a lovely turquoise blue jersey, and I had plenty of it, but it never seemed to be quite right for any of the patterns I wanted to make. That was until Seamwork released the Bobby dress, and I knew it was the answer that I'd been searching for.


Bobby is an easy-to-wear knit dress with a lined bodice, nicely shaped V-neck, A-line skirt and wide elastic casing at the waistband. And pockets - hooray for pockets!


This previously problematic jersey is a Robert Kaufman Laguna jersey, which I bought a couple of years ago from a shop that has since closed. It's a lovely quality, but it is slightly lighter weight than most other cotton jerseys I've used. I knew I wanted to use it for a dress, but the jersey dress patterns that I like tend to have fitted bodices and the Laguna jersey seemed like it would be too thin for them. The fact that the bodice of the Bobby is lined and therefore you have a double layer of the fabric meant that it would be reinforced so it would be a much better weight for a mostly fitted bodice.


The instructions are generally good. I did find the directions for the burrito method for sewing together the outer bodice and lining a little confusing, but Seamwork have a great video tutorial which explains the process nice and clearly. Other than that, I didn't have any problems at all and really enjoyed the process of sewing my Bobby dress.


In terms of sizing, I made a 10 at the bust blending out to a 12 at the waist as recommended for my measurements. I also lengthened the bodice by an inch, which is a standard adjustment for me. I think it fits just right!

I did wonder about shortening the skirt to knee length, but in the end decided to keep the midi length intended by the pattern to make it a bit different from my other dresses. In case you're wondering about skirt length - this is the length as in the pattern, it's midi length on me and I'm about 5'9". If you're shorter, you may well want to shorten the skirt. And in case it's of any help, I worked out that I'd need to shorten the skirt by about 5 inches if I wanted to make it knee length.


I'm really pleased with my Seamwork Bobby dress - it's obviously incredibly comfy, and the midi length feels a bit special and means that the skirt swishes about beautifully as I walk. I can definitely see myself making another Bobby dress or two - potentially shortened to knee length in a slightly heavier weight jersey to wear as a pinafore in autumn/winter. I also think it would be fun to try hacking the bodice into a top because I really like the shape of the V-neck. All in all, this one is definitely a winner for me!

Thursday, 25 July 2019

Jennifer Lauren Raine Dress

Usually I buy fabric with a specific project in mind, but sometimes I spy a print that's so pretty that it demands to be bought before plans have been formulated. The cotton that I've used for today's project definitely falls into the latter category.


I'd seen various online shops selling it last summer and was tempted but managed to resist it. That all changed when I saw it in the flesh in the John Lewis sale - I think the colours just come across better in real life than they do on screen. Although to be fair, the fact that it was 50% off may have also helped because I do love a bargain! The only downside was that it was January so definitely not seasonally appropriate to sew immediately.

Two and a half metres came home with me and were squirreled away in my stash to await warmer weather. Over the last couple of months I'd been pondering what to make with it whenever I saw it sitting on the shelf.


After I made my Eden jumpsuit, I had decided that this would make a nice second version of that pattern but when I went to cut it out I had this horrible vision of ending up with flowers or leaves bursting out at unfortunate places around the crotch seam! Once I'd had that thought, I couldn't get it out of my mind and it seemed like it would be difficult to avoid due to the spacing of the flowers. It's the sort of thing that most people wouldn't notice but I definitely would and it would have annoyed me.


So the jumpsuit plan was scrapped, and I went back to the drawing board. Then when I was wearing the Jennifer Lauren Raine dress that I made last year it suddenly struck me that this would be the perfect pattern for my beautiful floral stripes. The simple darted bodice with grown on sleeves and lovely full skirt are perfect for showing off a print, and the waistband would give me the opportunity to play with the stripe direction. Changing the stripes around also really shows off the nicely shaped waistband, which is good because I think it got a bit lost in the print that I used for my first Raine dress.


There's not a lot new to say about the construction of this dress that I didn't say when I talked about my first Raine dress. The only thing that I did differently this time was to lengthen the skirt a bit more - I added an extra 2 inches onto the length for the biggest size.

The Raine dress is a satisfying pattern to sew - there are some slightly trickier construction steps in comparison with what you'd usually expect from a simple looking unlined dress, but the instructions are very clear so as long as you follow them you should be fine. They give a nice finish on the inside as well, which is always pleasing.


All in all, I really enjoyed sewing this dress, it's lovely to wear and I'm glad that I finally found the right use for this cotton. It's worth taking the time to be sure that you make the perfect pattern and fabric pairing, isn't it?