Thursday 30 May 2019

Seamwork Rory top sewing pattern review

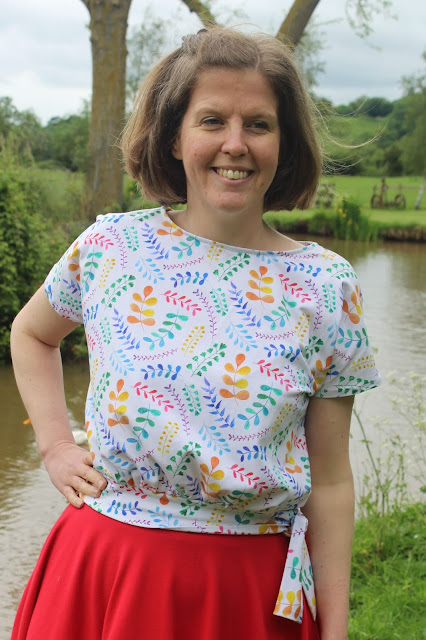
Recently I realised that my short-sleeved t-shirts are looking a little sorry for themselves. While I've made plenty of long-sleeved t-shits, my summery jersey tops are all pretty much RTW - which means that they're all at least six years old because since I started sewing my money has been spent on fabric rather than clothes! Shortly after this realisation, the Seamwork Rory top popped up in my Instagram feed and jumped to the top of my sewing queue.


Rory is a cropped t-shirt with grown-on sleeves, a relaxed fit gathered into a tie waistband at the natural waist and a boat neck. It reminded me of a top that I used to have many years ago, and seemed to be very wearable whilst still being a little different from a standard t-shirt so it really appealed to me. Plus I love anything with ties/bows, so that was an added bonus as far as I was concerned!


The instructions are very thorough and clear, and pattern is fairly simple to sew. If you've already sewn a knit top or two then it shouldn't pose any problems. The only difference from the construction of a standard t-shirt is the gathering of the main bodice into the waistband, and that was as easy as pie for me. 

I liked the fact that the neckband is attached and then folded to the inside before being topstitched down so it's more like a binding. It seems to suit this top better than having a neckband visible on the outside, but gives a better finish than just turning the bodice itself under. 


In terms of sizing - my measurements put me in a 10 at the bust and 12 at the waist and that seemed like it should work nicely based on the finished measurements. I was unsure of whether to lengthen the top - with woven patterns I'd make a toile, but inexpensive jersey isn't so easy to come by! I compared the measurements to some of my other tops and decided that it was on the borderline of being OK, but to be on the safe side I cut and sewed the bodice pieces before cutting the waistband so that I could lengthen that if necessary. When I tied on the assembled bodice, it seemed like it was just about right but I added an inch to the width of the waistband (which means that the finished top is half an inch longer as the waistband is folded in half) just to make sure that the top would be long enough.


I'm fairly happy with the fit - if I made another I might consider making a straight size 10 in the bodice and then just gathering it into a size 12 waistband so that there's slightly less blousing in the bodice section, but this one's fine the way it is.


The pretty jersey that I used is from LouBodu Fabrics - I got some of the last of it in the sale and it's now sold out (sorry!), but they have plenty of other fun prints if you're in the market for some interesting jersey. The fabric is great quality, and feels like it should wear well.


All in all, I'm really happy with my Rory top - it was fun and quick to make, is comfy to wear but more interesting than a standard t-shirt, and all the colours in the print mean that I should be able to wear it with lots of things. You can't ask for much more, can you?

Thursday 23 May 2019

Itch to Stitch Kalispell Dress Sewing Pattern Review

Sometimes a sewing pattern grows on you gradually, and sometimes you know as soon as you see it that you "need" to make it. For me, the Itch to Stitch Kalispell dress definitely fell into the second category! It's been a while since I sewed a pretty dress, and the Kalispell seemed like the perfect pattern to remedy that situation.


The Kalispell dress is a slightly vintage style, with a princess seamed bodice and full skirt with inverted box pleats. The dress has a V neck and a front button closure with button band. It has options for cap or flare sleeves (I chose the cap sleeves) and in seam pockets. The pattern also has different bodices for A, B, C, D and DD cups, which is helpful for getting a good fit.


This was the first Itch to Stitch pattern that I've made, and I was really impressed with it. The PDF is fairly big given all the different bodice pieces, but there are clear directions included about which pages you need to print for which sizes/options.

The instructions are very detailed (as an example, there are 11 different instructions just about applying interfacing and stay stitching!) and easy to follow. The diagrams accompanying them are also perfectly clear. All of the notches/seams etc. matched up nicely when I was sewing, and I didn't have any trouble at all with making the dress.


The only thing that I found slightly odd was that the instructions have you hem the skirt before it's even attached to the bodice. I don't know about you, but I definitely like to try on a dress before hemming it to get the length just right as even a small change in the hem length can change a dress from dowdy to delightful.

The instruction to do this does make sense in terms of the rest of the construction because the hem needs to be finished before the button band is attached. To get round this, I left the skirt unhemmed, then when it came to attaching the button band I stopped stitching a few inches above the where the hem should be. Once I'd finished sewing the rest of the dress, I hemmed the dress as I wanted and then finished off the button band and that worked fine. Hopefully that all makes sense!


In terms of sizing I used the A cup bodice and made a size 10. That's the size recommended for my bust and hip measurements; my waist measurement is actually between an 8 and a 10, but based on the finished garment measurements I thought I'd be happier with a 10. Thankfully that worked out nicely for me! I'd say the sizing is good, with just the right amount of ease to make the dress fitted whilst still being comfortable to wear.

As for adjustments - I lengthened the bodice by an inch and a half, which is fairly standard for me. Because of the added length, I also altered the button spacing and used more buttons.

To give you an indication of skirt length - I'm about 5'9" and this is the skirt straight from the pattern with a slightly bigger hem than called for in the pattern (I think half an inch more), and it's knee length rather than the midi length intended for the Kalispell.


The fabric I used came from Seasalt last summer. It's a cotton crepe that I managed to pick up at a bargain price (yay!). It's a nice quality fabric as I've come to expect from Seasalt, but I didn't enjoy sewing with this as much as I've liked their cotton voiles and poplin. It's a very fine fabric (this dress would probably be too sheer if I wasn't wearing a slip with it), but also quite crisp, and my sewing machine had a tendency to snag it, which it has never done for any fabric before. It did cause a couple of marks in the fabric, but thankfully they seem to be fairly inconspicuous in the finished garment.


The slight issues with sewing the fabric made me feel a bit downhearted about this dress when I was making it, but I'm happy to report that I feel a lot more positive having worn it. It's a lovely dress to wear as the skirt is pleasingly swishy! I'd quite like to make another one in a fabric with a bit more body to it at some point to see what that would be like, but for now I'm more than happy with this version of the Kalispell!


Wednesday 15 May 2019

Sew Over It Ultimate Trousers Pattern Review

Hello hello! I'm here today to share my first version of the Sew Over It Ultimate Trousers. I wrongly claimed in my last post that these were my first trousers, forgetting that I'd already made Sew Over It's Carrie trousers last year. Anyway, here are my second pair of trousers...


The Ultimate Trousers are slim-fitting, ankle-grazing trousers. They close with an invisible side seam zip, and the waistline is finished with a facing. Front and back darts provide shaping at the waist.

I'm much more commonly found in dresses and skirts (or sometimes culottes) than trousers, but I've been feeling recently like a couple of pairs of trousers could be a good addition to my wardrobe. Firstly, I think they'll be a good option for in betweeny weather when I don't want to be wearing tights, but it might be a bit cold for bare legs with dresses. And secondly, they're much more practical for breezy days (which are fairly common here on the coast) as there's no danger of the wind causing you to reveal more than intended!


As you'd expect from a Sew Over It pattern, the instructions are very detailed and thorough, and I didn't have any problems during the construction process. That said, this is a simple trouser pattern so there weren't any particularly tricky steps anyway.

The only slight complaint I'd make about that pattern is that there aren't any lengthen/shorten lines on the pattern pieces, but they're easy enough to add in (I lengthened mine by 4cm).


The tricky thing with this pattern is really going to be getting the right fit for you. I was unsure about which size to cut because the pattern envelope gives the finished waist measurements for the lower waist and says that this is approximately two inches below your navel, but the Sew Over It sewalong says that it's two inches below your natural waist. Now, maybe I'm odd (highly likely!), but my navel is below my natural waist. In search of advice, I read a few reviews online which differed wildly between saying that it's a good idea to go up a size to saying that the sizing is generous!

I decided to just go with what my measurements said, and made a toile of a 14. Sadly, that was way too small. I could pull them up (I basically made shorts, not full trousers), but there was no way I'd ever be able to do up a zip in them. Given how small they were, I didn't think going up to a 16 would be enough so I made a toile of an 18 instead. That seemed to fit OK, so I cut into my fabric.


I will say now that these are intended to be a wearable toile. The fit still isn't perfect but, having not worn trousers much for years, I wasn't sure whether I'd like wearing them or not so I didn't want to spend ages making fitting adjustments if I ended up not convinced by the final garment. I'm intending to wear these trousers for a bit and see how I feel about them and where I think I could do with some adjustments. Having worn them once, I'm already thinking about slimming the legs down a bit.


As this is a wearable toile, I used some cotton sateen that I bought really cheaply from someone's (I can't remember whose!) destash sale a while ago. I'm pretty sure I paid under £5 for 2m, so it was definitely a "low risk" fabric for me to use. And it means I now have the pinkest trousers in all the land!


So all in all, sewing these wasn't a problem at all. As for whether the project is a winner, I think only time will tell! I have wearable trousers at least, and I'll happily give wearing them a try. That's all I wanted from this pair, so in that respect they're a success. What do you think of my super pink trousers?!

Thursday 2 May 2019

Thoughts on repetition

Where do you stand on the issue of repetition in sewing? Do you have certain tried-and-tested patterns that you use over and over again, or do you prefer to try new things whenever possible? Anyone who read my last blog post, in which I shared a shirt that was my third version of Butterick 6563 and the fifth garment that I'd made using a particularly lovely Liberty print, would easily guess that I tend towards the first category.


There's nothing that would demonstrate that better in terms of my sewing than my collection of Christine Haynes Emery dresses.

This week I got a new wardrobe, and I decided that it would be fun (small things amuse me!) to initially just hang my Emery dresses in it to see quite how many I had. I thought it was 12 - turns out I'd underestimated myself and the grand total currently stands at 15!


Now, I definitely like to make multiple versions of successful patterns, but this is by far the biggest collection of one single pattern in my wardrobe. While part of the reason that I've made so many is because it was one of the first dresses that I ever made for myself back in 2013, therefore I've had more time to make multiple versions of Emery than of newer patterns, a large part of it is that it's a simple silhouette so when you're wearing it the focus more on the fabric rather than the dress itself. At least that's what I'm telling myself anyway!


Thinking about the patterns that I've made the most, they generally fall into this category. Other frequently used patterns in my wardrobe include the Sew Over It Susie blouse, although most of mine are my scoop neck hack (side note: finding that blog post to link to has uncovered a neglected 16th use of the Emery pattern in the form of a skirt), New Look 6217 (there have been more made since I wrote that post) and the Jennifer Lauren Gable top/dress.

Having a good simple silhouette to showcase a beautiful fabric is definitely welcome to someone like me who tends to be drawn to colourful and vibrant prints.


All this isn't to say that I don't like trying new patterns - I definitely do! My first pair of trousers are sitting waiting to be photographed and will hopefully be appearing here soon. At the moment I've got a toile cut out of what promises to be a super pretty new dress. I'm also thinking of joining in with #sewtogetherforsummer and sewing a jumpsuit or dungarees, which would definitely be out of my comfort zone. So I do enjoy learning new techniques and challenging myself to try different things.

However, there's a big part of me that primarily sews to relax. That part of me enjoys knowing that I already have pattern pieces cut out and adjusted to fit me. That I can just cut into my fabric and then get sewing, safe in the knowledge that I'll have already figured out any possible challenges of the construction process on my first (or second, third, or maybe even fourteenth!) previous version of the pattern.

Emery dresses modelled as they were finished, in roughly chronological order. Plus my changing hair over the years!

So while I'm not entirely in one camp or the other, I tend to like the comfort of the familiar with touches of sparkly newness thrown in every now and then to liven things up. How about you?