Showing posts with label Sewaholic Patterns. Show all posts

Monday, 23 March 2015

Sewaholic Oakridge Blouse

Look! I made something that's not blue! Yes, there's some blue in there, but I think we can agree that it's not the dominant colour. And all those lovely colours combine with Sewaholic's Oakridge pattern to make pretty much the perfect blouse for spring.


This is view C of the Oakridge. Views A and B have a bow neck and while in principle I'd like to try them, because generally I'm all for a good bow, for some reason bow neck blouses just never feel quite right on me. I loved the simple collarless version of the Oakridge as soon as it was released though so I knew I'd be sewing one before too long.

The pattern is really well designed and the instructions are clear and easy to follow so I enjoyed sewing my Oakridge. As with my Granville shirt, the only thing I found a little bit fiddly was the sleeve placket. Thankfully one of my lovely friends got me The Dressmaking Technique Bible for my birthday at the end of last year, and I consulted that to make sure that what I'd understood from the instructions was actually what I was meant to be doing - thankfully it was so it was all good.

I used French seams throughout so my blouse is nice and neat inside. I do like a good French seam - they do take a bit longer to do than normal seams and zigzag stitching (I don't have an overlocker so that's my usual method of seam finishing) but I think the extra effort does definitely pay off.
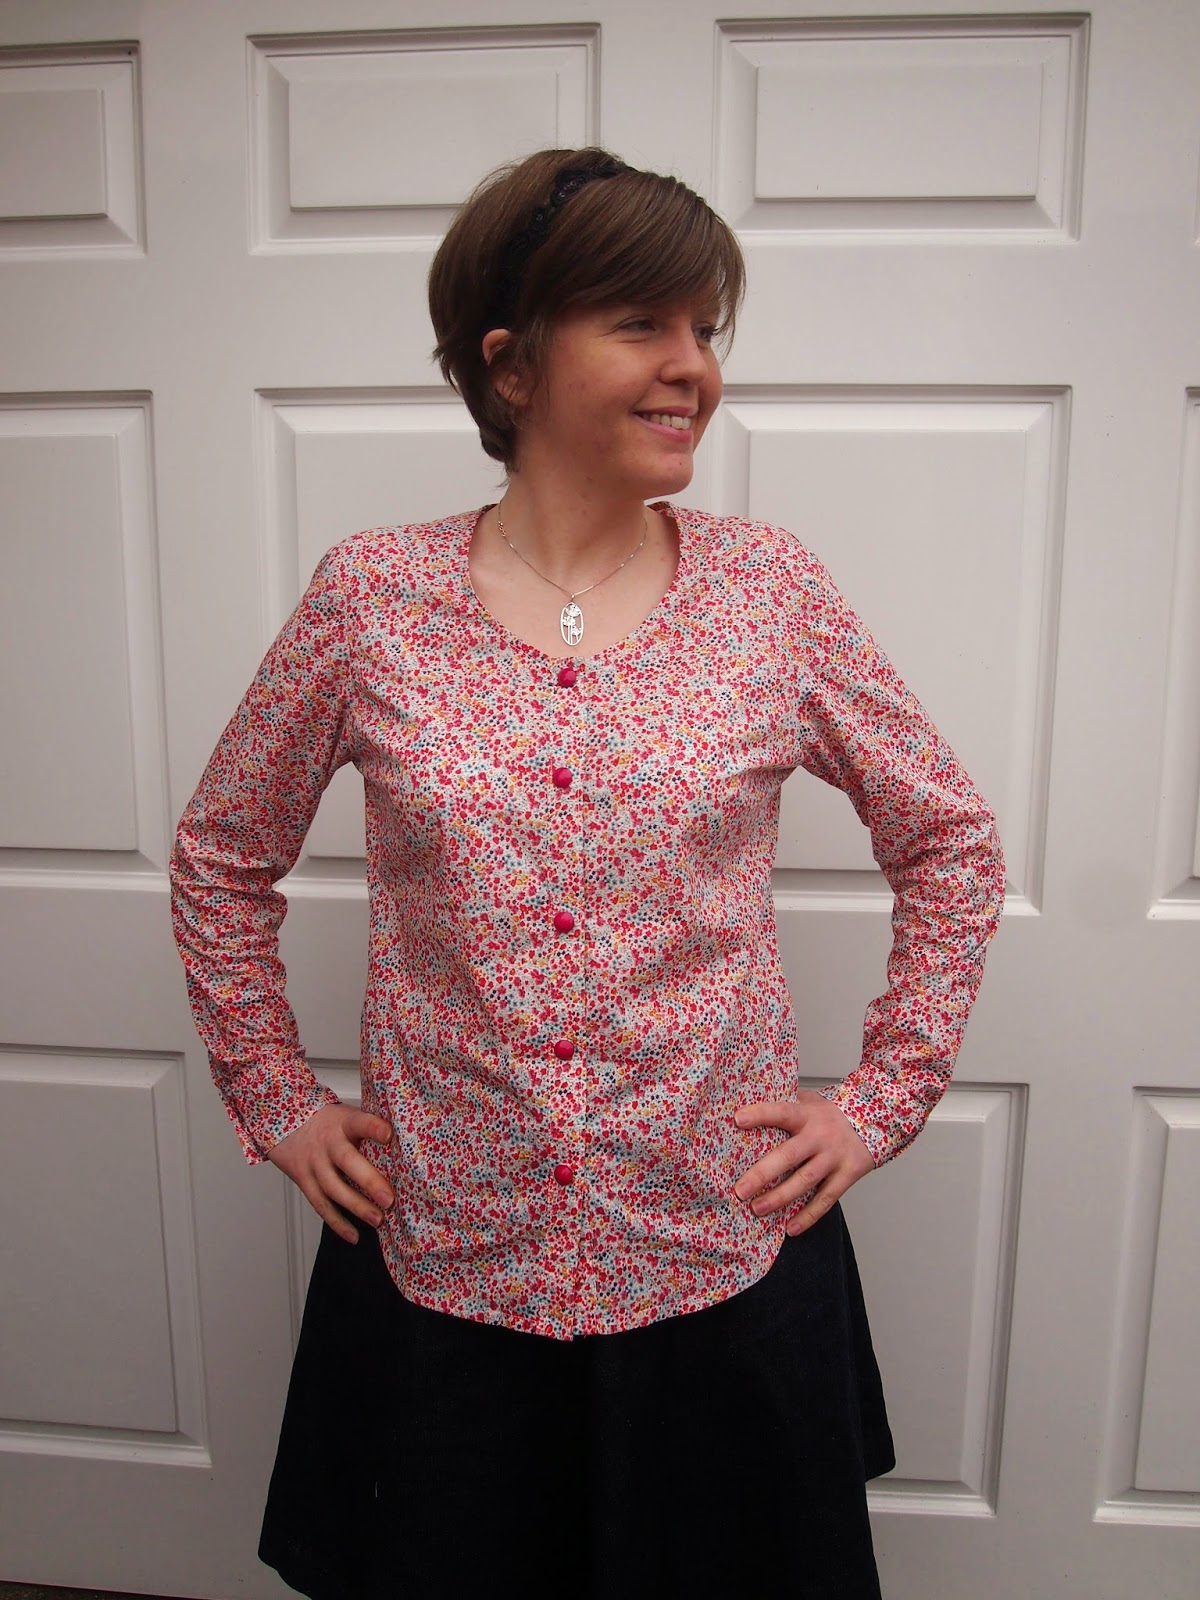
(I'll probably always wear the blouse tucked into skirts, but thought I'd leave it untucked here to show the full length)
My measurements all fall right in the middle of a 12 and a 14 for Sewaholic patterns. My Granville is a 14 and I like how that fits, but for my Oakridge I thought I could get away with a slightly smaller size so I made a 12. Also on the basis of my experience with the Granville, I shortened the sleeves on my Oakridge by an inch. I made a toile to check that I was right about the size and sleeve length and everything was fine so I went ahead, and I like how the finished blouse fits.


The fabric is 'Phoebe' Liberty lawn (funnily enough Lauren of GBSB and Guthrie & Ghani fame made an Oakridge in this exact same fabric!), which I got from Kat's Fabrics on ebay. I've seen quite a few bloggers recently who've bought Liberty lawn there - and with good reason! The fabric is factory seconds so is much cheaper, but just as lovely, as 'proper' Liberty. The fabric is listed as having no visible fault but unfortunately mine did have one area where the print was a bit blurry which you can see here...


Obviously this is a very small fault, it was very easy to cut round, and to be honest lots of people probably wouldn't notice it but it was one of those things where once I'd seen it, I knew it would bother me if I didn't make sure I avoided it. It definitely won't stop me from buying Liberty lawn from the same seller again, but I just thought I'd mention that it might be worth having a good look at your fabric if you buy from there to check that there are no faults before you start cutting.


The buttons I chose were some lovely bright pink ones that I found in a local wool shop. I was originally planning to find buttons to pick out the bluey-green of the flower stems in the print, but that didn't work out quite as I planned, and when I saw these buttons in the shop they just seemed to make the print sing and enhance its natural prettiness. Decision made!


So there we go, a pretty successful first version of the Oakridge blouse! It's already been worn a few times and has been perfect for the sunnier spring days we've been having recently. What are you sewing for spring?

Tuesday, 10 February 2015

Sewaholic Granville Shirt

At the start of the year, I got the urge to sew a shirt. I'm not quite sure where this urge emerged from as I don't wear a massive number of shirts, but emerge it did! It's entirely possible that I was just swayed by the massive number of Grainline Archers that are all over the sewing blogging world. So why didn't I just take the cue from my inspiration and sew an Archer? I was almost ready to do just that, but I had a niggling feeling that actually it might not be the one for me and that I'd prefer a slightly more fitted style. As if by magic, the precise style I was thinking of suddenly appeared when the Sewaholic Granville shirt was launched - Tasia must have read my mind!


I knew I had a weekend on the horizon with no major plans, and that to me always equals a sewing weekend, and I thought that it would be a good opportunity to get my teeth stuck into a slightly more involved sewing project so I snapped up the pattern and got planning!


For the fabric, I chose a white Swiss dot cotton lawn from Fabric Godmother. After all, what could be more classic than a crisp white shirt? Plus because it's a Swiss dot, it's plain and simple but with an added touch of subtle prettiness. The fabric is really soft and feels great to wear, and was a joy to work with. As you can probably tell from the fact that you can sort of see my skirt through the shirt in these photos, it is pretty sheer but wearing a nude-coloured camisole underneath keeps things decent.


When I got down to sewing, almost everything went really smoothly. While you do need to be accurate with any kind of sewing, I think shirtmaking requires an even greater level of precision if you want a nice end result, but other than that there's nothing that's scarily complicated about it. As you'd expect with a Sewaholic pattern, the instructions were clear and easy to follow. As it's an intermediate pattern, they do assume a certain level of knowledge and don't hold your hand and walk you through everything in baby steps, but they have just the right level of detail.


The only bit I found a bit fiddly was the sleeve placket, and that wasn't because the instructions weren't clear but just because you have to press quite small bits of material in a quite exact manner (which I found a little tricky to do without burning my fingers) - but I got there in the end! I'd never sewn a tower placket before so I'm pleased that they turned out neatly.


Another new technique I tried out for the first time here was flat felled seams, which I used for all of the seams on my Granville. I don't know why, but I'd been expecting there to be something really complicated about flat felled seams, but there really isn't! Yes, it does take a bit of extra time but I think it's definitely worth it for the lovely inside finish that you get (I tried to get a photo, but it's really hard to see with the white fabric so you'll just have to take my word for it!). I'm particularly glad that the insides of this shirt look nice, because I think it could make a great cover-up in warm weather worn open over a summer dress with the sleeves rolled up. I'll definitely be testing that theory later in the year anyway. For now, it'll mainly be worn more like this...


The slimmer fit of the Granville means that it's nice for layering without adding too much bulk, which is good because one of my main reasons for making a shirt like this was to be able to wear it under little knitted tank tops (another reason why I don't mind the fabric being slightly sheer). Thankfully for me it looks just like I hoped it would, so mission accomplished!

In terms of size, I made a straight size 14 and it fits well straight out of the packet (part of the reason why I love Sewaholic patterns - they always seem to fit me nicely!). The only thing I might change next time would be the sleeve length. They're pretty much fine as they are, especially when I move my arms, but if I'm just standing with my arms down they do seem a touch long. I suspect this was probably more of an issue for taking blog photos than it will be in daily life so it's all good! I thought it was worth mentioning though because I'm about 5 ft 9, and I don't think I have disproportionately short arms, so some people may need to shorten them.


All in all, I'm really happy with how my Granville turned out, in terms of how it looks but even more so in terms of the finish. I'm so glad I took the time to do the flat felled seams - I was cursing myself for making that decision in the middle of the project when things seemed to be taking ages, but it was definitely worth the extra time and I'd do the same for any possible future Granvilles (although I also want to try out Sewaholic's other new pattern, the Oakridge, so that will probably take precedence over more Granvilles at the moment). If you're thinking of sewing a shirt, I'd definitely recommend the Granville - it's a lovely pattern with great instructions. Give it a go!

Wednesday, 14 January 2015

A pair of warm jersey tops

Even if I've only seen the tiniest sprinkling of snow here in Bristol so far, it's still pretty chilly so the two projects that I have to show you today seem particularly appropriate for this weather because they're both made using lovely warm jersey from White Tree Fabrics. Pair that with the Bronte and Renfrew patterns, and I now have two great new tops to snuggle up and keep cosy in!


I started off with the Bronte top - I've made it twice before (here and here) and it's fast becoming a firm favourite pattern. It stitches up nice and quickly (I had this finished in an evening) and the neckline makes it a little bit different from a normal t-shirt without being any more complicated to make.


As with my previous versions, I made a size 14 with no alterations. Thankfully I managed to get through this incarnation of Bronte without nearly destroying it as I did last time, so the buttons are merely serving their purpose as intended in the pattern of holding down the shoulder overlap, instead of hiding a hole!

The buttons were actually the starting point of this project really. I love stars, so when I spotted these little pearly ones in my local haberdashery I knew I had to have some. I then dithered about what to use them for because I think the shape would make them annoying if they were functioning buttons that you needed to undo and do up all the time, but for this kind of fixed button, they're great. I wanted to use them on a plain fabric so they'd stand out, and the blue warm jersey seemed like a great match.


As well as the buttons, you can also see the fabric itself better here. The knits I've used in the past have been t-shirt type jerseys, but this is more like the kind of fabric that would be used for thin jumpers/sweaters. Unlike the other knits I've worked with, this fabric did shed a bit during cutting and sewing so I finished all of the seams with a zigzag stitch. Other than that, I treated it the same as other jerseys (prewashed on a normal 30 degree wash, seams using a narrow zigzag, and Bronte hems/topstitching with a twin needle) and that all seemed to work well and both of the tops have passed the initial wear test. The fabric definitely lives up to its name too - it's so nice and warm to wear.


So, with Bronte finished and looking pretty, I moved on to the Renfrew and some lovely wine coloured warm jersey. This is actually the first Renfrew I've sewn and I feel like I must be the last person in the sewing community to get around to making this pattern (I'm not am I? Please tell me there's someone else out there?)! I may be late to the party, but I'm glad I got there in the end and there'll be many more Renfrews in my future. After all with all the neckline and sleeve length options, you could make loads without even repeating the same combination.

As many people have said before me, it's a great pattern, the instructions are clear and easy to follow and I really like how the body and sleeve hems are finished with bands for a slightly different effect to the other patterns I've used and most RTW t-shirts. I can definitely see why Renfrew is a TNT pattern for so many people.


I love cowl neck tops (not least because you can hide in the cowl when you're not feeling very photogenic, which I definitely wasn't on this day!), so that was always going to be my first Renfrew neckline to try out, and pairing it with the long sleeves seemed like the obvious choice at this time of year.

I'm so pleased with how the top turned out it's definitely looser than the Bronte - my measurements are all pretty much exactly a 13 for the Renfrew (i.e. bang in the middle between a 12 and 14) so I erred on the side of caution and went for a 14. I possibly could have got away with a 12, but I like the looser fit, which combined with the fabric makes it feel more like a sweater than a t-shirt. Next time I make a Renfrew, I might go down to a 12 - or if I'm using a tighter-fitting fabric I might stick with a 14 and see how that goes.


All in all, I think these two tops are a very good start to my sewing for 2015 and I can see them both getting a lot of wear. I'm glad that I've finally got round to making a Renfrew so that, combined with Bronte, I've now got 2 t-shirt patterns I know I can trust. The fabric is lovely too, and I've just realised that it might make a really nice version of the Oslo cardigan from Seamwork, so I might have to treat myself to some more soon. I'm telling myself that it would be justified because I recently realised that moths had attacked one of my favourite cardis, so surely I need a replacement, don't I?!

Thursday, 7 August 2014

Sewaholic Cambie Dress

Back when I first started making my own clothes last year, there was one pattern in particular that caught my eye that I knew I wanted to make at some point - to be honest the only reason that I didn't start making one there and then was because I knew my very novice skills wouldn't do it justice! While I'm by no means claiming that I've become an expert in the last year, I knew that I was now definitely up to the task so it was time to sew myself a Sewaholic Cambie dress.


The Cambie is rated as an intermediate pattern, which is what put me and my then-limited skills off last summer, and I think that is probably right as it is a bit more complicated than a standard beginner pattern due to the full lining. At the same time though, there's absolutely nothing scary about this and, as always with Sewaholic patterns, the instructions and diagrams are totally clear and easy to follow and everything came together really nicely.


The Cambie is such a gorgeous design and so flattering - or I think it is at least! The sweetheart neckline is really pretty and the gathered cap sleeves add an interesting bit of detail. I think having the separate waistband also really helps to define the waist, which is always a good thing as far as I'm concerned. It's also probably no secret by now that I'm fairly fond of girly dresses with nicely fitting bodices and twirly skirts, and this definitely fits that bill - plus there's the added bonus of pockets in the skirt. That's not to say that I don't like view A with the A-line skirt though - that will be on my to-sew list at some point in the future.


Without wanting to tempt fate, I think I might have done a U-turn in my opinions on invisible zips! After completely losing faith in them when one broke on me a month or so ago, they now seem to be behaving themselves and I haven't had any trouble (touch wood...) with the last couple that I've sewn, and they do give a nice finish to a garment.


I cut a size 14 at the bust, grading down to a 12 at the waist and back out to a 14 at the hips, although I could probably have got away with using a straight size 12 for the skirt - it's lovely and full so there's plenty of room around the hips. Other than this, as normal I needed to add a bit of length to the bodice (an inch and a quarter in this case), and that gave me a toile that fitted really nicely. 

Once I came to try on the dress to check the length for hemming, I noticed that somewhere between the toile and the finished dress the sleeves seemed to have grown a bit and, even though the bodice fit me perfectly from the neckline down, I had extra material up around my shoulders. I fixed this by unpicking the seam between the front of the sleeve and the neckline, and then inserting more of the sleeve through the gap that is left there. This does mean that my shoulder seams are slightly further forward than they should be, but I don't think anyone other than fellow sewists would notice this, and it seemed like a much better option to me at that point than unpicking all of the lining to adjust the shoulder seams instead!


The fabric that I used is a John Kaldor cotton lawn that I got from Fabric Rehab, although unfortunately it looks like it's sold out now. It was lovely to sew and it's great to wear. As the shape of the Cambie is undeniably pretty girly, I quite liked the idea of using a more geometric, abstract print for this one, and the gorgeous shade of blue and white together are a good colour combination for me so choosing this fabric was pretty much a no-brainer. I intentionally cut the waistband with the print in the different direction to try to make it stand out more, which I think has worked. For the lining, I used some plain white cotton voile that I got from Abakhan - again it seems to have sold out (and I'm now wishing I'd ordered more!) but this is the same fabric in black, it works really well for lining summer dresses.


This might be quite a big statement to make, but I think this may possibly be my new favourite dress. I love the print and the colour, it's really flattering and it feels great to wear. 

I've come to the conclusion that one way to judge the success of a sewing project is to compare how easy it is to get decent photos of each garment - I always make far more weird faces and awkward-looking poses when I'm wearing things that I'm not entirely happy with, whereas with this one, while I'm definitely no supermodel, the main "problem" was not getting blinded by all the lovely evening sunshine - which isn't a problem I'll be complaining about any time soon because, after all, more sun equals more excuse for making pretty sundresses, yay!

Thursday, 26 June 2014

Sewaholic Belcarra Blouse: Take 2

I mentioned in my post about my first Sewaholic Belcarra blouse that my second blouse was already cut out, and as it's a nice, easy pattern to sew up, it didn't take long for it to get from being cut out to a finished blouse and slotting perfectly into my summer wardrobe. Here it is...


This time I didn't have to worry about reusing oddly shaped bits of material, so I stuck to the pattern straight out of the envelope. Like last time, I cut a straight size 12, and I'm happy with the fit. The neckline seems to have turned out a little wider than in my first version (maybe I was a bit too enthusiastic in my cutting or something!), and I do sometimes end up with a bra strap peeping out at the shoulder when I'm wearing it, which I don't with my first version, but it's not much of a problem.

I chose to sew view B as I thought that being as I was using a plain fabric the cute tucks along the shoulders would stand out well and add a bit of interest, and avoid the risk of a plain top being a boring. 


The tucks were the only bit of the construction that I hadn't already tested out on my first version but, like the rest of the blouse, they're simple to sew - you just need to take a bit of time and care to make sure that they're all nice and even. 


The fabric that I used this time is a pretty pink cotton lawn from Croft Mill. I was a little bit worried when it arrived that it would be too sheer and that it would need underlining, or that I'd need to wear an extra layer under it, but it's actually turned out just fine for this top. I think you'd need a lining of some kind for a more fitted top or a skirt though.


There are a whole load of different materials that I've got my eye on to buy at the moment, but I was good with this one and stuck to a plain material for a change instead of being seduced by all the fun prints that I usually go for. Like a lot of the online sewing community, I've realised that while all the pretty patterned materials are great (and don't worry, I'll definitely still be using them), I do also need some plain separates here and there to make sure that I'm not wearing a complete mess of different prints. This fits that bill well, as it goes nicely with a couple of my skirts - and as an added bonus is a perfect match for the flowers on the necklace I'm wearing here which I treated myself to recently!


I'm keeping my eye out for a nice fabric to make a slightly smarter Belcarra with as I think it's the kind of style that could easily be dressed up with nice accessories if you made it in the right fabric, but having been sensible with this project, I might allow myself to make another pretty patterned dress or two now! What's everyone else working on this week?

Tuesday, 10 June 2014

Sewaholic Belcarra - refashioning a dress into a blouse

Has everyone seen the new Sewaholic Belcarra blouse? I was instantly drawn to the pattern when it was released; not only is it meant to go with the Gabriola skirt, which I love, but it's also a very similar shape to an old favourite RTW top of mine. I snapped it up as soon as it was released, and here's my first version....


This is essentially view A of the blouse, with the one difference that you may have noticed that I split the front and back sections in two to use two different materials. This was entirely down to an old dress that I'd bought second hand and then never worn, and which I'd decided needed to be refashioned into something else. I stupidly forgot to take a photo of it before I hacked it to pieces, but it was a pretty short, strapless, white cotton eyelet lace empire line dress - there aren't many days a year when it's hot enough here in the UK to wear something like that and to be honest, it didn't do much for me! I think I only bought it because the material was so pretty....


This is a close-up of the material - something like that really shouldn't be left unloved in a wardrobe should it? Then the Belcarra came along, and I thought it would be a perfect match given that the pattern doesn't have any darts or anything to break up the material. The only problem? It turned out the skirt of the dress was a good few inches shorter than the Belcarra pattern pieces (this possibly gives you an idea of quite how short the dress was!). I considered shortening the Belcarra, but when I measured my RTW top it was exactly the same length as the finished measurements for the Belcarra, and I knew I didn't want it shorter. By now though, I had my heart set on using this material, so I came up with the idea of making the arms and top of the front/back pieces from some plain white cotton and using the eyelet material for the rest of the front and back. Problem solved!


I made a quick muslin and measured where I wanted the join between the two materials to be (in my case 17 inches up from the bottom), marked a line across the front and back sections at that point (the red line on the front section shown on the right above), then used that to cut two new pieces for both the front and back with an extra 5/8" added to each piece for the seam allowance - hopefully you can see where my two new front pieces cross over on the photo above.

Once I'd cut out all my pieces, I underlined the eyelet material using the lining of the original dress (a very lightweight cotton), basting the two materials together within the seam allowance and then treating them as one piece of material. I then joined the top and bottom sections of the front together, and did the same for the back, and from then on I followed the original instructions for view A (the plainest version; view B has tucks on the sleeves, and view C has different cuffs and a patch pocket).


Don't worry, I don't make a habit of hanging my clothes in random trees (especially not after the odd looks I got from a passerby when I was taking this photo! The things we do in the name of blogging!), but it seemed like a good way of making the pattern stand out more - getting detail to show up properly in the photos when I was wearing the top wasn't easy!


So, onto the Belcarra itself! This is a really great, simple pattern and doesn't eat up too much fabric. As I mentioned above, it doesn't have any darts which means it's a super speedy project if you've got a bit of experience - I had mine finished in an evening, including the time messing about with cutting my different sections. Obviously it would also be great for beginners, or for trying out new materials. I haven't sewed using silk yet so maybe I'll have to try that and make myself a more fancy Belcarra.

The fact that there's no darts does mean that you need a light weight material with a nice drape to avoid it looking too boxy. My white cotton I used for the sleeves/yoke is leaning more towards medium weight, but the eyelet is still pretty light weight even when underlined so I think I just about get away with it!


I cut a straight size 12 and didn't need to make any alterations to the fit - after all I am definitely pear-shaped so pretty much Sewaholic's target audience! It's quite a relaxed style though, so I think in general it's not going to cause as many fitting issues as more structured or closely fitting garments.

It's really comfy and easy to wear, but I think it looks a bit more dressed up and put together than an ordinary t-shirt. It also looks great either tucked into a skirt or untucked with trousers - I'm wearing mine here with my denim Hollyburn skirt and the only pair of trousers I own that can be worn outside of the house (I pretty much don't wear trousers, but it's nice to know I now have a new top for the odd occasions when I do!).

All in all, another successful creation as far as I'm concerned. Like the other Sewaholic patterns I've used, this came together really easily and the instructions were great. Version 2 is already cut out and waiting to be sewn up, and I'll definitely wear this top much more that I would have worn it as a dress! What does everyone else think of the Belcarra? And has anyone else had any refashioning successes lately?

Tuesday, 15 April 2014

Gabriola in Greece

As soon as Sewaholic released the Gabriola maxi skirt pattern, I knew I would have to sew myself one pretty quickly. I love maxi skirts, particularly if they're nice and swishy as the Gabriola definitely is, and I had a holiday coming up so wanted to get one finished ready to take away with me.


I spent last week in Greece consuming roughly my own body weight in feta and aubergines and twirling about in my lovely new skirt - I apologise for the pasty whiteness of my skin in these photos, my skin doesn't tan really, it's white or it burns so I figure it's best to stick with the whiteness.


Gabriola is a lovely pattern and was pretty straightforward to put together. It has some added interest thanks to the angled panels around the waist - they're completely lost in the print that I used (and are partly covered by my top - tucking this top in didn't look right), but I promise you that they are there and they definitely do a lot to give the skirt such a great shape. I may have to make another version at some point with contrast panels to make them stand out more.


The skirt flares out beautifully and swishes about really nicely when you walk, as I was trying (and probably failing!) to show in this picture.

I cut a straight size 12 and didn't need to make any alterations. As far as I'm concerned, a maxi skirt should definitely be a maxi (as long as it can be it without the risk of tripping up on it when you walk!), and this skirt definitely fits that bill. I'm on the taller side of average so I was a bit concerned that it might end up a bit short but it's a great length, but this might mean that some people would need to remove extra length when evening out the hem.


Speaking of which, getting the hem even was probably the most difficult bit about making this dress. All the lovely swishy-ness means there's a lot of hem, and the way my fabric flows about meant that each bit ended up looking different lengths every time I moved. I enlisted the help of my Mum and after some perseverance, and me standing on various items of furniture to give her a better view, we finally sorted it - thanks Mum!


The fabric I used is a really pretty floral print viscose from Fabric Rehab. I love the fact that there are quite a few colours in it so I'll be able to pair it with lots of different tops. It drapes really nicely, it was slightly slippy to work with but not too tricky. It feels lovely to wear as well and doesn't crease too much - these photos were taken at the end of being worn for a day and it still looks good I think.


As you can probably tell, I'm really happy with my Gabriola - now I just need to wait for the weather to warm up a bit here so that I can wear it again!


Sunday, 9 March 2014

Simple Denim Skirt

While it's always nice to try new patterns and learn new skills, sometimes you just fancy a simple sewing project using a pattern that you know and love. This was just the mood that I was in this week, so I set about making another version of the Sewaholic Hollyburn skirt, this time in denim.


The Hollyburn was the first thing that I made for myself when I took up dressmaking, I made a second version quickly after and I've worn the second one in particular quite a bit - the first one not so much recently but it'll definitely be coming back out this summer. It's a great beginner's sewing pattern, nice and simple and with no fitting issues - as long as you've got the waistband right, you're sorted! It's a shape that I really like and that suits me, so when I wanted a simple project this was the obvious choice. As with my second version, this time I made view C with the belt loops from view A.


The fabric choice was also a no brainer because a few weeks ago I was lucky enough to win some denim and other related goodies in a giveaway from Winnie of Scruffy Badger Time - thank you again Winnie! If anyone fancies some denim for themselves, it's available with the other bits that I won as a kit from Minerva.


Anyway, winning the denim was quite exciting for me because I never win anything, and it was particularly well-timed because I needed a new denim skirt. I don't really wear trousers, so denim skirts are sort of like jeans for me - they go with everything and are easy to throw on so get worn a LOT.


My prize came with some fun gold ric rac, which I was going to use as a trimming around the pocket edges, and some nice contrasting top stitching thread, which I did even start using at one point, but then I decided to keep things totally plain this time so that the skirt will go with absolutely everything. And it means that the fun of using up my prize can be extended to another project!


The denim is obviously quite a bit heavier than the cotton and cord that I used for my first two versions of the Hollyburn, and that means that the skirt has a bit more body to it and hangs a bit differently which is quite nice. I think it'll probably soften up a little bit with wear - I've worn the skirt a couple of times already since I finished sewing it and I can already notice a slight difference.


All in all, this project did exactly what I wanted it to - it was nice and quick and has filled a little hole that had recently developed in my wardrobe. Now I'm ready to get my teeth into something more complicated again - watch this space!

Tuesday, 27 August 2013

Sewaholic Hollyburn: Take 2

Having been so pleased with the results of my first attempt of a Sewaholic Hollyburn skirt, I couldn't wait to make a second version of the skirt, and I'm happy to report that I still love the pattern second time around. Here's take 2...


I wanted it to be a bit different from my first attempt, so this time I made view C (the shortest option) with the belt loops from view A, and I used a very fine baby cord fabric with the intention that it would be ready to wear with tights and boots once autumn appears. Of course, I was excited about finishing the skirt so I had to wear it right away on a lovely, warm August day...


Not quite what I was envisaging when I chose the fabric, but if you ask me this just makes the skirt even better because it means it's nice and versatile and I'll get lots of wear out of it. The baby cord is navy but has a tiny white, rusty and green floral print on it so doesn't look too dreary on a sunny day, but equally it won't look too summery once the colder months arrive.


All in all, I'm just as pleased with this version as I was with the first one, and it proves that the first one wasn't a fluke! If anyone out there is thinking about giving dressmaking a try, I'd definitely recommend this pattern - you only really need the waistband to fit so there aren't any complicated fitting issues, the instructions are really easy to follow and you end up with a great result.


I'm excited about trying out some other patterns now, but I think there'll be more versions of the Hollyburn in the future - you can't go wrong with a pretty full skirt really can you?