Wednesday, 31 July 2019

Seamwork Bobby Dress Pattern Review

In my continuing quest to use up my fabric stash, the piece I've used for today's project is one that had been causing me a bit of a headache. It's a lovely turquoise blue jersey, and I had plenty of it, but it never seemed to be quite right for any of the patterns I wanted to make. That was until Seamwork released the Bobby dress, and I knew it was the answer that I'd been searching for.


Bobby is an easy-to-wear knit dress with a lined bodice, nicely shaped V-neck, A-line skirt and wide elastic casing at the waistband. And pockets - hooray for pockets!


This previously problematic jersey is a Robert Kaufman Laguna jersey, which I bought a couple of years ago from a shop that has since closed. It's a lovely quality, but it is slightly lighter weight than most other cotton jerseys I've used. I knew I wanted to use it for a dress, but the jersey dress patterns that I like tend to have fitted bodices and the Laguna jersey seemed like it would be too thin for them. The fact that the bodice of the Bobby is lined and therefore you have a double layer of the fabric meant that it would be reinforced so it would be a much better weight for a mostly fitted bodice.


The instructions are generally good. I did find the directions for the burrito method for sewing together the outer bodice and lining a little confusing, but Seamwork have a great video tutorial which explains the process nice and clearly. Other than that, I didn't have any problems at all and really enjoyed the process of sewing my Bobby dress.


In terms of sizing, I made a 10 at the bust blending out to a 12 at the waist as recommended for my measurements. I also lengthened the bodice by an inch, which is a standard adjustment for me. I think it fits just right!

I did wonder about shortening the skirt to knee length, but in the end decided to keep the midi length intended by the pattern to make it a bit different from my other dresses. In case you're wondering about skirt length - this is the length as in the pattern, it's midi length on me and I'm about 5'9". If you're shorter, you may well want to shorten the skirt. And in case it's of any help, I worked out that I'd need to shorten the skirt by about 5 inches if I wanted to make it knee length.


I'm really pleased with my Seamwork Bobby dress - it's obviously incredibly comfy, and the midi length feels a bit special and means that the skirt swishes about beautifully as I walk. I can definitely see myself making another Bobby dress or two - potentially shortened to knee length in a slightly heavier weight jersey to wear as a pinafore in autumn/winter. I also think it would be fun to try hacking the bodice into a top because I really like the shape of the V-neck. All in all, this one is definitely a winner for me!

Thursday, 25 July 2019

Jennifer Lauren Raine Dress

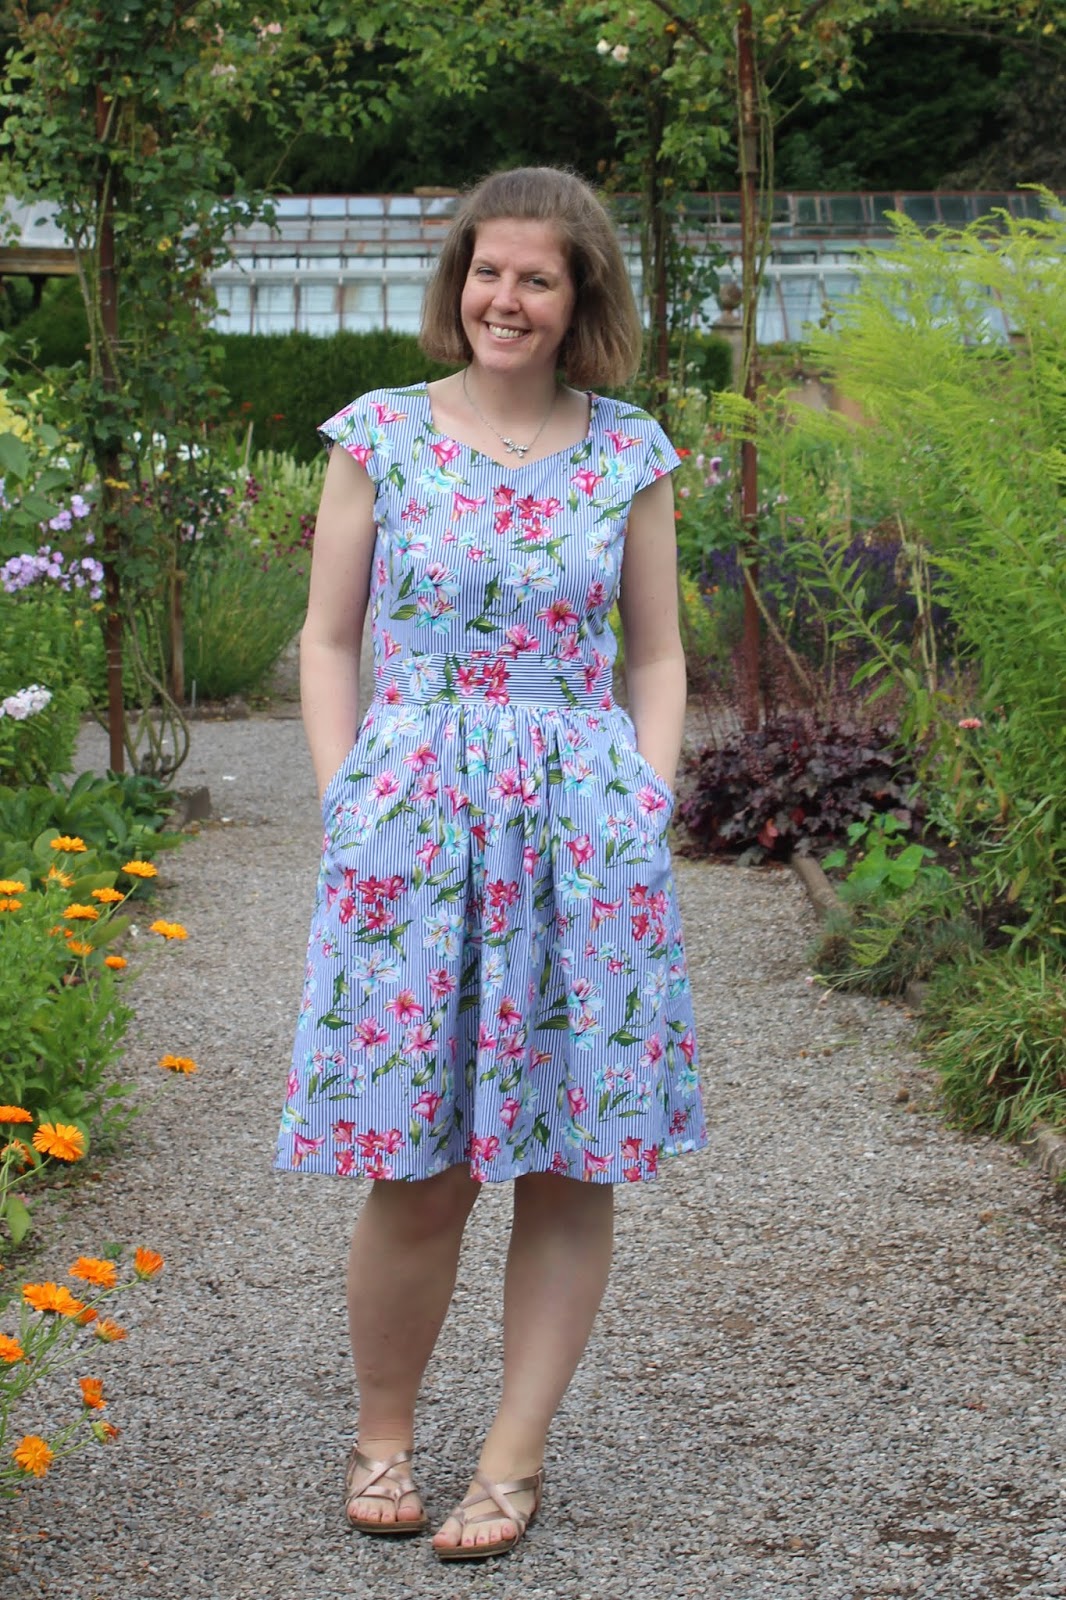
Usually I buy fabric with a specific project in mind, but sometimes I spy a print that's so pretty that it demands to be bought before plans have been formulated. The cotton that I've used for today's project definitely falls into the latter category.


I'd seen various online shops selling it last summer and was tempted but managed to resist it. That all changed when I saw it in the flesh in the John Lewis sale - I think the colours just come across better in real life than they do on screen. Although to be fair, the fact that it was 50% off may have also helped because I do love a bargain! The only downside was that it was January so definitely not seasonally appropriate to sew immediately.

Two and a half metres came home with me and were squirreled away in my stash to await warmer weather. Over the last couple of months I'd been pondering what to make with it whenever I saw it sitting on the shelf.


After I made my Eden jumpsuit, I had decided that this would make a nice second version of that pattern but when I went to cut it out I had this horrible vision of ending up with flowers or leaves bursting out at unfortunate places around the crotch seam! Once I'd had that thought, I couldn't get it out of my mind and it seemed like it would be difficult to avoid due to the spacing of the flowers. It's the sort of thing that most people wouldn't notice but I definitely would and it would have annoyed me.


So the jumpsuit plan was scrapped, and I went back to the drawing board. Then when I was wearing the Jennifer Lauren Raine dress that I made last year it suddenly struck me that this would be the perfect pattern for my beautiful floral stripes. The simple darted bodice with grown on sleeves and lovely full skirt are perfect for showing off a print, and the waistband would give me the opportunity to play with the stripe direction. Changing the stripes around also really shows off the nicely shaped waistband, which is good because I think it got a bit lost in the print that I used for my first Raine dress.


There's not a lot new to say about the construction of this dress that I didn't say when I talked about my first Raine dress. The only thing that I did differently this time was to lengthen the skirt a bit more - I added an extra 2 inches onto the length for the biggest size.

The Raine dress is a satisfying pattern to sew - there are some slightly trickier construction steps in comparison with what you'd usually expect from a simple looking unlined dress, but the instructions are very clear so as long as you follow them you should be fine. They give a nice finish on the inside as well, which is always pleasing.


All in all, I really enjoyed sewing this dress, it's lovely to wear and I'm glad that I finally found the right use for this cotton. It's worth taking the time to be sure that you make the perfect pattern and fabric pairing, isn't it?

Wednesday, 10 July 2019

Tilly & The Buttons Marigold Top Hack

A couple of months ago, I took the opportunity of picking up the Tilly & the Buttons Marigold pattern when it was included as a gift with Mollie Makes magazine. At that point I hadn't yet discovered my newfound love of jumpsuits, but I'd always liked the look of the bodice of the Marigold and for the price of the magazine (which also included some other interesting looking projects), I thought I'd get it to try out a bit of pattern hacking.


The Marigold is a jumpsuit/trouser pattern featuring peg trousers with an elasticated waistband, tapered ankles and slash pockets. The bodice has a sweetheart neckline, bust darts and wide shoulder straps and closes with a side seam invisible zip.


As I said, when I got the pattern I was mainly interested in the bodice and decided to turn it into a top. This was a very simple pattern hack - I simply lengthened the bodice by 6 inches. At the side seams, I followed the slant of the seam line outwards to allow for extra space at the hips.


The bonus of this project is that the fabric that I used is some spotty viscose from Minerva Crafts that I had left over from making my Carrie trousers last year, so I can wear the top with the trousers to create a fake jumpsuit - all the benefits of having a ready-made outfit with the advantage of not feeling like you have to almost get entirely undressed whenever you go to the loo! And the combination actually looks remarkably like the Marigold jumpsuit itself.


The top came together very quickly - without the trousers I found that for me there's no need to have a zip in the side seam which means that is was a nice simple project. The instructions are as detailed as I'm sure we've all come to expect from Tilly's patterns, although it has to be said that in this free magazine version they definitely weren't set out as nicely as they would be in the normal patterns - the limited space meant that the text was smaller/denser and that did make them seem slightly less user-friendly than they otherwise would be.


In terms of sizing, my bust measurement puts me in a size 5 and that seemed like it should be fine when I measured the pattern pieces (the magazine pattern didn't include finished garment measurements, but I assume the regular pattern would). It worked out fine, the only thing I would change if I make another version of this would be to shorten the straps by a centimetre or two. They're pretty much OK on this top, but they have a slight tendency to slip when I'm sitting down in the top in particular.


All in all, I think this is a pretty successful experiment! I really like the shape of the Marigold bodice, and I could definitely seem myself making another of these tops (quite possibly with some more matching Carrie trousers), or perhaps turning it into a elasticated waist dress. Have you tried any pattern hacking recently?

Wednesday, 3 July 2019

Simplicity 2588 Dress & #patternswap19

When Alice @the.polka.dot.palace and Emma @thezipperfoot announced that they'd be hosting The Great Big Pattern Swap again this year, I was quick to rummage through my pattern stash to find some neglected beauties to send to new, more appreciative homes. I managed to snap up a couple of lovely new-to-me patterns in return and I've now sewn up one of them. Here's my version of Simplicity 2588, kindly sent to me by Pavla.


Simplicity 2588 is one of the Project Runway series, and is for a dress with fitted, princess seam bodice, the possibility to make it sleeveless or use flat or pleated sleeves, neckband/yoke options, and a pleated flared or straight skirt. The pattern now seems to be out of print (correct me if you know otherwise!) but, as I type at least, there are copies available to buy on Amazon and ebay if you like the look of it.


The skirt choice was a no-brainer for me - flared every time! I considered going for a sleeveless dress, but ultimately decided that I'd get more wear out of one with sleeves, and chose the flat sleeve option.

When I made my toile, I used the slimmer neckband piece but found the neckline was too wide for me (I'd have been constantly fiddling with it to get it to sit right!). On my finished version, I used the wider yoke piece instead, which definitely avoids this problem. If anything, it goes the other way and the neckline now feels a little high. It's not going to stop me wearing this dress, but if I make another one I'd possibly trim down the yoke by a centimetre or so to make the neckline just a touch lower.


In terms of sizing, for my measurements the pattern recommends a 16 for the bust, and an 18 for my waist and hips. Based on the finished garment measurements, 16 for the bust seemed the right choice but I thought the 18 might be a bit big at the waist, and with the flared skirt I knew hip sizing wouldn't be too important. I decided to make a straight size 16, but taper to a fractionally smaller (about 1.2 cm instead of 1.5) seam allowance at the waist on the side seams only to allow a bit of extra breathing space. Thankfully that worked out nicely.

I also lengthened the bodice by 1.5 cm and the skirt by 5cm, which are both fairly standard adjustments for me (I'm around 5'9" for reference).


The sewing process was fairly straightforward. As with all commercial patterns, the instructions don't hold your hand every step of the way like indie patterns tend to, but I didn't find anything confusing or hard to follow. The pattern uses a lapped zip; I tend to favour invisible zips, but I decided to follow the instructions and use a lapped zip this time and I'm glad I did. Plus it's good to do different things every now and then, isn't it?


The fabric I used is a lovely cotton voile from Seasalt (in case you don't know, Seasalt currently have a sale on some of their fabric - you're welcome, and/or I'm sorry if you didn't want to be tempted!). It's a great print, and it's a nice cool fabric to wear in the sunny weather we've been enjoying in the last week or so.


All in all, I'm pretty happy with my Simplicity 2588 and I could definitely see myself making another, albeit with the slight alteration to the neckline I mentioned above. I'm happy to have given this pattern a new home, and I hope that the patterns that I sent out have futures that are just as successful with their new owners! And a big thank you to Alice and Emma for organising the swap!

Thursday, 20 June 2019

Designer Stitch Eden Jumpsuit

Today's project is brought to you partly thanks to the #sewtogetherforsummer challenge, which is hosted on Instagram by Sarah, Suzy and Monika, as that gave me the push to stop thinking about sewing a jumpsuit and actually get on with it. Jumpsuits are quite popular in the sewing community at the moment so there are a fair few patterns to choose from, but I decided that I'd start my jumpsuit journey with the Designer Stitch Eden pattern.


Eden has a V-neck bodice, with sleeveless or cold shoulder sleeve options, an elasticated waist, tie belt, pockets and relaxed fit legs. It can be cut to playsuit or cropped trouser length, and also comes with a separate waistband piece so you can make elasticated waist trousers as well as the jumpsuit/playsuit.

It has different bodice pieces for B, C, D and DD cups, with 11 sizes ranging from 32" to 52" bust.


This was my first time using a Designer Stitch pattern, and I'll admit that I didn't get the best first impression of the pattern and there were initially a few things I found a bit annoying.

Firstly, I sent the A0 version of the pattern to be printed (I used Dotty Print this time, and would happily use them again) but even in this version you have to stick two of the sheets together because each of the leg pieces are split across two sheets (each leg piece could fit on one). The instructions also tell you to stick all 4 A0 sheets together, which seems a bit crazy to me because that would make a fairly unwieldy pattern sheet! It also seemed like there was a lot of wasted space between the pattern pieces compared with other patterns I've used.


The pieces aren't always clearly labelled - for example the waistband piece doesn't indicate that it's only needed for the trouser option (the waist elastic casing on the jumpsuit is formed from the seam allowances). That is clear from the cutting layouts in the instructions, but it would be helpful to have it noted on the pattern pieces too.


I also noticed a few typos - for example, the quick step sewing guide at the start that lists the steps that are relevant for each version includes the steps for sewing just the trouser option under both of the jumpsuit options, and the steps for sewing the cold shoulder sleeves on the sleeveless version. Also, unless there was something odd about the printing on my version, on the trouser pattern pieces the "allowance" of "hem allowance" is written incorrectly as both "llowane" and "allowane".

None of these things are really a big problem individually, but all combined together they didn't fill me with confidence about the pattern at first.


Thankfully, things improved once I got on with the actual sewing process and it was a more positive experience. The body measurements and finished garment measurements are some of the most detailed I've seen, which helps to make sure you're picking the right size. The instructions are fairly clear and simple, and I didn't have any problem sewing my Eden jumpsuit.

In terms of sizing, based on my measurements (bust 38", waist 32", hip 42") I cut a size 4 at the bust, blending out to a 5 at the waist and hip. I'm 5'9", and I lengthened the bodice pieces by 2 inches - while lengthening bodice pieces is normal for me, that's more length than I usually add. The trousers were a fairly good length on me, but I used a slightly larger hem (2" instead of 1 1/4") as that hits my legs at a better point.


The only other change I made was to use a 16" zip instead of the 20" zip recommended in the pattern. I did this because it means that my zip finishes above the waistband - when I made a toile, I found it a bit of a pain to do the zip up over the elasticated waistband and with the amount of ease in the waistband I found there was no need to undo the zip below the waist. That might not be the case if you have a bigger difference between waist and hip measurements, but it could be worth a try!

The fabric I used is a rose print chambray that I bought locally in a shop that doesn't have a website, but I have seen similar fabrics available online (although typically I can't find any now!).


I wasn't entirely sure how much I'd like wearing a jumpsuit, but I'm happy to report that I really love my finished Eden. It has all the practicality of trousers, whilst still giving you the ease of just being able to put on one garment and feel put together that you get from a dress. In spite of my initial reservations about the pattern, I really enjoyed the actual sewing process and I'd happily use Designer Stitch patterns again. The definitive sign of success is that as soon as I'd worn this for the first time, I started plotting other versions of the Eden jumpsuit to add to my sewing queue. So all in all, this one is definitely a winner and there will be another jumpsuit or two in my future!