If you don't mind, I've got something a bit different to share with you today. When I moved house towards the end of last year, I needed to get a new chest of drawers. Rather than buy a basic Ikea one, I decided to look for something more sturdy and came across this in a local secondhand shop...
While it was definitely sturdy in essence (it's a heavy beast!), it had a few problems that needed fixing and the dark wood and gold coloured fancy handles weren't entirely to my taste. Thankfully, my Dad is fairly handy when it comes to do-it-yourself projects and was happy to help me with the more technical aspects of fixing it up. Between us, we've worked on it gradually over the last couple of months and here's what it looks like now....
Quite a transformation, don't you think?
In terms of repair work, I ripped off what was left of the old trim around the top and bottom, removed the drawer handles and sanded the whole thing down. My Dad than attached a new trim, replaced the back with a new panel, repaired the stoppers for the drawers and filled in the holes left from where I removed the handles.
Then came the fun part - deciding what colour to paint it! That actually proved to be one of the trickier parts of the process as far as I was concerned because I had too many ideas about what I wanted to do.
In the end, my mind was made up when I discovered a pretty lace wall/furniture stencil from Dizzy Duck Designs on Etsy. If you're interested in doing anything similar, I'd definitely recommend these stencils. Mine arrived really quickly, the film used is flexible but sturdy and, most importantly, the stencil was easy to use. I was concerned about getting the pattern to match up properly as I moved the stencil along the drawers, but there are clear overlap points so it's easy to produce the repeating pattern.
I'll be honest and say that my stencilling is definitely not perfect. There are quite a few points on the finer lines where it looks like my 'lace' has broken slightly, but I don't think that detracts from the overall effect at all. If anything, it just goes to prove that it's done by hand instead of mass produced.
I was fairly heavily influenced by one of the example photos that was shown on the listing for the stencil, although I went against my usual tendency to make everything blue and went slightly more green when I chose the paint. Although, if I'm being honest, I had fully intended to buy cornflower blue paint but when I got to the shop it was out of stock so I had a quick reconsideration. The paint I used is Rust-Oleum Satin Finish Furniture Paint in teal (which I personally wouldn't call teal, but the colour on the pot is an accurate reflection of the paint colour, so that's fine) and cotton.
If you're thinking of doing any furniture make-overs, one practical thing that I'd recommend is that if you're doing it in winter I'd make sure that you have somewhere heated where you can work! I was originally working on this in my parents' garage, where at one point it took glue over a week to set because the temperatures were so low. When it came to doing the painting, the paint needed to be used at above 10°C. Thankfully my parents are very accommodating and didn't mind me taking over their dining room with my chest of drawers, paint and a ground sheet!
I'm so pleased with how my chest of drawers turned out, and it's lovely to have a piece of furniture that's completely unique. So much so that I now want to repaint all the things! I have a couple of smaller projects in the works already, so they may be popping up around here soon - but don't worry, normal sewing/knitting/occasional crochet service will still be happening too!
Wednesday, 7 February 2018
Thursday, 1 February 2018
Seamwork Skipper Dress
Today's project might be a bit outside of my usual style comfort zone, but it definitely isn't lacking in terms of comfort itself. In fact, this may be one of the comfiest, cosiest garments that I've ever sewn. Here's my Seamwork Skipper dress.
The Skipper pattern itself is a traditional, crew neck sweatshirt, but the version I've made here is using the Seamwork member exclusive version. It's the same basic sweatshirt shape extended to dress length, with added in-seam pockets and a hood. When a picture of the dress version popped up on my Instagram feed one chilly day earlier this month, it appealed to me because it looked so snuggly. As someone who works from home, for me it looked like perfect winter work wear.
I've got quite a few Seamwork credits waiting to be used (clearly I haven't been sewing enough!), so I wasted no time in downloading the pattern and having a little online hunt for some suitable sweatshirting fabric.
I considered various fun print options, but none of them were especially cheap and I wasn't 100% sure whether the dress would suit me so I didn't want to spend too much.
In the end, I opted for this plain pink sweatshirting from Fabworks. It's lovely quality, especially for the price. As the fabric is extra wide, I was also easily able to cut the dress out of 2m, instead of the 2.3m of 150cm fabric called for by the pattern. I'm not sure I would agree with the description of it being magenta, but it's a very pretty shade of pink so I'm not going to worry too much about what the colour's called.
The Skipper dress (and the original sweatshirt version I imagine) is a nice, simple pattern to sew. The instructions were all nice and clear, apart from one point about making the drawstring casing in the hood where I think the instructions are in the wrong order. They have you make the casing (which is just formed by folding the outer edge of the hood back on itself), and then sew a buttonhole to feed your drawstring through. It may just be me being weird, but I'm not sure how you'd sew a buttonhole with the casing already made without it going through both layers of the fabric, when you only want it to be going through one layer. Instead, I sewed the buttonhole first and then made the casing.
In terms of sizing, I blended between a medium at the bust and a large at the waist/hips, which are the sizes recommended for my measurements. The fit is quite forgiving on a garment like this - it's not meant to be figure-hugging after all - and I'm fairly happy with how it turned out. The pattern description does say that the shoulders are slightly dropped, but they're possibly slightly too dropped on me and I might bring them in a bit if I make another version.
Other than that, if I make a second version I might do something quite against my usual preferences and omit the pockets. While I generally love pockets, I don't think the combination of pockets in a sweatshirting fabric and my proportionately large hips is particularly good here and they slightly spoil how the dress hangs (there's a reason why I've got my hands in the pockets in most of these photos - you can see in the photo below that the pockets are a bit lumpy).
Overall, I think we can probably all agree that this isn't really the most "flattering" dress that I've ever sewn. But that's OK - it's not meant to be! It is, however, definitely very comfy and cosy and, let's be honest, isn't that just what those of us in the northern hemisphere want at the moment?!
The Skipper pattern itself is a traditional, crew neck sweatshirt, but the version I've made here is using the Seamwork member exclusive version. It's the same basic sweatshirt shape extended to dress length, with added in-seam pockets and a hood. When a picture of the dress version popped up on my Instagram feed one chilly day earlier this month, it appealed to me because it looked so snuggly. As someone who works from home, for me it looked like perfect winter work wear.
I've got quite a few Seamwork credits waiting to be used (clearly I haven't been sewing enough!), so I wasted no time in downloading the pattern and having a little online hunt for some suitable sweatshirting fabric.
I considered various fun print options, but none of them were especially cheap and I wasn't 100% sure whether the dress would suit me so I didn't want to spend too much.
In the end, I opted for this plain pink sweatshirting from Fabworks. It's lovely quality, especially for the price. As the fabric is extra wide, I was also easily able to cut the dress out of 2m, instead of the 2.3m of 150cm fabric called for by the pattern. I'm not sure I would agree with the description of it being magenta, but it's a very pretty shade of pink so I'm not going to worry too much about what the colour's called.
The Skipper dress (and the original sweatshirt version I imagine) is a nice, simple pattern to sew. The instructions were all nice and clear, apart from one point about making the drawstring casing in the hood where I think the instructions are in the wrong order. They have you make the casing (which is just formed by folding the outer edge of the hood back on itself), and then sew a buttonhole to feed your drawstring through. It may just be me being weird, but I'm not sure how you'd sew a buttonhole with the casing already made without it going through both layers of the fabric, when you only want it to be going through one layer. Instead, I sewed the buttonhole first and then made the casing.
In terms of sizing, I blended between a medium at the bust and a large at the waist/hips, which are the sizes recommended for my measurements. The fit is quite forgiving on a garment like this - it's not meant to be figure-hugging after all - and I'm fairly happy with how it turned out. The pattern description does say that the shoulders are slightly dropped, but they're possibly slightly too dropped on me and I might bring them in a bit if I make another version.
Other than that, if I make a second version I might do something quite against my usual preferences and omit the pockets. While I generally love pockets, I don't think the combination of pockets in a sweatshirting fabric and my proportionately large hips is particularly good here and they slightly spoil how the dress hangs (there's a reason why I've got my hands in the pockets in most of these photos - you can see in the photo below that the pockets are a bit lumpy).
| Oddly excited by the hood and drawstring! |
Overall, I think we can probably all agree that this isn't really the most "flattering" dress that I've ever sewn. But that's OK - it's not meant to be! It is, however, definitely very comfy and cosy and, let's be honest, isn't that just what those of us in the northern hemisphere want at the moment?!
Friday, 26 January 2018
Knitting: Lots of Socks!
Without doubt, one of my biggest crafting successes last year was discovering the joy of sock knitting. From a practical perspective, my feet get cold really easily so having some lovely wooly socks to keep them cosy is never going to be a bad thing. More than that though, I just really love the process of sock knitting - those rounds of stitches seem to fly off my needles. And, of course, it also helps that there are so many beautifully coloured skeins of sock yarn out there to tempt me!
Since finishing my first socks, I've now knit another three pairs. The ones above are the only one of those pairs that were for me, and they're my most recent pair. I cast them on while enjoying the festivities of Christmas Eve, and have been merrily knitting away on them ever since.
The pattern for these socks was Hermione's Everyday Socks by Erica Lueder. They're a free pattern on Ravelry, and before I cast these on I was beginning to feel like I was the only knitter in the world who hadn't used this pattern. I'm really glad that I followed the crowd and gave the pattern a try - it's well written, easy to follow and the simple texture provides a bit of interest without demanding too much concentration.
Isn't the yarn that I used gorgeous? It's by Pixie Yarns and is called "Kitty Ate the Tinsel" (a Christmas colour so not available at the moment, but there are many other pretty colours in her shop!). I love all the speckles of different colours, and the merino/nylon blend was nice to knit and is feels lovely on my feet. These socks are definite winners!
These are the second pair of socks that I have to share with you today. They're the Atlantic Current Socks by Melissa Tuttle Sibley, and I knit them up for my Dad for Christmas. I enjoyed knitting these socks too - I would say though that I think the pattern assumed a bit of prior knowledge about sock knitting so I wouldn't recommend them if you're brand new to knitting socks.
Also, unless I was being completely silly (entirely possible), in the pattern as written for the larger size you end up with a bigger gap between the slipped stitch lines at the beginning/end of a row than you have between the lines in the middle of the row. I adjusted the spacing of the slipped stitches slightly so that they're even around the whole sock, which was easy to do but I just feel like it should have been even in the pattern anyway.
The yarn for these socks is Schoppel Wolle Crazy Zauberball, which I got from Loop. It was fun watching the colours change as I knit my way through the yarn, although the darker sections of the yarn possibly aren't the best for showing off the texture pattern in these socks. The wool/nylon blend definitely isn't as soft as the yarn I used for my socks, but it feels like it should be warm and sturdy.
And lastly, these socks were for my sister-in-law's birthday present. Being as I had a deadline (which wasn't too far off!) and they were only going to be the second pair of socks that I'd knit, I decided to use the same pattern as for my first ones. My thoughts on that pattern (My First Socks by Sandra Paul) are still the same as when I knit them for myself, so check out my blog post if you want all the details. The yarn I used this time is from Lamington Lass - it's the Mountain Pass colour on the soft socks base. Another lovely yarn! Can you tell that half of the reason I like sock knitting is because of all the pretty indie dyed sock yarn that's out there?!
You can be sure that these won't be the last socks that I'll be knitting! For my next pair, I'm planning to venture into the world of self-striping yarn and afterthought heels. Wish me luck!
Since finishing my first socks, I've now knit another three pairs. The ones above are the only one of those pairs that were for me, and they're my most recent pair. I cast them on while enjoying the festivities of Christmas Eve, and have been merrily knitting away on them ever since.
The pattern for these socks was Hermione's Everyday Socks by Erica Lueder. They're a free pattern on Ravelry, and before I cast these on I was beginning to feel like I was the only knitter in the world who hadn't used this pattern. I'm really glad that I followed the crowd and gave the pattern a try - it's well written, easy to follow and the simple texture provides a bit of interest without demanding too much concentration.
Isn't the yarn that I used gorgeous? It's by Pixie Yarns and is called "Kitty Ate the Tinsel" (a Christmas colour so not available at the moment, but there are many other pretty colours in her shop!). I love all the speckles of different colours, and the merino/nylon blend was nice to knit and is feels lovely on my feet. These socks are definite winners!
These are the second pair of socks that I have to share with you today. They're the Atlantic Current Socks by Melissa Tuttle Sibley, and I knit them up for my Dad for Christmas. I enjoyed knitting these socks too - I would say though that I think the pattern assumed a bit of prior knowledge about sock knitting so I wouldn't recommend them if you're brand new to knitting socks.
Also, unless I was being completely silly (entirely possible), in the pattern as written for the larger size you end up with a bigger gap between the slipped stitch lines at the beginning/end of a row than you have between the lines in the middle of the row. I adjusted the spacing of the slipped stitches slightly so that they're even around the whole sock, which was easy to do but I just feel like it should have been even in the pattern anyway.
The yarn for these socks is Schoppel Wolle Crazy Zauberball, which I got from Loop. It was fun watching the colours change as I knit my way through the yarn, although the darker sections of the yarn possibly aren't the best for showing off the texture pattern in these socks. The wool/nylon blend definitely isn't as soft as the yarn I used for my socks, but it feels like it should be warm and sturdy.
And lastly, these socks were for my sister-in-law's birthday present. Being as I had a deadline (which wasn't too far off!) and they were only going to be the second pair of socks that I'd knit, I decided to use the same pattern as for my first ones. My thoughts on that pattern (My First Socks by Sandra Paul) are still the same as when I knit them for myself, so check out my blog post if you want all the details. The yarn I used this time is from Lamington Lass - it's the Mountain Pass colour on the soft socks base. Another lovely yarn! Can you tell that half of the reason I like sock knitting is because of all the pretty indie dyed sock yarn that's out there?!
You can be sure that these won't be the last socks that I'll be knitting! For my next pair, I'm planning to venture into the world of self-striping yarn and afterthought heels. Wish me luck!
Tuesday, 16 January 2018
Winslow culottes & Gable top
How's 2018 going for you so far? It's not been too shabby for me, and I've got a couple of projects finished and ready to share with you today. I decided to kick off this year's sewing with a couple of tried and tested patterns to get things off to a guaranteed good start. So here are my latest versions of the Jennifer Lauren Gable top and the Helen's Closet Winslow culottes...
I haven't made any changes since I sewed my first Gable top, so all the details in that blog post still apply (I've just noticed that I said in that post that I might slim down the sleeves - I haven't subsequently felt any need to do that!).
I've really enjoyed wearing Gable tops and dresses this autumn/winter, which in part was prompted by spending a week wearing them for OWOP at the end of last year, and I knew that another one would definitely fit in well to my wardrobe. This one is made using some lovely Cotton and Steel jersey that I bought from Sew Me Sunshine. It's on the pricey side for my fabric buying budget, but sometimes it's worth splashing out for something that you know you're going to love sewing and wearing.
| Gable top worn with my Freja dress and a Pink Coat Club Seamstress pin |
I haven't made any changes since I sewed my first Gable top, so all the details in that blog post still apply (I've just noticed that I said in that post that I might slim down the sleeves - I haven't subsequently felt any need to do that!).
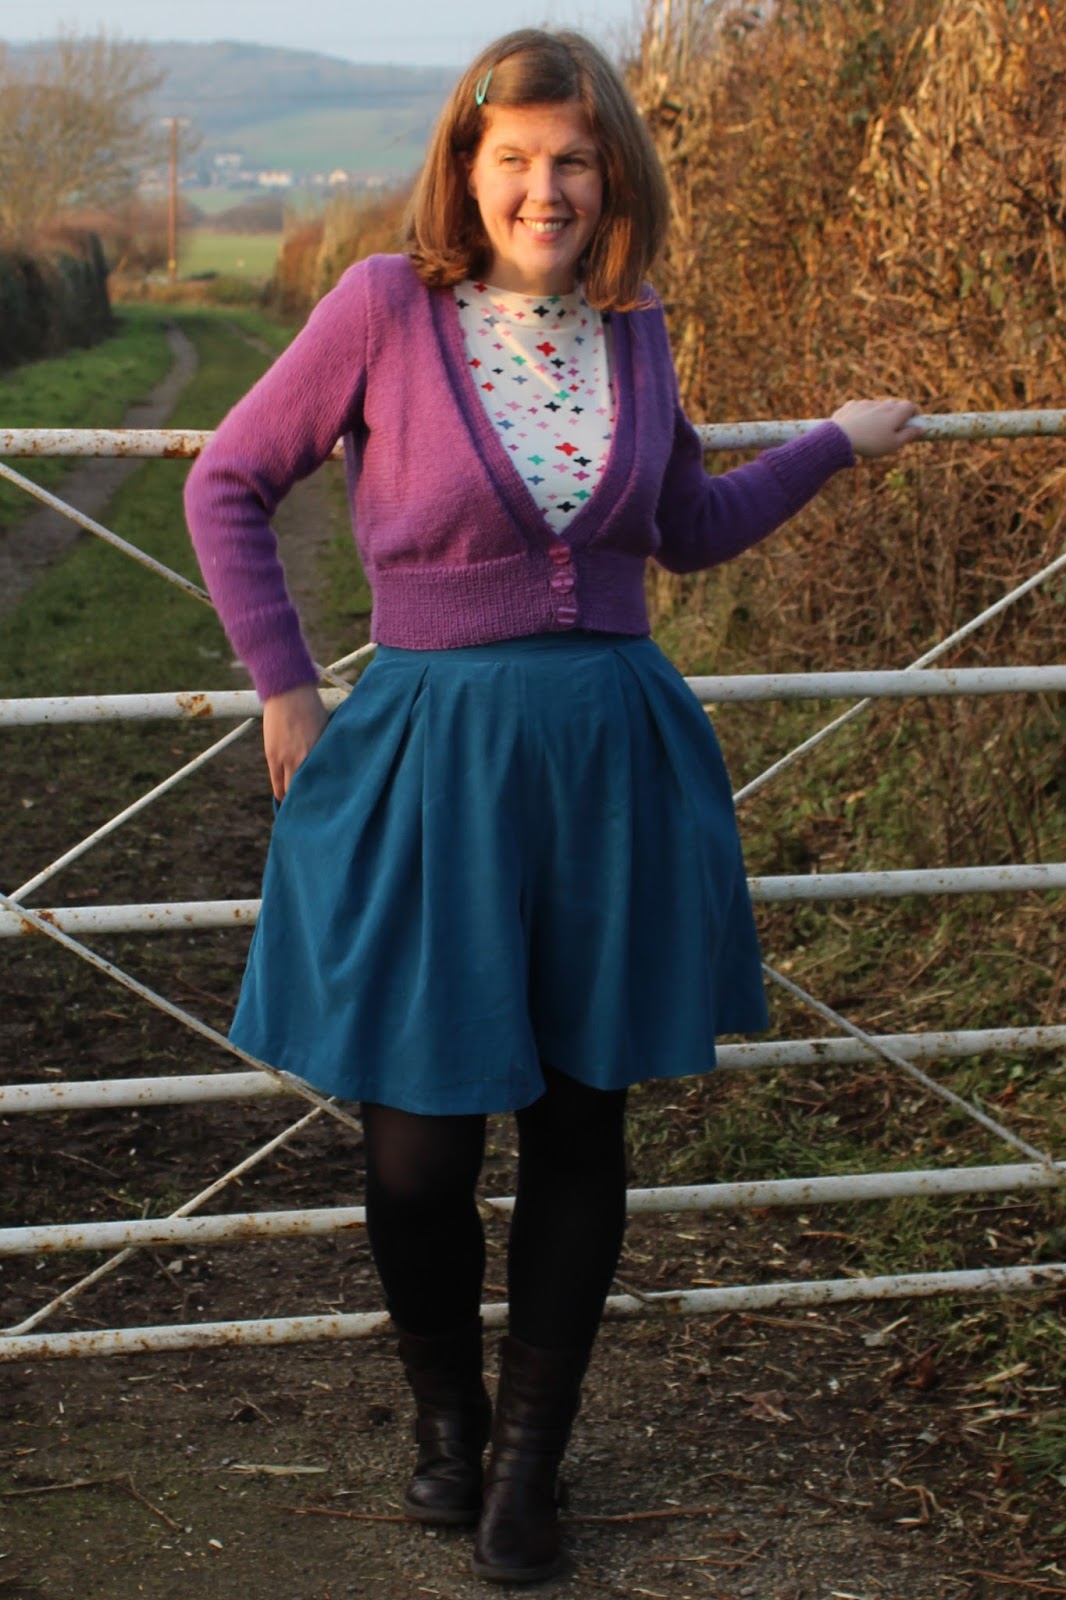
Now onto the Winslow culottes (and I'm sorry, I had to cover the Gable top up with my purple cardigan - it was just too chilly without it!). My original cord Winslow culottes were a bit of an experiment, but happily that experiment had a very successful outcome and I wear them fairly frequently in autumn/winter. One of the main benefits being that culottes are much less prone to (although not always immune from!) blowing up in the wind than all my full skirts!
This version is sewn using some beautiful aqua babycord from SewLoco (a fairly new UK-based online fabric shop - check out the lovely fabrics that Lucy has available if you haven't already!).
I made a slight change to the pattern for this version of the Winslow culottes. After the problems I had with the invisible zip on my first cord Winslows, this time I decided to split the waistband piece into two (in the pattern, the waistband is folded over on itself to create the facing). I then cut the waistband itself in the babycord and cut the second waistband piece in some Tana lawn (left over from making my Vogue 9239 dress last summer) to use as the facing.
Doing this reduced the bulk at the waistband seam, and meant that using an invisible zip was no problem. While there's nothing wrong with the regular zip I used in my navy culottes to get round the waistband bulk problem, I do prefer the look of the invisible zip that I've used here.
So all in all, I think I can safely say that this year's sewing has started successfully. I know that both my Gable top and my Winslow culottes will be worn a lot, and it's an added bonus that they look pretty good together! How's your sewing been going lately?
Tuesday, 2 January 2018
The Last Sewing of 2017 & Plans for 2018
Happy New Year! I hope that 2018 is off to a good start for you, and that you had a lovely festive period before that if you were celebrating. Before Christmas becomes too much of a distant memory, I thought I'd pop by to share some of the presents that I sewed for my family, and also talk about some of my crafty plans for the next 12 months.
First up we have a couple of dresses for my little niece. I used patterns from Puperita for both of these. The one on the left is the Duckie dress, but without the front pocket and shortened so that it's more of a long top/tunic length for wearing with leggings. On the right is a pinafore dress, which is reversible (the other side is some aqua blue needlecord). I shortened this dress as well - it's still pretty much knee length on my niece (who's 1 and average height), but I cut it at the 3 month length instead of 12 months so you might want to check the length if you're using this pattern - it would have been really long if I'd used the 12 month length. Other than that, these patterns were both really nice to sew and I'm sure I'll be using them again in the future.
For my nephew, I made a pair of pyjamas. He loves vehicles of any kind, so this jersey from Fabrics Galore went down well with him! The pattern I used is New Look 6237. I've made both the trousers/shorts and t-shirt separately for my nephew before so I was familiar with the pattern and could stitch it up fairly quickly - always good when there are lots of presents to make!
Continuing on the pyjama theme, I made a pair of pyjama trousers for my sister-in-law using some spotty jersey from Maud's Fabric Finds. I used Simplicity 2116, the same pattern as when I made a whole stack of pyjama trousers last Christmas. These trousers came in handy for my sister-in-law to change into after we got drenched in pouring rain on a Christmas afternoon walk!
For my sister, I whipped up a New Look 6217 top. This one really looks a lot better when worn than when on the hanger, but I didn't get a chance to get a photo of my sister modelling it. If you want to get an idea of what it looks like on, I made three different versions of this back in 2016 - the blog post is here. The viscose I used this time was from Sew Over It, but it doesn't seem to be in stock anymore unfortunately.
Lastly, I made a Tilly & the Buttons Françoise dress for my mum. Helpfully, my mum is a similar size to me so she she could try on my stripey Françoise dress, which meant that I didn't have to worry that it wouldn't fit. The fabric for this one is a dogtooth ponte roma from Sew Essential - it's really nice quality and perfect for this pattern. I really love the Françoise made in ponte roma; it means that the dress is super comfy, but it can also look quite smart at the same time.
Now that we've got last year's sewing out of the way, let's talk a little bit about some of my plans for 2018 - here's my #2018makenine list:
1. Closet Case Carolyn Pyjamas - these were on my Make Nine list last year, but I didn't quite get time to make them. Hopefully I'll be able to put that right this year!
2. Finish my scrappy hexagon quilt - another project carried over from 2017! I made good progress last year, so hopefully I will actually be able to finish it this year.
3. Vogue 8577 - another one that's been in my stash for a while and needs to be used!
4. Cloth Habit Watson Bra - I've got a bra making kit waiting to be used and plenty of knit scraps, so there's no excuse not to give this a try.
5. Butterick 6446 - I've got a wedding to go to later in the year, and I think a maxi version of this could be fun to make for that.
6. Knickers! This is the free Megan Nielsen Acacia pattern. See previous comment about knit scraps!
7. Lovely cardigan by Kim Hargreaves - way more cables than I've knit in one project before, so this could be a challenge.
8. Wainthropp cardigan by Andi Satterlund - I struggled with the only other cardigan I've knit seamlessly because it seemed to make my wrists hurt, but I love pretty much all of Andi Satterlund's designs and I've altered how I knit in the past year (I used to knit in a particularly awkward self-developed manner!) so I'm going to give it another try and hope it goes better this time.
9. Colourwork yoke sweater from Simply Crochet magazine issue 66 - I've never done any crochet colourwork before so this might be a bit ambitious, but you don't know if you don't try!
So there we go! I may have bitten off more than I can chew (with number 9 in particular), but at the moment I'm excited to give them all a go. Have you got any exciting plans for 2018?
First up we have a couple of dresses for my little niece. I used patterns from Puperita for both of these. The one on the left is the Duckie dress, but without the front pocket and shortened so that it's more of a long top/tunic length for wearing with leggings. On the right is a pinafore dress, which is reversible (the other side is some aqua blue needlecord). I shortened this dress as well - it's still pretty much knee length on my niece (who's 1 and average height), but I cut it at the 3 month length instead of 12 months so you might want to check the length if you're using this pattern - it would have been really long if I'd used the 12 month length. Other than that, these patterns were both really nice to sew and I'm sure I'll be using them again in the future.
For my nephew, I made a pair of pyjamas. He loves vehicles of any kind, so this jersey from Fabrics Galore went down well with him! The pattern I used is New Look 6237. I've made both the trousers/shorts and t-shirt separately for my nephew before so I was familiar with the pattern and could stitch it up fairly quickly - always good when there are lots of presents to make!
Continuing on the pyjama theme, I made a pair of pyjama trousers for my sister-in-law using some spotty jersey from Maud's Fabric Finds. I used Simplicity 2116, the same pattern as when I made a whole stack of pyjama trousers last Christmas. These trousers came in handy for my sister-in-law to change into after we got drenched in pouring rain on a Christmas afternoon walk!
For my sister, I whipped up a New Look 6217 top. This one really looks a lot better when worn than when on the hanger, but I didn't get a chance to get a photo of my sister modelling it. If you want to get an idea of what it looks like on, I made three different versions of this back in 2016 - the blog post is here. The viscose I used this time was from Sew Over It, but it doesn't seem to be in stock anymore unfortunately.
Lastly, I made a Tilly & the Buttons Françoise dress for my mum. Helpfully, my mum is a similar size to me so she she could try on my stripey Françoise dress, which meant that I didn't have to worry that it wouldn't fit. The fabric for this one is a dogtooth ponte roma from Sew Essential - it's really nice quality and perfect for this pattern. I really love the Françoise made in ponte roma; it means that the dress is super comfy, but it can also look quite smart at the same time.
Now that we've got last year's sewing out of the way, let's talk a little bit about some of my plans for 2018 - here's my #2018makenine list:
1. Closet Case Carolyn Pyjamas - these were on my Make Nine list last year, but I didn't quite get time to make them. Hopefully I'll be able to put that right this year!
2. Finish my scrappy hexagon quilt - another project carried over from 2017! I made good progress last year, so hopefully I will actually be able to finish it this year.
3. Vogue 8577 - another one that's been in my stash for a while and needs to be used!
4. Cloth Habit Watson Bra - I've got a bra making kit waiting to be used and plenty of knit scraps, so there's no excuse not to give this a try.
5. Butterick 6446 - I've got a wedding to go to later in the year, and I think a maxi version of this could be fun to make for that.
6. Knickers! This is the free Megan Nielsen Acacia pattern. See previous comment about knit scraps!
7. Lovely cardigan by Kim Hargreaves - way more cables than I've knit in one project before, so this could be a challenge.
8. Wainthropp cardigan by Andi Satterlund - I struggled with the only other cardigan I've knit seamlessly because it seemed to make my wrists hurt, but I love pretty much all of Andi Satterlund's designs and I've altered how I knit in the past year (I used to knit in a particularly awkward self-developed manner!) so I'm going to give it another try and hope it goes better this time.
9. Colourwork yoke sweater from Simply Crochet magazine issue 66 - I've never done any crochet colourwork before so this might be a bit ambitious, but you don't know if you don't try!
So there we go! I may have bitten off more than I can chew (with number 9 in particular), but at the moment I'm excited to give them all a go. Have you got any exciting plans for 2018?
Subscribe to:
Posts (Atom)