
The Strasbourg bag is a pattern from Empty Hanger Patterns. I came across this company when Zoe of "So Zo" fame included them in a list of companies offering discounts at the end of Me Made May this year. They have some interesting looking garment patterns, but it was the Strasbourg bag that really appealed to me. 'Why's that?', I hear you ask. It's a convertible bag, so you can use the one bag as two different styles of backpack, a shoulder bag or a crossbody bag. How useful is that?!
In addition to having multiple strap options, the bag also has a plethora of handy pockets. There's a large pocket on the outer front, and inside there's a large zip pocket that also acts as a divider to provide a section for a small laptop/tablet, an elasticated pocket, small side zip pocket, pen pocket and a key chain. The bag is also a good size - I can easily fit in my DSLR camera in its case, and all the other essentials I need for a day out.
As with lots of bag projects, it always seems like the hard work starts with trying to source all of the hardware in the right sizes! Is it just me that can never seem to get everything I need from one place?! In this case, the best option seemed to be to order some of it from WeaverDee and the rest from Sew Essential (sorry, I can't quite remember what I got from which shop!).
The fabric was an easier matter! After seeing this backpack in M&S, I decided that jumbo cord would be a nice option to use - the texture makes it a bit more interesting than other plain fabrics, whilst the solid colour makes it easier to wear with lots of things than a print might be (which is good for a bag I think). Dark denim was the obvious choice to use for the contrast base and straps for me. I got both of my outer fabrics from Fabric Godmother - the denim's here, and this is the cord. The lining fabric was a lucky charity shop find a while ago.
While I'm really happy with my finished bag, I don't think the instructions for this pattern were quite as good as other bag patterns I've used. There weren't any major errors, but there were a couple of places where I felt the pattern could have been better. For example, the pattern just gives you dimensions of rectangles to cut out (relatively standard - that doesn't bother me), but at one point you need to create a curve on a pattern piece and it tells you to draw around a glass whereas other patterns I've used provide pattern pieces for non-rectangular pieces.
It's also not very helpful about interfacing (FYI - I used a medium/heavy weight interfacing on my base fabric), which can really affect the final outcome of a bag project and can be a bit confusing if you haven't made bags before. It also suddenly mentions the option of using a button or a snap on the outer front pocket when you're in the middle of sewing the bag - it would be more helpful if this were included and marked as optional in the supplies list. I also felt like some of the interior pockets weren't constructed in the best way and did my own thing on a couple of occasions.
As I said, they weren't major problems - just little niggles here and there. I basically got the impression that the pattern was written by someone who knows what they're talking about in terms of sewing but is possibly more used to making garments, in comparison with other bag patterns that I've used which were written by people who specialise in bags. All that said, I didn't struggle with making the bag myself - I'm just not sure I'd recommend the pattern to a beginner.
Having used the bag a fair few times already, I can confirm that it's definitely very useful. It's pretty quick to switch between the different bag styles - you just have to unclip the swivel clasps and reattach them to different D-rings. Easy peasy!
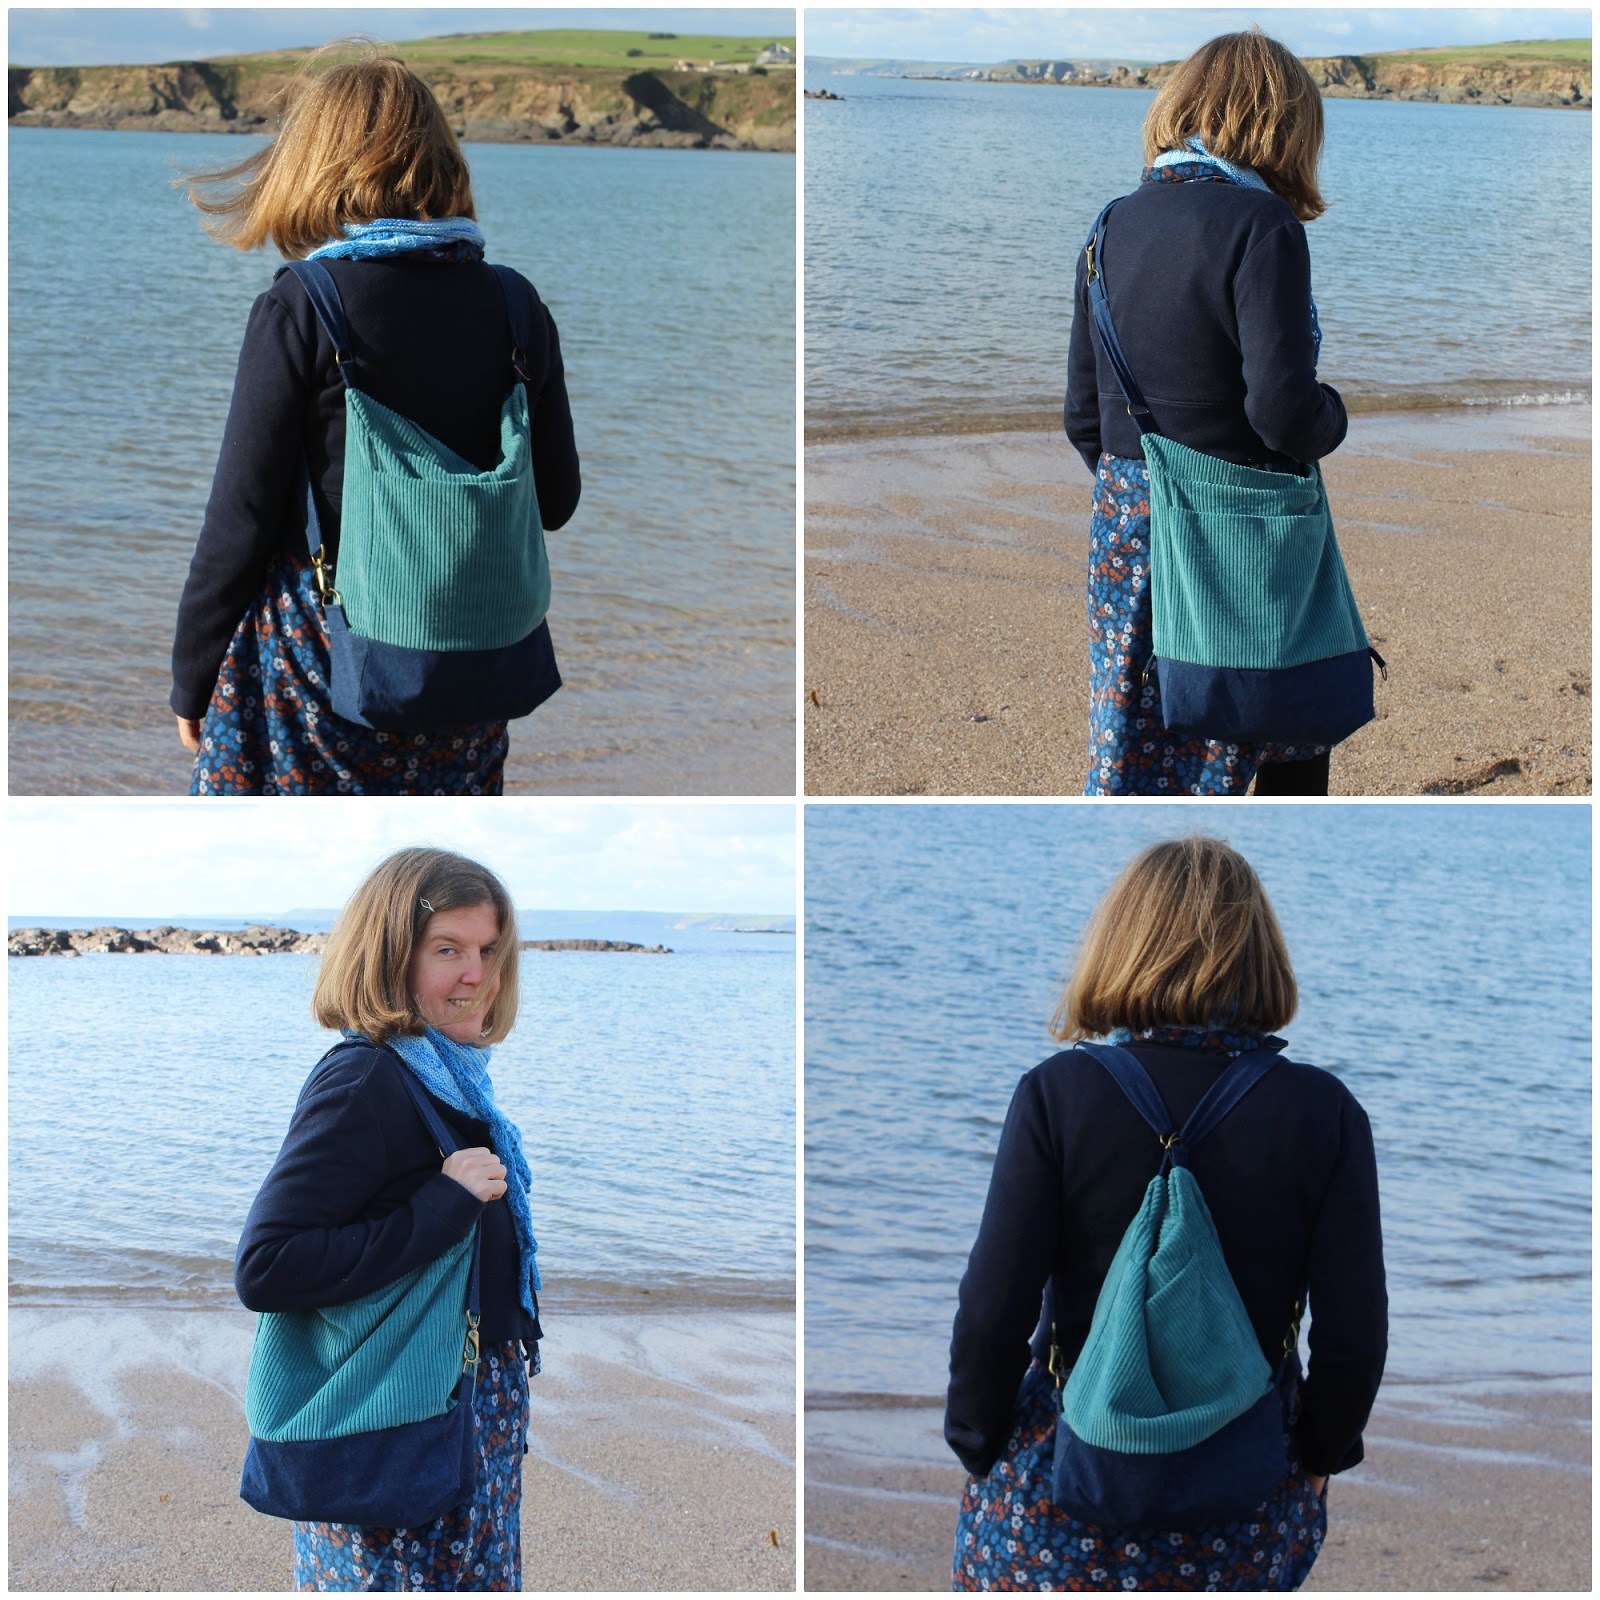
I would say that when I've used the bag as the "simple" backpack (in the top left photo below), the straps seem a bit long and have a tendency to slip off my shoulders. I wouldn't want to shorten the straps much though (the pattern does give you instructions on finding the right strap length for you), because they're just the right length for the other bag styles. I think that the gathered top backpack style and the shoulder bag (the two bottom photos below) are probably the styles that I'll use most often - partly because you can switch between them without altering the swivel clasps, and partly because I find them the comfiest styles to wear.
I've made a few bags before, and I always enjoy it as something a bit different in between garment sewing projects. Making the Strasbourg bag was no exception! I'll be getting a lot of use out of this bag, and it looks like I'll be making the pattern again because my sister told me that she would happily receive one as a Christmas or birthday present. Requests from other people are always a good sign that a project has been successful, don't you think?
Whoooo! Bookmarked. I love it because I have a dodgy right shoulder and always like a back back style to spread the load. Jo x
ReplyDeleteIt sounds like it would be a useful bag for you then!
DeleteOoo, this is brilliant! I love that it can convert into different styles, I haven't seen anything like that before.
ReplyDeleteThanks Lynne! I'd seen convertible bags to buy before, but this was the first sewing pattern I found for one. It's definitely very handy!
Delete