Showing posts with label Tilly and the Buttons. Show all posts

Thursday, 22 August 2024

Tilly & the Buttons Nell Dress

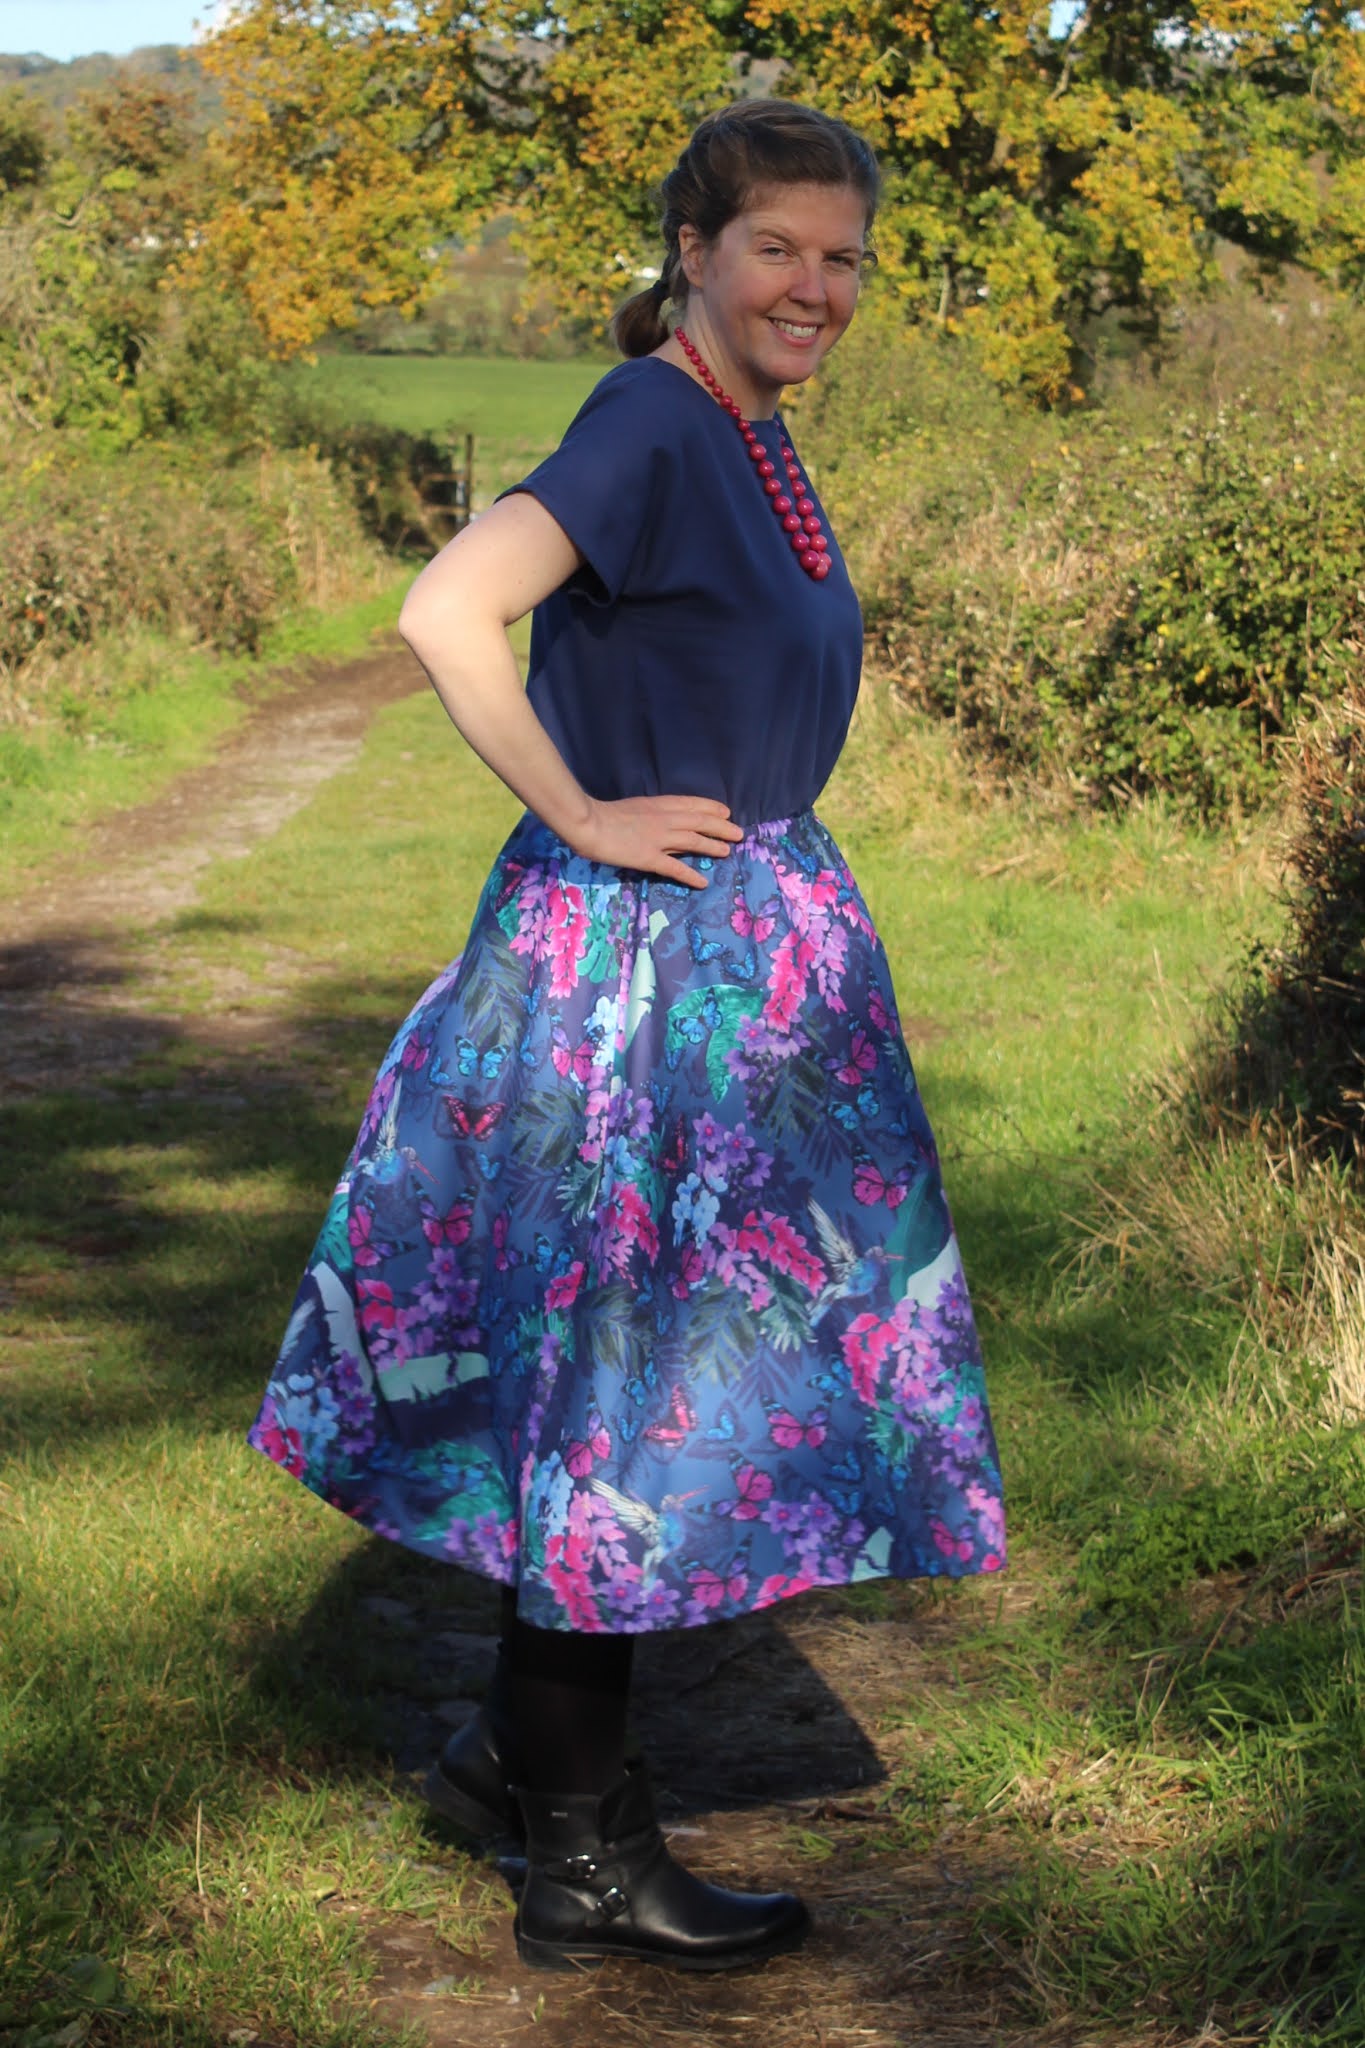
I like a sewing pattern that gives you plenty of options (always good to get your money's worth!), so the Nell blouse and dress that was released by Tilly & the Buttons earlier this summer appealed to me straightaway. I particularly liked the two-tone gingham dress shown in the pattern photos, so that's the version that I chose to make first.

Nell is a mix and match blouse and dress pattern, with options for a straight or peplum blouse or knee-length or midi-length dresses with gathered skirts. It also gives you the choice of short, bracelet-length, flutter or puff sleeves, and a button front closure or faux bow ties with hidden snaps. Last but not least, there are optional patch pockets that can be added to the bodice or skirt. 

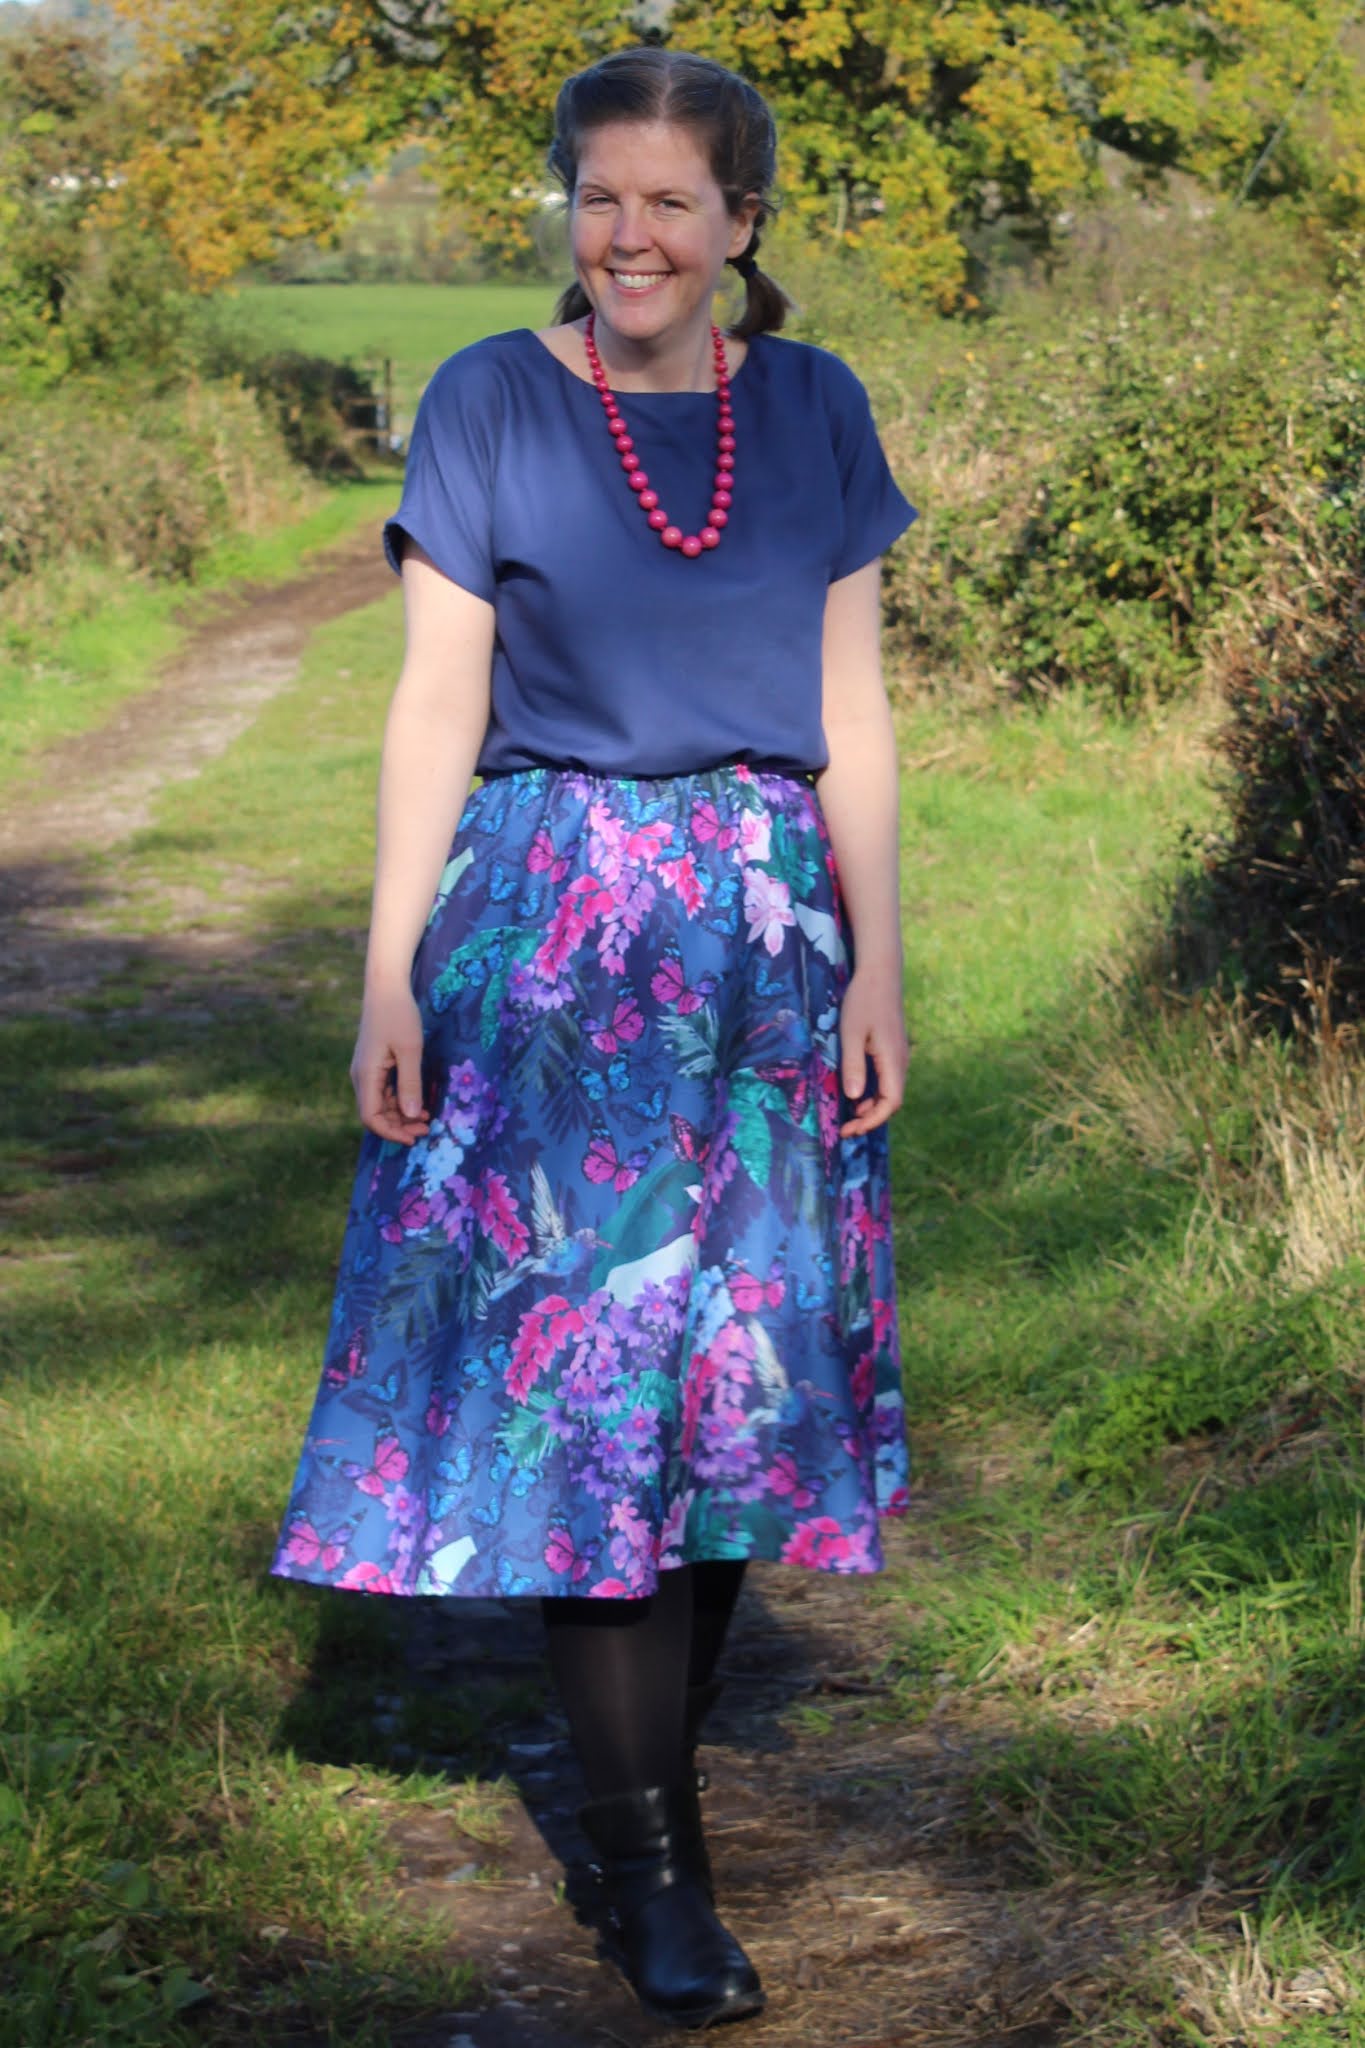
My version uses the short sleeves, midi skirt and skirt pockets.

The pattern size range covers bust measurements from 30 to 60" and hips from 33" to 61".

I enjoyed sewing my Nell dress and it seemed to come together quite quickly. The instructions are very detailed and illustrated with clear photos. I found them easy to follow, and I didn't have any trouble at all when making my dress.

If I had one complaint, it's that the pattern doesn't include the full skirt pieces - it gives you the pattern piece for the peplum for the blouse with instructions on how much extra length to add for the knee-length or midi skirts. It's a small point in some ways and I understand the argument about saving paper, but I just feel like if you're buying a paper pattern, you shouldn't have to draw out your own pieces - even if drawing them out is fairly simple.

When it comes to sizing, I think Nell comes up on the large side. It is described as having a relaxed fit bodice, but when I looked at the finished garment measurements I was fairly sure that making the recommended size would give me a dress that would be too oversized for my liking. My measurements put me between a 5 and 6 at the bust and hips and pretty much a 5 at the waist but I actually made a straight size 4. That's given me a very comfy and relaxed fit, and I think any larger would have felt too big for my taste.

I made a quick toile of the bodice and it came out unusually short. I do generally have to lengthen bodices because I'm slightly taller than average (about 5'9"), but the Nell bodice was particularly short on me - it was closer to empire line than waist length. I added 3" and that sorted the problem! The midi skirt is a good length though, and my skirt is the measurements recommended in the pattern.

The only other alteration I made was to use an extra button due to my added length.

The fabric that I used is a Robert Kauffman quilting cotton that I bought recently from Rainbow Fabrics. I really love the combination of blues, purples and greens in the print, and the gold grid over the top makes it a bit different to other fabrics. I know some people don't like using quilting cottons for garments, but I think they work fine for some patterns - including the Nell dress. It was a breeze to sew, and feels nice to wear.

All in all, Nell was an enjoyable pattern to sew and I'm pleased with the finished dress. It's very comfortable and easy to wear, and I think it'll be a useful addition to my wardrobe. I may well make more versions in the future too - I should probably try some of the other options after all!

Thursday, 24 August 2023

Embroidered Tilly & the Buttons Stevie Top

I bought the Tilly & the Buttons Stevie pattern quite a while ago, and it's been floating around on my sewing list ever since. I finally got around to making it, and decided to embellish the simple top with some pretty embroidered flowers.

The Stevie is a boxy fit top or tunic dress with a round neckline and grown-on sleeves. It closes at the back neckline with ties or a button and loop, and there are options to use patch pockets or sleeve cuffs (I didn't use either of them this time). There's also an add-on pack that you can buy to give you the possibility to add longer sleeves or turn the top into a dress with a gathered skirt.

The pattern covers hip sizes from 33" to 61".

Stevie is simple to sew - it would be a good pattern for beginners, or it's a nice relaxing project if you've got more experience. The instructions are detailed and very easy to follow, helped by the fact that they're illustrated with clear, bright photos.

I enjoyed sewing my Stevie top, and didn't have any problems at all as I was making it. I like the way the neckline facings are topstitched down - I think it gives a nice neat finish. Everything came together easily and it was a relatively quick project.

In terms of sizing, I made a size 6. My bust and waist measurements are currently between a 5 and a 6 in Tilly & the Buttons sizing, and my hips are bang on the measurement for the size 6. I looked at the finished garment measurements and decided that the 6 would probably be the best bet. I'm happy with how it turned out.

After making a toile, I decided to lengthen the top but my finished top then felt a bit long so I actually ended up taking my top back to the original length from the pattern.

The fabric that I used is a white and grey-blue striped cotton (or at least I think it's cotton!) that I found in a charity shop. I bought it thinking that it would be a good base for embroidery, and the simple shape of the Stevie top seemed like it would be a good canvas for some embroidery too.

I decided to design the embroidery myself and sketched out a couple of ideas before eventually deciding to use this idea of flowers trailing from one shoulder. My flowers have satin stich petals with accents added in straight stitch and French knots in the centres. The leaves are done in fishbone stitch, and for the stems I (appropriately!) used stem stich. It turned out just how I was hoping it would!

I enjoyed both sewing and embroidering my Stevie, and I really like the finished top. It's nice and easy to wear, but the embroidered flowers make it feel a bit more special to me. The pattern would be great for showing off a fun print so I suspect I may make more in future!

Thursday, 13 January 2022

Tilly & The Buttons Nora Top

Hello there! It's been a little while since my last post, hasn't it? Things tend to get a bit quiet on my blog towards the end of a year because I'm busy making Christmas presents that need to be kept secret. But now the gifts have all been given, we're into a new year and I have a project to share with you - the Tilly & The Buttons Nora top.

Nora is a modern, boxy t-shirt or sweater with drop shoulders and wide sleeves. It has options for a high neck or regular neckband, and you can also choose between short, elbow-length or extra-long sleeves as well as a long hemline or a cropped and stepped deep hem with side splits. Plenty of variations to play with! 

I opted for the high neck, extra-long sleeves (more on that later...) and cropped and stepped hem.

The pattern is fairly simple to sew and has excellent instructions. I didn't have any trouble when I was making my Nora, and it was finished within a couple of hours. The boxy shape also means that you probably won't need to worry as much about fitting as you might with more figure-hugging silhouettes as this is a fairly forgiving style.

The pattern is available in UK sizes 6-20 (bust sizes 30" to 44"), however there is quite a lot of ease in the pattern so it might work for slightly larger bust sizes too. I went a size down (my measurements put me in Tilly's size 5, but I made a 4) and there's still plenty of room for me.

In addition to sizing down, I also lengthened the pattern. This is a common adjustment for me because I'm 5'9". I added my standard 1" to the length, but probably should have added a bit more - if I'd followed the instructions it would have ended up just a bit too cropped for my liking (you don't want to have a sweater that's supposed to keep you warm but actually exposes your middle!). As the pattern instructions mention, the hem for Nora is quite deep (7 cm), so I just made mine a bit shallower (4.5 cm) to give myself some extra length. So in total my Nora is about 7cm/almost 3" longer than the length out of the packet.

Along with lengthening the bodice section of the top, I should have lengthened the sleeves too. I like the look of the extra-long, wide sleeves, but even if I'd have used a smaller sleeve hem than the pattern intended, the sleeves would have ended up a length that just didn't look quite right on me when combined with the wide shape. I decided to solve the problem by cutting a couple of centimetres off the end of the sleeve, then using a 3cm hem and inserting 2cm-wide elastic (just a touch longer than my wrist measurement) to cinch the ends of the sleeves in a bit. I really like the effect, and I think it'll make the sleeves much more practical for me.

I'd also recommend you consider the length of the high neck piece. I have a large head, and my fabric wasn't super stretchy so I added a couple of centimetres to the neck piece - I'm glad I did because I can just get it over my head now. The neck is quite high, but that makes it nice and cosy. It also looks good folded down in half as I've done in some of these photos.

The fabric I used for my Nora is a sweatshirt fleece from Fabric Godmother - although it's currently out of stock. The colours are lovely and bright and the fabric itself is nice and warm so it's the perfect choice for keeping me cheerful and cosy during a chilly January!

All in all, I'm really pleased with how my Nora top turned out. It's nice to start the year with a successful project, and I'll have to explore some of the other options in the pattern at some point - a t-shirt version would definitely be fun for the summer!

Wednesday, 29 September 2021

Tilly & The Buttons Indigo Dress

 Continuing on from a theme of my last post, I've made another dress that will hopefully work well across different seasons. Here's my Tilly & The Buttons Indigo dress....

The Indigo pattern has been around for a few years now, and I have to admit that when it was released it didn't initially appeal to me that much for some reason. But I kept seeing lovely versions of the pattern on Instagram and blogs, and then the add-on pack was released to offer even more options for Indigo. All of that combined meant that I decided I needed to jump on the bandwagon!

Indigo is a smock dress or top pattern with no fastenings. It has an empire waistline, floaty gathered skirt and pockets. There are options to use classic gathered seams or exposed frill seams. Between the original and add-on pack, there are a variety of sleeve options, and the add-on pack also offers a button back bodice and the possibility of making a midi dress by adding an extra tier to the skirt.

As you can probably see, I used the short sleeves and midi tier option from the add-on pack.

Sewing my Indigo dress was a breeze. The instructions are very detailed and give you plenty of help along the way. It's also a fairly simple pattern anyway, and it felt like it came together pretty quickly. Although it has to be said that all the gathering on the skirt tiers took a little while! The sewing level is rated as 'confident beginner', which I think is fair - or it makes a nice simple project if you have more experience.

In terms of sizing, I chose to make a size 5 - that's the size recommended for my bust and waist measurements. My hips are between a 5 and 6, but there's plenty of room in the hips so I just made the size 5.

I made a couple of fitting alterations. The first was very standard for me - adding 2" to the bodice length. I'm about 5'9" so I have to lengthen almost all patterns. 

When I made a toile it looked fine when I was standing still, but it was too tight across the back if I tried to move my arms so I did a broad back adjustment. I used a tutorial from Deer & Doe for making the adjustment, and added a total of 1.5" (0.75" on each side of the back bodice). That sorted the problem nicely and I can now wave my arms around as much as I want!

I also added some slim waist ties (they're hard to see in the photos, but they are there!). I've generally found that with looser fit dresses, I like the looseness in theory but in practice I think it works better for me if there's the option to add a bit of extra definition at the waistline with ties. 

The fabric I used is a star print viscose that I got from Oh Sew Crafty. I wanted a fabric that will hopefully work OK across different seasons, and star prints are one of my favourites so this was always going to appeal to me. Plus it was a bargain price so it seemed like a good option for giving this dress a try in case the style wasn't quite me.

Thankfully I needn't have worried about the Indigo dress not suiting me - I love how it turned out! It's beautifully swishy as you walk around, and the loose style means that its super comfy. I definitely think I'll wear this a lot, and I'm already on the lookout for fabric for a second version. After all, there are a lot more styles of Inidgo to try! Have you made any of the other versions of the pattern?

Friday, 30 July 2021

Coordinating Safiya Trousers & New Look 6217 top

It's a measure of how my style has changed in the last couple of years that I bought the fabric featured in today's post to make a swishy summer dress, and instead it has become a coordinating set of Tilly & The Buttons Safiya trousers and a New Look 6217 top.

A couple of years ago, my wardrobe was mainly full of dresses, with a few skirts and tops for a little bit of variation. While I do still love dresses and skirts, particularly if they have a good twirl factor, gradually more trousers, jumpsuits and shorts have been infiltrating their way into my garments of choice. It has to be said, this is in no small part due to me moving to a coastal town and getting fed up of battling against the wind to prevent skirt-related wardrobe malfunctions on breezy days!

Anyway, the reason for this shift isn't really important, but it doesn't show any sign of stopping yet. Having bought this fabric for a dress, the more I thought about it I just couldn't shake the feeling that it would get more wear if I turned it into a coordinating top and trouser set, a kind of fake jumpsuit - all of the ease that a jumpsuit brings of having a ready-made outfit with the added benefit of not having to get almost completely undressed whenever you need the loo, and of being able to combine the two pieces with other garments as well.

I debated various pattern combinations for a while - the Winslow culottes and M7131 were both strong contenders for the bottoms, and I considered the new Helen's Closet Reynolds and the Sew Over It Silk Cami for the top - but in the end I decided on the Tilly & The Buttons Safiya trousers and the New Look 6217 top.

The Safiya trousers are one of the patterns from the book Make It Simple. I blogged about making the dungaree version of Safiya last year, and also made a pair of Safiya trousers but apparently they never made it to my blog. They're definitely on my Instagram though. Anyway, I knew it was a nice, simple pattern to sew and that the trousers fit me well and are comfortable to wear.

The New Look 6217 top is one of my most used patterns - although the pattern itself is one of the commercial patterns that features a collection of separates and I've only actually made the top (view B) and not any of the other three garment options. I've definitely got my money's worth out of the top though and by now I've lost count of the versions that I've made for both me and other people since I first made it back in 2016 (enjoy the old photos there!). It's a great simple top for showing off a pretty print, and works particularly well with viscose fabrics.

The fabric that started this little experiment is a light blue leopard print viscose (still a bit in stock as I write this!) that I got from Like Sew Amazing. I'm not much of a fan of traditional leopard print fabrics because the colours just don't suit me, but in these shades of blue and off white it's definitely something I can get on board with! The fabric is that lovely kind of viscose that has great drape, but isn't horrifically slippery to work with. 

So what's the verdict on the finished set? I think the Safiya trousers and New Look 6217 top work well together and pull off the fake jumpsuit look I was going for. There is a small part of me that's slightly concerned that they might look a bit like pyjamas, but the majority of me feels great in them and doesn't particularly care about that! So much so, that I've already got another coordinating set underway - albeit with different patterns and very different fabric. Stay tuned for more soon!

Tuesday, 8 June 2021

Tilly & The Buttons Lotta - the knit version

 Usually I don't blog projects using patterns that I've already reviewed - there often isn't much to add to my original thoughts - but sometimes things are different enough to warrant their own post. That's the case for this Tilly & The Buttons Lotta dress, because it's made in a knit fabric, whereas my original Lotta dress used a woven cotton.

One of the things that first drew me to the Lotta dress was that it was designed to be made in either knit or woven fabrics. I had my eye out all winter for some jersey to make a cosy long-sleeved version, but nothing ever quite seemed to be what I wanted. Instead, I picked up a lovely spotty jersey from Threadquarters (sadly it's no longer in stock) in the perfect shade of sky blue early this year and squirreled it away for a summer dress instead.

Now that the weather has finally caught up with the season it's meant to be here in the UK, I thought I'd better get it sewn up and enjoy wearing it while the sun's shining!

The knit version of the Lotta dress is sewn in exactly the same way as the woven one, with the exception of the neckline being finished with a neckband rather than a facing - and using stretch stitches/a ballpoint needle of course.

The fabric suggestions on the pattern recommend drapey jersey, stretch velvet or lightweight French terry, but this is a fairly standard cotton jersey (a bit of drape, but nowhere near as much as a viscose jersey would have) and it works nicely I think. 

One of my favourite things about this version compared with my original one (which I also really like, and have worn a lot already) is that the jersey is slightly heavier than the woven cotton I used and it gives the skirt a bit of added body meaning that it moves beautifully as you walk.

My woven cotton Lotta dress is already really comfortable, but the jersey fabric takes Lotta into definite secret pyjamas territory - it's so comfy!

I used the same size and adjustments as in my original version - if you want more details you can read my blog post here.

So all in all, I really love how this dress turned out. It's possibly my favourite shade of blue, it was an easy and enjoyable project to sew, and it's a great dress to wear. I can definitely see more jersey Lotta dresses in my future!

Wednesday, 2 June 2021

Tilly & The Buttons Lyra Dress Review

When a particularly lovely looking sewing pattern is released, sometimes you just have to jump on the bandwagon and make one don't you? That's what happened for me with the Lyra dress, the latest offering from Tilly & The Buttons. The short version is that I love it, but read on if you want my review...

Lyra is a shirtwaist dress with a blousy bodice with button front opening, two-piece collar and stand, pockets and options for either short sleeves or full-length sleeves with elasticated cuffs. It also has a gathered skirt that can either be left simple at knee length or have a midi panel added for a tiered look. For my version I used the short sleeves and tiered skirt, and I think that makes a great summer dress.

The pattern is available in sizes from 30/24/33" to 60/53/61" (bust/waist/hip in both cases).

The Lyra dress is rated as being for Improvers, which I'd say is fair. There are quite a few steps to go through, but none of them individually are that complicated and the instructions are very thorough and detailed to help you along the way. 

That said, I also like the fact that the instructions are illustrated with really clear photos that allow you to quickly see what each step involves so you don't have to read everything in full if you have a bit more experience. 

I really enjoyed sewing my Lyra dress. As I said before, it isn't the speediest pattern to sew, but no one step takes too long and it's nice to work through them all gradually.

My measurements put me in a size 5 at the bust and between a 5 and 6 at the waist and hips but I made a straight size 5 - there's a fair bit of ease in the waist, and plenty of extra space around the hips so I knew that would work out fine. I also added 1.5" to the length of the bodice, which is fairly standard for me.


As I'd added extra length to the bodice, I also added in an extra button and altered the button spacing. I do this for most buttoned bodices - both because of lengthening them and to make sure that there's always a button at my bust point so there's no risk of gaping.

The only other change I made was to use fabric belt loops instead of thread loops, which is just a personal preference.

The fabric I used is a printed lightweight denim from Croft Mill - I love the pretty print of daisies and flowers, and it's a lovely fabric for this pattern. It's easy to work with, but with just enough drape to hang nicely. Croft Mill have lots of other lightweight denim prints if you're looking for something similar.

I also added a cute label from Pink Coat Club to liven up the insides - this design is currently sold out but Joy has lots of other great designs to choose from.

So to summarise my review - this is a great sewing pattern! The sizing is good, the instructions are thorough and it's fun to sew. Most importantly, it creates a lovely dress that's beautifully swishy and comfy to wear. What more could you want?!

Tuesday, 13 October 2020

Tilly & The Buttons Lotta Dress

The dress I have to share with you today was one of those serendipitous projects where the fabric and pattern appear in your life at the same time and demand to be put together. A few weeks ago I bought a duvet cover in a charity shop with the intention of making a basic-but-not-boring dress to show off its pretty print. Just a couple of days later Tilly & The Buttons released the Lotta dress pattern, which was just the style I had in mind. 

Lotta is a beautifully simple dress with a blousy bodice, flared skirt and narrow elasticated waistline. It has the options of midi or knee-length skirts, grown-on short sleeves or drop-shoulder bracelet length sleeves, and deep patch pockets. As an added bonus, it can be made using either woven or knit fabrics so it's a pretty versatile pattern.

Lotta would be a really great pattern for beginners - with no fastenings or darts it's a straightforward project to sew, and the more relaxed style of the bodice would make it easier to fit than some other dresses. As is always the case with Tilly & The Buttons patterns, the instructions are really detailed so should give you any help you need and if you want more support there's the option of an online course to accompany the pattern too. 

For those of us with more experience under our belts, it's a nice relaxing project to sew and comes together quickly. It could be a nice palate cleanser after a complicated project, or a good way to boost your sewing mojo if you're currently lacking in motivation.

In terms of sizing, my measurements (B 38", W 32", H 42") basically put me in Tilly's size 5 (my hips are actually between a 5 and a 6, but hip sizing isn't crucial for Lotta because of the flared skirt) and that's the size that I made. I'd say the sizing is good - the bodice is blousy as intended, but not so loose that it's starting to look baggy. 

The only alteration I made was to lengthen the bodice by an inch, which is very standard for me (I'm about 5' 9"). For reference, I used the midi skirt length straight from the pattern.

One point I should mention is that I can *just* get the bodice over my head - I do have pretty big head (all those hats that say "one size fits all"? It definitely doesn't!) so this shouldn't be a problem for most people, but it might be worth making a toile to check that you're OK if you also have a large head!

As I mentioned above, the fabric I used is from a duvet cover that I bought in a charity shop recently. The patterned fabric of the skirt is the top side of the cover, and the navy is the back. I originally intended to use the patterned fabric for the entire dress, but when I came to cut it out I noticed a couple of small areas of damage to the fabric that I needed to avoid and that meant that I didn't have enough fabric for both the bodice and skirt. 

In hindsight I think that might have been a blessing in disguise because I really like the combination of the two fabrics together, and having the whole dress in the patterned fabric might have been a bit overwhelming.

Having given my Lotta dress its inaugural outing, I'm pleased to report that it's really comfy but also makes you feel like you've made a bit of an effort. I think it will look good layered over a long-sleeved t-shirt or paired with cardigans/jumpers in the cooler weather we have coming up, but will also be great on its own for spring/summer so hopefully it should be an almost year-round dress. 

I'm really pleased with how my Lotta dress turned out, and I'll definitely be sewing more versions in the future. It's the kind of pattern that could be a really casual everyday dress, or could be dressed up to be quite smart depending on the fabric that you chose and the way you style the dress. I think my next version might have to be in a jersey to make it even more comfy and cosy for autumn/winter. What fabric would you use for Lotta?