Showing posts with label Dressmaking. Show all posts

Thursday, 19 June 2025

Simplicity 8384 dress

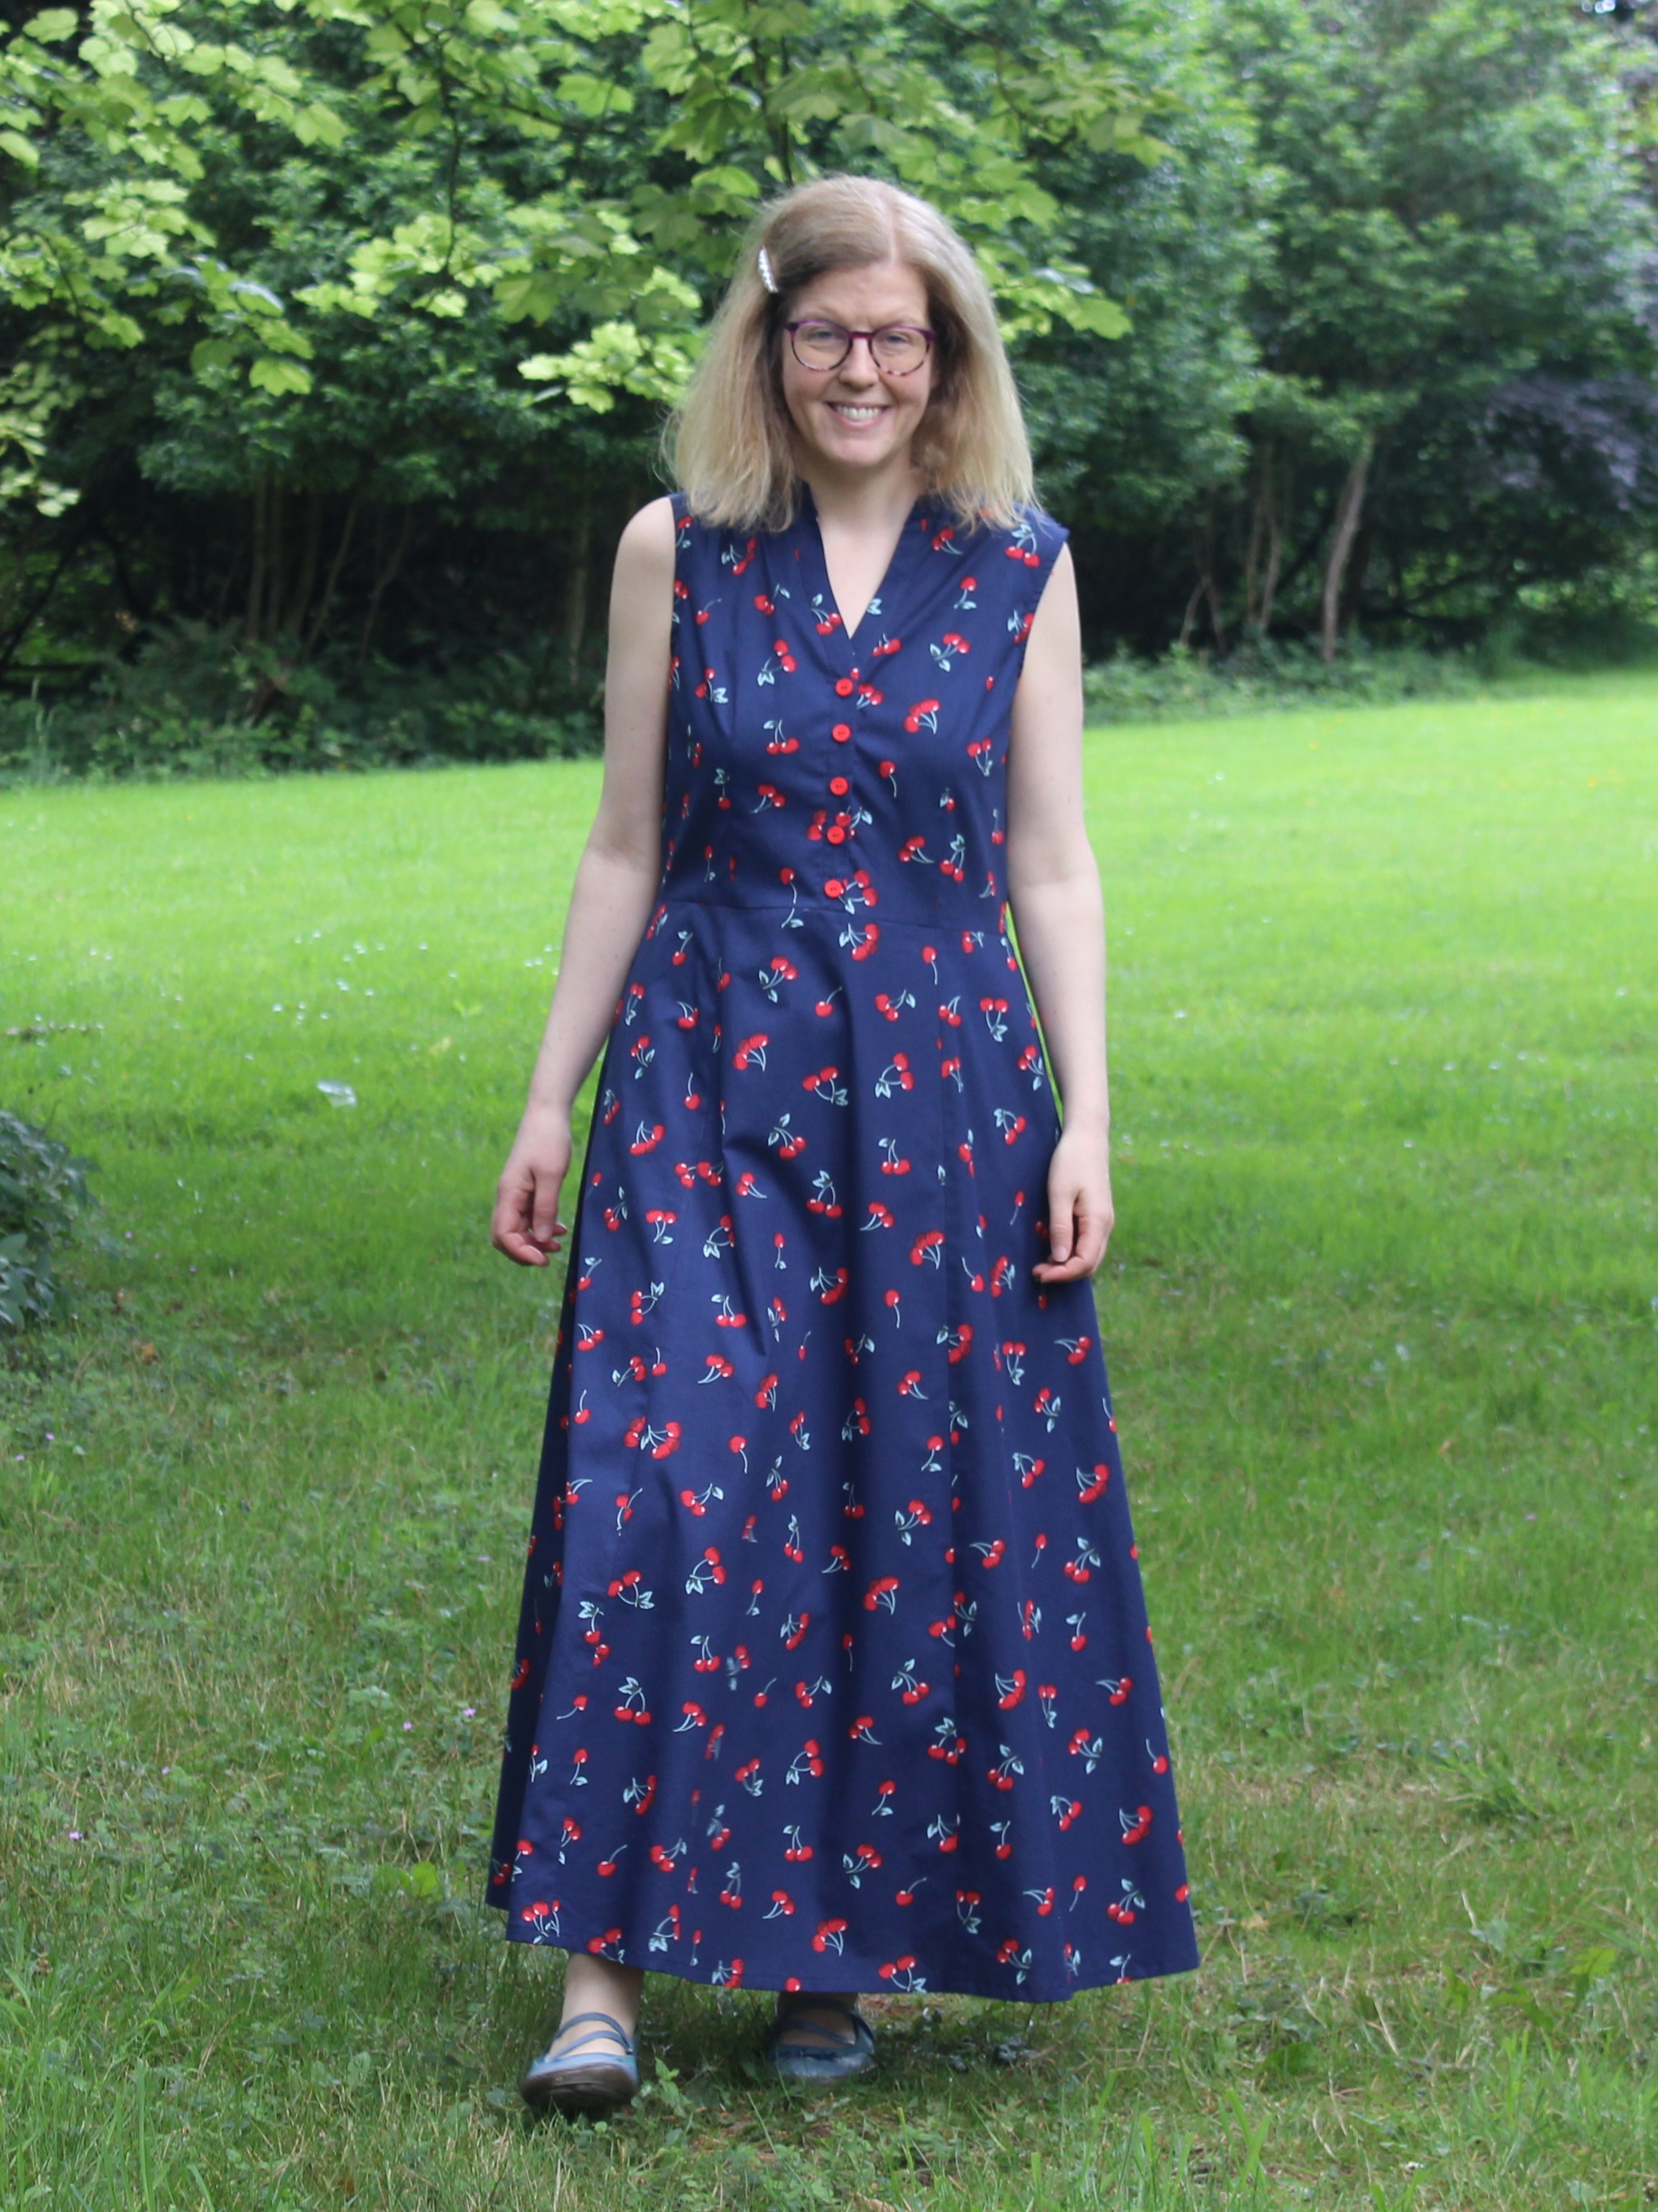
I enjoy hunting out bargains in charity shops, and always keep an eye out for sewing patterns. A couple of months ago I stumbled upon a box of patterns and treated myself to a couple of them, one of which was Simplicity 8384. I particularly liked the look of view A, which is what I've sewn here. 

Simplicity 8384 is a shirt dress or top with various length options. All the views have a collarless rounded neckline, and buttons at the centre front of the bodice. There are sleeveless, short sleeve and three-quarter sleeve options. The dress has a handkerchief hem for the knee and mid-calf lengths, and a straight hem for the ankle length and peplum top versions. The back of the waistline is cinched in slightly with elastic.

The pattern covers bust measurements from 30.5" to 46".

I enjoyed sewing my dress. The neckline/collar band in particular turns out really nicely and was very satisfying to sew. 

The instructions in Big 4 sewing patterns often get a bad reputation, but I usually find them clear and easy to follow. They maybe don't hold your hand as much as indie patterns and they're generally a lot more concise, but that's not necessarily a bad thing. I had no problems while I was making my dress.

That said, I did take a slightly different approach to inserting the elastic in the back of the waistline. The instructions call for you to sew the edges of the seam allowances together to make a channel and insert the elastic into that. I thought that might be irritating to wear because the seam allowance could move about. Instead, I pressed the seam allowance up and made my channel by stitching the seam allowance to the back bodice to anchor it in place. It worked nicely, and isn't irritating at all (although, to be fair, I don't have any evidence that the version from the pattern would have been irritating either!).

Another thing that Big 4 patterns are renowned for is having lots of ease, and that's very much true for this pattern. It's definitely always best to look at the finished garment measurements (on the pattern paper) – I think in this case the pattern includes 5" of ease. 

That would have given me a dress that was looser than I wanted, so I went down a couple of sizes. I made a straight size 14, whereas my measurements would put me between a 16 and an 18.

I lengthened the bodice by an inch, which is normal for me (I'm 5'9"), and actually shortened the skirt by 3". Those skirt pieces are long! It's intended to be ankle length, but it would have been on the floor if I hadn't shortened it, and I'm a bit taller than average. 

It's also worth mentioning that if you have a non-directional print/plain fabric without nap, you can definitely get view A out of less fabric than the pattern suggests. It calls for 3.4 metres for size 14, but I managed to cut my dress out of just over 2.5 metres. 

Talking about fabric, this is a cotton poplin that I bought from Minerva but I can't seem to find it on their website now – sorry!

My finished Simplicity 8384 feels lovely to wear – the elastic in the back waist cinches it in nicely to give it some shape, but it's still really comfortable. It's a bit different from my other dresses, which is nice. I'm glad that I found the pattern in that charity shop box!

Thursday, 24 April 2025

Pauline Alice Nautic Set Blouse

The Pauline Alice Nautic set appealed to me as soon as I saw sneak peeks of it on Instagram, so I was fairly quick to purchase the pattern when it was released. I already had some fabric that was just right for the blouse, so it jumped to the top of my sewing list.

The Nautic set includes a blouse, skirt and shorts. The blouse, which I've made here, has a sailor collar, short sleeves, decorative binding/ribbon and front buttons. The shorts have an elasticated waist, slanted pockets and contrasting bias binding, while the skirt has an elasticated waist and gathered tier.

The pattern covers bust sizes from 31½" to 47¼" and hip measurements from 34" to 49½".

I enjoyed sewing my Nautic blouse. The instructions and accompanying diagrams are easy to follow. They maybe don't hold your hand quite as much as some instructions do, but they're still perfectly clear and I didn't have any trouble sewing my blouse. 

The pattern is rated as beginner level, which I'd say is probably fair. You probably wouldn't want to sew the blouse as your very first pattern, but if you've made a couple of projects and are looking for something to build your skills a bit, this could be a good option. 

You need to be quite careful and accurate when sewing the decorative ribbon/binding, but other than that it's a fairly simple blouse.

In terms of sizing, my bust is currently 39" but I made a size 42, which is intended for a 38" bust. I could tell from the finished garment measurements that it would be big enough, and that the next size up would probably be bigger than I wanted. 

After making a toile, the only adjustment I made was to lower the bust dart by an inch. 

Rather than lengthening the pattern (I'm just under 5'9"), I simply used a smaller hem. I used a total of 1" for my hem, whereas the pattern calls for you to use 2⅝".

Another non-fitting change that I made was to interface the facing pieces. This isn't included in the instructions, but I just thought that it would give a better finish. 

I also used 5 buttons instead of 3. It's a personal preference, but I just felt like 3 buttons wouldn't be quite enough and might result in gaping.

The main fabric that I used is a lightweight cotton that I bought in a charity shop a few months ago, and the white that I used for the collar is part of an old sheet. So this was a pretty thrifty project! I bought the ribbon and the buttons locally, and I love how they highlight the little pops of pink in the fabric print.

I'm really pleased with how my Nautic blouse turned out, and I like the fact that the collar makes it a bit different to other blouses in my wardrobe. I'd definitely like to try making the skirt from the set too, so there may well be more Nautic projects in my future!


Tuesday, 25 June 2024

Make With Mandi Penny Dress

The Make With Mandi Penny dress has been on my 'to sew' list for a while and I've been keeping my eye out for some interesting fabric to combine with the pattern. Finally I found the right candidate and I'm happy to share my Penny dress with you now!

The Penny is a woven dress with a loose-fitting bodice and tiered skirt with in-seam pockets. The bodice has a rounded neckline with two depths, and the sleeves can be made in long, mid or short lengths and are intended to have elasticated hems (more on that later!). The skirt has knee or midi length options.

For my version I used the short sleeves, higher neckline and midi skirt.

The finished bust measurements for the dress range from 34" to 55⅜".

I'll mention now that I was using the version of the pattern that was included with Simply Sewing magazine, so it's entirely possible that there may be some differences in the pattern directly from Make With Mandi. For example, the magazine version pattern accidentally omitted the pocket pattern pieces - if you need them, I found them available to download here.

I enjoyed sewing my Penny dress. The instructions had a good level of detail and I found them easy to follow. They're illustrated with photos which are mostly clear. One thing I thought was a bit odd was that the instructions refer to topstitching a couple of times, when what they're telling you to do would generally be called understitching. 

I found the order of the steps a bit odd - they have you start by stay stitching the neckline and sewing the bodice shoulder and side seams, then take you on to sewing the skirt, before returning to the bodice and sewing the facings and sleeves. There's nothing wrong with that, but it felt like it dotted about a bit to me so I followed the instructions, but did them in my own preferred order. 

The version of the pattern I used didn't give you any body measurements, just finished garment measurements. There's not necessarily anything wrong with that, but it would be helpful if they gave some guidance about how much ease the pattern is intended to have. I made a straight size 12, which gives me around 2" of ease at the bust, and the waist and hips are looser fitting.

I made a couple of alterations. The first was to lengthen the bodice by 1.5", which is a standard alteration for me. I also lowered the bust dart by 1", which is not something I normally have to do. I also chose to omit the elastic from the sleeve hems - when I made a toile it just didn't feel like the sleeve hems on the short sleeves were loose enough round my arms to need elastic and I like them as they are. 

The fabric that I used is a lightweight cotton that I bought from Koala Kreations. I really like the print - it's a bit different to anything else that I've seen around recently. I think it's a good weight of fabric for this pattern and should be nice and cool to wear over the summer.

All in all, I enjoyed sewing my Penny dress, it turned out really nicely, and I think it will be a welcome new addition to my wardrobe - I can see it being worn a lot!

Thursday, 6 June 2024

True Bias Nova Jumpsuit

Some potential projects float around in my mind for a while as I try to find the right combination of pattern and fabric, and others suddenly present themselves as a fully formed idea that demands to be made immediately. This True Bias Nova jumpsuit definitely falls into the second category!

I was browsing the True Bias patterns when they were on sale a few weeks ago and the Nova jumpsuit suddenly caught my eye. I'd seen it many times before, but for some reason now it seemed like it would be a good addition to my wardrobe. The next day Sarah from Simple Life Fabrics posted some new fabrics on Instagram, including a jersey that seemed just right for giving the Nova a try.

The Nova is a knit jumpsuit with a fully faced neckline and armholes. The pattern gives you the option of a wide elastic wasitband, and can be made either as a short romper or with full-length legs with elastic at the ankle. 

The pattern comes in two size ranges with the 0-18 size range covering bust measurements from 32" to 44.5", and the 14-30 range going from bust measurements from 41.5" to 57.5".

Sewing the Nova was fairly straightforward and the jumpsuit came together pretty quickly. The instructions were clear and easy to follow, with a good level of detail. They're accompanied by clear diagrams that really help to explain the processes. The pattern seems well drafted to me - I appreciated the fact that the facing pieces are slightly smaller than the bodice pieces so they easily turn to the inside of the jumpsuit.

In terms of sizing, I made a 12 at the bust blending out to a 14 at the hips as recommended for my measurements. I lengthened my jumpsuit by a total of 5 inches (not surprising because True Bias patterns are drafted for 5'5", and I'm just under 5'9"), adding 2 inches each at the lengthen/shorten lines on the bodice and legs and 1 inch at the lengthen/shorten line on the crotch. 

I'm fairly happy with the fit. I initially thought it might be slightly loose around the top, but having worn it I think that I want that slight extra space to make it easy to get on and off. I'll probably mainly wear it with a t-shirt underneath as I am in these photos, so a bit of extra room is helpful for that too. 

The only change I think I'd consider if I make another version (a definite possibility!) would be to take out the inch I added at the crotch, and add an extra inch on the leg instead. I'm going to wear this version a few more times before I make any decisions on that though.

As I mentioned above, the fabric I used is a jersey from Simple Life Fabrics. The colourway I used doesn't seem to be in stock anymore, but it is available in two different colours (here and here). It's a really pretty print and I like the blue colour. It also seemed like a good option to use for my first version of the Nova because it was quite a good price (Sarah has an excellent Bargain Fabrics collection!) so I was happier to see this as a wearable toile than if I'd bought more expensive jersey. Thankfully my "toile" is definitely very wearable!

I'm glad the idea of making the Nova jumpsuit presented itself to me. It was a fun project to sew and I really like the finished jumpsuit. Unsurprisingly, it's very comfy and easy to wear - definite secret pyjamas! It's definitely a winner for me!

Wednesday, 17 January 2024

Peppermint Bardon Dress

Hello there! Things have been quiet on my blog recently as I spent the last couple of months making Christmas presents for my family. Now that we're in the new year, I get to sew for myself again - hurrah! The first project I decided to make was the Bardon dress from Peppermint Magazine in collaboration with Elbe Textiles.

The Bardon dress has a sleeveless bodice, two-tiered skirt and pockets. It's intended to be a summer dress, but as you can see I've made it to wear as a pinafore. As far as I'm concerned, any sleeveless dress that's not too fitted is fair game for wearing layered as a pinafore!

The pattern is drafted for bust sizes from 31" to 53" and hip measurements from 34.6" to 56.3". As with all Peppermint patterns, it's a pay what you want pattern.

Sewing the Bardon dress was a nice, straightforward project. The front bodice has bust darts, the pockets are in-seam in the skirt and the skirt tiers are gathered. The bodice neckline and armholes are finished with bias binding so you get a nice clean finish on the inside. 

The instructions are clear and easy to follow. I deviated from them slightly in a few places to do things in the ways I'm more familiar with, but I didn't do anything too far from what they said.

One thing I will mention is that I cut my bias binding pieces slightly wider than the pattern suggests (the pattern calls for 1" pieces, I cut mine to 1.5"). I'd definitely do that again if I make another version of the dress - I think 1" would have just been a bit too narrow for my liking.

In terms of sizing - there is a fair amount of ease built into the pattern. I made the size recommended for my measurements and that works well for layering as a pinafore. If I had been making this as a summer dress as the pattern intends, I'd possibly have considered sizing down or maybe just using a slightly larger seam allowance at the underarms in particular. 

For this version, the only alteration I made was to lengthen the bodice by an inch. Once I'd sewn the dress, I also used a slightly larger hem on the skirt (I think I used an inch instead of half an inch). 

The fabric that I used is a royal blue needlecord from 1st for Fabrics. It's a perfect fabric for this kind of pinafore - it feels lovely, is soft enough to handle being gathered but has enough body to give a bit of warmth, plus it's a beautiful colour!

I wasn't too sure about the pinafore when I first tried it one once I'd finished sewing it - it just felt a bit too tent-like. Having worn it though, it has definitely grown on me. It's really comfortable, the needlecord gives a bit of warmth and the colour is bright and cheerful. If you're looking for a pinafore like this, I'd definite recommend making the Bardon dress!

Monday, 17 April 2023

Sew Me Something Florence Dress Pattern Review

Have you ever had a sewing project that feels like it might be doomed? That was definitely the case for me with this dress as it involved lots of little niggles, but thankfully in the end it's maybe not entirely perfect, but definitely perfectly wearable! Here's my Sew Me Something Florence dress...

The Florence dress is a loose-fitting midi dress with two views. View 1 has a bound button placket on the front bodice and darted three-quarter sleeves, while view 2 (which I made) has a bias bound neckline with a keyhole back and gathered long sleeves. Both versions have a gathered skirt with cut away pockets.

The pattern comes in two size ranges, with 6-20 covering bust sizes from 77-110cm and 20-34 for bust sizes from 118 to 153 cm.

My problems with this project were mainly related to the fabric. I bought the fabric from Backstitch and it's a navy blue and white polka dot viscose. While it's described simply as viscose on their website, I'd actually call it a viscose twill - which was initially quite a pleasant surprise because I've had good experiences using viscose twill in the past. 

Unfortunately when I pre-washed the fabric the blue bled a bit, particularly around the selvedges, and some of the polka dots turned pale blue rather than white. As it was worst around the selvedges, I was able to avoid the most severely affected areas when cutting out my pattern pieces so there are some dots with a distinctly blue tinge on my finished dress, but it's not too noticeable from a distance. I'm a bit concerned about what might happen when I have to wash the dress though!

The fabric also snags fairly easily, and unfortunately chose to do so right up the front of the bodice when I was sewing the waist seam, leaving me with a very noticeable white line in the middle of a navy section. With a bit of patience, I was able to make it look a bit better but it's still visible close up. Maybe if the blue runs again when I wash the dress that'll help in this case!  You've got to look on the bright side, haven't you?!

Actually sewing the dress was mostly a fairly straightforward experience. The instructions are clear, but I would say maybe aren't as detailed as some indie patterns. For example, I may have been missing something, but I don't think they ever actually tell you to sew the two halves of the back skirt together - it's fairly obvious that you need to do that, but it should still be mentioned. 

It's a personal preference, but I'm not a huge fan of the way the keyhole neckline is finished (the centre back seams are just pressed and then topstiched) or of the exposed neckline binding. I also think it would be easier to press the folds into the binding before stitching it onto the neckline rather than sewing it on and then pressing. If I make the dress again, I'd be tempted to draft a facing for the neckline, or maybe to use binding but attach it so it's on the inside. 

When it comes to picking a size, I'd definitely recommend consulting the finished garment measurements (the pattern does advise you to do this too). My body measurements would suggest I should make a size 16, but when I looked at the finished garment measurements I could tell that would be bigger than I wanted. I actually made a size 12 and it's perfectly big enough for me - it's still loose-fitting, but it's not overly baggy. 

I lengthened the bodice by 2cm and the sleeves by 2.5cm (standard for me because I'm taller than average). I also made a slight mistake when cutting out my fabric, and that combined with avoiding some of the worst blue areas meant that I didn't have quite as much fabric as I needed, so my skirt is about 7.5cm shorter than it should be. Thankfully it's still plenty long enough.

While making this project wasn't the smoothest process, the finished dress has actually turned out surprisingly well! It's really comfy, and you wouldn't notice the slight problems with the fabric if you don't look too closely. I know I'll enjoy wearing it, and I'd definitely consider making another version in future. So thankfully my Florence dress turned out not to be doomed at all!

Thursday, 26 January 2023

Homer + Howells Ingrid Dress Pattern Review

Hello there! It's been a while since I last posted, but I've got what I think is a good project to share to break the silence. It's the  Homer + Howells Ingrid dress - a pattern that I liked as soon as I saw it, and have now finally sewn for myself.

The Ingrid is a gathered panel dress with asymmetric seams and a centre front bust tuck. It comes with options for a midi or mini length dress or a top, and also has the choice of a classic tee sleeve or gathered cuff sleeve. I used the midi length and tee sleeve.

The pattern is drafted for bust sizes from 31½" to 48⅞" and hip sizes from 34¼ to 52".

Ingrid appealed to me because the asymmetric seam lines make it a bit different from the (many!) other dress patterns that I've made.

This is the first time that I've made a Homer + Howells pattern, and I wasn't disappointed. I bought the printed pattern and the envelope, instruction booklet and printed pattern are all really good quality, which is always a nice start! 

Sewing the dress was no trouble at all - the instructions have just the right level of detail and are easy to understand. It's the kind of pattern where you do need to keep track of which piece is which, and make sure that you cut everything out right, but there's clear information about that on the pattern pieces so as long as you follow that you should be fine. 

I would say it's a slightly more time-consuming dress to make than some others because you have to sew the two front and two back panel pieces all separately rather than making one bodice and attaching it to one skirt, but it's still not particularly complicated. 

It's worth taking time to make sure the bust tuck lines up across the centre front seam - I actually hand basted the two front pieces together across the tuck, then sewed the seam in two stages - first going from the bust tuck up to the neckline and then from the bust tuck down toward the waist.

The sizing seams good - it's intended to be a relaxed fit, and it achieves that without feeling baggy and shapeless. I made a straight size 14 (which is what is recommended for my current measurements) with no alterations, and I'm very happy with the fit. It's a really comfy dress to wear.

The fabric that I used is a lovely needlecord that I bought from Sew Much Moor. These photos aren't entirely doing it justice - the drab January weather is making the colour less saturated than it is in real life. The photos on the Sew Much Moor website are a much better reflection of it.

I really enjoyed sewing my Ingrid dress, and I'm happy with how it turned out. I don't think it'll necessarily be a pattern that I make over and over again - I tend to do that more with simpler dress styles that look different depending on the fabric you use, whereas the unique design of Ingrid makes the dress itself stand out (if that makes sense?!). I think a summery version in chambray would be nice though, so something along those lines may find its way onto my sewing table!