Thursday 22 February 2024

Friday Pattern Company Bernadette Skirt

I recently decided that a denim skirt would be a useful addition to my wardrobe. I looked through the skirt patterns that I already owned but nothing was quite what I wanted, so I decided to buy the Bernadette skirt from Friday Pattern Company to give that a try!

The Bernadette is a mini or midi skirt with front pleats, back darts and an invisible zip on one side. It also has a cute belt bag - the belt closes with D-rings and the bag is a zipper pouch with a front buttoned pocket. The belt bag may have been the thing that really made the pattern appeal to me! If the skirt isn't your thing but you like the look of the belt bag, it is available on its own as the Bernie belt bag.

The skirt comes in waist sizes from 24" to 53", and hip measurements from 34" to 62".

Bernadette comes together fairly quickly and is a reasonably simple project to sew. The instructions give you a good amount of detail and are easy to follow, helped by nice clear diagrams. 

The only difficulty I had was getting the waist facing and the waist of the skirt to match up - my skirt seemed to be too big, particularly at the back. I compared my pattern pieces and they matched up perfectly, so I think I must have somehow managed to stretch out the waist of my skirt when I was sewing the darts/pleats. I unpicked my back darts and resewed them to be a fraction bigger, and that sorted my problem.

You kind of think the belt bag will be quick to sew, but I think it probably actually took me just as long as the skirt itself! One thing I would say about it is that some areas of the bag end up with lots of layers of fabric and my machine did not enjoy trying to sew them. The points where the bag loops join the back of the pouch were a particular challenge and I had to hand crank my machine through those. If I make the bag again in a similar weight of fabric, I think I'd try to find a suitable thinner fabric for the bag loops and probably the flap of the front pocket too.

I deliberated about what size to make for a while. My current waist measurement is 32.5", which is just above the L range but below the XL. I looked at the finished measurements and I felt that the L would probably have technically fitted, but it would have been a bit tight to be comfortable when sitting. The XL would have been a bit too big though. In the end, I cut an XL but used a larger seam allowance (1.5 cm instead of the 1 cm called for in the pattern). I think I made the right choice - my finished skirt has just enough ease to make it comfortable to wear without feeling too big.

The fabric that I used is an 8 oz washed denim that I bought locally. It's a lovely weight for the skirt, but as I mentioned before it was a bit thick for some parts of the bag. 

I'm glad that I decided to give the Bernadette skirt a try. It was a really nice pattern to sew, and I'm very pleased with the finished results. I only finished it last week and I've already worn it twice - I think it'll be in regular wardrobe rotation from now on!

Wednesday 17 January 2024

Peppermint Bardon Dress

Hello there! Things have been quiet on my blog recently as I spent the last couple of months making Christmas presents for my family. Now that we're in the new year, I get to sew for myself again - hurrah! The first project I decided to make was the Bardon dress from Peppermint Magazine in collaboration with Elbe Textiles.

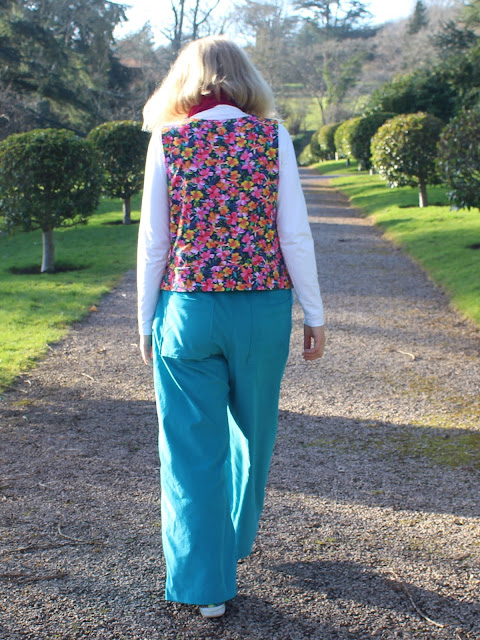
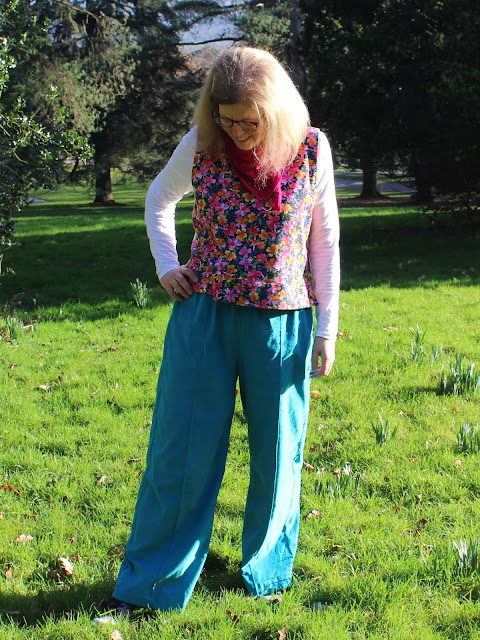
The Bardon dress has a sleeveless bodice, two-tiered skirt and pockets. It's intended to be a summer dress, but as you can see I've made it to wear as a pinafore. As far as I'm concerned, any sleeveless dress that's not too fitted is fair game for wearing layered as a pinafore!

The pattern is drafted for bust sizes from 31" to 53" and hip measurements from 34.6" to 56.3". As with all Peppermint patterns, it's a pay what you want pattern.

Sewing the Bardon dress was a nice, straightforward project. The front bodice has bust darts, the pockets are in-seam in the skirt and the skirt tiers are gathered. The bodice neckline and armholes are finished with bias binding so you get a nice clean finish on the inside. 

The instructions are clear and easy to follow. I deviated from them slightly in a few places to do things in the ways I'm more familiar with, but I didn't do anything too far from what they said.

One thing I will mention is that I cut my bias binding pieces slightly wider than the pattern suggests (the pattern calls for 1" pieces, I cut mine to 1.5"). I'd definitely do that again if I make another version of the dress - I think 1" would have just been a bit too narrow for my liking.

In terms of sizing - there is a fair amount of ease built into the pattern. I made the size recommended for my measurements and that works well for layering as a pinafore. If I had been making this as a summer dress as the pattern intends, I'd possibly have considered sizing down or maybe just using a slightly larger seam allowance at the underarms in particular. 

For this version, the only alteration I made was to lengthen the bodice by an inch. Once I'd sewn the dress, I also used a slightly larger hem on the skirt (I think I used an inch instead of half an inch). 

The fabric that I used is a royal blue needlecord from 1st for Fabrics. It's a perfect fabric for this kind of pinafore - it feels lovely, is soft enough to handle being gathered but has enough body to give a bit of warmth, plus it's a beautiful colour!

I wasn't too sure about the pinafore when I first tried it one once I'd finished sewing it - it just felt a bit too tent-like. Having worn it though, it has definitely grown on me. It's really comfortable, the needlecord gives a bit of warmth and the colour is bright and cheerful. If you're looking for a pinafore like this, I'd definite recommend making the Bardon dress!

Thursday 26 October 2023

French Navy Patterns Belinda Button Up Shirt

It appears that I've been in a shirt making mood of late so, hot on the heels of my recent Belle shirt, here's my version of the French Navy Patterns Belinda Button Up Shirt.

The Belinda Button Up is a long-sleeved shirt with collar and cuff options. View A has a neat, narrow collar and plain cuffs, while view B has a rounded ruffled collar and ruffled sleeve cuffs. Both versions feature a breast pocket. For my Belinda, I used the plain cuffs of view A, the ruffled collar of view B and omitted the breast pocket.

The pattern is sized for bust measurements from 31.5" to 59.5" and hips from 34.5" to 62.5".

As with all collared and cuffed shirt patterns, the Belinda is a slightly involved project that takes a bit of time. I enjoyed working through the steps gradually and didn't find any of the individual processes particularly complicated. The instructions were really good and explained everything with a good level of detail, and they're accompanied by clear diagrams.

Admittedly, I have made a few shirts in the past so there wasn't anything unfamiliar to me, but even if this had been my first attempt at a shirt I think the instructions are good enough to ensure that sewing the Belinda would be a fairly smooth experience.

My (high/full) bust/waist/hip measurements vary between a size E and F and halfway between the two. Having looked at the finished garment measurements, I decided to make a straight size E for my toile and go from there. That was mainly because my high bust is the right measurement for the E so I thought that would hopefully mean the shoulders/neck should fit.

My toile turned out nicely and the only fit adjustment I made was to lengthen the shirt by 3 cm, which is a standard alteration for me (I'm about 5'9"). I also used an extra button, partly because I'd lengthened the shirt and partly because I always position a buttonhole at my bust point to try to prevent gaping and I needed an extra button to make even spacing work around that.

The fabric that I used is a floral cotton poplin that I bought locally from a shop that doesn't have it available online. It's a pretty print and I think the fabric works really well for this shirt.

I really enjoyed sewing my Belinda Button Up shirt, and I think it turned out nicely. I particularly like the ruffle collar - it's cute without being twee, and gives the shirt a bit of a distinctive character. I could definitely see myself sewing this pattern again, and that's always a good verdict isn't it?!

Thursday 12 October 2023

Peppermint x Modern Sewing Co Belle Blouse

Every now and then I like to get my teeth into a slightly more involved sewing project, and shirts are often top of the list. Especially if those shirts happen to have some interesting details to make them a bit unique. The Belle shirt, which was recently released by Peppermint magazine in collaboration with Modern Sewing Co., definitely fits that description!


The Belle shirt is a relaxed fit blouse with a slightly A-line shape. It has a dropped front collar and voluminous sleeves that are gathered into the sleeve cuff. The pattern has shirt and dress options.

The pattern is drafted for a C cup and 5'8" height. The size range covers bust measurements from 29.5" to 55.5" and hip sizes from 32.7" to 58.7".


I enjoyed sewing my Belle shirt, and the instructions were generally very good. They give you a good level of detail and are accompanied by clear diagrams. I like the fact that they result in a nice neat finish on the inside. All the seams apart from the armholes are French seamed, the edge of the facing is hemmed, and the back facing is top-stitched down from the outside to keep it in place.


I will say that I noticed a few oversights/errors in the instructions, which I emailed Peppermint magazine about. I received a reply very quickly saying that they're in the process of correcting them. The issues didn't cause me any major problems (they were more obvious omissions or typos rather than anything being incorrect) and because of that and the fact they're being fixed, I won't go into too much detail. The only thing I will say (because it might be helpful for someone buying supplies for the shirt) is that the pattern actually calls for 7 buttons for the shirt and 9 for the dress - the supplies list in my version of the instructions says 5 and 7 respectively.


It seems a bit strange to me that the pattern includes a dress option, but that's not shown on any of the photos or line drawings. In case you're interested in that option, the dress is a lengthened version of the shirt (i.e. there's not a separate skirt piece), and I think it would be a fairly short dress. For my size, the dress is 22.5 cm longer than the shirt, so it would definitely be well above knee length.


My measurements put me pretty much exactly half way between a size F and G. I consulted the finished garment measurements and decided to try a straight size F. This worked well for my toile and I made my finished shirt with no fit adjustments. As the pattern is drafted for 5'8" height, I didn't even have to lengthen it - hurrah!


The only alteration I made was to change the button spacing so that I have a button positioned at my bust point to prevent gaping. To get a sensible spacing around that point, I've also used more buttons than the pattern calls for.


The fabric I used is a fruit print cotton (with added glitter!) that I bought from Simple Life Fabrics. It's in their bargain section, and at £5.60 per metre it really is a bargain! It's also great quality, was a pleasure to sew and is lovely to wear. It's a great fabric for a shirt.


All in all, I'm really happy with my Belle shirt. Yes, there were a couple of issues with the instructions, but they've been recognised and they're being fixed. I enjoyed sewing the Belle and I'm pleased with the end result. I particularly like the collar and the full sleeves. I think it'll be great to wear with dungarees this autumn!

Thursday 24 August 2023

Embroidered Tilly & the Buttons Stevie Top

I bought the Tilly & the Buttons Stevie pattern quite a while ago, and it's been floating around on my sewing list ever since. I finally got around to making it, and decided to embellish the simple top with some pretty embroidered flowers.

The Stevie is a boxy fit top or tunic dress with a round neckline and grown-on sleeves. It closes at the back neckline with ties or a button and loop, and there are options to use patch pockets or sleeve cuffs (I didn't use either of them this time). There's also an add-on pack that you can buy to give you the possibility to add longer sleeves or turn the top into a dress with a gathered skirt.

The pattern covers hip sizes from 33" to 61".

Stevie is simple to sew - it would be a good pattern for beginners, or it's a nice relaxing project if you've got more experience. The instructions are detailed and very easy to follow, helped by the fact that they're illustrated with clear, bright photos.

I enjoyed sewing my Stevie top, and didn't have any problems at all as I was making it. I like the way the neckline facings are topstitched down - I think it gives a nice neat finish. Everything came together easily and it was a relatively quick project.

In terms of sizing, I made a size 6. My bust and waist measurements are currently between a 5 and a 6 in Tilly & the Buttons sizing, and my hips are bang on the measurement for the size 6. I looked at the finished garment measurements and decided that the 6 would probably be the best bet. I'm happy with how it turned out.

After making a toile, I decided to lengthen the top but my finished top then felt a bit long so I actually ended up taking my top back to the original length from the pattern.

The fabric that I used is a white and grey-blue striped cotton (or at least I think it's cotton!) that I found in a charity shop. I bought it thinking that it would be a good base for embroidery, and the simple shape of the Stevie top seemed like it would be a good canvas for some embroidery too.

I decided to design the embroidery myself and sketched out a couple of ideas before eventually deciding to use this idea of flowers trailing from one shoulder. My flowers have satin stich petals with accents added in straight stitch and French knots in the centres. The leaves are done in fishbone stitch, and for the stems I (appropriately!) used stem stich. It turned out just how I was hoping it would!

I enjoyed both sewing and embroidering my Stevie, and I really like the finished top. It's nice and easy to wear, but the embroidered flowers make it feel a bit more special to me. The pattern would be great for showing off a fun print so I suspect I may make more in future!