Wednesday 24 April 2024

Helen's Closet Wildwood Jacket

This project has been a long time coming. It's something I've fancied making for a while but always felt intimidated by, once I got up the courage to make it the project itself took some time, and then I had to wait ages to get photos of it because the weather kept being too rainy. At long last, I'm happy to share my Helen's Closet Wildwood jacket!

The Wildwood is a quilted jacket or vest/gilet that comes in high hip, low hip and mid thigh lengths. It has overlapping shoulder and side seams, and the edges are bound with bias tape. The pattern also includes patch pockets, and the jacket/vest closes with front snaps.

The pattern covers bust sizes from 31 to 60" and hip measurements from 33 to 62". 

If, like me, you find the idea of making a quilted jacket appealing but a bit daunting, I'd definitely recommend the Wildwood pattern. 

The instructions are really clear and detailed. In addition to telling you how to make the actual jacket/vest, they also guide you through making and attaching bias binding, quilting your pieces, choosing the stitching pattern for quilting and pre-shrinking your pieces. 

They answered all of the questions that I had in my mind about making the jacket and made me confident that I could tackle the project successfully.

Sewing the jacket itself is actually relatively straightforward, and the overlapped shoulder and side seams are helpful if you need to adjust your fit a bit. Binding all the outside edges and the interior seams does take a bit of time, but it's not difficult. 

I made sewing my Wildwood jacket more time consuming because I pieced the patchwork for the outside of my jacket rather than just using a fabric. I was lucky enough to win the fabric I used in a fat quarter bundle from Sew Scrumptious a year or two ago. They're Liberty quilting cottons from The Artist's Home collection. As they're such pretty prints, I took my time deciding what to use them for - they were almost turned into a bag or a quilt, but I'm glad that I went down the quilted jacket route in the end.

The pieces I cut for my patchwork were 5.25" x 4.75" (so ended up 4.75" x 4.25" once sewn) - a slightly random size that I chose to make maximum use of the fat quarters. I had 11 fat quarters and that gave me plenty of fabric; I have small sections left of each of them. 

Once I'd pieced together my outer "fabric", I had to decide how to quilt the pieces. I debated a couple of options, and eventually decided to keep things simple and stitched horizontal lines one inch from each horizontal seam. Thankfully that seems to have worked out nicely. 

I bought my batting from 1st for Fabrics, and the lining fabric that I used is a vintage Laura Ashley cotton that I've had for so long that I can't remember where it came from!

The next decision to make was about the binding. I wanted something that would stand out whilst also complementing all the pretty prints in my quilted pieces. In the end, I plumped for a red cotton with small white spots, and made my own bias binding. I'm happy with that choice - it's just the look I was after.

I made the possibly controversial choice to omit the pockets from the jacket. I like pockets as much as the next person, but I felt like my jacket had enough going on as it was and that adding patch pockets might be taking things one step too far. I also decided to use sew on snap fasteners instead of setting in snaps - I've had some disasters with snaps before, and I'd invested so much time in the jacket by that point that I didn't want to risk that happening to this project! Sewing on snaps seemed far less risky, and they work fine.

I used the size recommended for my measurements (blending from a 14 at the bust to a 16 at the hips) and I'm happy with that. There is a bit of ease in the jacket and some people might like it slightly more fitted, but I'd prefer to have it as it is to allow for wearing layers underneath. 

I used the high hip view of the pattern, and it's the perfect length for me - long enough to cover my waist if I'm wearing separates, but short enough to look good with dresses too. 

All in all, in case it's not obvious already, I'm so proud of how my Wildwood turned out! It wasn't a quick project, but I really enjoyed working on it, and my jacked turned out just how I hoped it would. I'd heartily recommend the pattern if you're looking for a quilted jacket/vest. And I'm very tempted to make another version - that's always a good verdict on a pattern, isn't it?!
Thursday 22 February 2024

Friday Pattern Company Bernadette Skirt

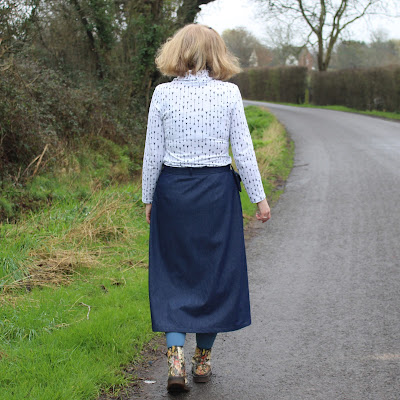
I recently decided that a denim skirt would be a useful addition to my wardrobe. I looked through the skirt patterns that I already owned but nothing was quite what I wanted, so I decided to buy the Bernadette skirt from Friday Pattern Company to give that a try!

The Bernadette is a mini or midi skirt with front pleats, back darts and an invisible zip on one side. It also has a cute belt bag - the belt closes with D-rings and the bag is a zipper pouch with a front buttoned pocket. The belt bag may have been the thing that really made the pattern appeal to me! If the skirt isn't your thing but you like the look of the belt bag, it is available on its own as the Bernie belt bag.

The skirt comes in waist sizes from 24" to 53", and hip measurements from 34" to 62".

Bernadette comes together fairly quickly and is a reasonably simple project to sew. The instructions give you a good amount of detail and are easy to follow, helped by nice clear diagrams. 

The only difficulty I had was getting the waist facing and the waist of the skirt to match up - my skirt seemed to be too big, particularly at the back. I compared my pattern pieces and they matched up perfectly, so I think I must have somehow managed to stretch out the waist of my skirt when I was sewing the darts/pleats. I unpicked my back darts and resewed them to be a fraction bigger, and that sorted my problem.

You kind of think the belt bag will be quick to sew, but I think it probably actually took me just as long as the skirt itself! One thing I would say about it is that some areas of the bag end up with lots of layers of fabric and my machine did not enjoy trying to sew them. The points where the bag loops join the back of the pouch were a particular challenge and I had to hand crank my machine through those. If I make the bag again in a similar weight of fabric, I think I'd try to find a suitable thinner fabric for the bag loops and probably the flap of the front pocket too.

I deliberated about what size to make for a while. My current waist measurement is 32.5", which is just above the L range but below the XL. I looked at the finished measurements and I felt that the L would probably have technically fitted, but it would have been a bit tight to be comfortable when sitting. The XL would have been a bit too big though. In the end, I cut an XL but used a larger seam allowance (1.5 cm instead of the 1 cm called for in the pattern). I think I made the right choice - my finished skirt has just enough ease to make it comfortable to wear without feeling too big.

The fabric that I used is an 8 oz washed denim that I bought locally. It's a lovely weight for the skirt, but as I mentioned before it was a bit thick for some parts of the bag. 

I'm glad that I decided to give the Bernadette skirt a try. It was a really nice pattern to sew, and I'm very pleased with the finished results. I only finished it last week and I've already worn it twice - I think it'll be in regular wardrobe rotation from now on!

Wednesday 17 January 2024

Peppermint Bardon Dress

Hello there! Things have been quiet on my blog recently as I spent the last couple of months making Christmas presents for my family. Now that we're in the new year, I get to sew for myself again - hurrah! The first project I decided to make was the Bardon dress from Peppermint Magazine in collaboration with Elbe Textiles.

The Bardon dress has a sleeveless bodice, two-tiered skirt and pockets. It's intended to be a summer dress, but as you can see I've made it to wear as a pinafore. As far as I'm concerned, any sleeveless dress that's not too fitted is fair game for wearing layered as a pinafore!

The pattern is drafted for bust sizes from 31" to 53" and hip measurements from 34.6" to 56.3". As with all Peppermint patterns, it's a pay what you want pattern.

Sewing the Bardon dress was a nice, straightforward project. The front bodice has bust darts, the pockets are in-seam in the skirt and the skirt tiers are gathered. The bodice neckline and armholes are finished with bias binding so you get a nice clean finish on the inside. 

The instructions are clear and easy to follow. I deviated from them slightly in a few places to do things in the ways I'm more familiar with, but I didn't do anything too far from what they said.

One thing I will mention is that I cut my bias binding pieces slightly wider than the pattern suggests (the pattern calls for 1" pieces, I cut mine to 1.5"). I'd definitely do that again if I make another version of the dress - I think 1" would have just been a bit too narrow for my liking.

In terms of sizing - there is a fair amount of ease built into the pattern. I made the size recommended for my measurements and that works well for layering as a pinafore. If I had been making this as a summer dress as the pattern intends, I'd possibly have considered sizing down or maybe just using a slightly larger seam allowance at the underarms in particular. 

For this version, the only alteration I made was to lengthen the bodice by an inch. Once I'd sewn the dress, I also used a slightly larger hem on the skirt (I think I used an inch instead of half an inch). 

The fabric that I used is a royal blue needlecord from 1st for Fabrics. It's a perfect fabric for this kind of pinafore - it feels lovely, is soft enough to handle being gathered but has enough body to give a bit of warmth, plus it's a beautiful colour!

I wasn't too sure about the pinafore when I first tried it one once I'd finished sewing it - it just felt a bit too tent-like. Having worn it though, it has definitely grown on me. It's really comfortable, the needlecord gives a bit of warmth and the colour is bright and cheerful. If you're looking for a pinafore like this, I'd definite recommend making the Bardon dress!