Showing posts with label Simplicity. Show all posts

Thursday, 19 June 2025

Simplicity 8384 dress

I enjoy hunting out bargains in charity shops, and always keep an eye out for sewing patterns. A couple of months ago I stumbled upon a box of patterns and treated myself to a couple of them, one of which was Simplicity 8384. I particularly liked the look of view A, which is what I've sewn here. 

Simplicity 8384 is a shirt dress or top with various length options. All the views have a collarless rounded neckline, and buttons at the centre front of the bodice. There are sleeveless, short sleeve and three-quarter sleeve options. The dress has a handkerchief hem for the knee and mid-calf lengths, and a straight hem for the ankle length and peplum top versions. The back of the waistline is cinched in slightly with elastic.

The pattern covers bust measurements from 30.5" to 46".

I enjoyed sewing my dress. The neckline/collar band in particular turns out really nicely and was very satisfying to sew. 

The instructions in Big 4 sewing patterns often get a bad reputation, but I usually find them clear and easy to follow. They maybe don't hold your hand as much as indie patterns and they're generally a lot more concise, but that's not necessarily a bad thing. I had no problems while I was making my dress.

That said, I did take a slightly different approach to inserting the elastic in the back of the waistline. The instructions call for you to sew the edges of the seam allowances together to make a channel and insert the elastic into that. I thought that might be irritating to wear because the seam allowance could move about. Instead, I pressed the seam allowance up and made my channel by stitching the seam allowance to the back bodice to anchor it in place. It worked nicely, and isn't irritating at all (although, to be fair, I don't have any evidence that the version from the pattern would have been irritating either!).

Another thing that Big 4 patterns are renowned for is having lots of ease, and that's very much true for this pattern. It's definitely always best to look at the finished garment measurements (on the pattern paper) – I think in this case the pattern includes 5" of ease. 

That would have given me a dress that was looser than I wanted, so I went down a couple of sizes. I made a straight size 14, whereas my measurements would put me between a 16 and an 18.

I lengthened the bodice by an inch, which is normal for me (I'm 5'9"), and actually shortened the skirt by 3". Those skirt pieces are long! It's intended to be ankle length, but it would have been on the floor if I hadn't shortened it, and I'm a bit taller than average. 

It's also worth mentioning that if you have a non-directional print/plain fabric without nap, you can definitely get view A out of less fabric than the pattern suggests. It calls for 3.4 metres for size 14, but I managed to cut my dress out of just over 2.5 metres. 

Talking about fabric, this is a cotton poplin that I bought from Minerva but I can't seem to find it on their website now – sorry!

My finished Simplicity 8384 feels lovely to wear – the elastic in the back waist cinches it in nicely to give it some shape, but it's still really comfortable. It's a bit different from my other dresses, which is nice. I'm glad that I found the pattern in that charity shop box!

Wednesday, 21 September 2016

Simplicity 1418 dress

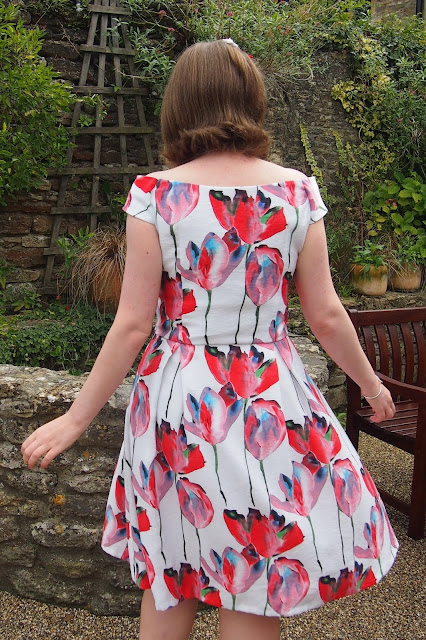
This weekend just gone my brother got married. An occasion like that demands a new dress, don't you think? And obviously I had to make that dress. I knew I wanted to stick with my favoured fit and flare silhouette, but with some sort of feature to stand out from the dresses I wear on a daily basis. I looked through my pattern stash and eventually settled on Simplicity 1418.


This is a pattern that I got free with a magazine at some point and to be honest I'd forgotten I even owned it, but it was just what I wanted for this project. Simplicity 1418 is one of the Pattern Runway series, which has various bodice options and a pleated skirt. I decided to omit the back inserts and shoulder straps, and use the off-the-shoulder sleeves.


I made a toile of the bodice using a size 16 at the bust and grading to an 18 at the waist, and making my standard adjustment of adding an inch to the length. The fit was good, apart from when it came to the sleeves - they were huge! I took a large wedge out of the middle of the sleeve piece, which greatly improved things but there was still a bit of extra room so I slimmed them down again. I think in the end I took around 3 inches out of the sleeve, and adjusted the elastic and casing that help hold the sleeve in place by the same amount.


That meant I was ready to move on to creating the actual dress. I considered a whole range of fabric options, but the winner in the end was this lovely viscose and linen mix from Sew La Di Da. It's a really gorgeous fabric, and I think the large scale print helps to make it stand out from my everyday dresses.

It is quite a thin fabric so I decided to underline everything with white cotton lawn. I'm really happy I made that choice - not only does it ensure that the fabric is opaque, it also makes the colours look more vivid.


I cut everything out in a single layer to make it easier to get the print placement right. I wanted to make sure I had one of the groups of 3 poppies in the centre of the bodice, and then carry that on down through the skirt. The front bodice also has princess seams, and I matched the pattern up as closely as possible between the centre front and side front sections. I'm glad I put in the effort to do that - I think the bodice could have ended up looking a bit of a mess with this print otherwise.

+

The sewing process was all straightforward and the instructions were easy to follow. I decided to line the bodice instead of using the facings. I used the facings on my toile and there's absolutely nothing wrong with them, but I just prefer the clean finish of a lined bodice, especially for a dress like this. I also added 2 inches to the length of the skirt pieces just to make sure that it would be a nice elegant length.

To top it all off, I used some of the remnants of the fabric to make the simple flowers that you can hopefully just about see in my hair in these photos. The benefit of making your own outfit is that it's easy to make sure your accessories match because you can just use the same fabric!


 I really enjoyed wearing this dress - I was slightly concerned that the off-the-shoulder sleeves would annoy me, but they didn't at all. I think having the elastic underneath the sleeves really helps them to stay in place and stops the bodice from slipping. It's not going to be one of my most worn dresses because it is a bit special, but it is definitely one of my favourites. Now I just need someone else to get married so that I can wear it again!

Monday, 29 August 2016

Father's Day shirt - SImplicity 1544

For Father's Day this year, I decided to make my Dad a shirt. But I also decided that it would be best not to make it as a surprise, but instead consult him so he coul pick what features he wanted in the shirt (he has quite specific opinions on pockets) and to make sure that I'd get the fit right. So I presented him with the pattern and fabric, and then I got to work on making him the shirt. Don't worry, it hasn't taken me this long to make the shirt for him - it's been finished for well over a month already - it just took a while to get a couple of pictures of him wearing it.


The pattern I chose is Simplicity 1544 -  a button front shirt with various options for pockets, shoulder tabs and yokes. The collar band, cuff and inside yoke are intended to be cut from a contrast fabric "for a fresh modern approach",

We instantly ignored the contrast fabric options, as well as the studded front yoke option, and the shoulder tabs. My Dad chose the pockets from view D (patch pockets with a buttoned top flap).


You've probably noticed the main difference between the pattern and the version I made is the sleeves - namely that the pattern comes with long sleeves only, and I made short sleeves. This is obviously an easy adjustment to make, and I simply measured the length sleeves on one of my Dad's short-sleeved shirts, added a bit extra for the hem, and then cut my traced pattern piece at that level.


The fabric I used is a pink Oxford stripe shirting from Fabworks. It's a really lovely quality cotton (especially for £4 per metre!), was great to work with and, I'm told, is lovely and soft to wear. Which is good news for me because I over-ordered so I think there may be just about enough left to squeeze out a top of some kind for me. Yay!

The buttons were a stroke of genius on my part (well, maybe not genius, but I was quite pleased with myself when I thought of the idea) because I harvested them from one of my Dad's old shirts. I tend to commandeer shirts that are a bit worn around the cuffs/collar to use the main fabric for linings, so there was one sitting here ready and waiting to have its buttons removed. More sustainable and I didn't have to wait till I could get to a shop to buy some. Everyone wins!


I've made shirts and shirtdresses for myself before, so I'm familiar with all the processes in making a collar, button plackets, etc. but they're still things that for some reason I imagine to be more complicated than they are. Does anyone else do that, or am I just weird?! I think making this shirt will have helped me get over that a bit though, because everything just seemed more straightforward. Admittedly, I did make things slightly easier for myself this time due to the fact that long sleeves and cuffs were eliminated, so maybe that helped.


The collar and collar stand is the area that I've struggled with most on other shirts, but this combination went together easily, and looked right first time without having to unpick and redo anything. Maybe the pattern is drafted particularly well, or maybe I've got better at inserting collars over time. Who knows.

In any case, the instructions were clear and easy to follow throughout. They're not overly hand-holdy, but they don't leaving you scratching your head wondering what on earth they're talking about either.


Shirts aren't necessarily the speediest of projects simply because of the number of pieces involved in creating a collar, button plackets etc. but there's definitely nothing to be afraid of as long as you've got a good pattern. I'm sure I'll be using Simplicity 1544 again in the future because I never usually know what to make for my Dad when it comes to present-giving times, but now I know this is a good option. And making things for people who appreciate the work that has gone into them is always nice, isn't it?

Tuesday, 25 November 2014

Simplicity 1325 V-neck pinafore dress

I was wandering aimlessly around Fabricland in Bristol a month or two ago not feeling inspired by any of the fabrics. I always find that place to be a bit hit and miss, and on that particular Saturday nothing seemed to be quite right for the projects that I had in mind. So I was feeling a bit despondent, but then thankfully a random unknown stranger came to my rescue by helpfully leaving one of the pattern catalogues open on the page for Simplicity 1325.


The pinafore dress (or jumper to the Americans) on the pattern cover really caught my eye. It's a bit different to any of the dresses I've made so far, whilst keeping to my general preference for fit and flare styles. Plus I love a bit of layering when the weather gets a bit colder, so a flattering pinafore-style dress was always going to appeal to me. Especially when it was combined with a good basic t-shirt pattern, a jacket that I like the look of (and trousers too, but I probably won't be making them any time soon given my whole not wearing trousers thing) and, best of all, a half price Simplicity sale.


The dress has a flared skirt with pockets, and a lined bodice with a plunging V-neck. As you can see from the photos, this is definitely a pinafore and would be a bit indecent if you didn't have the t-shirt underneath! I'm wearing it with a basic RTW t-shirt here, but I'm planning to try out the t-shirt that comes in the pattern at some point soon.

I made a size 14, with the only alteration being to add 1 inch to the length of the bodice, which is a standard alteration for me. I was a bit worried before making the dress that the deep V neck might make fitting a bit of a pain, but I got lucky and it fit me really nicely straight out of the packet. I think the photos don't entirely do it justice on that front, as they seem to show up every possible tiny little crease which doesn't seem to be there in real life, but I promise it does fit nicely really!


Sewing up the dress was pretty straightforward. The instructions were all nice and clear and fairly well illustrated. I was already familiar with almost all of the techniques, but I sewed my first lapped zip (I'm pretty confident with centered zips, and growing to love invisible zips after a bit of a wobbly start, but I'd somehow unintentionally avoided lapped zips until now!), and that went relatively well. There's room for improvement there, but I'm happy with it for a first attempt.

If you've followed my blog for a little while, you may have noticed that the fabric I used is a different colourway (indigo) of the same chambray that I used for my latest Mortmain dress. I still think it doesn't photograph brilliantly as a finished garment, but really is beautiful fabric - in terms of both how it looks and feels. Here it is in all it's glory when it arrived...


I love how fabric comes tied up with pretty ribbon from Dragonfly Fabrics - it makes it feel like Christmas has come early!

The only thing I might change about this dress would be to think about leaving out the pockets. This is odd for me because I generally prefer dresses/skirts with pockets, but in this case the combination of the skirt being cut on the bias and the chambray I used means that I have to be really careful about keeping the pockets completely smooth under the skirt, otherwise they don't sit particularly nicely and aren't very flattering for my hips. This means I probably won't really be using these pockets, so they might as well not be there really!


That's a fairly minor point though, and other than that I'm pretty pleased with this dress. I'm not sure I'll make another one again instantly, not because I don't like this one but because, compared to most of my other dresses, it's quite a distinctive shape so I think even if you made it in a totally different fabric it would quite obviously be the same dress (if that makes any sense?!), and it's always good to have a bit of variety, don't you think?