Today I'm here to talk to you about a relatively new sewing pattern - the Sew Over It Salma dress. It was released at the start of the year and I've already made three versions so it's probably not hard for you to guess that I'm a bit of a fan!
Salma is a classic jersey shift dress that offers a few different options to make it a bit more exciting. You can choose from a round neck, V-neck or roll neck, as well as a standard or puff sleeve in two different lengths. The pattern has above-the-knee or knee length views. It's available in sizes from a 31" to 57" bust.
The first version of Salma that I made was actually a top rather than a dress. I made this as a wearable (thankfully very wearable!) toile using some ponte roma that I had left over from making a dress a couple of years ago. For this version I used the V-neck and standard sleeve options. To make a top instead of a dress, I very simply just measured how long I wanted the top to be and cut the pattern at that length - happily it turned out that I had just enough fabric for the length I wanted.
I really like how the top turned out and the fit seemed good, so I went on the lookout for some fabric for a dress version.
I found this grey floral sweatshirting on the Sew Over It website. It's a bit of a different choice for me - the fabric is available in a blue colourway too, which would be my default option, but I felt like stepping outside the box a bit.
Unfortunately I'm not sure that was the wisest choice! The fabric is lovely in itself and super soft, but the finished dress just doesn't feel quite me. It's just not quite vibrant enough! I'll definitely still wear it though - since taking these photos I've tried pairing it with a pink cardi, which really helps to lift it a bit, and I think if I layer it over a roll neck top that could be good too. I love the shape of the dress (I used the V-neck and standard sleeve again for this one) though so decided that I might need another version that's more me!
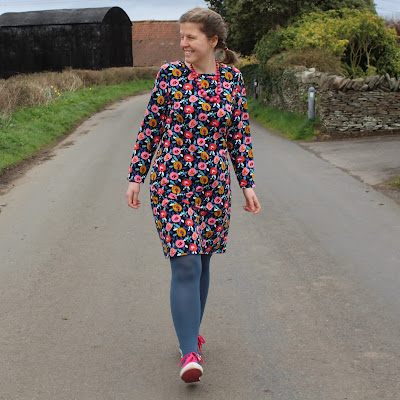
Now, you definitely couldn't accuse this fabric of not being vibrant enough! It's a lovely French terry that I got from Backstitch (side note - I've ordered from Backstitch a few times over the last year and have been really impressed with their customer service. My orders have always arrived super quickly even when everything else was delayed due to the pandemic). For this version I used the round neck and standard sleeve. I love how this one turned out (hence most of the photos I'm sharing being of this one!) and I know I'll wear it a lot.
The Salma dress is really simple to sew - in terms of construction, it's pretty much just a lengthened t-shirt with the added benefit of bust darts and side seam shaping to give the dress a lovely silhouette. It's also designed for medium to heavy weight knits such as ponte roma, sweathshirting and French terry that tend to be quite stable and easy to handle in comparison with some jerseys.
As with all Sew Over It patterns that I've made, the instructions are really detailed and easy to follow. I particularly like the method that they use for sewing the neck band on the V-neck option, and I think it helps to get a neater finish than I've sometimes got when sewing V-necks on other patterns.
I made a straight size 14 as recommended for my measurements, and I think the fit is good. It's fitted enough to have shape, without being at all tight anywhere. The only change I made was to lengthen the pattern by an inch above the waistline, which is very standard for me. For both my dress versions, I used the knee length option - as you can see, it's slightly above knee length on me (I'm about 5'9").
I think the Salma is a really versatile pattern - it's the kind of dress that can be really casual when made in colourful patterned fabrics like mine, but could also look smart if you made it in a solid colour ponte roma. And of course, being a knit dress, its super comfy - definite secret pyjamas! Three versions are probably enough for me for now, but I'll definitely be keeping my eye out for nice fabric for possible future versions!


