Showing posts with label Sew Over It. Show all posts

Thursday, 1 April 2021

Sew Over It Salma Dress(es and top!)

Today I'm here to talk to you about a relatively new sewing pattern - the Sew Over It Salma dress. It was released at the start of the year and I've already made three versions so it's probably not hard for you to guess that I'm a bit of a fan!

Salma is a classic jersey shift dress that offers a few different options to make it a bit more exciting. You can choose from a round neck, V-neck or roll neck, as well as a standard or puff sleeve in two different lengths. The pattern has above-the-knee or knee length views. It's available in sizes from a 31" to 57" bust.

The first version of Salma that I made was actually a top rather than a dress. I made this as a wearable (thankfully very wearable!) toile using some ponte roma that I had left over from making a dress a couple of years ago. For this version I used the V-neck and standard sleeve options. To make a top instead of a dress, I very simply just measured how long I wanted the top to be and cut the pattern at that length - happily it turned out that I had just enough fabric for the length I wanted.

I really like how the top turned out and the fit seemed good, so I went on the lookout for some fabric for a dress version.

I found this grey floral sweatshirting on the Sew Over It website. It's a bit of a different choice for me - the fabric is available in a blue colourway too, which would be my default option, but I felt like stepping outside the box a bit. 

Unfortunately I'm not sure that was the wisest choice! The fabric is lovely in itself and super soft, but the finished dress just doesn't feel quite me. It's just not quite vibrant enough! I'll definitely still wear it though - since taking these photos I've tried pairing it with a pink cardi, which really helps to lift it a bit, and I think if I layer it over a roll neck top that could be good too. I love the shape of the dress (I used the V-neck and standard sleeve again for this one) though so decided that I might need another version that's more me!

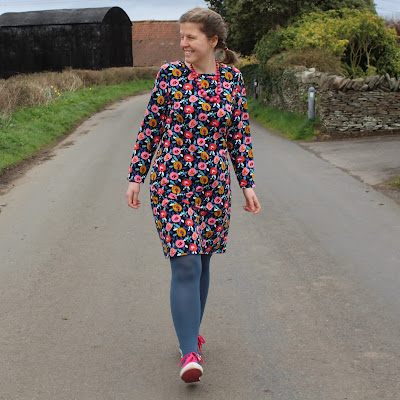
Now, you definitely couldn't accuse this fabric of not being vibrant enough! It's a lovely French terry that I got from Backstitch (side note - I've ordered from Backstitch a few times over the last year and have been really impressed with their customer service. My orders have always arrived super quickly even when everything else was delayed due to the pandemic). For this version I used the round neck and standard sleeve. I love how this one turned out (hence most of the photos I'm sharing being of this one!) and I know I'll wear it a lot.

The Salma dress is really simple to sew - in terms of construction, it's pretty much just a lengthened t-shirt with the added benefit of bust darts and side seam shaping to give the dress a lovely silhouette. It's also designed for medium to heavy weight knits such as ponte roma, sweathshirting and French terry that tend to be quite stable and easy to handle in comparison with some jerseys. 

As with all Sew Over It patterns that I've made, the instructions are really detailed and easy to follow. I particularly like the method that they use for sewing the neck band on the V-neck option, and I think it helps to get a neater finish than I've sometimes got when sewing V-necks on other patterns.

I made a straight size 14 as recommended for my measurements, and I think the fit is good. It's fitted enough to have shape, without being at all tight anywhere. The only change I made was to lengthen the pattern by an inch above the waistline, which is very standard for me. For both my dress versions, I used the knee length option - as you can see, it's slightly above knee length on me (I'm about 5'9").

I think the Salma is a really versatile pattern - it's the kind of dress that can be really casual when made in colourful patterned fabrics like mine, but could also look smart if you made it in a solid colour ponte roma. And of course, being a knit dress, its super comfy - definite secret pyjamas! Three versions are probably enough for me for now, but I'll definitely be keeping my eye out for nice fabric for possible future versions!

Thursday, 8 August 2019

Agnes/Molly tops

As I mentioned when I posted my Seamwork Rory top a couple of months ago, my wardrobe has been in need of some new summer t-shirts. When this beautiful floral jersey popped up in my Instagram feed one day from Material Girl Laura (sadly it no longer seems to be in stock), I snapped some up to help boost my t-shirt collection.


The only question then was what pattern to make with it. While I really like my Rory top, I wanted this to be more of a "normal" t-shirt. I considered the patterns that I've already made and, while none of them seemed to be quite right, they weren't far enough from being right to justify buying another pattern so I decided to do a bit of low key pattern hacking to make something to my exact specifications.


The Tilly & The Buttons Agnes top is very close to what I wanted, the only problem was that I wanted the neckline to be a little bit higher. While I like the Agnes neckline in general, on me I think t-shirts with slightly higher necklines look better when I wear them with pinafores. Thankfully I have the Sew Over It Molly top (I think I got it free with a magazine), which has a neckline more like what I was looking for, so I simply redrew the neckline on my Agnes pattern pieces using my Molly pattern, and also used the neckband from the Molly top.


While this was a fairly simple pattern hack, I didn't want to cut straight into my pretty floral jersey without being sure that it would be what I wanted so I dug out this bird print jersey for a trial run. While it's Art Gallery jersey, so it's not exactly cheap fabric in itself, it's the leftovers of a piece that I won in a giveaway a couple of years ago (therefore it didn't cost me anything) and I'd already used part of it to make my first Gable top (therefore I'd already got a very successful and much worn garment out of it) so it felt like it was fairly low risk fabric to experiment with.


As you can probably already guess, my plan worked out nicely so I went ahead and made a second version of the top in the floral jersey and had a lovely Sunday afternoon sewing it up at a leisurely pace. While I enjoy tackling more complicated projects sometimes, often my favourite sewing sessions are ones spent working on simple projects where you can relax a bit without too much risk of having to reach for the seam ripper!


I'm really happy to be able to add these two into my t-shirt drawer. They're great basics so they'll definitely be worn a lot, the floral version is super pretty and the trial run version has put another piece of leftover fabric to good use. What more could you want?

Wednesday, 10 July 2019

Tilly & The Buttons Marigold Top Hack

A couple of months ago, I took the opportunity of picking up the Tilly & the Buttons Marigold pattern when it was included as a gift with Mollie Makes magazine. At that point I hadn't yet discovered my newfound love of jumpsuits, but I'd always liked the look of the bodice of the Marigold and for the price of the magazine (which also included some other interesting looking projects), I thought I'd get it to try out a bit of pattern hacking.


The Marigold is a jumpsuit/trouser pattern featuring peg trousers with an elasticated waistband, tapered ankles and slash pockets. The bodice has a sweetheart neckline, bust darts and wide shoulder straps and closes with a side seam invisible zip.


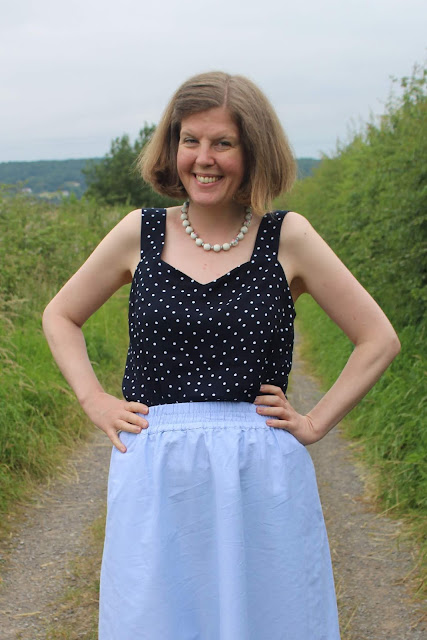
As I said, when I got the pattern I was mainly interested in the bodice and decided to turn it into a top. This was a very simple pattern hack - I simply lengthened the bodice by 6 inches. At the side seams, I followed the slant of the seam line outwards to allow for extra space at the hips.


The bonus of this project is that the fabric that I used is some spotty viscose from Minerva Crafts that I had left over from making my Carrie trousers last year, so I can wear the top with the trousers to create a fake jumpsuit - all the benefits of having a ready-made outfit with the advantage of not feeling like you have to almost get entirely undressed whenever you go to the loo! And the combination actually looks remarkably like the Marigold jumpsuit itself.


The top came together very quickly - without the trousers I found that for me there's no need to have a zip in the side seam which means that is was a nice simple project. The instructions are as detailed as I'm sure we've all come to expect from Tilly's patterns, although it has to be said that in this free magazine version they definitely weren't set out as nicely as they would be in the normal patterns - the limited space meant that the text was smaller/denser and that did make them seem slightly less user-friendly than they otherwise would be.


In terms of sizing, my bust measurement puts me in a size 5 and that seemed like it should be fine when I measured the pattern pieces (the magazine pattern didn't include finished garment measurements, but I assume the regular pattern would). It worked out fine, the only thing I would change if I make another version of this would be to shorten the straps by a centimetre or two. They're pretty much OK on this top, but they have a slight tendency to slip when I'm sitting down in the top in particular.


All in all, I think this is a pretty successful experiment! I really like the shape of the Marigold bodice, and I could definitely seem myself making another of these tops (quite possibly with some more matching Carrie trousers), or perhaps turning it into a elasticated waist dress. Have you tried any pattern hacking recently?

Wednesday, 15 May 2019

Sew Over It Ultimate Trousers Pattern Review

Hello hello! I'm here today to share my first version of the Sew Over It Ultimate Trousers. I wrongly claimed in my last post that these were my first trousers, forgetting that I'd already made Sew Over It's Carrie trousers last year. Anyway, here are my second pair of trousers...


The Ultimate Trousers are slim-fitting, ankle-grazing trousers. They close with an invisible side seam zip, and the waistline is finished with a facing. Front and back darts provide shaping at the waist.

I'm much more commonly found in dresses and skirts (or sometimes culottes) than trousers, but I've been feeling recently like a couple of pairs of trousers could be a good addition to my wardrobe. Firstly, I think they'll be a good option for in betweeny weather when I don't want to be wearing tights, but it might be a bit cold for bare legs with dresses. And secondly, they're much more practical for breezy days (which are fairly common here on the coast) as there's no danger of the wind causing you to reveal more than intended!


As you'd expect from a Sew Over It pattern, the instructions are very detailed and thorough, and I didn't have any problems during the construction process. That said, this is a simple trouser pattern so there weren't any particularly tricky steps anyway.

The only slight complaint I'd make about that pattern is that there aren't any lengthen/shorten lines on the pattern pieces, but they're easy enough to add in (I lengthened mine by 4cm).


The tricky thing with this pattern is really going to be getting the right fit for you. I was unsure about which size to cut because the pattern envelope gives the finished waist measurements for the lower waist and says that this is approximately two inches below your navel, but the Sew Over It sewalong says that it's two inches below your natural waist. Now, maybe I'm odd (highly likely!), but my navel is below my natural waist. In search of advice, I read a few reviews online which differed wildly between saying that it's a good idea to go up a size to saying that the sizing is generous!

I decided to just go with what my measurements said, and made a toile of a 14. Sadly, that was way too small. I could pull them up (I basically made shorts, not full trousers), but there was no way I'd ever be able to do up a zip in them. Given how small they were, I didn't think going up to a 16 would be enough so I made a toile of an 18 instead. That seemed to fit OK, so I cut into my fabric.


I will say now that these are intended to be a wearable toile. The fit still isn't perfect but, having not worn trousers much for years, I wasn't sure whether I'd like wearing them or not so I didn't want to spend ages making fitting adjustments if I ended up not convinced by the final garment. I'm intending to wear these trousers for a bit and see how I feel about them and where I think I could do with some adjustments. Having worn them once, I'm already thinking about slimming the legs down a bit.


As this is a wearable toile, I used some cotton sateen that I bought really cheaply from someone's (I can't remember whose!) destash sale a while ago. I'm pretty sure I paid under £5 for 2m, so it was definitely a "low risk" fabric for me to use. And it means I now have the pinkest trousers in all the land!


So all in all, sewing these wasn't a problem at all. As for whether the project is a winner, I think only time will tell! I have wearable trousers at least, and I'll happily give wearing them a try. That's all I wanted from this pair, so in that respect they're a success. What do you think of my super pink trousers?!

Tuesday, 11 September 2018

Sew Over It Carrie Trousers

I've got something a bit different to share with you today - I made trousers! Specifically, a pair of Sew Over It Carrie trousers.


Trousers aren't something I've contemplated sewing before because it's actually been getting on for 10 years since I wore trousers (other than pyjamas!). While this is largely because I love wearing dresses and skirts, it's also at least partly because I always used to hate shopping for trousers as it was so difficult to find any that fit. That doesn't necessarily need to be a problem now that I sew though, and since I moved to an often-windy coastal town last year, I've been thinking that it might be a good idea to try some trousers to help avoid 'Marilyn moments' on particularly blustery days!


The Carrie trousers are loose-fitting through the leg tapering slightly towards the ankle, with a flat-fronted elasticated-back waistband, front pleats and slanted pockets at the side seams. When Sew Over It released Carrie as a PDF pattern (it had previously been available as part of their Ultimate Guide to Sewing and Fitting Trousers online course), I thought that it would be a good place to start giving trousers a go.

The pattern is simple to sew (I'd say only slightly more complicated than an average pair of pyjama bottoms), and the elastic-back waistband made me fairly confident that even if I decided that they weren't very "me", they'd be a comfy option for lounging around the house so would still be worn somehow!


I made a size 14, which is the size recommended for my measurements, and made a toile just of the top of the trousers (essentially a pair of shorts) to check the fit. Even though the Carrie trousers are designed to be loose fitting, I wanted to make sure that there was enough space in the thighs because I have fairly "sturdy" legs. Thankfully the thighs were fine, and the fit was pretty much OK. The only slight change I made was to raise the waistband by about 2cm to make the rise more comfortable on me.


Sewing the trousers was no trouble at all, and fairly speedy - I sewed the toile and the trousers themselves over the course of a fairly leisurely day of sewing. The instructions were very detailed and easy to follow.

The only slight criticism I'd have is that some of the photos that accompany the instructions might have been a bit clearer if a less patterned fabric had been used for the sample. That's just nitpicking though, because it didn't really cause me any problems.

The only change I had to make during the sewing process was to cut the elastic 9cm shorter than recommended, but elastic length is always going to depend on how stretchy your elastic is, and my elastic is definitely stretchier than most.


The fabric I chose is some navy and white spot print viscose from Minerva Crafts. I thought it was a good fabric for me to use for this project because it will go with a lot of my tops (I'm not the only one who thinks that navy and white spots count as a neutral am I?!), whilst still being a bit more interesting (and therefore more likely to appeal to me) than a plain colour.


I'm actually turning into a bit of a Sew Over It fangirl in this outfit, because the top I'm wearing is an as-yet-unblogged Silk (or viscose in my case) Cami. I made it earlier this summer after the pattern was included with Simply Sewing magazine. It's another great pattern from Sew Over It, but this was just a wearable toile and I want to make a couple of tweaks before I make another version and I'll blog about it properly once I've done that.


So what's the verdict on the Carrie trousers? I'd say the pattern itself is a winner - the fit is good for me, and the trousers were easy to sew. As for me wearing trousers - the jury's still out! They're very comfy and it's nice not to have to worry about my dress/skirt blowing all over the place when wearing them, but I did feel slightly like I was wearing my pyjamas and I still think that dresses/skirts suit me better. I'm definitely going to keep on wearing them though, so hopefully I'll grow to love them more, and I might give some other trousers a try at some point. I'm also quite tempted by the idea of dungarees/overalls/whatever they're called in your part of the world. Have you got any good trouser/dungarees patterns to recommend that could convert a dress lover?!

Wednesday, 27 June 2018

Sew Over It Libby Shirt

When I first saw Sew Over It's latest PDF pattern release, the Libby shirt, it instantly appealed to me. Boxy shapes aren't traditionally my style, but I could see that the combination of the relaxed fit and a nice drapey fabric would be perfect for the warmer weather. Luckily for me, I got my version finished just in time for heat wave temperatures here in the south west of England.


The Libby Shirt features, in Sew Over It's own words, "a comfortable loose fit, button-up front, notched collar, partial collar stand, unlined yoke with gently gathered back, and short grown-on cuffed sleeves". The shirt also has a cropped hem with the option either to have a straight front hem, or a slightly curved one (which I opted for) which adds a touch more length, mirroring the shape of the back hem.


As with all Sew Over It patterns, the instructions were really thorough. I was glad of the accompanying photos to confirm what I was meant to be doing on a couple of occasions, but that's not in any way to say that the written instructions weren't clear - it's just nice to be able to double-check things sometimes!


The pattern is rated as being for intermediate sewers or advanced beginners who want a challenge, and I'd say that's fair. If you're newer to sewing, it might be worth thinking about using a light cotton lawn instead of a viscose or rayon because you might find the combination of a very drapey fabric and some of the collar construction a bit fiddly. But in terms of the pattern itself, the instructions hold your hand through the whole process, so as long as you take it a step at a time there shouldn't be too many problems.


In terms of sizing, my measurements fall right between the 12 and the 14. As this is a boxy style, there's plenty of ease so I went down to the size 12 and, with no adjustments at all, it turned out pretty nicely. The perfect amount of ease to make this nice and breezy to wear, without it just being shapeless. If I make another (definitely possible!), I'd maybe think about lengthening it slightly (fairly standard for me) but that's the only adjustment I'd make.


The fabric I used here is a pretty viscose lawn from WeaverDee. I think it's a really lovely fabric, especially for the very reasonable price. As the Libby shirt doesn't have many seamlines and has no darts, it's a great canvas for a large scale print like this, and I think they're a great pairing.


All in all, I'm pretty pleased with how my Libby shirt turned out. As it's slightly out of my usual style comfort zone, I'm going to wait to see how much wear it gets and what skirts I have to pair it with. If it turns out, as I hope it will, to be a useful addition to my wardrobe then I'd definitely think about making another. It was an enjoyable project to sew, and it's nice to try something new every now and then, isn't it?

Thursday, 8 March 2018

Sew Over It Clara Blouse

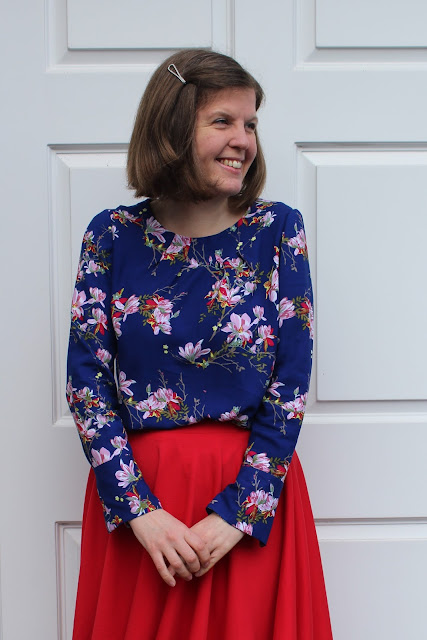
Last weekend my plans were changed at the last minute because of the snow which covered the country, so I decided to try to help spring to win the battle that currently seems to be going on between the seasons by cutting into some pretty floral fabric to make a Sew Over It Clara blouse.


The Clara blouse was Sew Over It's February PDF release. It looked a bit different from other patterns in my stash, and seemed to be a good combination of being very wearable but also with the potential to look quite smart, so I was fairly quick to buy it when it was released.


The blouse features, in Sew Over It's own words, 'a pretty pleated round neckline, keyhole opening at the centre back, a stepped hem, and long sleeves with deep cuffs and continuous bound placket cuff closures'.

The Clara blouse was an enjoyable pattern to sew. The bodice section came together fairly quickly, and then I needed a bit more time to sew the sleeves because those cuffs involve a couple of more fiddly steps. Nothing too taxing, but the kind of thing that it's worth taking your time over to make sure you do a good job.


The instructions were all very clear and easy to follow. I did spot a typo in the instructions about making the rouleaux loops for the neckline and cuff buttons, but I emailed Sew Over It to point it out and they got back to me really quickly to say that the instructions have now been corrected (if you downloaded the pattern before this week, the seam allowance when sewing the rouleau loop strip should be 1.5cm instead of 2cm).


In terms of sizing, my bust measurement is between the 12 and 14 for this pattern, and my waist/hip measurements put me right in the size 14. The Clara blouse has a relaxed fit though, and based on the finished measurements I was fairly sure that I'd be fine with a straight size 12. Thankfully, it turns out I was right! There's still plenty of ease as far as I'm concerned, and I think if I'd made the 14 it might have turned out a bit too roomy for my tastes.


I was slightly unsure about how I'd feel about the cuffs - not in terms of how they look, but in terms of whether they'd annoy me when I was wearing the blouse because they're quite large. I'm pleased to report that I've worn the blouse for a whole day now and wasn't bothered by the cuffs once.

If I make another Clara blouse, I'd possibly omit the stepped hem and just use a regular straight hem. While the stepped hem looks nice, I'm only going to wear the blouse tucked into full skirts so nobody will ever see it.


The fabric I used is a freesia print viscose that I bought last spring/summer (I think from WeaverDee, but I know a few online shops stocked it at the time) with the intention of making a dress, but I then went off the idea of the fabric/pattern combination I had in my head. I love the fabric though, so I'd been keeping an eye out for the right project to use it and when the Clara pattern was released it seemed like I'd found what I was looking for. And as bonus, as I'd bought enough for a full-skirted dress, I'm pretty sure I've got enough fabric left for a short sleeved summery top too!


Overall, I'm really happy with my Clara blouse. I enjoyed sewing it, I'm pleased with how it looks and it's good to get this fabric out of my stash. I'm going to wait and see how much I wear the blouse but, based on first impressions, I could definitely see myself making more in the future. Have you had success with any new patterns recently?

Thursday, 10 August 2017

Sew Over It Doris Dress

Do you have any garments in your wardrobe that get a bit overlooked? Until recently, the Sew Over It Doris dress that I sewed up last year had sadly slipped into that category. I wore it a fair amount just after I made it, but somehow since then I'd forgotten how lovely it is and the dress had stayed neglected on the hanger. Once I put that right, I enjoyed wearing it so much that I quickly decided that I needed to make a second Doris dress.


I wonder whether one of the reasons that I hadn't been wearing my first Doris dress so much is that the ties get a bit in the way of cardigans (because you often need a cardigan still in the British summer!), so this time I decided to use the fixed back belt instead. That also creates a bit more of a difference between my two versions than just using different fabric, which is never a bad thing.


Other than switching the ties for the belt, I did everything else just the same as I did for my first version. I blended between a 12 at the bust and 14 at the waist/hip, with 1.5 inches added to the bodice length. Also, the buttons down the front of the bodice are there for decoration only - there's no need for them to function because of the side zip so I just sewed them through both front bodice pieces.


The Liberty tana lawn that I used for my first version worked so nicely - it's the perfect mix of fabric that's easy to handle but has just enough drape for the Doris dress - that I decided to use a prized length of Liberty fabric from my stash for this second version. The print is called Suzy Elizabeth, and is my favourite Liberty print that I've used so far. I made a dress using the navy colourway of the same print a couple of years ago, and I've got another length of the navy in my stash which I'm intending will become a shirt this autumn. How many times do you have to use the same print before it becomes an obsession?! What can I say? I just love all that tiny crockery!


I should mention that my fabric buying budget isn't generous enough to just be buying Liberty fabric at RRP as often as my last few projects would suggest! A lot of the tana lawn that I've used has come from Kat's Fabrics on ebay which sells factory seconds, making them much more reasonable prices. I've bought fabric from them quite a few times now, and I've only found a small fault on one piece - the rest of them have all seemed perfect to me.


While we're on the subject of fabric, I think the fabric requirements stated on the pattern envelope for the Doris dress are really generous. I made a 12/14 (with length added to the bodice), and the fabric requirements state 3.2m for 12 and 3.7m for 14, but I used well under 3m - I'd say 2.8m at the very most, and this is a directional print. That's OK (it just means I have bonus fabric left over for another project!), but it's something I'd bear in mind if I were buying fabric for another Doris.


All in all, I'm really happy that I rediscovered my original Doris dress and gave myself the motivation to make this second one. It's a lovely floaty dress to wear and, as I've already detailed at length, I love tana lawn for summer weather. Let's just hope that we get a bit more of that soon so that I can wear it some more!