Thursday, 21 September 2017

Pauline Alice Seda Dress - Take 2

Do you have any fabric that you love, but aren't sure what to do with? The main fabric in this project was a Christmas gift from my sister last year and, while I really like the print, whenever I held it up against myself while pondering what to make, I couldn't shake the feeling that the green and yellow in the print aren't very flattering colours for me. Recently I realised the solution was obvious - sew a Pauline Alice Seda dress with a contrast yoke.


After I'd had the idea, I wanted to get on with the sewing because the fabric had already been in my stash for quite a while by my standards. Thankfully it was easy to find a plain fabric to match the navy in the print, so after a quick trip to a local fabric shop I was ready to go.


I've already sewn one Seda dress this year and I was really happy with how that one turned out, so I did almost exactly the same for this one - with the exception of shortening the sleeves. I'm not sure why exactly, but this fabric just felt as if it should be made into a dress with short sleeves rather than three-quarter. Shortening the sleeves was obviously very easy, and I just used the sleeves from the Emery dress as a guide for the length.


In fact, while I'm calling this dress a Seda dress, it is very much a hybrid with the Emery dress because, like my first Seda, it also uses the skirt from the Emery. While the Seda skirt is also just a simple gathered skirt, the pieces were too wide for my 45" fabric so I couldn't use them. I still think that this is more a Seda dress than an Emery though, because the contrast yoke of the bodice is the distinctive feature of this version (view B) of the Seda pattern, and using the Emery skirt instead doesn't really alter the overall look of the dress.


I think the combination of the floral print with the plain navy yoke is really successful. With the two fabrics combined, the navy in the print is highlighted and the yellow and green which were originally bothering me don't seem as noticeable. Green and yellow are always slightly funny colours for me - I'm a fan of them on paper, but for me to wear them near my face they have to be just the right shade or they end up making me look ill. It's probably more in my head than anything anyone else would notice, but if I'm not happy with something then I won't wear it, and I didn't want that to be the fate of this fabric.


The navy yoke solved the problem in this case though, and I'm really happy with my finished Seda (or mostly Seda!) dress. I'm glad that this fabric has finally been sewn up so it can be worn instead of languishing on the shelf. Now I just need to find solutions for what to do with a couple of other long-term stash residents...

Thursday, 7 September 2017

Granny square crochet blanket

This little (well, quite big actually!) crochet project has been a long time in the making. The date on my first work-in progress photo of it tells me that I started it in February 2016. I haven't exactly been working on it flat out, and I know quite a few months went by last year without me picking it up at all, but I decided that finishing it would be one of my #2017makenine projects - and now I can tick it off my list!


This colourful beauty was made using a pattern from the book Granny Squares by Susan Pinner - it's actually the project featured on the cover of the book and is listed as the 'Double-bed or sofa blanket'. Looking back at the book as I write this, I'm cheered by the fact that the intro to the pattern says it "is a big project, one to be picked up and put down often. But by making a few squares at a time you will eventually create a fabulous family heirloom." So that obviously justifies the fact that it took me over 18 months to make this!


The blanket is made up of 196 individual granny squares joined together in 14 x 14 rows, and finished with a border of 3 rounds of granny shells (although I actually did 2 rounds in the dark blue rather than 1, so I have 4 in total). The squares aren't the traditional granny square, but instead have colourful circular centres which are turned into squares in the white outer round.


The book gives instructions for making the blanket up either using the join as you go method or sewing the squares together. I chose (without much hesitation) to use the join as you go method; I've got a pile of granny squares sitting in a drawer somewhere which are testament to the fact that I get bored of a blanket if it's sitting in piles of squares rather than looking like a blanket. And why spend the time sewing squares together if you can join them as you go? I made up batches of 14 squares at a time and then joined them on to the blanket so that it gradually grew as the months went by.


Now, let's talk about all of that colour! The squares are all different colour combinations - well, some of them use the same three colours in the centre but in a different order (if that makes sense). I used 14 different colours, so I decided half way through making the blanket that I wanted each horizontal and vertical row of the blanket to have each of the 14 colours used in the outer circles of the granny squares like some sort of giant crochet Sudoku. I think that would have been possible if I'd thought about it and planned it from the start, but it didn't quite work out without the planning. Never mind, I think the random arrangement works nicely!


The yarn I used is Stylecraft Special DK. While 100% acrylic yarn may detract slightly from the heirloom status that the book claims for its 100% wool version, it did make this a much more affordable project and means that I can use the blanket without being too protective of it.

The colours I used are Pomegranate, Royal, Turquoise, Sherbet, Wisteria, Sunshine, Lipstick, Fondant, Emperor, Kelly Green, Aspen, Spice, Cloud Blue and Magenta, with White for the joining rounds and border (I did find that I needed quite a bit more white than the book suggests - I used over 400g), and Midnight for the contrast row in the border. I really enjoyed putting together different combinations of colours as I worked up the squares, and it make me rethink some of my ideas on colour - I'd never realised before quite how nice pink and green can look together!


This project may have taken a fair while to complete, but I'm really glad that I put in all that work and that I now have a lovely snuggly blanket ready to use once autumn arrives!

Friday, 1 September 2017

Tilly and the Buttons Fifi Pyjamas

When the Tilly and the Buttons Fifi pyjamas pattern was first released, I thought that it looked pretty but not necessarily for me. Gradually as I saw more versions pop up online, I decided that maybe I needed to give the pattern a go after all. Then pretty much as soon as I'd bought it, Megan Nielsen released the Reef pattern and that took priority in my sewing plans. So Fifi was left sitting in my stash until recently when I decided that it was time to finally crack the pattern open.


At this point I'll apologise for the fact that the photo above is the only modelled one you're going to get in this post. While I've happily posed for photos in pyjamas before, the Fifi set is just that bit more skimpy than the others that it made be feel a bit too exposed. But I know I always like to see what a pattern looks like when worn, so I braved one photo with the added protection of my dressing gown in the interests of the greater good of the sewing community.


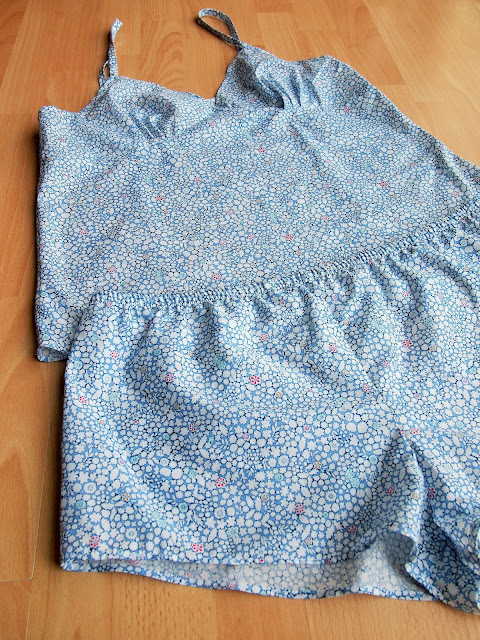
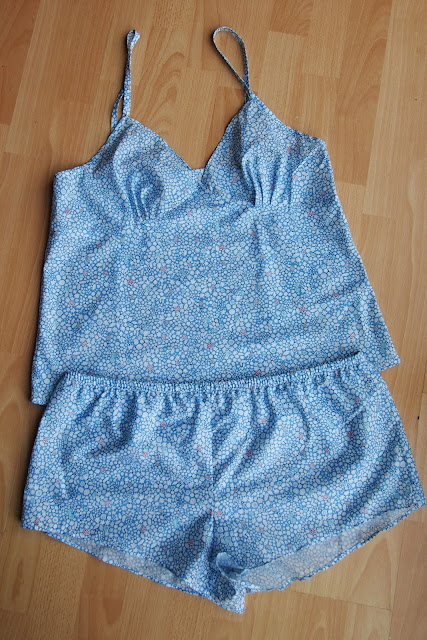
Anyway, back to the sewing...the Fifi "boudoir set" (although I definitely think of them as pyjamas, I'm not fancy enough for a boudoir set) features a camisole and little sorts. The camisole is cut on the bias, with pleated cups, a princess seamed back and bias binding straps. The shorts have a narrow stitched-in elastic waistband and are definitely quite short!


I found the Fifi pyjamas were a really enjoyable project to sew. Tilly's patterns are well-known for having very comprehensive instructions, and Fifi is no exception. Everything was very clearly explained and came together easily. I'm always a fan of French seams, so I liked the fact that they were used throughout this pattern - the insides really are as neat as the outside for Fifi. I hadn't sewn an elastic waistband like this one before (you stitch the elastic straight onto the shorts, and then turn it under to encase it before stitching again), but I really like the finish and it was nice not to have to thread the elastic through (I don't know about you, but that always seems to take me longer than it should!).


In terms of size, my measurements are 38-32-42, and I made a size 5 camisole and size 6 shorts. I added an inch to the length of the camisole, but other than that made no adjustments. I didn't make a toile because I reasoned that pyjamas don't necessarily need to fit as perfectly as day-to-day clothes, but as it turns out the fit is pretty good anyway.

The fabric that I used is some more ebay bargain Liberty tana lawn (from Katsfabrics), this time in the 'Kathy' print. I bought this fabric to make a Susie blouse for my Mum's birthday earlier this summer and, since fabric from Katsfabrics comes in pre-cut lengths, I ended up with a fair bit left over for myself. Definitely not complaining! I pondered what to do with it for a while before realising that I probably had just about enough for a Fifi set. Thankfully I was right!


All in all if I'm honest, I probably prefer my Reef PJs in terms of wearing - but that is really just a personal style preference and is in no way a negative reflection on Fifi as a sewing pattern. This was a really enjoyable project to sew and my finished pyjama set will definitely be worn a lot - after all, who wouldn't want some tana lawn PJs for the summer?!