Showing posts with label Seamwork. Show all posts

Wednesday, 15 June 2022

Seamwork Benning Dress Sewing Pattern Review

A couple of years ago my wardrobe was mainly made up of fitted-bodice/full-skirted knee-length dresses, but these days I tend to favour looser and longer styles. The Seamwork Benning dress that I have to share with you today falls firmly into the latter category!


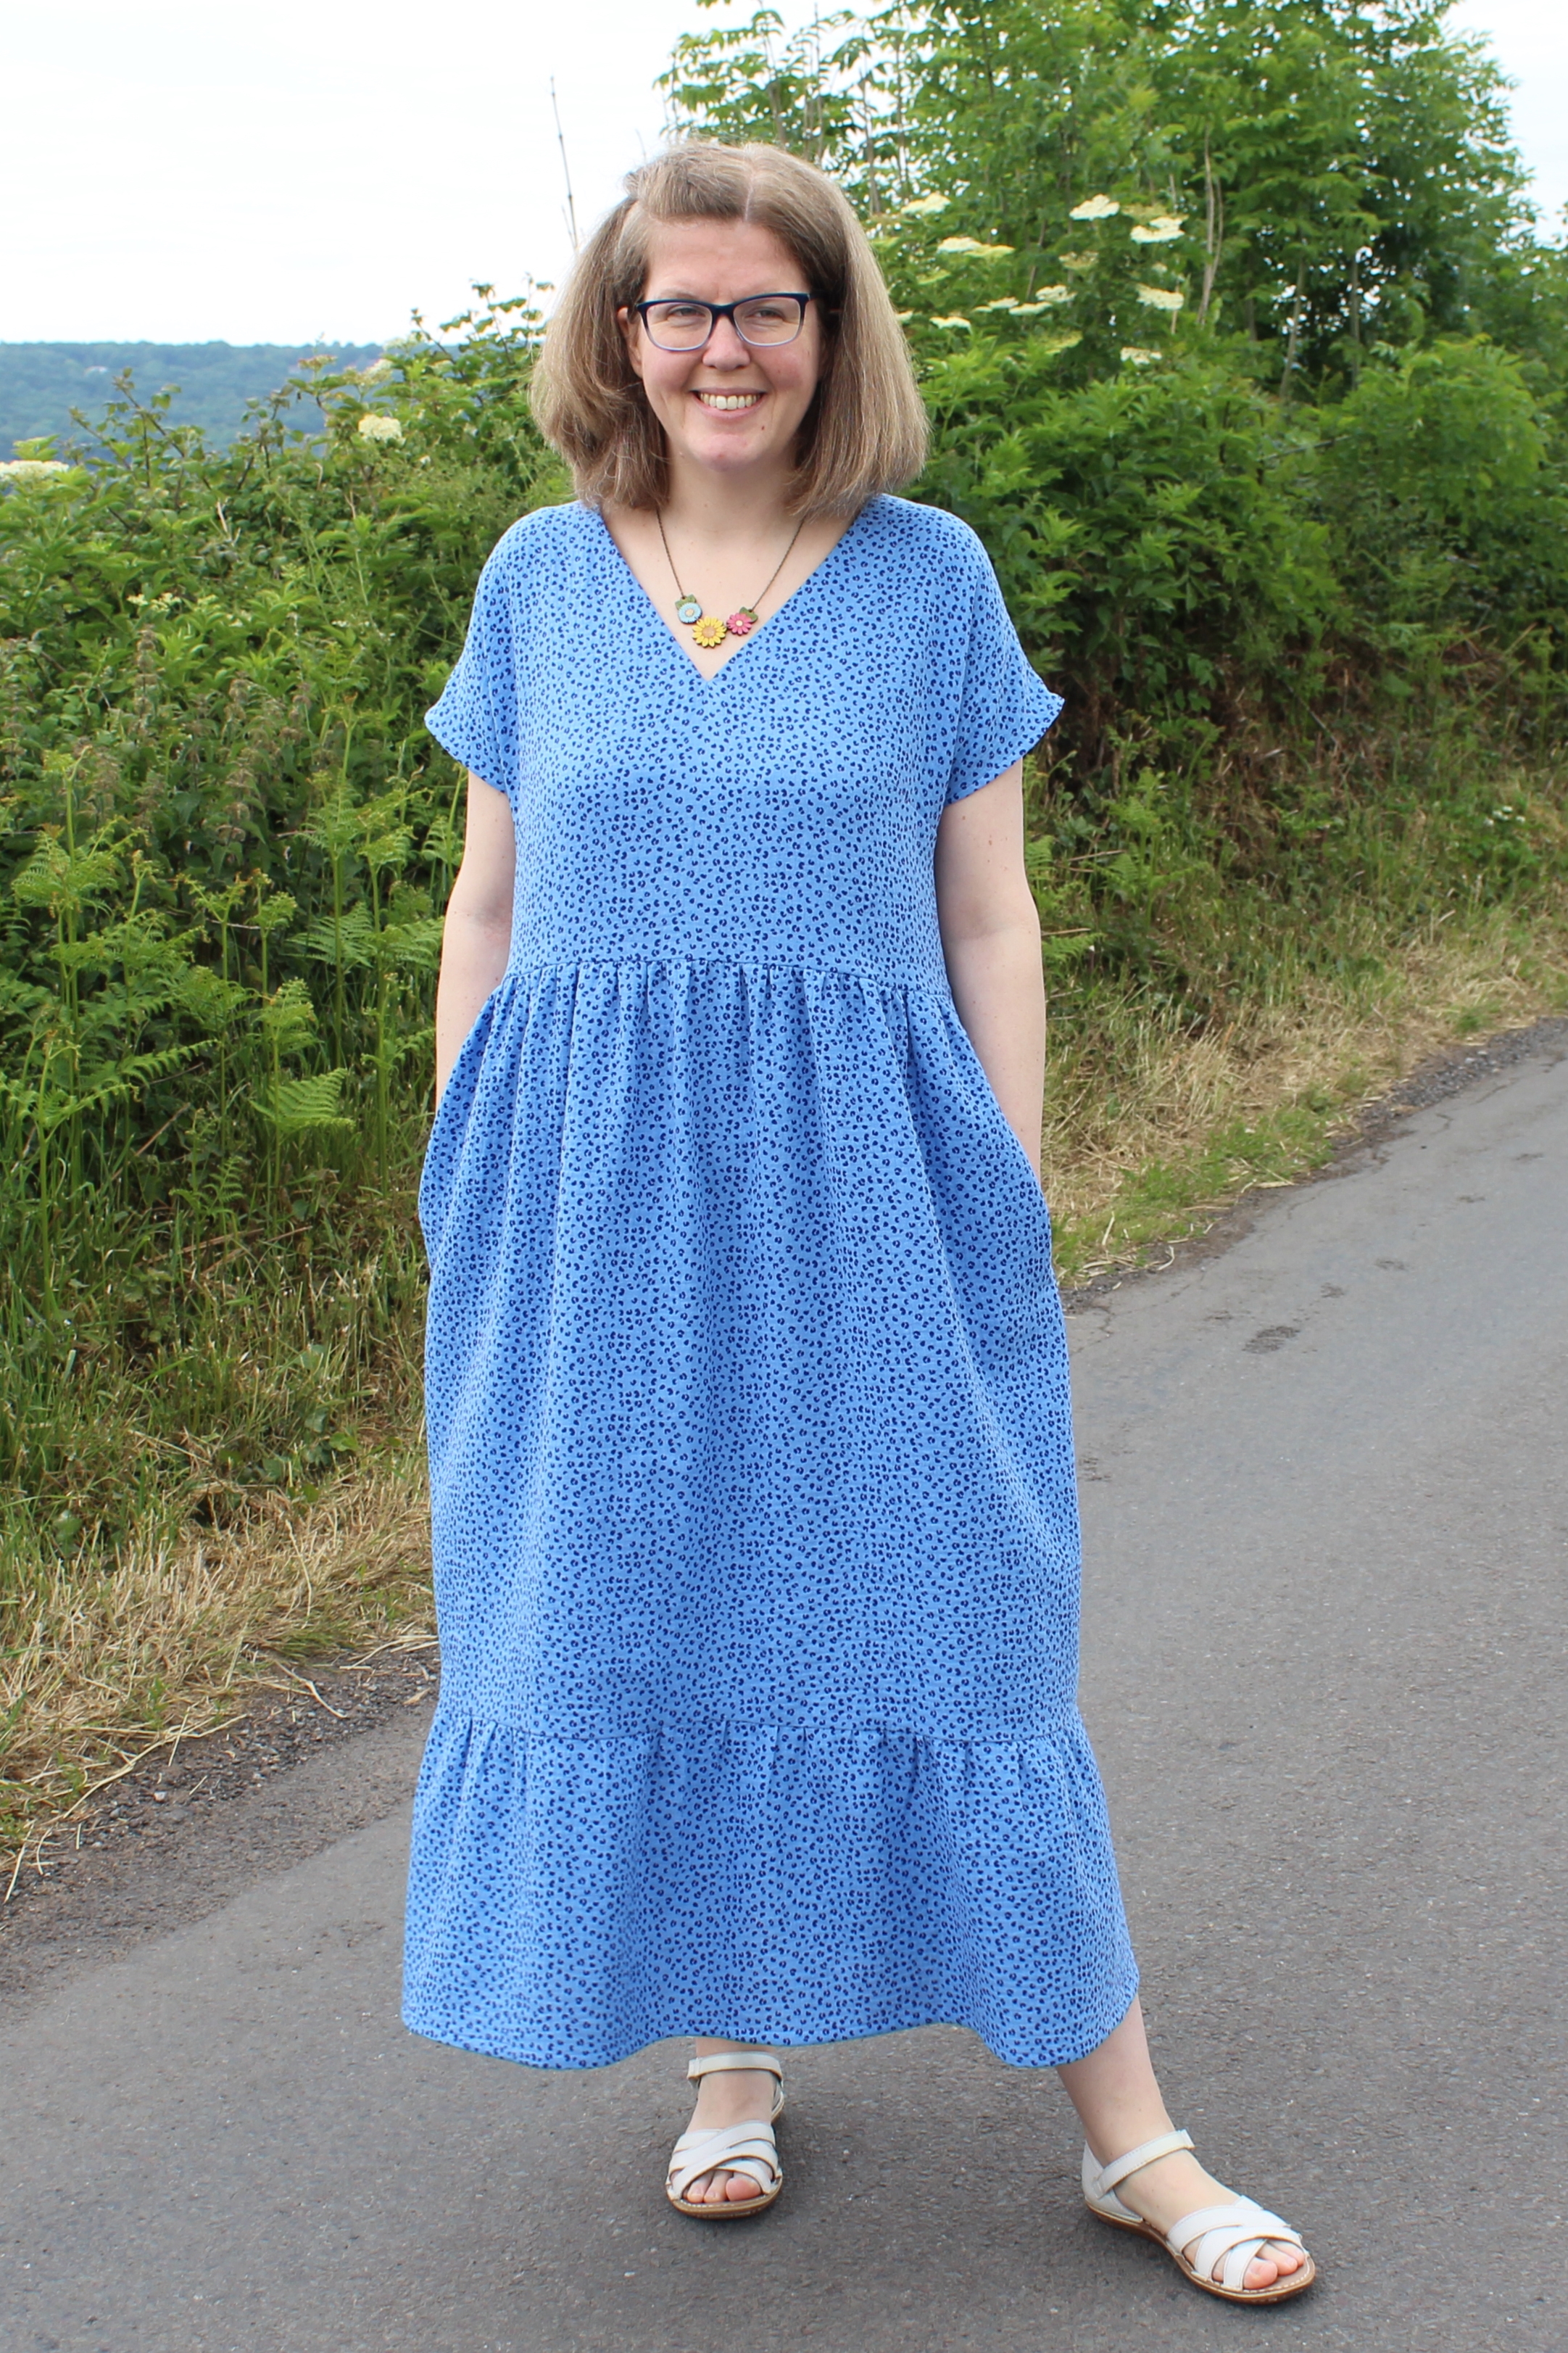
The Benning dress has a V-necked bodice with grown-on short sleeves and a two-tiered gathered midi-length skirt. It also, importantly, has pockets! The dress has a relaxed fit and is available in sizes from 32" to 54" bust.


Benning is rated as being a beginner level pattern and I think that's accurate. With no fastenings, no sleeves to set in and a relaxed fit, there's nothing too complicated about the pattern. 


As with all Seamwork patterns, the instructions are also very detailed so should hold your hand through the sewing process. Personally, I didn't have any problems at all and found sewing the Benning dress pretty straightforward and relaxing.


My measurements put me in a 10 at the bust, and 12 at the waist and hips and I followed that sizing for the bodice. 

I made a couple of adjustments - my standard lengthening of the bodice (in this case by 1.5") and I also lowered the bust dart by an inch. That's not an adjustment that I usually have to make, but the bust darts seemed abnormally high on this pattern and looked quite odd when I made a toile. Lowering them by an inch solved the problem. 


As I mentioned above, I blended out to a 12 at the waist for this version, but if I make the Benning dress again then I'd probably take out that extra at the waist and just use the size 10 waist as I have got quite a lot of ease at the waist in my dress.


It's not exactly an adjustment, but another slight change I made was to use the size 16 skirt pieces instead of the 10/12. The skirt on the Benning isn't that full in comparison with some other patterns (even the bottom tier of the skirt will fit on 45" wide fabric for sizes 00 to 16) so using the skirt pieces from a larger size of the dress just gave me a bit of extra fullness.


The fabric I used for this dress is a lovely double gauze that I bought from Like Sew Amazing - sadly it no longer seems to be in stock. It's a really pretty shade of blue and is beautifully soft. I think this is a really good fabric for the Benning dress - it's nice and floaty and wearing the dress feels a bit like walking about in a cloud!


I think my Benning dress turned out nicely - it was fun to sew, and it's so comfy to wear. I think it'll be really nice in hot weather - which is scheduled to be heading our way in a day or two, so I'll be able to test out my theory!

Monday, 29 June 2020

Seamwork Dorian Shorts

When Seamwork recently released the Dorian shorts they really appealed to me because they looked relaxed yet presentable. I then realised that I had a piece of linen in my stash left over from an old project that was just the right size for the pattern so it seemed silly not to give Dorian a try!


The Dorian shorts have elastic in the side of the waistband to cinch in the waist but still be comfortable. The shorts close with a zipper fly and button, and also have nicely sized inset pockets that are an interesting design feature.


The skill level is rated as beginner intermediate which I would say is fair. You probably wouldn't want to take this on as your first project because there are quite a lot of pieces and a couple of steps that need a bit of concentration. At the same time, there's nothing particularly complicated about the pattern and the recommended fabrics - medium weight wovens such as twill, denim and linen - are all easy to work with.


The instructions are also really detailed (I'd probably go as far as to say the most detailed I've ever used). They're very clear and illustrated with great diagrams, so if there are any steps that you're not entirely familiar with then they should help you through. I personally had never sewn a zip fly using the method in this pattern, but didn't have any trouble with that step and the fly turned out nicely (even if I do say so myself!).


I also liked the fact that the instructions provide two methods for finishing the waistband/inserting the elastic (one where you attach the elastic and then sew down the inner waistband, and one where you secure the inner waistband and then thread through the elastic) because I think that's the kind of technique where personal preferences can vary quite a lot.


In terms of sizing, my measurements (waist 32", hip 42") exactly match the size 12 for this pattern and that's the size I cut. The only change I made was to lengthen the inseam by 3 inches. I haven't worn shorts for years so I wasn't sure what length I'd like, but I knew I'd want them a little longer than in the pattern. I opted for 3 inches because that was the most I could lengthen the pattern by and still be able to fit it all onto my fabric! I was fairly sure from my toile that 3 inches would be enough and I knew that I would be able to cut a bit off/use a deeper hem if they felt too long. As it turns out, the length feels just right for me. In case it helps for reference, I'm about 5'9".


As I mentioned earlier, the fabric I used is left over from an old project (specifically my Anise jacket - enjoy my old short hairstyle there!). It's a jade green linen that, according to my Anise blog post, I got from Calico Laine - although given that I got it over 6 years ago it's probably unlikely that they still have this exact fabric in stock. It's a good fabric for these shorts and will be nice to wear when it's hot. The colour goes well with quite a few of my summer tops so hopefully I'll get a fair bit of wear out of them this summer - weather permitting of course!

The top I'm wearing the shorts with here is the top hack of the Tilly and the Buttons Marigold that I made last year - blog post here.


I enjoyed sewing my Dorian shorts, and I think they turned out really nicely. They're a good shape on me and, most importantly, they're super comfy! I'll definitely be making at least one more pair because my mum likes my shorts so much that she requested her own for her upcoming birthday. I also quite fancy trying out the member bonus trouser version of the pattern so you might be seeing that at some point in the future. If you're looking for a comfy pair of shorts that are interesting to sew, I can definitely recommend giving Dorian a try!

Thursday, 19 September 2019

Recent Repeats

For today's post you're getting two dresses for the price of one! Although don't get too excited, because they're both repeat versions of recent projects (my Butterick 6556 and Seamwork Bobby dresses) so there I haven't got much revolutionary new information to share about them.


First up, here's my second version of Butterick 6556. I did always intend that my original version would be something of a test run to see how much I enjoyed wearing the dress - while I like the striped cotton that I used, it had been in my stash for ages and didn't cost that much originally so it was a fairly 'low risk' kind of fabric. Thankfully the stripey version proved very successful, so I was happy to cut into slightly more precious fabric.


In this case it's a cotton voile from Seasalt (no longer available, but they do have lots of new autumnal fabric beauties). I do enjoy sewing with Seasalt fabric, but there's a part of me that always feels compelled to sew something that's noticeably different from the garments Seasalt made with the same fabric - if nothing else because it entertains me to confuse their shop assistants when they recognise the fabric, but then not the actual garment (small things amuse me!). The dress Seasalt had made with this fabric was lovely, but definitely different from this square necked beauty so Butterick 6556 got my seal of approval for this fabric.

There's really not a lot more to say about this, because I didn't do anything at all that was different from my first version!


In contrast, my second Bobby dress has a couple of little changes, one which will be obvious if you compare it with my original one, and one which is slightly more subtle.

The obvious difference is that I shortened this one to be knee length. While I love the midi style of my turquoise blue Bobby, it seems like quite a summery length that's best to be worn with sandals. As there probably won't be too much more sandal-wearing weather this year, I thought for this version I'd try it at knee length. I shortened the skirt pattern by about 4.5", and used a one inch hem and it turned out just how I wanted.


The more subtle difference is that I used 1.5" elastic for the waist instead of the 2" called for in the pattern - for no reason other than the fact that I had some 1.5" elastic in my stash and I thought I might as well use it rather than going out to buy 2". For Bobby, you create the elastic casing by stitching a line parallel to waistline so it's easy to alter where you stitch the casing to accommodate narrower elastic.


The fabric that I used for this second version of Bobby is a great quality cotton jersey from Like Sew Amazing that I picked up at Sarah's Bristol shop at her recent summer party. It's a lovely pink - nice and bright, and the kind of colour I'll wear year-round.


On the face of it, making a couple of sleeveless dresses as summer is coming to an end might seem like a slightly odd choice but I fully intend to carry on wearing both of these dresses with cardigans and tights as the temperatures drop. I'll probably also try layering them with long-sleeved shirts/t-shirts underneath, because any dress without sleeves is fair game for use as a pinafore as far as I'm concerned! So making dresses like this is actually a good way of transitioning gradually from summer to autumn sewing for me. Have you switched seasons in your sewing already?

Wednesday, 31 July 2019

Seamwork Bobby Dress Pattern Review

In my continuing quest to use up my fabric stash, the piece I've used for today's project is one that had been causing me a bit of a headache. It's a lovely turquoise blue jersey, and I had plenty of it, but it never seemed to be quite right for any of the patterns I wanted to make. That was until Seamwork released the Bobby dress, and I knew it was the answer that I'd been searching for.


Bobby is an easy-to-wear knit dress with a lined bodice, nicely shaped V-neck, A-line skirt and wide elastic casing at the waistband. And pockets - hooray for pockets!


This previously problematic jersey is a Robert Kaufman Laguna jersey, which I bought a couple of years ago from a shop that has since closed. It's a lovely quality, but it is slightly lighter weight than most other cotton jerseys I've used. I knew I wanted to use it for a dress, but the jersey dress patterns that I like tend to have fitted bodices and the Laguna jersey seemed like it would be too thin for them. The fact that the bodice of the Bobby is lined and therefore you have a double layer of the fabric meant that it would be reinforced so it would be a much better weight for a mostly fitted bodice.


The instructions are generally good. I did find the directions for the burrito method for sewing together the outer bodice and lining a little confusing, but Seamwork have a great video tutorial which explains the process nice and clearly. Other than that, I didn't have any problems at all and really enjoyed the process of sewing my Bobby dress.


In terms of sizing, I made a 10 at the bust blending out to a 12 at the waist as recommended for my measurements. I also lengthened the bodice by an inch, which is a standard adjustment for me. I think it fits just right!

I did wonder about shortening the skirt to knee length, but in the end decided to keep the midi length intended by the pattern to make it a bit different from my other dresses. In case you're wondering about skirt length - this is the length as in the pattern, it's midi length on me and I'm about 5'9". If you're shorter, you may well want to shorten the skirt. And in case it's of any help, I worked out that I'd need to shorten the skirt by about 5 inches if I wanted to make it knee length.


I'm really pleased with my Seamwork Bobby dress - it's obviously incredibly comfy, and the midi length feels a bit special and means that the skirt swishes about beautifully as I walk. I can definitely see myself making another Bobby dress or two - potentially shortened to knee length in a slightly heavier weight jersey to wear as a pinafore in autumn/winter. I also think it would be fun to try hacking the bodice into a top because I really like the shape of the V-neck. All in all, this one is definitely a winner for me!

Thursday, 30 May 2019

Seamwork Rory top sewing pattern review

Recently I realised that my short-sleeved t-shirts are looking a little sorry for themselves. While I've made plenty of long-sleeved t-shits, my summery jersey tops are all pretty much RTW - which means that they're all at least six years old because since I started sewing my money has been spent on fabric rather than clothes! Shortly after this realisation, the Seamwork Rory top popped up in my Instagram feed and jumped to the top of my sewing queue.


Rory is a cropped t-shirt with grown-on sleeves, a relaxed fit gathered into a tie waistband at the natural waist and a boat neck. It reminded me of a top that I used to have many years ago, and seemed to be very wearable whilst still being a little different from a standard t-shirt so it really appealed to me. Plus I love anything with ties/bows, so that was an added bonus as far as I was concerned!


The instructions are very thorough and clear, and pattern is fairly simple to sew. If you've already sewn a knit top or two then it shouldn't pose any problems. The only difference from the construction of a standard t-shirt is the gathering of the main bodice into the waistband, and that was as easy as pie for me. 

I liked the fact that the neckband is attached and then folded to the inside before being topstitched down so it's more like a binding. It seems to suit this top better than having a neckband visible on the outside, but gives a better finish than just turning the bodice itself under. 


In terms of sizing - my measurements put me in a 10 at the bust and 12 at the waist and that seemed like it should work nicely based on the finished measurements. I was unsure of whether to lengthen the top - with woven patterns I'd make a toile, but inexpensive jersey isn't so easy to come by! I compared the measurements to some of my other tops and decided that it was on the borderline of being OK, but to be on the safe side I cut and sewed the bodice pieces before cutting the waistband so that I could lengthen that if necessary. When I tied on the assembled bodice, it seemed like it was just about right but I added an inch to the width of the waistband (which means that the finished top is half an inch longer as the waistband is folded in half) just to make sure that the top would be long enough.


I'm fairly happy with the fit - if I made another I might consider making a straight size 10 in the bodice and then just gathering it into a size 12 waistband so that there's slightly less blousing in the bodice section, but this one's fine the way it is.


The pretty jersey that I used is from LouBodu Fabrics - I got some of the last of it in the sale and it's now sold out (sorry!), but they have plenty of other fun prints if you're in the market for some interesting jersey. The fabric is great quality, and feels like it should wear well.


All in all, I'm really happy with my Rory top - it was fun and quick to make, is comfy to wear but more interesting than a standard t-shirt, and all the colours in the print mean that I should be able to wear it with lots of things. You can't ask for much more, can you?

Thursday, 29 November 2018

Astoria & Toaster Sweaters

Recently I've made a couple of simple, speedy projects. They're both repeats of patterns I've made before, meaning I might not have as much to say about them as a completely new project, so I thought I'd combine the two into a quick post to share with you today.


The first is a Seamwork Astoria top. This project was really inspired by the fabric. It's a very colourful (as you can see!) French terry from Flamingo Fabrics, which sadly no longer seems to be in stock. I thought it would be good for brightening up the duller days of autumn and winter so I treated myself to a piece without knowing quite what pattern I was going to use it for.


When the fabric arrived, I decided it would be perfect for the Astoria. I made a few versions of the pattern not long after it was released (here and here) a couple of years ago, and they're all still in fairly regular wardrobe rotation. It's a style that works well with lots of my dresses and skirts/culottes so I knew that it would get a lot of wear.


The Astoria is a simple and quick pattern to make, so after a couple of hours of sewing I had a nice new top to wear - and it definitely brightens up my day when I put it on!


The second top I have to share today is a Sew House Seven Toaster sweater (version 1). This is another pattern that I first made not long after it was released, and thankfully it's another one that has been a success for me.


This time I bought the fabric specifically with the Toaster pattern in mind. It's a quilted cloqué jersey from The Textile Centre. It's also no longer in stock (sorry, I'm not being a very good fabric buying enabler today!) but they do have other similar fabrics available. I'm slightly in two minds about the fabric - I really like the textured pattern and I think it looks good as a Toaster, but it does get a bit bulky at some of the seams and it definitely feels fairly synthetic to me when I'm wearing it. I tend to lean more towards natural, more breathable fibres and this definitely doesn't feel very breathable, but on the plus side it does keep me warm.

In case anyone's wondering about the pin I'm wearing in these photos - it's a super sparkly glitter heart that I bought from Claireabellemakes not long ago. I'm wondering if I can justify gradually adding a whole rainbow of them to my brooch collection!


Overall, I'm calling both of the tops a success and I know I'll definitely be wearing them over the coming months. I've paired both of them with needlecord Winslow culottes in these photos (navy pair blogged here and teal pair here). I wear these culottes loads at this time of year - definitely more than I would have expected when I first made them. Hopefully my new Astoria and Toaster tops will be just as well loved!

Thursday, 1 February 2018

Seamwork Skipper Dress

Today's project might be a bit outside of my usual style comfort zone, but it definitely isn't lacking in terms of comfort itself. In fact, this may be one of the comfiest, cosiest garments that I've ever sewn. Here's my Seamwork Skipper dress.


The Skipper pattern itself is a traditional, crew neck sweatshirt, but the version I've made here is using the Seamwork member exclusive version. It's the same basic sweatshirt shape extended to dress length, with added in-seam pockets and a hood. When a picture of the dress version popped up on my Instagram feed one chilly day earlier this month, it appealed to me because it looked so snuggly. As someone who works from home, for me it looked like perfect winter work wear.


I've got quite a few Seamwork credits waiting to be used (clearly I haven't been sewing enough!), so I wasted no time in downloading the pattern and having a little online hunt for some suitable sweatshirting fabric.

I considered various fun print options, but none of them were especially cheap and I wasn't 100% sure whether the dress would suit me so I didn't want to spend too much.

In the end, I opted for this plain pink sweatshirting from Fabworks. It's lovely quality, especially for the price. As the fabric is extra wide, I was also easily able to cut the dress out of 2m, instead of the 2.3m of 150cm fabric called for by the pattern. I'm not sure I would agree with the description of it being magenta, but it's a very pretty shade of pink so I'm not going to worry too much about what the colour's called.


The Skipper dress (and the original sweatshirt version I imagine) is a nice, simple pattern to sew. The instructions were all nice and clear, apart from one point about making the drawstring casing in the hood where I think the instructions are in the wrong order. They have you make the casing (which is just formed by folding the outer edge of the hood back on itself), and then sew a buttonhole to feed your drawstring through. It may just be me being weird, but I'm not sure how you'd sew a buttonhole with the casing already made without it going through both layers of the fabric, when you only want it to be going through one layer. Instead, I sewed the buttonhole first and then made the casing.


In terms of sizing, I blended between a medium at the bust and a large at the waist/hips, which are the sizes recommended for my measurements. The fit is quite forgiving on a garment like this - it's not meant to be figure-hugging after all - and I'm fairly happy with how it turned out. The pattern description does say that the shoulders are slightly dropped, but they're possibly slightly too dropped on me and I might bring them in a bit if I make another version.


Other than that, if I make a second version I might do something quite against my usual preferences and omit the pockets. While I generally love pockets, I don't think the combination of pockets in a sweatshirting fabric and my proportionately large hips is particularly good here and they slightly spoil how the dress hangs (there's a reason why I've got my hands in the pockets in most of these photos - you can see in the photo below that the pockets are a bit lumpy).

Oddly excited by the hood and drawstring!

Overall, I think we can probably all agree that this isn't really the most "flattering" dress that I've ever sewn. But that's OK - it's not meant to be! It is, however, definitely very comfy and cosy and, let's be honest, isn't that just what those of us in the northern hemisphere want at the moment?!

Thursday, 3 November 2016

Seamwork Elmira Cardigan

When the Elmira cardigan was released as one of the patterns with the August issue of Seamwork, I knew right away that I'd be making one at some point. I really love the look of wrap cardigans, and the large bow closure is just the kind of thing that appeals to me. It was one of the first things on my autumn sewing list, and here's my version....


The Elmira is a cropped, fitted wrap cardigan that fastens with buttons and thread chain loops on the right on the inside, and a large ties at the left hand side.

As with all of the Seamwork patterns, it's a fairly speedy sew. I cut mine out one evening and sewed up everything apart from the loops and buttons the next evening. By the evening after that, I'd decided that I didn't want to use the loops and buttons, and instead I sewed in some poppers/press studs/snap fasteners/whatever-you-want-to-call-them that I had in my stash.


The fabric I used came from Girl Charlee, but I bought it several months ago and it doesn't seem to be in stock now. I originally ordered it intending to make a dress, but when it arrived it seemed a little lightweight for that so then it sat around waiting for me to decide what it would become.

When fabrics have been in my stash for a while, I tend to regard them as "free" (even though they're clearly not because I had to pay for them at some point) and will happily use them for anything, even if I'm not sure how they'll turn out (am I the only one that does that?!), and that's how this piece of jersey ended up being an Elmira.


It's a lightweight jersey; I can't remember the exact fibre content, but I'm pretty sure it's some sort of viscose blend because it's really drapey. It's also slightly sheer when stretched, which is what put me off using it for a dress. I knew wouldn't be a problem with the Elmira though, because I'll always be wearing at least a little vest top underneath it.

I don't think I would have wanted to use any knits that were much heavier than this. I noticed that one of the recommended fabrics in the Elmira description is French terry which sounds really cosy and tempting but, from my experience of French terry at least, I think that the knot/bow could end up being really bulky.


The fabric was nice to work with, and the instructions were clear and easy to follow. I'm not 100% sold on the finish that the pattern produces. The front pieces are self-lined, and the outer and lining pieces are joined together and the back neckline is finished (by turning under and stitching) before sewing the shoulder seams. I found that my shoulder seam allowances wanted to peep out at the neckline (because they're not enclosed in a band or anything) so I ended up top-stitching them down to keep them in place inside the cardigan. I'm not sure if that's a "thing" or not, but it worked, so that's what matters.


Based on my mesurements, I graded between a medium at the shoulders and bust, and a large at the waist. As it turns out, I really didn't need to grade up at the waist because I ended up taking the side seams in (probably taking them back to where they would have been for the medium), and I positioned the poppers so they're not right at the end of the inside front piece meaning that the overlap is bigger than it should be. I also added 1.5 inches to the length - fairly standard for me. With those adjustments, I'm fairly pleased with how the fit turned out.

The front crossover sits quite nicely when I'm wearing it. I've worn it once so far and, while I did have to adjust it a couple of times throughout the day, it wasn't constantly moving out of place as I feared it might. I would say though that this is definitely a wrap cardigan rather than a wrap top - you'll want to wear something under it unless you want the world to see your bra!


Overall, I'm pretty happy with how this turned out, and I love how it looks with a nice full skirt (I'm wearing it here with my denim Veronika skirt). I won't be rushing to make another Elmira instantly because I want to see how much I wear this one first. It's also reminded me that I have the Papercut Coppelia cardigan in my stash so part of me wants to make that one and compare the two. I could have my own little quest to find the perfect wrap cardigan! Have you made either of them? Or are there any other wrap cardigans out there that I should try?