Friday, 28 March 2014

Easy Short Sleeve Dress: Take 2

Hello everyone! It's another Friday afternoon where I've let myself finish work early, so I thought I'd come and show you my latest finished creation. Here it is, my 2nd version of the Pattern Runway Easy Short Sleeved Kimono Dress...


This really is a super easy pattern; my original version (here) was one of the first garments that I sewed for myself, and even with my limited experience at that point it was fairly straightforward. Now that I've had a bit more practice, it came together really quickly, which is always nice and satisfying.
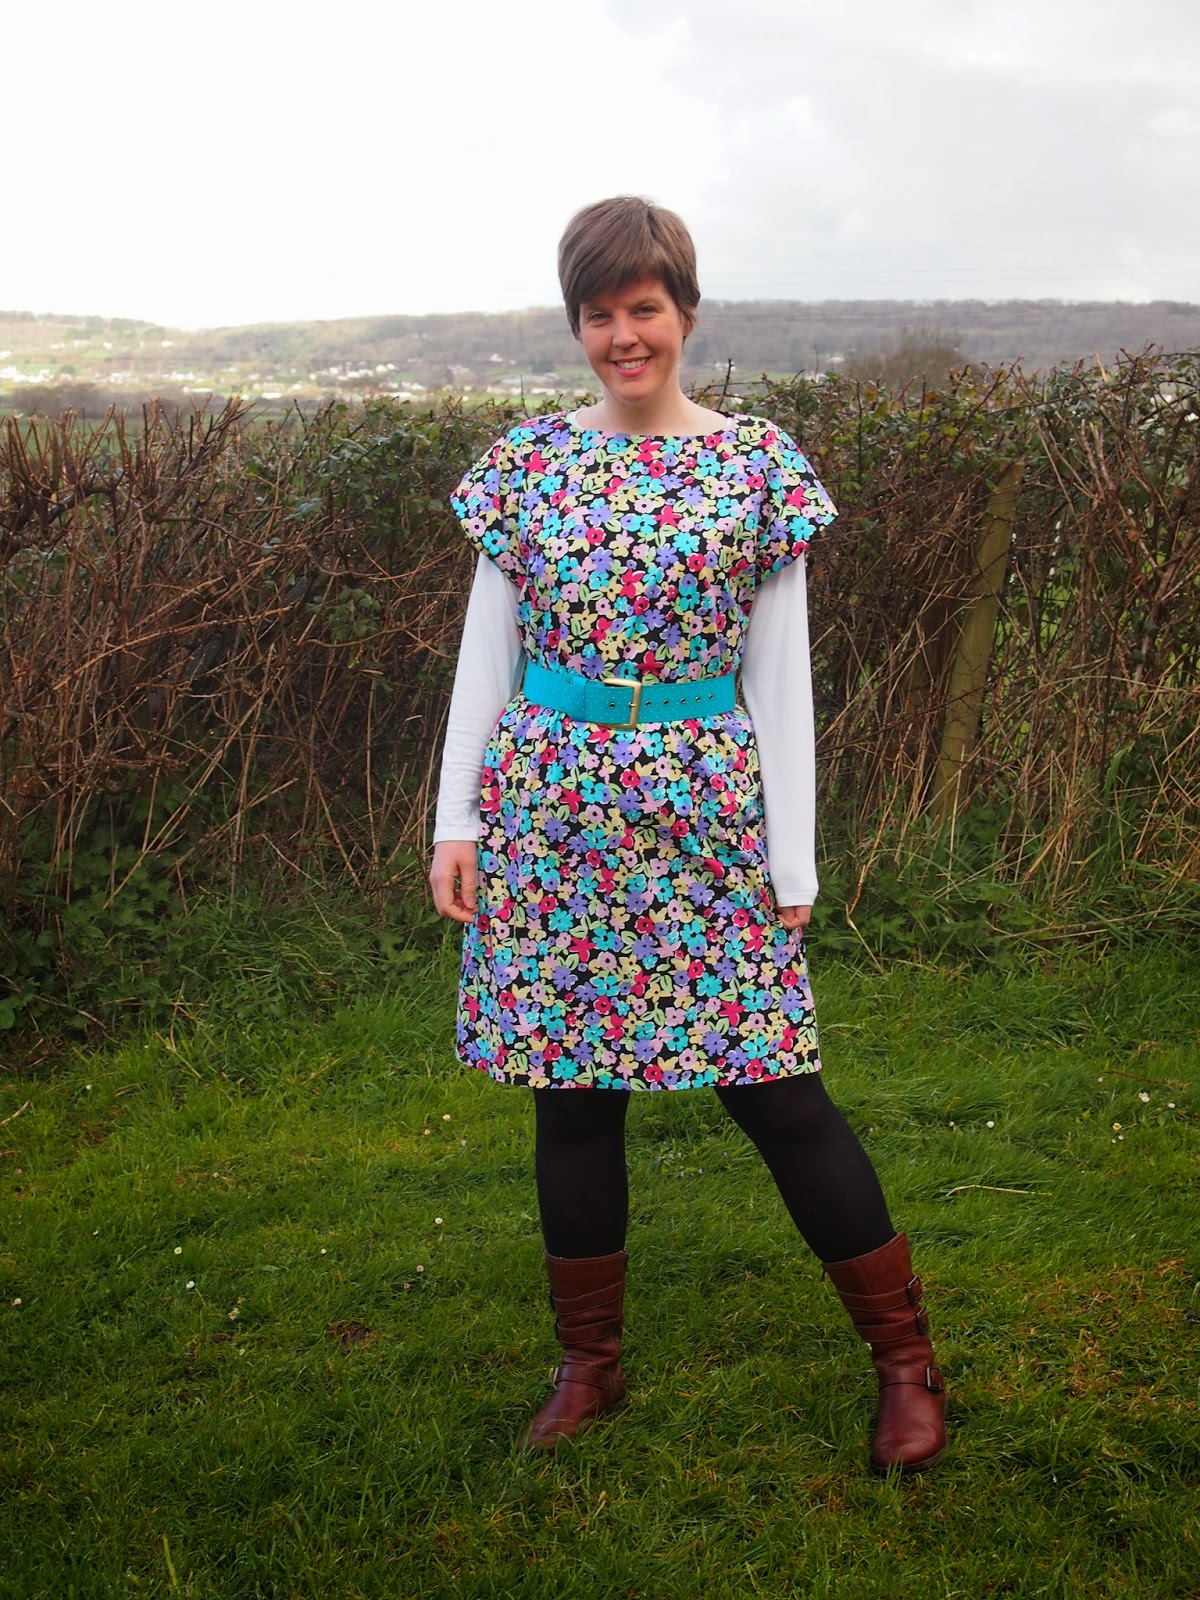

For my first version, I used a poplin and I said at the time that I thought it might be better in a fabric with a little bit more drape. This time, I used a lovely lawn that I found half price in the sales after Christmas (Minerva also have it here if you want some bright flowers in your life!), and I am happier with the end result. Looking back at that blog post, I think I also realise how much easier I find it posing for blog photos now. Don't get me wrong, I'm no model by any means but I used to HATE it, now it's bearable at least!


I didn't completely love the dress when I first tried it on, but then I realised I just needed to add a belt to it - the waist of the dress is elasticated anyway but I need a bit of waist definition or else I end up looking like a bit of a blob. Luckily, I have a couple of belts that go really well with the dress, so I decided to go crazy and use two different styling options for these photos. It may have been sunny while I was posing for them, but it definitely wasn't warm enough to be hanging around in a cotton dress without any layers under/over it and I did get a couple of funny looks!


Having taken two different sets of photos shows how versatile this dress could be - it looks good layered up while there's still a bit of a chill in the air, but will be good once it's warmer too, and it can easily be dressed up or down. Definitely a good addition to my wardrobe.


This button is the only fastening on the dress, which is one of the reasons why it's so quick to sew up and why it's a good pattern for beginners. It's also quite a relaxed fit so you don't need to worry as much about fitting issues as you do with some patterns.


All in all, another successful project as far as I'm concerned! It's being worn layered up for now, but I'm looking forward to the weather being warm enough to wear it on its own - and with the sun shining through my window this afternoon that time isn't feeling as far away as it has been recently!




Friday, 21 March 2014

Pretty Petals Paper Piecing

It's Friday afternoon and I finished work early (the advantage of being freelance!) so I thought I'd take the opportunity to show you my latest creation. I've got a couple of bigger sewing projects on the go, but in between working on them I decided to sew up this pretty little makeup bag. It's made using a design by Florence of Flossie Teacakes which was featured in issue five of the relatively new magazine Love Patchwork and Quilting (if you're in the UK and interested in patchwork or quilting then check it out, lots of lovely inspiration and ideas!).


While I mainly love sewing my own wardrobe at the moment, I also have a mountain of small bits of material and scraps which, short of making myself some sort of crazy patchwork technicolour dreamcoat, are never going to be big enough to turn into clothes so I need to find other uses for them. I kind of like the idea of making a quilt, but am slightly scared of the reality of it, so at the moment small little projects like this are a good compromise!


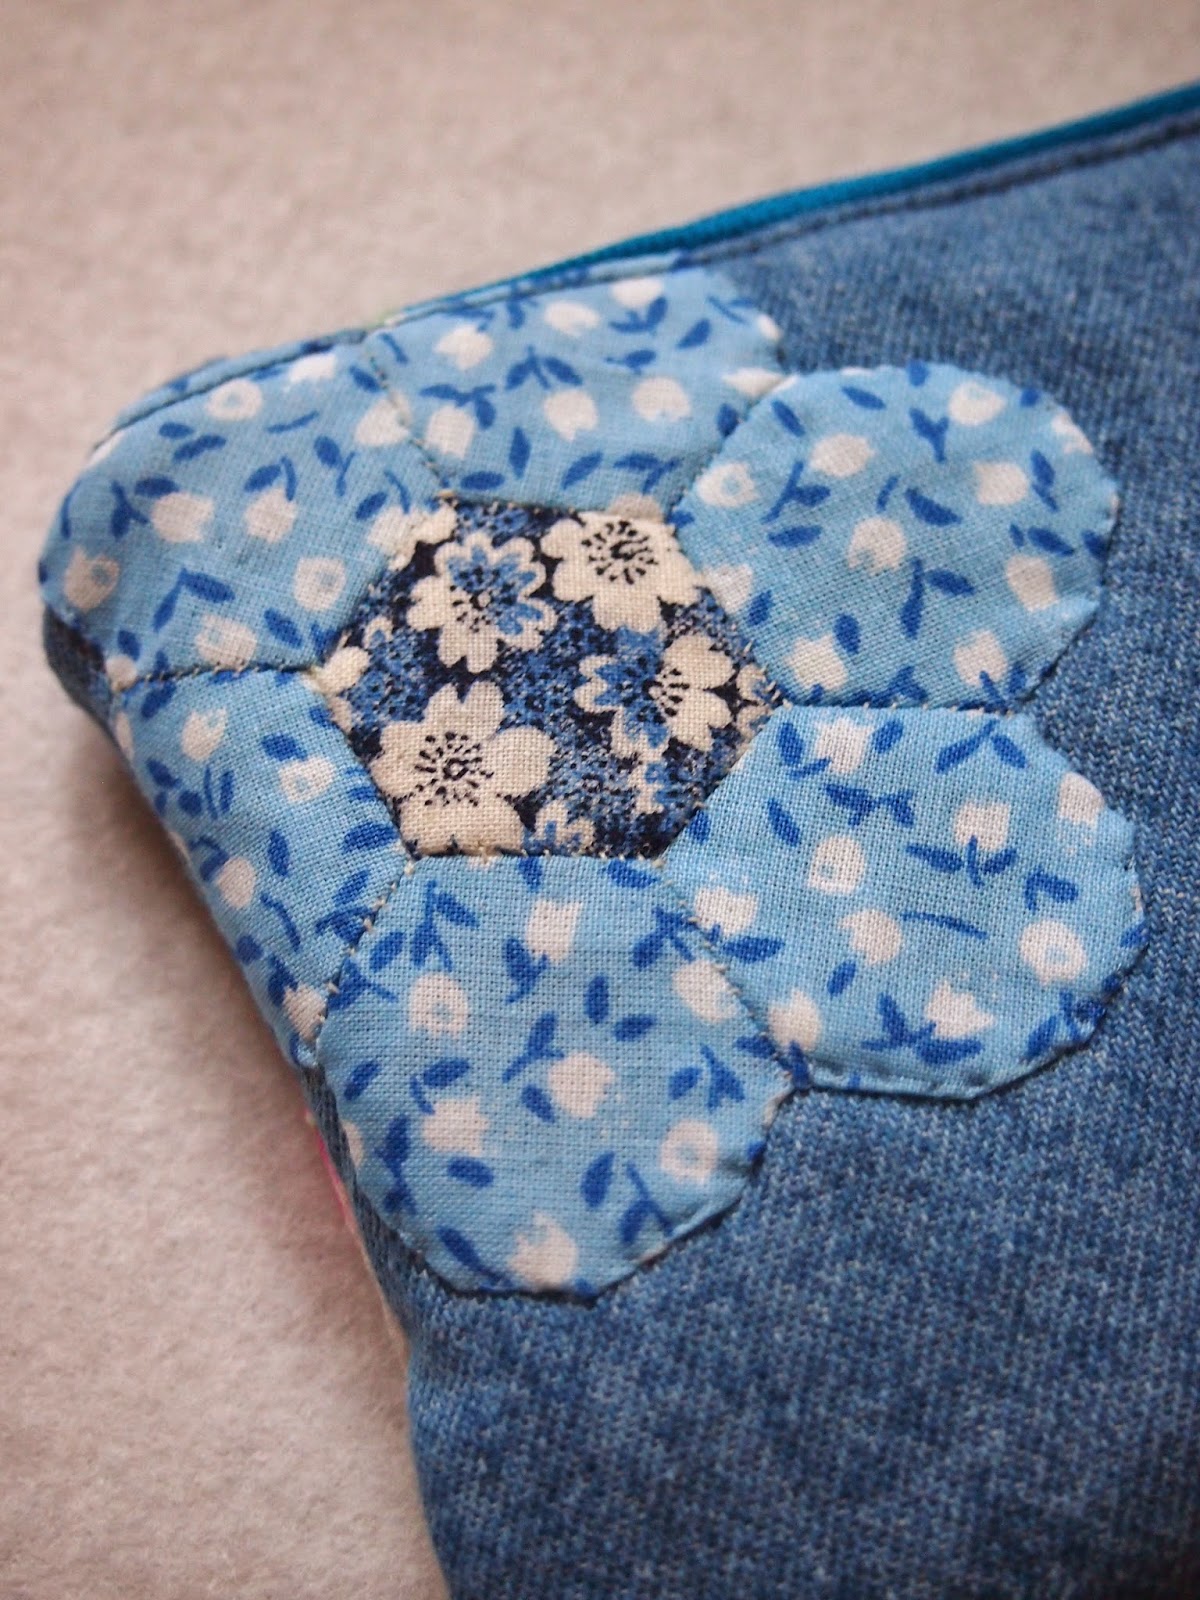
I made the bag using some lightweight denim, which was once a very well worn skirt, and the flowers and lining materials are some of the many bits and pieces I have left over from making masses of bunting for my sister's wedding the other year.


The flowers are sewn together using English paper piecing. You can see in these photos that my stitching probably leaves quite a bit to be desired but I'm working on it.

I made a couple of patchwork tea cosies and a patchwork cushion a year or so ago using paper piecing, and I really enjoyed the process then, but hadn't done any more since. This small little project has reminded my that I liked it and I think I might have to try something a bit bigger soon. Much as I love my sewing machine, things like this are much more portable, and unlike lots of people, I actually really like a bit of hand stitching every now and then - as long as there's something good on the TV anyway!


I went into autopilot when it came to putting the actual makeup bag together - I've made quite a few little pouches like this (they're quick and easy to make, and make great presents!) so I just used the method that I've always used, but I've just looked at the magazine again and it's actually pretty much identical to Florence's instructions so it's all good.


I think that's about all I've got to say about this one! I've just finished a new dress though so hopefully I'll be able to get some pictures of that soon and then I'll be back to show you. Have a good weekend everyone!

Sunday, 9 March 2014

Simple Denim Skirt

While it's always nice to try new patterns and learn new skills, sometimes you just fancy a simple sewing project using a pattern that you know and love. This was just the mood that I was in this week, so I set about making another version of the Sewaholic Hollyburn skirt, this time in denim.


The Hollyburn was the first thing that I made for myself when I took up dressmaking, I made a second version quickly after and I've worn the second one in particular quite a bit - the first one not so much recently but it'll definitely be coming back out this summer. It's a great beginner's sewing pattern, nice and simple and with no fitting issues - as long as you've got the waistband right, you're sorted! It's a shape that I really like and that suits me, so when I wanted a simple project this was the obvious choice. As with my second version, this time I made view C with the belt loops from view A.


The fabric choice was also a no brainer because a few weeks ago I was lucky enough to win some denim and other related goodies in a giveaway from Winnie of Scruffy Badger Time - thank you again Winnie! If anyone fancies some denim for themselves, it's available with the other bits that I won as a kit from Minerva.


Anyway, winning the denim was quite exciting for me because I never win anything, and it was particularly well-timed because I needed a new denim skirt. I don't really wear trousers, so denim skirts are sort of like jeans for me - they go with everything and are easy to throw on so get worn a LOT.


My prize came with some fun gold ric rac, which I was going to use as a trimming around the pocket edges, and some nice contrasting top stitching thread, which I did even start using at one point, but then I decided to keep things totally plain this time so that the skirt will go with absolutely everything. And it means that the fun of using up my prize can be extended to another project!


The denim is obviously quite a bit heavier than the cotton and cord that I used for my first two versions of the Hollyburn, and that means that the skirt has a bit more body to it and hangs a bit differently which is quite nice. I think it'll probably soften up a little bit with wear - I've worn the skirt a couple of times already since I finished sewing it and I can already notice a slight difference.


All in all, this project did exactly what I wanted it to - it was nice and quick and has filled a little hole that had recently developed in my wardrobe. Now I'm ready to get my teeth into something more complicated again - watch this space!

Tuesday, 25 February 2014

Shawl collar cardigan

This cardigan has been an on-and-off (mostly off!) knitting project for well over two years now. I've knitted other things in between, but after I finished my polo neck tank top in the autumn, I told myself that I wasn't allowed to start any other big knitting projects until this was finished. I'm adding more and more cute patterns to my to-knit list all the time and I wanted to get this finished so I could move on to something more exciting, so I'm very pleased that it's now done!


The main reason why this stayed a WIP for so long is because, truth be told, I was never completely in love with the pattern. I bought the pattern and yarn together in a kit from The Knitting Shop because the kit was reduced and a really good price and because this looked like something that my limited knitting skills could handle. Don't get me wrong, I don't hate it by any means - it's a nice cosy cardi, I like the colour, and I know I'll wear it, it's just it's a bit boring and I'd probably prefer something that's a little bit more fitted than this pattern is designed to be. 

But on the plus side, I've got a new cardigan to keep me warm and I was right about it being something that my knitting skills could handle. This is all just stocking stitch with a bit of ribbing round the edges so nothing complicated at all. I think it was good for me to knit something like this that I could definitely cope with, but now I'm ready for more challenging things! And I've also learnt the lesson not to start knitting something unless I really like the pattern!


The pattern is Wendy Skye pattern 5495, and I used Wendy Skye DK yarn in Fir, which is a poly/acrylic/mohair blend. It was nice to work with, and I like the blend of colours and the effect that the yarn produces when knitted up. 

When I actually picked it up and got round to working on it, it was mostly quite quick to knit. In 2 years, I'd only managed to knit about half of the back, then I knit the rest of the back, the 2 front pieces and the arms relatively quickly over Christmas and at the start of the year. Then I hit a bit of a wall again when it came to picking up 357 stitches around the button band and collar! It was a bit of a tedious process, but the collar turned out nicely so it was all worth it in the end.


Speaking of the collar, here's a photo to prove that it does sit nicely and it's not always in the weird half-turned-up position that it's in for some of these photos. Not sure what happened there, but it started raining (again!) before I could take some more with the collar in the right position, but at least it looks nice in the close-up.


I decided that neutral buttons would work best with all the colours going on in this cardigan, and I love these cute little wooden flower buttons. I found them in Millie Moon on a recent trip to Frome. I could spend a fortune in that shop - it's very dangerous!


Anyway, to cut a long story short, I'm glad this is finally finished, I like it but don't love it, and I'm now looking forward to knitting something else. I got Little Red in the City for Christmas, and I love all of the patterns in there, so my only dilemma is which to knit first - not a bad problem to have!

Sunday, 16 February 2014

Gather Mortmain Dress

Just after Christmas, I picked up some pretty rose print cotton at a bargain price in the John Lewis sale. I had a plan of the dress I was going to make and it was all going to be great, then as I was working on other projects I fell out of love with the original idea for the dress. For some unknown reason I started to get oddly stressed about what to make with the material, but then I saw the Mortmain dress, which has recently been released by Gather, and my problems were solved! It's a shape that I knew I'd love, and the name is taken from the book I Capture the Castle, which was definitely a good sign as far as I was concerned. A couple of weeks later and the result is just what I hoped for...


Sorry for the random shadows, but hey, shadows mean that the sun is out which is definitely a good thing compared with how the weather has been lately!

Anyway, back to the dress...the first thing to say is that the packaging is really pretty (it also arrived the day after I'd ordered it which is nice when you want to get sewing!), the pattern is printed on slightly thicker paper than lots of patterns and the instruction booklet that comes with it has lots of really clear instructions and plenty of diagrams to help you along the way. The pattern is classified as being for ambitious beginners, which I'd say is just right - there are more details than in an average beginner pattern but the instruction book will hold your hand and guide you through them all so there's nothing to be scared of. 


The dress has a fitted bodice, separate waistband and box pleated skirt, and can either be sleeveless or the option which I made with 3/4 sleeves with cuffs. The main instructions for the cuff have you make an elastic loop to fasten onto a button, but there's also a tip in the instruction book which suggests using ribbon ties instead which sounded fun to me, so that's what I did...


This option probably wouldn't be to everyone's tastes, and it does make the dress very girly, but I love it! Oh, and excuse the stray bit of thread that I clearly didn't manage to remove before taking the photos. On the plus side, this photo does show the waistband nice and clearly for you - it gets a bit lost in this print but I think it gives the dress a good shape.

The Mortmain fastens with an exposed zip up the back - this was the only bit of the dress that I wasn't 100% sold on at the outset because I'm often not sure about how exposed zips look in general but I decided to give it a go and I'm glad that I did because it means I've done something a bit different for this dress. I think it helped as well that I found an olive green zip to use which goes with the leaves on the material. 


As for sizing and fit - I cut a straight size 14 and added an inch to the bodice (which is a standard adjustment for me as I'm on the taller side of average) but that was the only change I needed to make. 

Everything came together really nicely, apart from the moment when I almost managed to ruin things by somehow ripping the neckline part way through sewing up the bodice. Aaaargh! Don't ask me how I managed that because I really couldn't tell you what happened. Much to my relief, the rip was tiny so I just sewed the neck facing with a very slightly bigger seam allowance and disaster was averted - phew!


Overall, as you can probably tell, I'm really happy with my Mortmain dress. The general shape is similar to some of the other dresses I have made, but there are extra details to keep things interesting - the fastened cuffs are cute and I think the waistband is flattering. The pattern was great to work with so I'm looking forward to seeing what Gather come up with in the future and for now there are other Mortmain dresses emerging in my head - I think it would work well with some colour blocking and I've already spotted a fun print which would make a great sleeveless version for summer. Now let's just hope that this break from the rain will continue so I can wear my dress again soon!