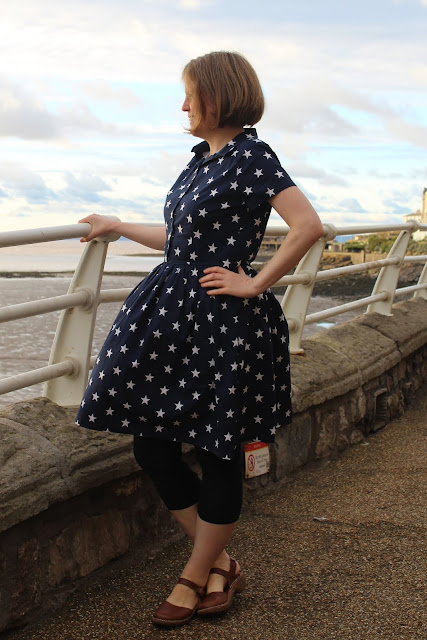
The project I have to share with you today is my third version of the Pauline Alice Cami dress. While I love my first two versions, the fabrics that I made them in mean that one feels quite wintery and the other one is very summery. I really enjoy wearing them both in the appropriate seasons, but felt like making another Cami that could be worn more throughout the year - and here it is...
To be honest, I'm quite surprised that I haven't made this dress before! Navy and white is one of my favourite colour combinations, and I do have a bit of a penchant for stars. Actually, the fact that there simply weren't enough star print dresses in the world for my liking was one of the things that first attracted me to the idea of trying to sew my own clothes. And yet in the five years or so since I started sewing, I've only actually made one star print dress before. I suppose that one of the great things about sewing is that you suddenly have a whole world of prints available to you, and all the novelty prints were just so tempting that I've neglected the stars until now.
Thankfully, I've put that right now thanks to this lovely poplin that I found in John Lewis a month or so ago. I actually bought this in a spare few minutes before I had to head to the station to get a train back home after a weekend away for a friend's hen do, so this also provides a nice little reminder of that weekend too.
Obviously being poplin, it was very easy to work with and pressed like a dream. I'm also pleased to report that it's nice to wear and doesn't seem to crease too easily either. I'd been wearing the dress all day (including crawling around on the floor constructing an Ikea filing cabinet) when we went out for a walk and took these photos, and while it's not completely pristine it looks better than some garments do when they've been ironed right before taking photos.
In terms of the dress itself, I used the same adjustments as I did for both of my previous Cami dresses (size 44 with 1.5 inches added to the bodice length, and 3 inches added to the skirt). I didn't have the same problems with the collar stand that I mentioned in my post about my summery Cami, so I can only conclude that I must have done something odd when I was making that one! The instructions are really thorough, and the only problems I had making this one were due to me not sewing the zip particularly well first time and so having to unpick it.
The colour lover inside me was very tempted to add some bright red or pink buttons to this dress to give a pop of colour. I did also contemplate adding a rainbow of different coloured buttons, but I'm thinking of doing that on another shirt dress that I'm planning to make soon, and there's probably only so many dresses with button rainbows that one person needs! In the end I decided to go with some neutral coloured buttons so that I can wear the dress with absolutely any of my cardigans or accessories.
The Cami dress was re-released recently with a different second view featuring a looser bodice, full length centre front button band and patch pocket. The looser fit probably isn't for me so I'm happy just to stick with my older version of the pattern, but if you'd previously dismissed the fitted bodice version of the Cami dress it might be worth taking a look to see if the new view is more to your taste.
Overall, I love this dress. It's one of those dresses that makes me feel good as soon as I put it on, and I know that it'll be worn a lot. And now I have a Cami dress for all seasons - hooray!


I love how the front placket looks with the row of stars with buttons in between! Good button choice. I'm hoping I have time to finish off my starry looking dress soon ;o)
ReplyDeleteThanks Colette - I did actually entirely ignore the button placement on the pattern and just put the buttons in between the stars!
DeleteOh I LOVE it! If only I had a longer body... gathered skirts are no good on me but it looks so fabulous. I have a red cardigan that would go perfectly! Jo x
ReplyDeleteThanks Jo! Funnily enough, I was wearing a red cardigan with it the day these photos were taken!
Deletegorgeous - that front placing of the stars gives the beautiful finish you can only get with the handmade. suits you so well
ReplyDeleteThank you Eimear - I did take time to make sure that the stars were positioned nicely so I'm glad it was worth it!
DeleteI love it!! Star fabric for the win!!
ReplyDelete