Saturday 2 December 2017

OWOP 2017: The Jennifer Lauren Gable Top/Dress

If you're part of the sewing community on Instagram, then you're probably well aware that One Week One Pattern, or OWOP, has been happening over the last week, this time hosted by Sheona of Sewisfaction.

Day 1 - Anchor print dress with a knitted cardi (blogged here)
For the uninitiated, it's a fairly simple challenge - you just pick a pattern and wear a version of it every day for a week. It could be all different versions or the same garment styled differently for 7 days (if you're better at not spilling things on yourself than I am!).

Day 2 - Gable top in Art Gallery jersey with my corduroy Winslow culottes, and my Turin cardigan
I had fun taking part in the OWOP a couple of years ago (when my hair was much shorter!), so I decided to sign up again. The obvious pattern for me to pick would have been the Emery dress; even discounting very summery versions, I've got enough that I could have worn a different one every day so the challenge would have been fairly easy. However, I decided that it would be more interesting to pick something different so I went with the Jennifer Lauren Gable top and dress.

Blue ponte Gable dress with beads, brooch and very red tights!
I really love the Gable top/dress at this time of year - as it's a knit pattern it's super comfy to wear, and, while I know some people aren't fans of the fairly high slash neckline, I find that it helps to make me feel cosier than patterns with lower necks. Plus it also gave me the benefit of having both tops and dresses to play with over the week.

Pink Gable top, with a denim Veronika skirt and teal cardigan
Gable is also a simple pattern to sew, which meant that I had time to squeeze in a new version (the navy anchor print dress I wore on days 1 and 6) to add to my collection before OWOP started. If you're interested in more of my thoughts on the pattern itself, I blogged about my first Gable top here, and my blue ponte Gable dress here.

Gable top with my Freja dress
I had four Gables at my disposal - 2 dresses and 2 tops - and I found it really easy to wear one of them every day for the week. That's definitely helped by the fact that 3 of them are shades of blue, which is pretty much a neutral colour in my wardrobe so there were plenty of options for me when it came to putting an outfit together every morning.

Anchor print dress with my Toaster sweater
As it's been on the chilly side (by the standards of southern England anyway!) this week, so I was glad to be wearing knit garments (they just always seem warmer to me), and to be able to combine them with my knitted cardigans, or my crochet shawl on the last day.

Blue ponte Gable dress with my crochet flowers shawl
I really enjoyed participating in OWOP again this year. Putting on one of my Gables every morning didn't feel like too much of a constraint, and it didn't get boring - in some ways it actually make getting dressed easier because I couldn't be indecisive! I definitely don't think these four versions of the Gable are the last ones you'll see from me either - there's room for more of both the top and dress versions in my wardrobe. It's also been really interesting to take part in the challenge on Instagram and to see how other people have styled the various patterns that they chose. Thanks to all the sponsors, and of course an even bigger thank you to Sheona of Sewisfaction for hosting OWOP this year.

Thursday 9 November 2017

Knitting: Cable Edge Garter Stitch Shawl

I mentioned in my last post that knitting had been keeping me calm and fulfilling my need to create while I was moving house. Well, today's project is the result of all that knitting. I'd cast it on a couple of months ago, then it got a bit overlooked for a while in favour of the excitement of my first socks, but I picked it back up again when I needed something simple and relaxing to work on.


This little shawl is the cable edge garter stitch shawl from the February 2017 issue of Knitting Magazine. It's a really simple pattern; as the name would suggest, it's mainly garter stitch with a very simple cable down one edge, an eyelet row down the other and an optional cable bind off. Once I'd worked the first few rows and had got the pattern established, this was a nice easy project - good TV knitting!


While the pattern is simple, there is something a bit odd about the instructions. The stitches are gradually increased, and you're meant to end up with 170 stitches. I'd come to the end of the wool called for by the pattern by the time I'd got to 132 stitches and, with the way the stitches are increased, that's a massive number of rows away from reaching 170 (I'm not the only one who's had this problem). I had some of the same wool left from knitting a hat for my sister last year, so I used a bit of that to make my shawl a bit longer. I only knit a few inches extra and cast off when I was at 142 stitches but, after blocking, the dimensions of my shawl are roughly the same as the ones in the pattern.


I used the optional cable bind off but, if I were knitting this again (I'm not ruling that out), I probably wouldn't bother and just use a simple bind off instead. I'm not sure whether I did something wrong (always possible), but the cables just don't really stand out as well on the bind off as they do on the edge of the shawl and just look a bit "blah" (you can kind of see this in the photo below if you look at the difference between the edge that runs across my back and left arm, and the one across my right arm).


For once, I used the exact yarn recommended by the pattern - right down to the colour even! It's Stylecraft Head Over Heels in the Eiger colourway. This pattern is knit at a fairly loose gauge on 4mm needles, which makes the yarn feel quite different from when I've used it at the recommended gauge for other projects, and the finished shawl drapes really nicely.


In spite of the slight oddities about the stitch count/yarn amount and me being not too enthused about the cable bind off, I'm happy with the finished shawl. It's the first shawl I've made of this size, and it feels like it'll be very wearable - hopefully it'll do a good job of keeping my neck cosy over the next few months!

Sunday 29 October 2017

Vogue 9239 for a wedding

Hello! How are you all? Things have been a bit quiet around here recently in terms of blogging and sewing, but life itself has been hectic because I've just moved house. As it always the way, it's been a bit chaotic and sometimes stressful (knitting has been keeping me calm while the sewing stuff has been packed away!), but I'm starting to feel just a little bit sorted at last so I thought I'd pop by and show you the last project that I sewed in my old flat.


This is a dress that I made to wear to a friend's wedding a couple of weeks ago, but the dress you see here isn't at all what I intended to make. The original plan was to make a Sew Over It Betty dress using a large-scale floral cotton sateen that has been in my stash for a while. Sadly, that wasn't meant to be!


When I toiled the Betty, I had some issues with the fit of the shoulders - they were just too big on me (proportionately, my shoulders are small-ish so that's not too surprising) and just kept slipping off. I made some adjustments to sort that out, but the bodice still just didn't feel quite right on me. For some reason the V-neck back made me feel bizarrely exposed, but I told myself that I was just being weird because the dress isn't exactly revealing at all. So I went to cut into my fabric and found that it was much narrower than I'd thought and wouldn't fit the Betty skirt pieces. I'd have had enough fabric to cut the skirt on the cross grain, but the flowers would have looked a bit distorted if I'd done that.


So it was back to the drawing board! At this point, I didn't have much time left (and probably should have been packing instead of faffing about sewing a pretty dress!), so I knew I needed to sew a pattern that I'd already got to fit me. I've really enjoyed wearing the Vogue 9239 (view D) dress that I made earlier this year, so I decided to go with that. Only I thought the large scale floral would be spoiled by interrupting the print over all the panels in the 9239, and I didn't have any other suitable fabric in my stash so I was "forced" to do some emergency online fabric shopping - life's tough sometimes! 😉


Thankfully I found some lovely stretch cotton from Sewisfaction, which had enough colours in it that I knew I'd be able to find some suitable accessories to complement it in my wardrobe. I wasn't disappointed when it arrived - it's lovely quality and happily it looked good with the shoes that I'd originally been planning to wear with the ill-fated Betty dress (they're the perfect shoes for wearing to a wedding as far as I'm concerned because the look fancy but are surprisingly comfortable!).


I set aside the whole of the Sunday before the wedding to sew the dress and thankfully it was one of those sewing days where everything just goes to plan. The fabric behaved well, was lovely to sew and pressed nicely and because I'd sewn Vogue 9239 relatively recently, there were no nasty surprises during the process. At the end of the day, I had a dress that was finished apart from hemming so I just left it to hang and then hemmed it with bias binding a couple of days later.

If you're interested in details on sizing and the adjustments I made (there were a few!) - they're all exactly the same as for my first version so check out the blog post on that one.


The dress was lovely to wear at the wedding and great for dancing (by which I mean twirling!). I actually don't think I'd have liked the dress I was originally intending to make as much, so it turns out that it was probably good  that things didn't initially go to plan. Anyway, that's about all I have to say about this one so I'll leave you in peace! I hope you're having a lovely Sunday - I'm off to unpack all my sewing paraphernalia!

Friday 6 October 2017

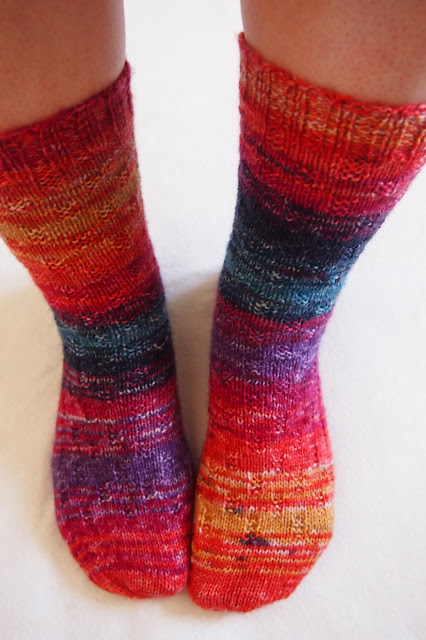
Knitting: My first socks!

What's your attitude to trying new techniques? When I'm sewing I'll happily dive in and give things a go, but when it comes to knitting I tend to be a bit more reticent. I think that's in no small part because knitting involves a much bigger time investment so there's more to go to waste if things don't work out quite right. That's why it's taken me until now to get around to knitting socks, even though the idea has intrigued me for a while.


To give me added incentive to finally give sock knitting a try, I included knitting a pair of socks on my #2017makenine list. So when September came around, I thought I'd better get on with it before the year completely slipped away.


The pattern that I chose was, appropriately, My First Socks by Sandra of Cherry Heart. These are top down socks with a simple texture pattern, flap and gusset heel and rounded toe. I thought the pattern was excellent. As it's intended for beginner sock knitters, it's really detailed with plenty of help along the way and helpful photos to illustrate all the key steps. I didn't have any trouble at all knitting these socks - I was actually surprised by how simple it all was. I don't know why, but I was imagining all sorts of magic and trickery would be involved in knitting socks, but that couldn't have been further from the truth. If you're new to knitting socks, I'd definitely recommend this pattern.


There are instructions in the pattern for using both DPNs or the magic loop method on one circular needle. I've used both techniques in the past, but marginally preferred the magic loop method so that's what I went with. I started off using the Pony circular needles that are readily available in most knitting shops, but moving the stitches around the needles started getting on my nerves as they kept getting caught on the join between the needles and the cable. I'd heard other people mentioning HiyaHiya needles, so I decided to give them a try - and I couldn't believe the improvement! They may be over twice the price of the Pony needles, but they're well worth it in my humble opinion.


The yarn that I used is Stylecraft Head Over Heels in the Etna colourway, which I picked up at a local yarn shop. It's a 75% superwash wool/25% nylon blend and from wearing the socks for the first time they feel lovely and cosy, and not at all scratchy. It was also nice to knit with, and I love all the colours in the yarn. Actually the colour changes made knitting these socks quite addictive because I kept wanting to get to the next colour.


Overall, I loved knitting these socks and don't know what I thought would be so "scary" about knitting socks in the past. I'd really recommend the My First Socks pattern if you're also tempted but slightly intimidated by the idea. I'm looking forward to having some handknitted socks to keep my toes warm this winter, and I don't think it'll be long before I'll be casting on another pair. Does anyone have any recommendations of other sock patterns I should try?

Thursday 21 September 2017

Pauline Alice Seda Dress - Take 2

Do you have any fabric that you love, but aren't sure what to do with? The main fabric in this project was a Christmas gift from my sister last year and, while I really like the print, whenever I held it up against myself while pondering what to make, I couldn't shake the feeling that the green and yellow in the print aren't very flattering colours for me. Recently I realised the solution was obvious - sew a Pauline Alice Seda dress with a contrast yoke.


After I'd had the idea, I wanted to get on with the sewing because the fabric had already been in my stash for quite a while by my standards. Thankfully it was easy to find a plain fabric to match the navy in the print, so after a quick trip to a local fabric shop I was ready to go.


I've already sewn one Seda dress this year and I was really happy with how that one turned out, so I did almost exactly the same for this one - with the exception of shortening the sleeves. I'm not sure why exactly, but this fabric just felt as if it should be made into a dress with short sleeves rather than three-quarter. Shortening the sleeves was obviously very easy, and I just used the sleeves from the Emery dress as a guide for the length.


In fact, while I'm calling this dress a Seda dress, it is very much a hybrid with the Emery dress because, like my first Seda, it also uses the skirt from the Emery. While the Seda skirt is also just a simple gathered skirt, the pieces were too wide for my 45" fabric so I couldn't use them. I still think that this is more a Seda dress than an Emery though, because the contrast yoke of the bodice is the distinctive feature of this version (view B) of the Seda pattern, and using the Emery skirt instead doesn't really alter the overall look of the dress.


I think the combination of the floral print with the plain navy yoke is really successful. With the two fabrics combined, the navy in the print is highlighted and the yellow and green which were originally bothering me don't seem as noticeable. Green and yellow are always slightly funny colours for me - I'm a fan of them on paper, but for me to wear them near my face they have to be just the right shade or they end up making me look ill. It's probably more in my head than anything anyone else would notice, but if I'm not happy with something then I won't wear it, and I didn't want that to be the fate of this fabric.


The navy yoke solved the problem in this case though, and I'm really happy with my finished Seda (or mostly Seda!) dress. I'm glad that this fabric has finally been sewn up so it can be worn instead of languishing on the shelf. Now I just need to find solutions for what to do with a couple of other long-term stash residents...

Thursday 7 September 2017

Granny square crochet blanket

This little (well, quite big actually!) crochet project has been a long time in the making. The date on my first work-in progress photo of it tells me that I started it in February 2016. I haven't exactly been working on it flat out, and I know quite a few months went by last year without me picking it up at all, but I decided that finishing it would be one of my #2017makenine projects - and now I can tick it off my list!


This colourful beauty was made using a pattern from the book Granny Squares by Susan Pinner - it's actually the project featured on the cover of the book and is listed as the 'Double-bed or sofa blanket'. Looking back at the book as I write this, I'm cheered by the fact that the intro to the pattern says it "is a big project, one to be picked up and put down often. But by making a few squares at a time you will eventually create a fabulous family heirloom." So that obviously justifies the fact that it took me over 18 months to make this!


The blanket is made up of 196 individual granny squares joined together in 14 x 14 rows, and finished with a border of 3 rounds of granny shells (although I actually did 2 rounds in the dark blue rather than 1, so I have 4 in total). The squares aren't the traditional granny square, but instead have colourful circular centres which are turned into squares in the white outer round.


The book gives instructions for making the blanket up either using the join as you go method or sewing the squares together. I chose (without much hesitation) to use the join as you go method; I've got a pile of granny squares sitting in a drawer somewhere which are testament to the fact that I get bored of a blanket if it's sitting in piles of squares rather than looking like a blanket. And why spend the time sewing squares together if you can join them as you go? I made up batches of 14 squares at a time and then joined them on to the blanket so that it gradually grew as the months went by.


Now, let's talk about all of that colour! The squares are all different colour combinations - well, some of them use the same three colours in the centre but in a different order (if that makes sense). I used 14 different colours, so I decided half way through making the blanket that I wanted each horizontal and vertical row of the blanket to have each of the 14 colours used in the outer circles of the granny squares like some sort of giant crochet Sudoku. I think that would have been possible if I'd thought about it and planned it from the start, but it didn't quite work out without the planning. Never mind, I think the random arrangement works nicely!


The yarn I used is Stylecraft Special DK. While 100% acrylic yarn may detract slightly from the heirloom status that the book claims for its 100% wool version, it did make this a much more affordable project and means that I can use the blanket without being too protective of it.

The colours I used are Pomegranate, Royal, Turquoise, Sherbet, Wisteria, Sunshine, Lipstick, Fondant, Emperor, Kelly Green, Aspen, Spice, Cloud Blue and Magenta, with White for the joining rounds and border (I did find that I needed quite a bit more white than the book suggests - I used over 400g), and Midnight for the contrast row in the border. I really enjoyed putting together different combinations of colours as I worked up the squares, and it make me rethink some of my ideas on colour - I'd never realised before quite how nice pink and green can look together!


This project may have taken a fair while to complete, but I'm really glad that I put in all that work and that I now have a lovely snuggly blanket ready to use once autumn arrives!

Friday 1 September 2017

Tilly and the Buttons Fifi Pyjamas

When the Tilly and the Buttons Fifi pyjamas pattern was first released, I thought that it looked pretty but not necessarily for me. Gradually as I saw more versions pop up online, I decided that maybe I needed to give the pattern a go after all. Then pretty much as soon as I'd bought it, Megan Nielsen released the Reef pattern and that took priority in my sewing plans. So Fifi was left sitting in my stash until recently when I decided that it was time to finally crack the pattern open.


At this point I'll apologise for the fact that the photo above is the only modelled one you're going to get in this post. While I've happily posed for photos in pyjamas before, the Fifi set is just that bit more skimpy than the others that it made be feel a bit too exposed. But I know I always like to see what a pattern looks like when worn, so I braved one photo with the added protection of my dressing gown in the interests of the greater good of the sewing community.


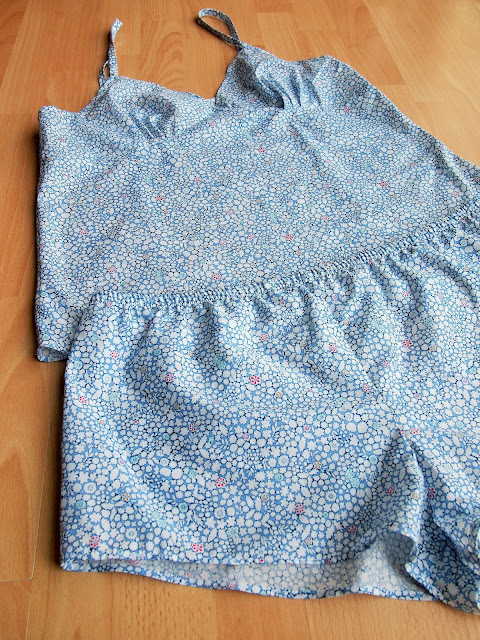
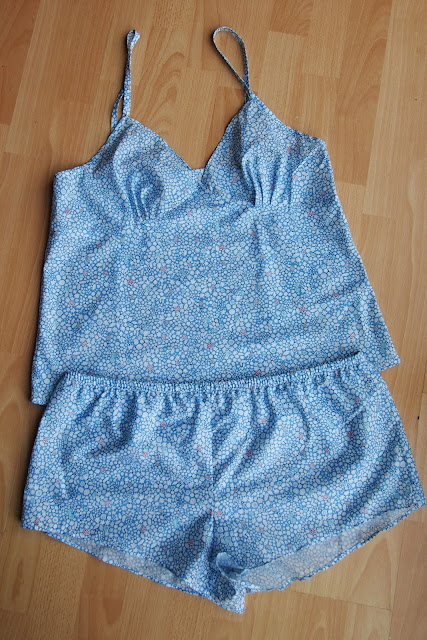
Anyway, back to the sewing...the Fifi "boudoir set" (although I definitely think of them as pyjamas, I'm not fancy enough for a boudoir set) features a camisole and little sorts. The camisole is cut on the bias, with pleated cups, a princess seamed back and bias binding straps. The shorts have a narrow stitched-in elastic waistband and are definitely quite short!


I found the Fifi pyjamas were a really enjoyable project to sew. Tilly's patterns are well-known for having very comprehensive instructions, and Fifi is no exception. Everything was very clearly explained and came together easily. I'm always a fan of French seams, so I liked the fact that they were used throughout this pattern - the insides really are as neat as the outside for Fifi. I hadn't sewn an elastic waistband like this one before (you stitch the elastic straight onto the shorts, and then turn it under to encase it before stitching again), but I really like the finish and it was nice not to have to thread the elastic through (I don't know about you, but that always seems to take me longer than it should!).


In terms of size, my measurements are 38-32-42, and I made a size 5 camisole and size 6 shorts. I added an inch to the length of the camisole, but other than that made no adjustments. I didn't make a toile because I reasoned that pyjamas don't necessarily need to fit as perfectly as day-to-day clothes, but as it turns out the fit is pretty good anyway.

The fabric that I used is some more ebay bargain Liberty tana lawn (from Katsfabrics), this time in the 'Kathy' print. I bought this fabric to make a Susie blouse for my Mum's birthday earlier this summer and, since fabric from Katsfabrics comes in pre-cut lengths, I ended up with a fair bit left over for myself. Definitely not complaining! I pondered what to do with it for a while before realising that I probably had just about enough for a Fifi set. Thankfully I was right!


All in all if I'm honest, I probably prefer my Reef PJs in terms of wearing - but that is really just a personal style preference and is in no way a negative reflection on Fifi as a sewing pattern. This was a really enjoyable project to sew and my finished pyjama set will definitely be worn a lot - after all, who wouldn't want some tana lawn PJs for the summer?!

Thursday 24 August 2017

Knitting: a pretty pink cardigan (King Cole 3541)

We're drifting into late August and heading rapidly towards the autumn so, in the grand tradition of my knitting habits, obviously it's the perfect time to have just finished knitting a very summery cardigan. The temperatures will hopefully still be appropriate for a short-sleeved cotton cardi for a little while though, so I'm going to wear it as much as possible before longer sleeves have to make their seasonal reappearance.


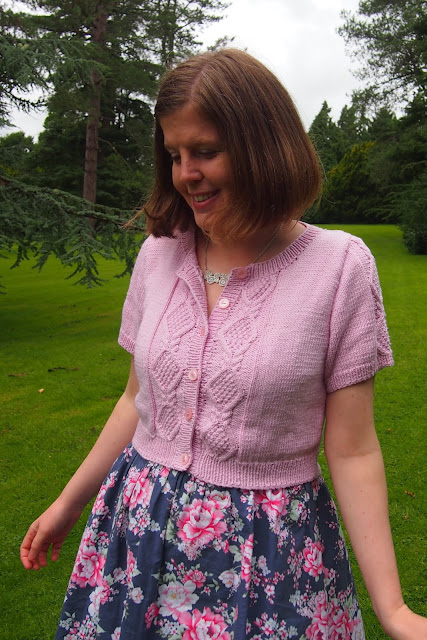
The pattern that I chose to use for this summer's knitting project is King Cole 3541, which features the short-sleeved round neck cardigan that I made and a long-sleeved V neck option. Both of the cardigans have the same cable panel running up the centre fronts and down the middle of the sleeves.


I have to admit that I was slightly daunted at first by the 28-row repeat for the cable panel. I've tackled cables quite happily before, but in simpler patterns and with a smaller number of rows in the repeat so you quickly memorise the pattern. While I don't think I ever completely memorised the cable repeat in this case, I got the basic idea of what I needed to knit in my head fairly quickly. There wasn't anything to be scared of in the cables and I didn't have any problems with knitting the panel as long as I always had the pattern leaflet by my side to consult.


By the time I'd finished knitting the back and fronts and was moving on to the sleeves, I was feeling a bit lazy and wanted to get the cardigan finished quicker so I considered leaving the cable panels out of the sleeve and just knitting them in stocking stitch, but I'm glad that in the end I opted to include the cables. It definitely made knitting the sleeves more interesting, and I think it's a nice detail to have the cables from the fronts mirrored in the sleeves. When I've knitted long-sleeved cardigans I always slightly dread the sleeves because they seem to take forever, but these short sleeves were finished in no time by comparison.


I made the size based on my bust measurement, and I'm pretty pleased with how it turned out. The cardigan has 2 inches of positive ease, and I think it's just the right level of being fitted enough to be flattering without it being so tight that the button bands end up gaping when they're done up. The cardigan has also turned out to be the perfect length to wear with all my waisted dresses, which is always good.


The yarn I used is the King Cole Cottonsoft as called for in the pattern, and I used colour 712 Rose. I haven't always enjoyed knitting with 100% cotton yarn in the past (memorably when I knitted some baby hats in 100% cotton yarn a few years ago, my mum told me she thought they'd make better dish cloths!), but I didn't have any problems with this yarn. It was good to knit with, and the finished cardigan is nice and soft to wear, but also feels like it will wear well. Which is good when you've put so much time into making something!


All in all, this cardigan is definitely a winner for me - not least because it goes really nicely with quite a few of my summery dresses (I'm wearing it here with my original New Look 6723 dress that I made a couple of years ago). I enjoyed knitting the cardigan and I'm tempted to have a go at a long-sleeved V neck option at some point. Who knows when that will be though because I've already got a list as long as my arm of knitting patterns to try! Next in the queue is a shawl, and I'm thinking of casting on my first pair of socks too. What are you knitting at the moment?

Thursday 10 August 2017

Sew Over It Doris Dress

Do you have any garments in your wardrobe that get a bit overlooked? Until recently, the Sew Over It Doris dress that I sewed up last year had sadly slipped into that category. I wore it a fair amount just after I made it, but somehow since then I'd forgotten how lovely it is and the dress had stayed neglected on the hanger. Once I put that right, I enjoyed wearing it so much that I quickly decided that I needed to make a second Doris dress.


I wonder whether one of the reasons that I hadn't been wearing my first Doris dress so much is that the ties get a bit in the way of cardigans (because you often need a cardigan still in the British summer!), so this time I decided to use the fixed back belt instead. That also creates a bit more of a difference between my two versions than just using different fabric, which is never a bad thing.


Other than switching the ties for the belt, I did everything else just the same as I did for my first version. I blended between a 12 at the bust and 14 at the waist/hip, with 1.5 inches added to the bodice length. Also, the buttons down the front of the bodice are there for decoration only - there's no need for them to function because of the side zip so I just sewed them through both front bodice pieces.


The Liberty tana lawn that I used for my first version worked so nicely - it's the perfect mix of fabric that's easy to handle but has just enough drape for the Doris dress - that I decided to use a prized length of Liberty fabric from my stash for this second version. The print is called Suzy Elizabeth, and is my favourite Liberty print that I've used so far. I made a dress using the navy colourway of the same print a couple of years ago, and I've got another length of the navy in my stash which I'm intending will become a shirt this autumn. How many times do you have to use the same print before it becomes an obsession?! What can I say? I just love all that tiny crockery!


I should mention that my fabric buying budget isn't generous enough to just be buying Liberty fabric at RRP as often as my last few projects would suggest! A lot of the tana lawn that I've used has come from Kat's Fabrics on ebay which sells factory seconds, making them much more reasonable prices. I've bought fabric from them quite a few times now, and I've only found a small fault on one piece - the rest of them have all seemed perfect to me.


While we're on the subject of fabric, I think the fabric requirements stated on the pattern envelope for the Doris dress are really generous. I made a 12/14 (with length added to the bodice), and the fabric requirements state 3.2m for 12 and 3.7m for 14, but I used well under 3m - I'd say 2.8m at the very most, and this is a directional print. That's OK (it just means I have bonus fabric left over for another project!), but it's something I'd bear in mind if I were buying fabric for another Doris.


All in all, I'm really happy that I rediscovered my original Doris dress and gave myself the motivation to make this second one. It's a lovely floaty dress to wear and, as I've already detailed at length, I love tana lawn for summer weather. Let's just hope that we get a bit more of that soon so that I can wear it some more!