Thursday, 23 May 2019

Itch to Stitch Kalispell Dress Sewing Pattern Review

Sometimes a sewing pattern grows on you gradually, and sometimes you know as soon as you see it that you "need" to make it. For me, the Itch to Stitch Kalispell dress definitely fell into the second category! It's been a while since I sewed a pretty dress, and the Kalispell seemed like the perfect pattern to remedy that situation.


The Kalispell dress is a slightly vintage style, with a princess seamed bodice and full skirt with inverted box pleats. The dress has a V neck and a front button closure with button band. It has options for cap or flare sleeves (I chose the cap sleeves) and in seam pockets. The pattern also has different bodices for A, B, C, D and DD cups, which is helpful for getting a good fit.


This was the first Itch to Stitch pattern that I've made, and I was really impressed with it. The PDF is fairly big given all the different bodice pieces, but there are clear directions included about which pages you need to print for which sizes/options.

The instructions are very detailed (as an example, there are 11 different instructions just about applying interfacing and stay stitching!) and easy to follow. The diagrams accompanying them are also perfectly clear. All of the notches/seams etc. matched up nicely when I was sewing, and I didn't have any trouble at all with making the dress.


The only thing that I found slightly odd was that the instructions have you hem the skirt before it's even attached to the bodice. I don't know about you, but I definitely like to try on a dress before hemming it to get the length just right as even a small change in the hem length can change a dress from dowdy to delightful.

The instruction to do this does make sense in terms of the rest of the construction because the hem needs to be finished before the button band is attached. To get round this, I left the skirt unhemmed, then when it came to attaching the button band I stopped stitching a few inches above the where the hem should be. Once I'd finished sewing the rest of the dress, I hemmed the dress as I wanted and then finished off the button band and that worked fine. Hopefully that all makes sense!


In terms of sizing I used the A cup bodice and made a size 10. That's the size recommended for my bust and hip measurements; my waist measurement is actually between an 8 and a 10, but based on the finished garment measurements I thought I'd be happier with a 10. Thankfully that worked out nicely for me! I'd say the sizing is good, with just the right amount of ease to make the dress fitted whilst still being comfortable to wear.

As for adjustments - I lengthened the bodice by an inch and a half, which is fairly standard for me. Because of the added length, I also altered the button spacing and used more buttons.

To give you an indication of skirt length - I'm about 5'9" and this is the skirt straight from the pattern with a slightly bigger hem than called for in the pattern (I think half an inch more), and it's knee length rather than the midi length intended for the Kalispell.


The fabric I used came from Seasalt last summer. It's a cotton crepe that I managed to pick up at a bargain price (yay!). It's a nice quality fabric as I've come to expect from Seasalt, but I didn't enjoy sewing with this as much as I've liked their cotton voiles and poplin. It's a very fine fabric (this dress would probably be too sheer if I wasn't wearing a slip with it), but also quite crisp, and my sewing machine had a tendency to snag it, which it has never done for any fabric before. It did cause a couple of marks in the fabric, but thankfully they seem to be fairly inconspicuous in the finished garment.


The slight issues with sewing the fabric made me feel a bit downhearted about this dress when I was making it, but I'm happy to report that I feel a lot more positive having worn it. It's a lovely dress to wear as the skirt is pleasingly swishy! I'd quite like to make another one in a fabric with a bit more body to it at some point to see what that would be like, but for now I'm more than happy with this version of the Kalispell!


Wednesday, 15 May 2019

Sew Over It Ultimate Trousers Pattern Review

Hello hello! I'm here today to share my first version of the Sew Over It Ultimate Trousers. I wrongly claimed in my last post that these were my first trousers, forgetting that I'd already made Sew Over It's Carrie trousers last year. Anyway, here are my second pair of trousers...


The Ultimate Trousers are slim-fitting, ankle-grazing trousers. They close with an invisible side seam zip, and the waistline is finished with a facing. Front and back darts provide shaping at the waist.

I'm much more commonly found in dresses and skirts (or sometimes culottes) than trousers, but I've been feeling recently like a couple of pairs of trousers could be a good addition to my wardrobe. Firstly, I think they'll be a good option for in betweeny weather when I don't want to be wearing tights, but it might be a bit cold for bare legs with dresses. And secondly, they're much more practical for breezy days (which are fairly common here on the coast) as there's no danger of the wind causing you to reveal more than intended!


As you'd expect from a Sew Over It pattern, the instructions are very detailed and thorough, and I didn't have any problems during the construction process. That said, this is a simple trouser pattern so there weren't any particularly tricky steps anyway.

The only slight complaint I'd make about that pattern is that there aren't any lengthen/shorten lines on the pattern pieces, but they're easy enough to add in (I lengthened mine by 4cm).


The tricky thing with this pattern is really going to be getting the right fit for you. I was unsure about which size to cut because the pattern envelope gives the finished waist measurements for the lower waist and says that this is approximately two inches below your navel, but the Sew Over It sewalong says that it's two inches below your natural waist. Now, maybe I'm odd (highly likely!), but my navel is below my natural waist. In search of advice, I read a few reviews online which differed wildly between saying that it's a good idea to go up a size to saying that the sizing is generous!

I decided to just go with what my measurements said, and made a toile of a 14. Sadly, that was way too small. I could pull them up (I basically made shorts, not full trousers), but there was no way I'd ever be able to do up a zip in them. Given how small they were, I didn't think going up to a 16 would be enough so I made a toile of an 18 instead. That seemed to fit OK, so I cut into my fabric.


I will say now that these are intended to be a wearable toile. The fit still isn't perfect but, having not worn trousers much for years, I wasn't sure whether I'd like wearing them or not so I didn't want to spend ages making fitting adjustments if I ended up not convinced by the final garment. I'm intending to wear these trousers for a bit and see how I feel about them and where I think I could do with some adjustments. Having worn them once, I'm already thinking about slimming the legs down a bit.


As this is a wearable toile, I used some cotton sateen that I bought really cheaply from someone's (I can't remember whose!) destash sale a while ago. I'm pretty sure I paid under £5 for 2m, so it was definitely a "low risk" fabric for me to use. And it means I now have the pinkest trousers in all the land!


So all in all, sewing these wasn't a problem at all. As for whether the project is a winner, I think only time will tell! I have wearable trousers at least, and I'll happily give wearing them a try. That's all I wanted from this pair, so in that respect they're a success. What do you think of my super pink trousers?!

Thursday, 2 May 2019

Thoughts on repetition

Where do you stand on the issue of repetition in sewing? Do you have certain tried-and-tested patterns that you use over and over again, or do you prefer to try new things whenever possible? Anyone who read my last blog post, in which I shared a shirt that was my third version of Butterick 6563 and the fifth garment that I'd made using a particularly lovely Liberty print, would easily guess that I tend towards the first category.


There's nothing that would demonstrate that better in terms of my sewing than my collection of Christine Haynes Emery dresses.

This week I got a new wardrobe, and I decided that it would be fun (small things amuse me!) to initially just hang my Emery dresses in it to see quite how many I had. I thought it was 12 - turns out I'd underestimated myself and the grand total currently stands at 15!


Now, I definitely like to make multiple versions of successful patterns, but this is by far the biggest collection of one single pattern in my wardrobe. While part of the reason that I've made so many is because it was one of the first dresses that I ever made for myself back in 2013, therefore I've had more time to make multiple versions of Emery than of newer patterns, a large part of it is that it's a simple silhouette so when you're wearing it the focus more on the fabric rather than the dress itself. At least that's what I'm telling myself anyway!


Thinking about the patterns that I've made the most, they generally fall into this category. Other frequently used patterns in my wardrobe include the Sew Over It Susie blouse, although most of mine are my scoop neck hack (side note: finding that blog post to link to has uncovered a neglected 16th use of the Emery pattern in the form of a skirt), New Look 6217 (there have been more made since I wrote that post) and the Jennifer Lauren Gable top/dress.

Having a good simple silhouette to showcase a beautiful fabric is definitely welcome to someone like me who tends to be drawn to colourful and vibrant prints.


All this isn't to say that I don't like trying new patterns - I definitely do! My first pair of trousers are sitting waiting to be photographed and will hopefully be appearing here soon. At the moment I've got a toile cut out of what promises to be a super pretty new dress. I'm also thinking of joining in with #sewtogetherforsummer and sewing a jumpsuit or dungarees, which would definitely be out of my comfort zone. So I do enjoy learning new techniques and challenging myself to try different things.

However, there's a big part of me that primarily sews to relax. That part of me enjoys knowing that I already have pattern pieces cut out and adjusted to fit me. That I can just cut into my fabric and then get sewing, safe in the knowledge that I'll have already figured out any possible challenges of the construction process on my first (or second, third, or maybe even fourteenth!) previous version of the pattern.

Emery dresses modelled as they were finished, in roughly chronological order. Plus my changing hair over the years!

So while I'm not entirely in one camp or the other, I tend to like the comfort of the familiar with touches of sparkly newness thrown in every now and then to liven things up. How about you?

Thursday, 18 April 2019

Another Butterick B6563 shirt

The other Sunday evening, I was at a loose end and felt like starting a new sewing project. I'd been planning to make a project case for my embroidery but realised I was missing one of the key supplies. With that idea scuppered, I decided to move on to trying out the Sew Over It Ultimate Trousers (one of my Make Nine projects) but when I went to trace out the pattern I found that I'd run out of tracing paper, and I definitely didn't want to cut into the pattern because I was very unsure about what size I'd need to make.


Having been thwarted once again, I went back to the drawing board hoping that it would be third time lucky. The one advantage of having a pile of fabric sitting in the corner of my flat is that there were a few pieces left over from other projects that were therefore already prewashed and ready to sew. One of those pieces was a decent-sized chunk of Liberty tana lawn in the Suzy Elizabeth print left over from a Granville shirt that I made last year (which I now realise made it to my Instagram account, but not onto my blog for some reason).


While this fabric was left from another project so was sort of a "freebie", it is still Liberty and therefore demands a bit of respect and is also potentially my favourite fabric print ever (there's a closeup of it on my Instagram here) so I didn't want it to go to waste. A tried-and-tested pattern was therefore definitely required! Enter Butterick 6563, one of the Patterns by Gertie range.


I made two versions of this cute little shirt pattern last year, so I knew that it wouldn't disappoint. As with my previous two, for this B6563 I also used the cap sleeves from view B and the Peter Pan collar from view C. I fully intend to use the other collar and the sleeveless/puffed sleeved options at some point, but this time I wanted to stick with what I knew would work.


Unsurprisingly, given that I've made this pattern twice before, the sewing process was a breeze. The instructions are clear, and the pattern is relatively simple but still produces a nicely finished garment. As I said in my post about my previous versions, I made a size down from what is recommended for my measurements and that fits me nicely.

Considering the fact that this is a pattern that I've already road-tested and a fabric that I know and love, it's also not a shock that I'm really happy with the finished garment.


Just to prove how much I love this fabric, here's my current collection of garments made using it! In my defence, there are two different colourways and the two tops on the left were both made using leftovers from two of the other garments. And fabric for four of the five garments came from an ebay seller that used to sell precut lengths of Liberty fabrics at significantly reduced prices (sadly they no longer do!). That all makes having five garments in one print acceptable doesn't it? I'm not the only one who uses the same print repeatedly am I?!

Wednesday, 10 April 2019

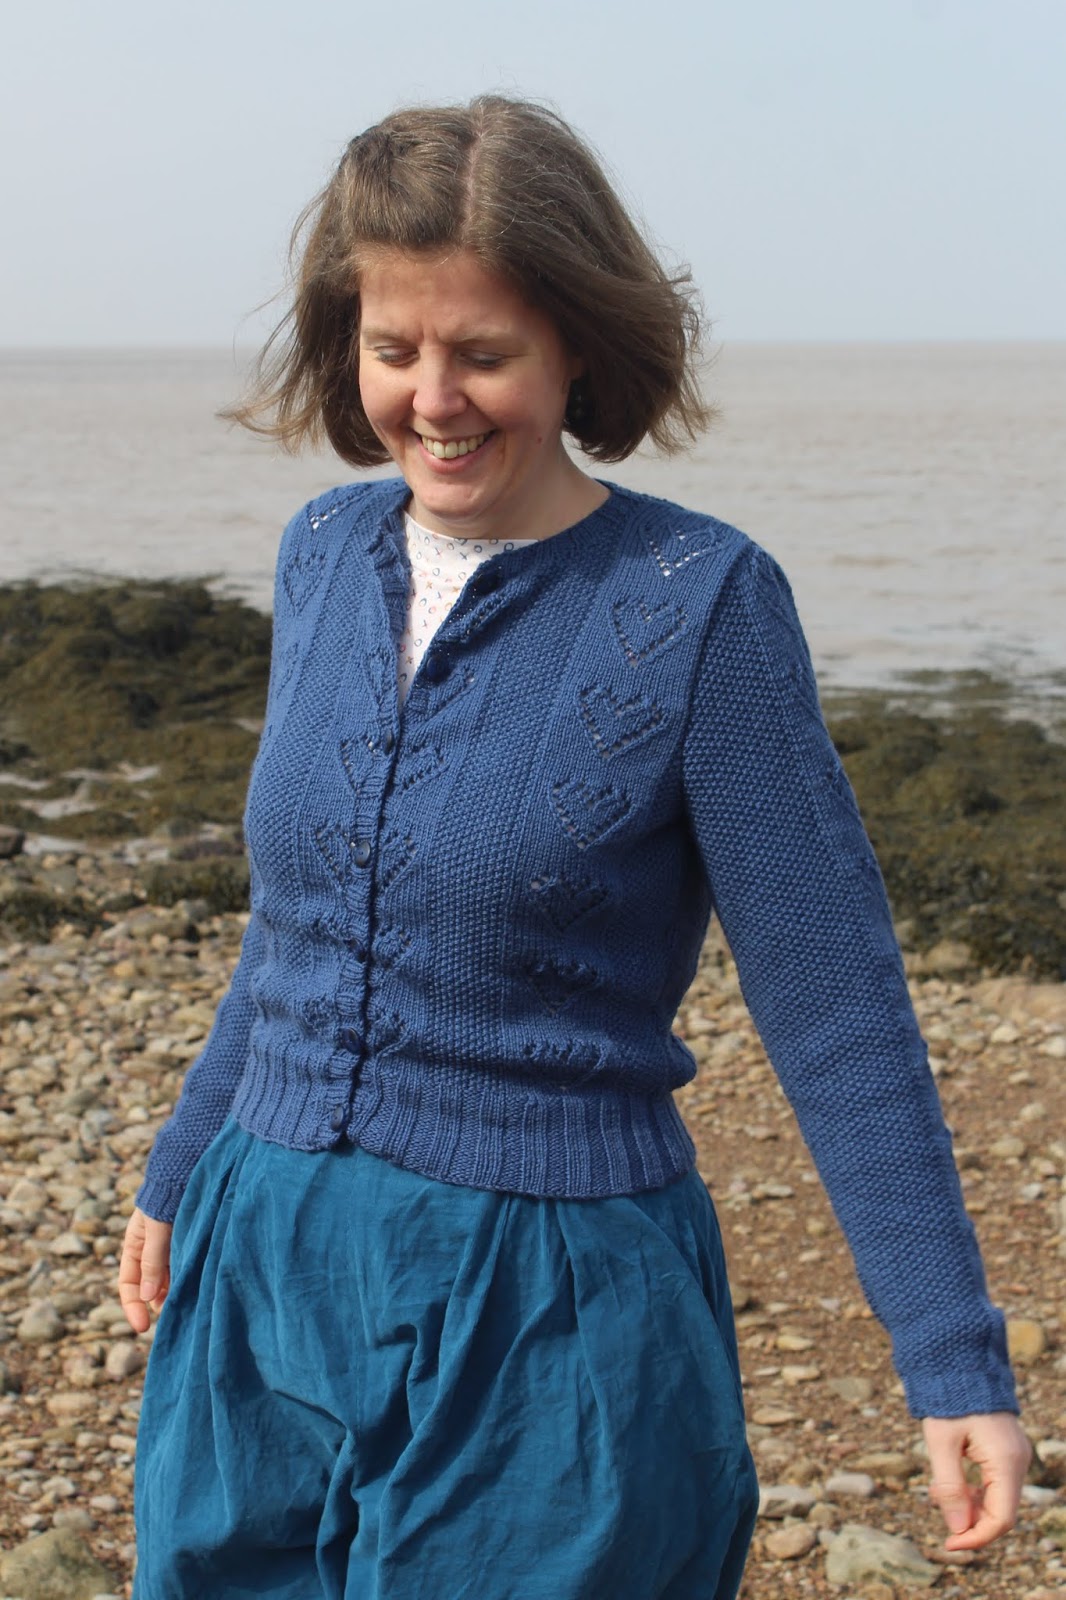
Knitting: Lace Hearts Cardi

As has become customary in recent years, I've finished knitting a cardigan just as the temperatures should be about to rise so I won't be wanting to wear it for a few months. Given the grey and chilly day outside my window as I type though, it seems likely that this project will get a few more outings this spring. Here's my Lace Hearts Cardi!


The Lace Hearts Cardi is a pattern by Martin Storey published in the book Knit Red. I picked my copy up secondhand for a few pounds, which was a bit of a bargain considering there are 31 patterns in the book. Admittedly I wouldn't want to make them all, but there are a couple that I definitely like the look of - particularly the slip stitch beret by Ysolda Teague and Debbie Bliss's dolman sleeve sweater.


Anyway, back to the Lace Hearts Cardi! It's a classic, slighty cropped and nicely fitted cardigan that alternates between moss/seed stitch panels and the eponymous lace heart motif on a stocking stitch background. It's knit in pieces and them seamed, which is my comfort zone when it comes to garment knitting. I didn't have any problems at all with knitting the cardigan, and the pattern for the lace hearts is simple and effective, and fairly intuitive to knit.


The pattern calls for DK yarn, and I chose to use Willow & Lark Ramble from Love Knitting in the Bluebell colourway. It's a 100% merino wool - I loved knitting with it and it seems to me like it's soft enough to wear against the skin. If it wears well in this cardigan, I'd definitely like to use it to knit something else. If you're interested in using it yourself, it's worth keeping an eye out for offers - I got mine for 40% off which made it pretty affordable, and I've noticed (and been tempted by but so far managed to resist!) a few similar offers over the last couple of months.


I had to go down a needle size to get gauge for the pattern. Even with the smaller needles, my swatch came out fractionally bigger than it should have been but I did some calculations and worked out that if I knitted the 37" size, then I should end up with a cardigan with zero ease (my bust measurement is 38"). I think my finished cardigan might be a little bigger than that, but I'm happy with the fit so it's all good.


The sleeves are perhaps fractionally longer than ideal, but that's because I knitted a little more than recommended before starting the cap shaping so that the decreases would end ready for me to bind off with a complete heart at the top of the sleeve. I decided I'd rather have a slightly longer sleeve than have one that was just the right length but with the final heart cut off in the middle at the shoulder, and I'm happy with that decision. And it'll help keep my wrists warmer!


All in all, I'm really happy with how my Lace Hearts Cardi turned out, and it's another item that I can cross off my Make Nine list. I'm making way better progress with my Make Nine challenge this year than in previous years - obviously I must have planned it better this year! How are you getting on if you made a Make Nine list?