Hello hello! I hope you're all having a happy festive season. Before this nice little in-between period that we're now in turns into 2017, I thought I'd share the Christmas presents that I made this year.
First up is this bag that I made for my Mum. The pattern is the Maker's Tote by Noodlehead which, as the name suggests, is designed to be a project tote bag for makers and creatives. There's plenty of space in the main compartment of the bag, and lots of pockets for keeping bits and pieces safe. Because of all those pockets, this was easily this year's most time-consuming present, but I think it was definitely worth the effort.
The instructions are very detailed and easy to follow so it wasn't a difficult project (I found that the only tricky part was applying the binding around the bottom edges, and even that wasn't as problematic as I'd suspected it might be), it just took a bit of time to sew all the various sections.
The outer fabric is Painterly Wash Art Gallery denim, and the inside pocket fabric is Tulip in Turquoise from the Cloud 9 Vignette collection. The rest of the fabric is a combination of various remnants from my stash.
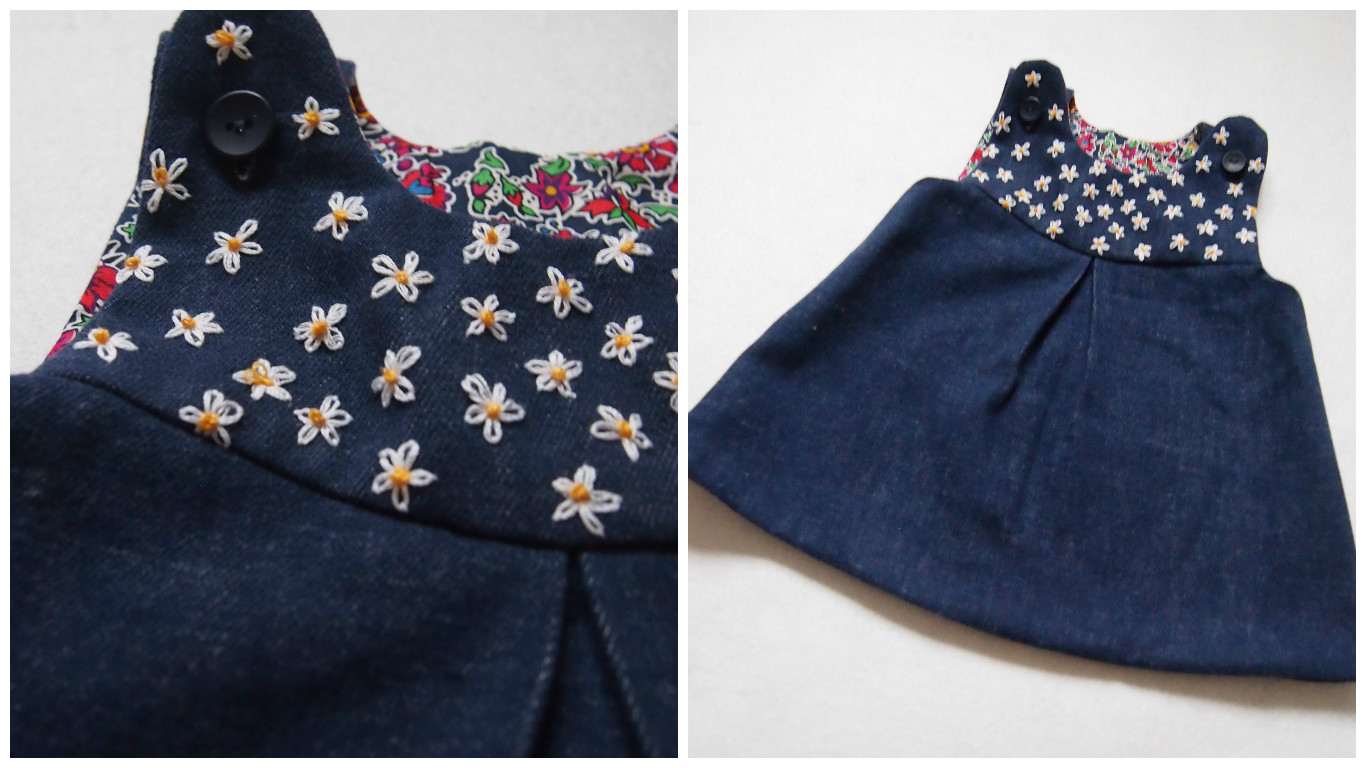
Over the years I've learned that it's better to keep things simple when making presents, so all of my other projects were much quicker. First up is a dress for my niece who was born a couple of months ago. It's a baby pinafore pattern from Puperita - a sweet, simple dress that I sewed up in a couple of hours. The outer fabric is a soft denim repurposed from a skirt, and the inside is left over from my latest Susie blouse. I did make it slightly more complicated by deciding to embroider the yoke with little daisies, but that was a nice relaxing project to work on in front of the TV so it was fine.
Her Christmas present was actually the second version of the pattern I've made for her - I made the red version above for her when she was born. I really like the fact that the dress is reversible, so I could make this red version with Christmas fabric on one side and plain babycord on the reverse so that she'll be able to wear it outside of the Christmas season too.
Next up was an apron/smock for my nephew, which I think will definitely come in useful because he likes 'helping' my sister with cooking and baking but has a tendency to end up covered in half of the ingredients. This is a very simple pattern from the book Sew a Metre. The main fabric is the same denim as my niece's dress, with added red binding and a scrap of fabric from my stash for the 'J'.
Last, but by no means least, I made a five pairs of pyjama trousers for my Dad, siblings and siblings-in-law. I intended to take a photo of them all modelling them, but that got a bit overlooked in the excitement of present opening, so all I have is this picture of the stack of them waiting to be wrapped - sorry about that!
I can show you this photo of my brother sporting another pair of pyjama trousers that I made him earlier this year, using the same pattern (in this spectacular beetle print jersey). There are many basic pyjama patterns, but this particular one is Simplicity 2116. Unsurprisingly, given that pyjama trousers are one of the simplest things to sew, this was a nice easy project. By the end of the fifth pair I was definitely ready to sew something else, but I'd happily use this pattern for pyjamas again the future.
So there we go, that's what's kept me busy for the past few weeks! Did you make any presents? I really enjoyed it, but it's also great to be back sewing for me again now!
Friday, 30 December 2016
Wednesday, 7 December 2016
Handmade Style - review & projects
My sewing machine is as busy as usual at the moment, but it's in full-on Christmas present production so that all needs to be kept secret for another couple of weeks. I'm sure I'm not the only one in that situation, am I? As I can't share my latest creations, I thought I'd talk about a couple of projects that haven't made it to my blog before. They all happen to come from the same book, so I'm going to combine them with a bit of a review.
The book in question is Handmade Style by Anna Graham of Noodlehead. It was released early last year so I'm not exactly quick off the mark with this post, but with a sewing book I prefer to wait until I've used it to make a couple of things so that I know whether or not the projects work before writing a review.
The book includes 23 projects divided into three sections - "To wear", "To carry" and "To use". It includes paper patterns where necessary, but most of the pieces in the projects I've used have been rectangles/squares and in those cases the dimensions are simply provided for cutting.
The first project I made from the book was the carry-all pincushion. Now, a pincushion might not seem like a particularly exciting project, but this is no ordinary pincushion! It's got a range of different pockets all round the sides for all your small sewing essentials, and a strap on the top to hold scissors. I made mine over a year ago, and I haven't lost my seam ripper since!
Next up, I made the double zip wallet. As the name suggests, it has two zippered openings and additional pockets and card holders on the inside. There's plenty of space for holding just about anything you could want to keep in your wallet.
My third project was the gingham tote, so called because in the sample in the book the main outer pocket (which I used the blue floral for in my version) is made in gingham. As you can probably tell, this was a more involved project than the other two but, although there were more steps to go through, the individual processes themselves weren't complicated.
I deviated slightly from the bag in the book by using a purchased leather strap instead of making the fabric strap included in the pattern. This was mainly because I made the bag as a birthday present for my Mum as a replacement for a Cath Kidston one that she'd used lot, and one of the things I knew she really liked about that bag was the fact that it had a leather strap. My version has the added benefit of the strap being removable for washing, whereas the CK one has a fixed strap, therefore meaning that I can pretend that I make better bags than Cath Kidston!
All three of these projects were really nice to sew. They're a good way to use up remnants/scraps, and a bit of a change from all the dressmaking that usually goes on around these parts.
I think that the instructions and diagrams are the kind that have a tendency to seem a bit confusing if you read them all through before starting, but then make complete sense and are easy to follow once you're actually sewing. Everything fitted together nicely, and I had no problems at all making any of the three projects.
Overall, I really like the general style of the whole book. The samples are made in a lovely range of modern fabrics, and they're beautifully photographed.
I would say that if you're only interested in sewing clothes then I don't think this would be the book for you. Although one of the sections is "To wear", it's definitely the smallest of the three, and the two garments (a simple chambray dress and a tunic) are both perfectly nice, but not anything revolutionary. I was aware of that before I bought the book though, so I'm not at all disappointed; in fact, I think there's a really nice selection of projects. A lot of them would be great to make as gifts as well - always handy at this time of year!
There are plenty more things that I'd like to make from Handmade Style. Top of the list has to be the patchwork bench, but I need to work out where I'd put it in my flat first! Have you made anything from this book?
Thursday, 24 November 2016
Winslow & Susie - the autumn edit
Back in August, I wrote a post all about my first pair of Helen's Closet Winslow culottes and wore them with a scoop neck hack of the Sew Over It Susie blouse. Now a few months have gone past, and I'm back again with a more autumnal version of the same outfit.
I really enjoyed wearing my viscose Winslow culottes this summer, so I was keen to try making another version for the cooler weather. While the viscose was lovely when it was hot, I thought some made with a thicker fabric would be nice, and being as I would be wearing them with tights now I also fancied a pair that were a bit shorter than my original version.
Happily for me, I had a piece of navy needlecord sitting in my stash that I found in a charity shop a while back. I always see people online who've found great fabric in charity shops but, even though I'm a frequent charity shop rummager, this was the first time I'd found any actual fabric (as opposed to duvet covers/sheets etc., which I often buy to use for toiles). I had no idea what I would use it for at the time but, at £4 for over 2 metres, I wasn't going to leave it behind.
When the idea of making another pair of Winslow culottes came into my mind, the needlecord seemed to be the perfect candidate. While I was keen to give culottes and tights a try, I wasn't 100% convinced that I would like the look on me so using the charity shop corduroy meant that I wasn't putting expensive fabric at risk. And navy goes with everything (in my wardrobe anyway!), so I shouldn't be short of tops to wear with them.
I made up view B (above the knee) in a size 14 with no alterations, and I'm really happy with how they turned out in the end, although I did have a bit of a hiccup along the way.
I originally used an invisible zip as recommended in the pattern and unfortunately it didn't really cooperate with the needlecord and the thickness it created at the waistband. Zipping them up was a bit tricky but just about OK when I wasn't wearing the culottes, but when I had them on I just couldn't get the zip over the waistband. I think if I'd had someone else around, they'd have been able to do them up for me, but being as I live on my own that wouldn't be a practical long-term solution! So I took the zip out and replaced it with a regular centred zip instead. That wasn't the most fun process being as I'd already trimmed my seam allowances, but I got there in the end.
As I said before, the top is another scoop neck hack of the Sew Over It Susie blouse - which is fast becoming a favourite top pattern for me (my first of these hacks is here).
This time I used the three-quarter sleeves to make it slightly more seasonal. Only slightly though - it definitely wasn't warm enough to be wearing it outside without a cardigan and/or coat when I was taking these photos, and I did get some very odd looks from passers-by.
The fabric is a lovely Liberty lawn which I picked up for a bargain price in the Fabric Rehab closing down sale. It's sad that they're closing - I haven't bought huge amounts of fabric from them, but I've always been really happy with any purchases that I have made. I think there's still time to pick up a bargain in their sale if you're interested...
I wore this outfit (with added cardigan and coat!) last weekend, and I really liked it. The culottes are really comfy, and it turns out I quite like how they look with tights. So much so that I think I might need to make another pair in the not too distant future!
Wednesday, 16 November 2016
Jennifer Lauren Gable Top
A few months ago, I was lucky enough to win a giveaway in Simply Sewing magazine and part of my prize was a length of lovely Art Gallery jersey. I already had plenty of summer sewing projects on my agenda when it arrived, so I put it back to wait for future plans. A little while later, Jennifer Lauren released the Gable top and I matched the two of them up in my head as one of the first projects on my autumn sewing list.
The Gable is a knit top with a slash neckline, a long-line body and three different sleeve options - clearly here I used the long sleeves.
Sewing the Gable top was quick and really straightforward. The instructions and diagrams are really clear. It's rated as being for confident beginners upwards and I'd say that's right. It would probably be a good beginner knit project because I think that the way the neckline is finished (turning under and top stitching all the way from one shoulder to the other) is easier than using bands.
I did use the option suggested in the instructions of finishing the neckline as soon as you've sewn the shoulder seams rather than later in the sewing process, when you can try the top on and adjust the neckline according to your preference. I've had slash neck tops in the past so I was confident that I would like it, and finishing the neckline earlier seemed like it would be easier to me.
I made a straight size 14 and I'm pleased with how the fit turned out. It's slightly looser fitting than some of my t-shirts, but it's perfectly fitted enough for my liking. If I were to change anything, I might possibly think about slimming the arms down slightly for a future version, but they're not too baggy so I might not even do that.
It is described as being longline, and it definitely is an inch or two longer than most of my other t-shirts. That's quite a nice feature for this time of year because it comes down right to my hips, which helps keep my middle warmer!
The Art Gallery jersey was brilliant to work with. I've often admired their knits from afar, but so far haven't actually got round to buying any. It's not the cheapest of fabrics, but I'm a firm believer that it's worth paying for quality so it was nice to win this fabric so I could test the fabric out and see what it's like. As I said, it was great to sew and it feels lovely to wear as well. I'll definitely be investing in more Art Gallery jersey in the future!
I made the top with the intention of wearing it, as I am above, with my denim Lilou pinafore dress. It's a great for pairing with pinafores because the simple slash neckline will work nicely with different pinafore necklines. Hardly surprising really given than it was designed to complement Jen's Ivy pinafore.
Speaking of which, has anyone tried sewing an Ivy pinafore yet? I'm tempted by the tent dress version because it looks so comfy and cosy, but it's a pretty different silhouette for me so I'd love to hear if anyone's got any thoughts about it!
I'm calling this Gable top a definite success - it was great to sew, it's just what I wanted for wearing with pinafores, it's obviously super comfy to wear and, as an added bonus, I didn't even have to pay for the fabric! You can't beat that really, can you?!
Thursday, 3 November 2016
Seamwork Elmira Cardigan
When the Elmira cardigan was released as one of the patterns with the August issue of Seamwork, I knew right away that I'd be making one at some point. I really love the look of wrap cardigans, and the large bow closure is just the kind of thing that appeals to me. It was one of the first things on my autumn sewing list, and here's my version....
The Elmira is a cropped, fitted wrap cardigan that fastens with buttons and thread chain loops on the right on the inside, and a large ties at the left hand side.
As with all of the Seamwork patterns, it's a fairly speedy sew. I cut mine out one evening and sewed up everything apart from the loops and buttons the next evening. By the evening after that, I'd decided that I didn't want to use the loops and buttons, and instead I sewed in some poppers/press studs/snap fasteners/whatever-you-want-to-call-them that I had in my stash.
The fabric I used came from Girl Charlee, but I bought it several months ago and it doesn't seem to be in stock now. I originally ordered it intending to make a dress, but when it arrived it seemed a little lightweight for that so then it sat around waiting for me to decide what it would become.
When fabrics have been in my stash for a while, I tend to regard them as "free" (even though they're clearly not because I had to pay for them at some point) and will happily use them for anything, even if I'm not sure how they'll turn out (am I the only one that does that?!), and that's how this piece of jersey ended up being an Elmira.
It's a lightweight jersey; I can't remember the exact fibre content, but I'm pretty sure it's some sort of viscose blend because it's really drapey. It's also slightly sheer when stretched, which is what put me off using it for a dress. I knew wouldn't be a problem with the Elmira though, because I'll always be wearing at least a little vest top underneath it.
I don't think I would have wanted to use any knits that were much heavier than this. I noticed that one of the recommended fabrics in the Elmira description is French terry which sounds really cosy and tempting but, from my experience of French terry at least, I think that the knot/bow could end up being really bulky.
The fabric was nice to work with, and the instructions were clear and easy to follow. I'm not 100% sold on the finish that the pattern produces. The front pieces are self-lined, and the outer and lining pieces are joined together and the back neckline is finished (by turning under and stitching) before sewing the shoulder seams. I found that my shoulder seam allowances wanted to peep out at the neckline (because they're not enclosed in a band or anything) so I ended up top-stitching them down to keep them in place inside the cardigan. I'm not sure if that's a "thing" or not, but it worked, so that's what matters.
Based on my mesurements, I graded between a medium at the shoulders and bust, and a large at the waist. As it turns out, I really didn't need to grade up at the waist because I ended up taking the side seams in (probably taking them back to where they would have been for the medium), and I positioned the poppers so they're not right at the end of the inside front piece meaning that the overlap is bigger than it should be. I also added 1.5 inches to the length - fairly standard for me. With those adjustments, I'm fairly pleased with how the fit turned out.
The front crossover sits quite nicely when I'm wearing it. I've worn it once so far and, while I did have to adjust it a couple of times throughout the day, it wasn't constantly moving out of place as I feared it might. I would say though that this is definitely a wrap cardigan rather than a wrap top - you'll want to wear something under it unless you want the world to see your bra!
Overall, I'm pretty happy with how this turned out, and I love how it looks with a nice full skirt (I'm wearing it here with my denim Veronika skirt). I won't be rushing to make another Elmira instantly because I want to see how much I wear this one first. It's also reminded me that I have the Papercut Coppelia cardigan in my stash so part of me wants to make that one and compare the two. I could have my own little quest to find the perfect wrap cardigan! Have you made either of them? Or are there any other wrap cardigans out there that I should try?
Subscribe to:
Posts (Atom)