Showing posts with label bag making. Show all posts

Tuesday, 11 October 2022

In Complete Stitches Planetary Backpack

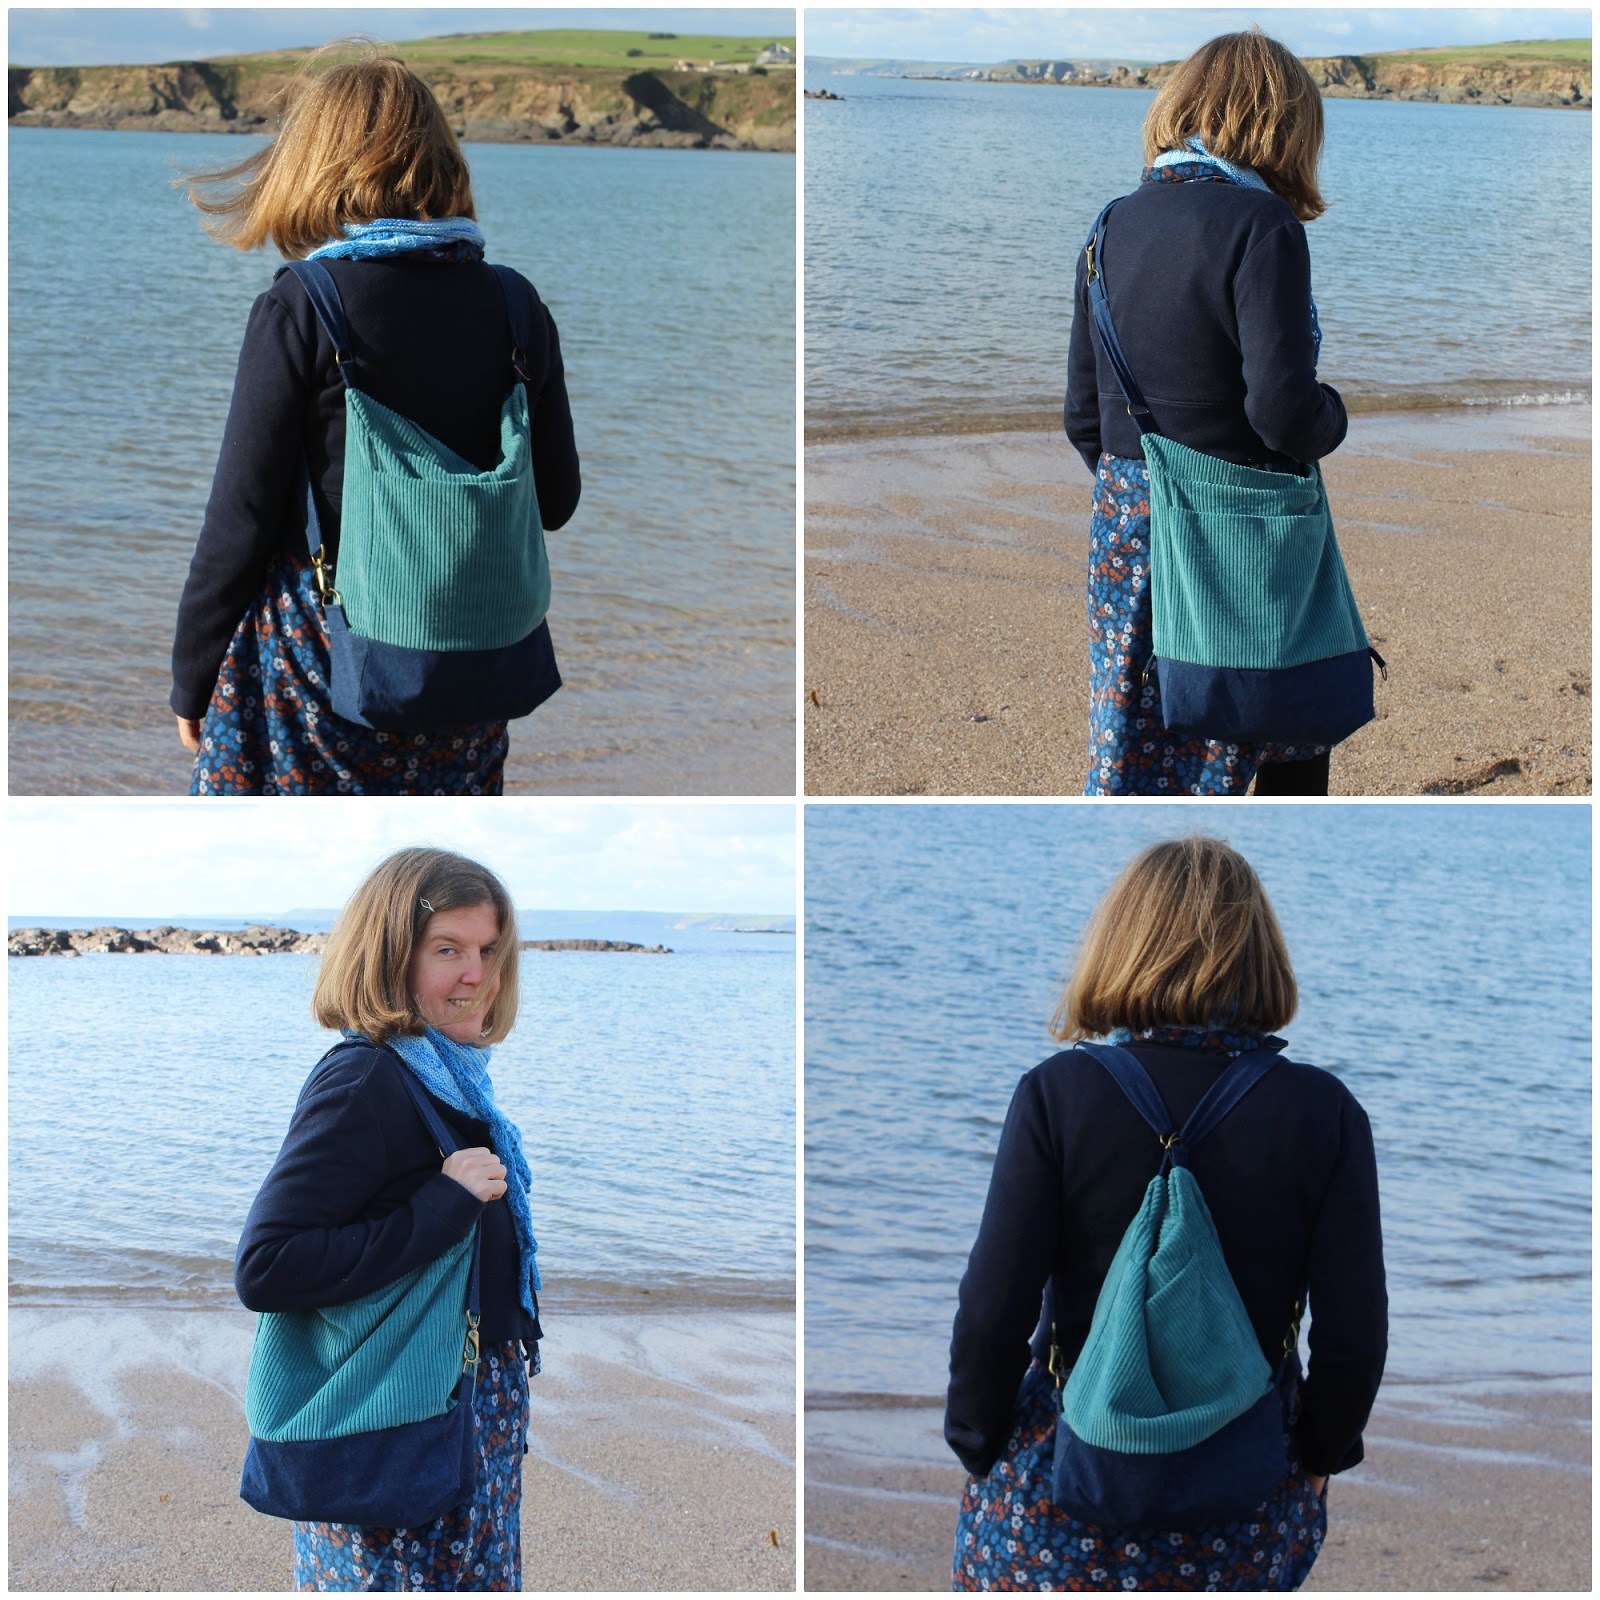
Every now and then I like to step away from sewing clothes and indulge in a little bag making. It's still sewing obviously, but you get to use slightly different techniques and processes, and of course there's no need to worry about fitting. My latest bag project is the Planetary Backpack from In Complete Stitches.

The Planetary backpack is a lined drawstring backpack, with a top cover flap, outer front pocket and inner slip pockets. It uses webbing for the straps.

Fellow dressmakers will probably appreciate the fact that the pattern provides pattern pieces rather than giving cutting measurements, and even has an A0 file that you can send to a printer rather than having to tape together a PDF.

The instructions are very detailed and are accompanied by helpful illustrations. I found the directions very easy to follow and didn't have any trouble making my backpack. 

There are helpful tips included along the way, such as pointing out areas where you may need to hand crank your sewing machine where there are quite a few layers of fabric - I definitely had to follow this tip a few times.

I used the idea in the instructions for hemming the ends of the drawstring casing instead of using eyelets because I didn't have any eyelets. I also used a magnetic snap fastener instead of a regular snap fastener for the outer front pocket, again just because I already had some of them in my stash. 

The rainbow motif on my top cover flap is my latest hand embroidery project. It's a pattern by Hope Steward from issue 28 of Love Embroidery magazine. I bought a thread pack from Hello Hooray to make sure that I'd have nicely complimentary bright rainbow shades (I didn't use the lighter green in the pack because the pattern only uses six colours in the rainbow). 

I enjoyed stitching the design and found it very relaxing. I'm really pleased with how it turned out - I often struggle to get satin stitch looking neat, but I think I've done a fairly good job here.

All of the fabrics that I used for my backpack came from my stash. The indigo denim that I used for most of the outer is left over from making my Yanta overalls, and the white and red striped cotton twill on the outer and floral white and red cotton for the lining were both from charity shops. 

I really like the rainbow webbing that I used for the straps - it seemed the perfect choice to use with my rainbow embroidery! I found it on Etsy - although just to note that the webbing I was sent is different from the photos of the rainbow webbing that were shown in the listing when I ordered and that are still shown in the listing as I write this.

I enjoyed sewing my Planetary backpack and I'm pleased with how it turned out. I'm looking forward to taking it out and about for some adventures! I'd happily recommend this pattern, and I've got my eye on a couple of the other patterns from In Complete Stitches for future bag making projects.

Wednesday, 30 October 2019

Empty Hanger Patterns Strasbourg Bag

I'm going to go ahead and say right from the start of this post that the project I have to share with you today may be one of the most practical things I've ever made. Don't worry though, in this case practical doesn't mean boring! Let me introduce you to my Strasbourg bag...


The Strasbourg bag is a pattern from Empty Hanger Patterns. I came across this company when Zoe of "So Zo" fame included them in a list of companies offering discounts at the end of Me Made May this year. They have some interesting looking garment patterns, but it was the Strasbourg bag that really appealed to me. 'Why's that?', I hear you ask. It's a convertible bag, so you can use the one bag as two different styles of backpack, a shoulder bag or a crossbody bag. How useful is that?!


In addition to having multiple strap options, the bag also has a plethora of handy pockets. There's a large pocket on the outer front, and inside there's a large zip pocket that also acts as a divider to provide a section for a small laptop/tablet, an elasticated pocket, small side zip pocket, pen pocket and a key chain. The bag is also a good size - I can easily fit in my DSLR camera in its case, and all the other essentials I need for a day out.


As with lots of bag projects, it always seems like the hard work starts with trying to source all of the hardware in the right sizes! Is it just me that can never seem to get everything I need from one place?! In this case, the best option seemed to be to order some of it from WeaverDee and the rest from Sew Essential (sorry, I can't quite remember what I got from which shop!).


The fabric was an easier matter! After seeing this backpack in M&S, I decided that jumbo cord would be a nice option to use - the texture makes it a bit more interesting than other plain fabrics, whilst the solid colour makes it easier to wear with lots of things than a print might be (which is good for a bag I think). Dark denim was the obvious choice to use for the contrast base and straps for me. I got both of my outer fabrics from Fabric Godmother - the denim's here, and this is the cord. The lining fabric was a lucky charity shop find a while ago.


While I'm really happy with my finished bag, I don't think the instructions for this pattern were quite as good as other bag patterns I've used. There weren't any major errors, but there were a couple of places where I felt the pattern could have been better. For example, the pattern just gives you dimensions of rectangles to cut out (relatively standard - that doesn't bother me), but at one point you need to create a curve on a pattern piece and it tells you to draw around a glass whereas other patterns I've used provide pattern pieces for non-rectangular pieces.


It's also not very helpful about interfacing (FYI - I used a medium/heavy weight interfacing on my base fabric), which can really affect the final outcome of a bag project and can be a bit confusing if you haven't made bags before. It also suddenly mentions the option of using a button or a snap on the outer front pocket when you're in the middle of sewing the bag - it would be more helpful if this were included and marked as optional in the supplies list. I also felt like some of the interior pockets weren't constructed in the best way and did my own thing on a couple of occasions.


As I said, they weren't major problems - just little niggles here and there. I basically got the impression that the pattern was written by someone who knows what they're talking about in terms of sewing but is possibly more used to making garments, in comparison with other bag patterns that I've used which were written by people who specialise in bags. All that said, I didn't struggle with making the bag myself - I'm just not sure I'd recommend the pattern to a beginner.


Having used the bag a fair few times already, I can confirm that it's definitely very useful. It's pretty quick to switch between the different bag styles - you just have to unclip the swivel clasps and reattach them to different D-rings. Easy peasy!

I would say that when I've used the bag as the "simple" backpack (in the top left photo below), the straps seem a bit long and have a tendency to slip off my shoulders. I wouldn't want to shorten the straps much though (the pattern does give you instructions on finding the right strap length for you), because they're just the right length for the other bag styles. I think that the gathered top backpack style and the shoulder bag (the two bottom photos below) are probably the styles that I'll use most often - partly because you can switch between them without altering the swivel clasps, and partly because I find them the comfiest styles to wear.


I've made a few bags before, and I always enjoy it as something a bit different in between garment sewing projects. Making the Strasbourg bag was no exception! I'll be getting a lot of use out of this bag, and it looks like I'll be making the pattern again because my sister told me that she would happily receive one as a Christmas or birthday present. Requests from other people are always a good sign that a project has been successful, don't you think?

Wednesday, 12 June 2019

Noodlehead Traverse Bag

Today's project, a Noodlehead Traverse bag, has been gradually brewing in my mind for a few months. Back in February when I was tidying up my fabric stash, I realised that I had a fairly sizeable chunk left of the canvas (from Sew Me Sunshine, but now sold out) that I used to make a backpack last summer. I resolved that as soon as the weather was more appropriate for the print, I'd have to make another bag so that the fabric didn't go to waste.


It took me a while to decide what would be the right pattern to make the best use of the amount of fabric that I had available - I wanted to use as much of the leftover canvas as possible, but also make a bag that I'd definitely find useful.

In the end the Traverse bag was the winner, as it's very similar in style to a bag that I already own that's now looking a bit tired because it's been used so much, and I've sewn Noodlehead patterns before so I knew that I could trust it to be an enjoyable project.


The Traverse bag is a crossbody bag with a main zippered compartment with interior slip pocket, back zippered pocket, and a front pocket with flap closure. The bag comes in two sizes - the regular size which I made, and a mini size.

The regular is a good size for me to use as my day-to-day bag, with plenty of space for all my essentials (wallet, notebook, a little pouch with lip balm and stuff, umbrella (definitely essential for the current British summer!), shopping bag, etc.), and the added bonus of being able to fit in a small bottle of water.


I always find that one of the trickiest parts of making a bag is gathering together all of the supplies and making sure that everything will look right together. Thankfully for me, I also had a decent amount of the lining fabric that I used for last year's backpack so that was the obvious choice for the lining.

I decided to highlight the black and gold in the print in the zips/hardware/piping, as although the turquoise/blue in the print is much more of a "me" colour that would have been harder to match. Not that all of the golds match each other or the print exactly, but they're close enough. The supplies that I didn't have in my stash were gathered together from a variety of small local shops, and an ebay order when I couldn't find a 14" black/gold metal zip locally.


I also decided to buy a leather strap from Etsy instead of making a fabric one. This isn't a cheap option, but I think it makes the bag look more professional. It also made more sense for me in terms of colours for this project because I didn't want a black strap because I thought any more black than I was already using would make the bag look less summery than I wanted, but truly "gold" fabric would have been hard to come by.


Once I had all my supplies gathered together, cutting out all the pieces also caused me a bit of a headache. The pattern mainly just lists sizes of pieces to cut out, with a pattern piece for the front flap. I'm used to that from other bag patterns so that didn't bother me, but working out how to fit all of the pieces onto my slightly oddly shaped leftover pieces of fabric required a bit of pattern tetris! Thankfully it all worked out, and with only very small scraps left.


The sewing process was pretty hassle free. As I expected from previous experience of Noodlehead patterns, the instructions were all very clear and I always felt like I knew what I was doing. The only thing I struggled with slightly was sewing through all of the layers where the strap holders join on to the main bag, and that was only an issue because my sewing machine objected to the thickness of the many layers I was asking it to sew through. A little gentle cajoling was needed, but I got there in the end!

The pattern is very good in terms of giving you a bag that feels well put together, and also offers lots of useful pockets and compartments.


My finished Traverse bag looks really good I think - and I've already had a couple of people be surprised that I made it so I'm obviously not alone there! While garment sewing is always going to be my first love, I do also really enjoy making bags every now and then for a bit of a change so it was a fun project to work on. I've been using it pretty much every day since I finished making it, so I think we can definitely call that a success, don't you?

Wednesday, 4 July 2018

Simply Sewing Magazine City Backpack

Are you a fan of sewing magazines? I used to buy them quite regularly, but then started to feel like I was seeing the same (or very similar) projects repeatedly so it's been a while since I picked one up. Simply Sewing magazine issue 43 caught my attention though - it included the Sew Over It Silk Cami pattern, a pattern for a dress/top that I could see myself making and a useful looking backpack.


The City Backpack pattern was the project that I wanted to make most out of the three. I enjoy bag making as a bit of a break from garment sewing every now and then but haven't done much recently, and a summery backpack is always useful for day trips.

The backpack has a feature main fabric, a contrast base panel and matching contrast details, adjustable webbing straps, and is fastened with D-rings and webbing. It's also fully lined and has a zipped pocked on the inside. Press fasteners on either side of the side seams at the top of the bag are used to stop it gaping open.


I try to use bag making as an opportunity to use up bigger pieces of fabric left over from my dressmaking adventures, but I didn't have anything that was quite the right weight and print for the main fabric. I wanted something that had a bit of interest, whilst still being neutral enough not to clash horribly with too many of my dresses/tops. This lovely 'Relaxing on the beach' cotton canvas from Sew Me Sunshine fit the bill perfectly!


The base and contrast details are some denim from my stash left over from an unknown past project, and the lining is a piece of cotton twill which came from the remnant box in John Lewis ages ago (I knew that as it was a neutral spotty print it would come in useful for lining something at some point!). The hardware, notions and webbing were a mixture of things I had in stash or purchased from Jaycotts or Sew Hot.


The backpack was fairly straightforward to sew, but there were a few things about the pattern that I found slightly annoying. The main thing was that the seam allowances are 5 mm - for someone used to 1.5 cm or 1 cm in dressmaking, that seemed teeny tiny and fiddly on some steps.

I also thought it was a bit odd that the pattern had you cut out the iron-on wadding to be bigger than the pieces that you fuse it to, and then cut it down after it is fused. I'm far more used to garment sewing than bag making so maybe that's not uncommon, but I haven't had to do that in any other bags I've made, and having the wadding bigger than the fabric made it difficult not to get it stuck to either my ironing board or the iron.


There were also a couple of occasions where I felt like the pattern was relying on you having some vague idea about bag making. For example, it didn't give you any indication of how big to leave the turning gap when sewing the lining. That's the kind of thing that I would have wanted to have been given details about if this were the first bag I was making.


Having said all that, the bag turned out nicely and, as you can see, it has already been taken on its first outing on a day trip to the seaside (with my seaside print Emery dress, naturally!). I'm pleased to report that it was comfortable to wear and had plenty of space for all the essentials.

I've also already sewn up a Silk (or viscose in my case) Cami from the magazine, so I'm glad I bought this issue of Simply Sewing. Magazines can seem expensive at times, but they're worth it if you're going to make a few of the projects, don't you think?

Wednesday, 7 December 2016

Handmade Style - review & projects

My sewing machine is as busy as usual at the moment, but it's in full-on Christmas present production so that all needs to be kept secret for another couple of weeks. I'm sure I'm not the only one in that situation, am I? As I can't share my latest creations, I thought I'd talk about a couple of projects that haven't made it to my blog before. They all happen to come from the same book, so I'm going to combine them with a bit of a review.


The book in question is Handmade Style by Anna Graham of Noodlehead. It was released early last year so I'm not exactly quick off the mark with this post, but with a sewing book I prefer to wait until I've used it to make a couple of things so that I know whether or not the projects work before writing a review.

The book includes 23 projects divided into three sections - "To wear", "To carry" and "To use". It includes paper patterns where necessary, but most of the pieces in the projects I've used have been rectangles/squares and in those cases the dimensions are simply provided for cutting.


The first project I made from the book was the carry-all pincushion. Now, a pincushion might not seem like a particularly exciting project, but this is no ordinary pincushion! It's got a range of different pockets all round the sides for all your small sewing essentials, and a strap on the top to hold scissors. I made mine over a year ago, and I haven't lost my seam ripper since!


Next up, I made the double zip wallet. As the name suggests, it has two zippered openings and additional pockets and card holders on the inside. There's plenty of space for holding just about anything you could want to keep in your wallet.


My third project was the gingham tote, so called because in the sample in the book the main outer pocket (which I used the blue floral for in my version) is made in gingham. As you can probably tell, this was a more involved project than the other two but, although there were more steps to go through, the individual processes themselves weren't complicated.


I deviated slightly from the bag in the book by using a purchased leather strap instead of making the fabric strap included in the pattern. This was mainly because I made the bag as a birthday present for my Mum as a replacement for a Cath Kidston one that she'd used  lot, and one of the things I knew she really liked about that bag was the fact that it had a leather strap. My version has the added benefit of the strap being removable for washing, whereas the CK one has a fixed strap, therefore meaning that I can pretend that I make better bags than Cath Kidston!


All three of these projects were really nice to sew. They're a good way to use up remnants/scraps, and a bit of a change from all the dressmaking that usually goes on around these parts.

I think that the instructions and diagrams are the kind that have a tendency to seem a bit confusing if you read them all through before starting, but then make complete sense and are easy to follow once you're actually sewing. Everything fitted together nicely, and I had no problems at all making any of the three projects.


Overall, I really like the general style of the whole book. The samples are made in a lovely range of modern fabrics, and they're beautifully photographed.

I would say that if you're only interested in sewing clothes then I don't think this would be the book for you. Although one of the sections is "To wear", it's definitely the smallest of the three, and the two garments (a simple chambray dress and a tunic) are both perfectly nice, but not anything revolutionary. I was aware of that before I bought the book though, so I'm not at all disappointed; in fact, I think there's a really nice selection of projects. A lot of them would be great to make as gifts as well - always handy at this time of year!


There are plenty more things that I'd like to make from Handmade Style. Top of the list has to be the patchwork bench, but I need to work out where I'd put it in my flat first! Have you made anything from this book?