Thursday, 22 September 2022

Megan Nielsen Durban Jumpsuit

The Megan Nielsen Durban jumpsuit has been on my "to make" list for some time now, and I'm pleased that it finally reached my sewing table and now has a firm place in my wardrobe.

The Durban jumpsuit has lots of mix and match options so you can make quite a few different versions, giving you good value from the pattern. 

You can choose from a round or V neckline, short or long sleeves or a sleeveless bodice, patch and/or in-seam pockets, tapered or wide full-length legs or shorts, and optional belt loops with a tie belt or D-ring belt. That's definitely a lot of scope for creating variations!

The pattern also comes in a good range of sizes, with the regular version of the pattern covering hip measurements from 34" to 48", and the curve range going from 42" to 62" hip. As someone who is slightly taller than average, I also appreciated the fact that the trousers are marked for regular and tall in-seam lengths.

For my version, I used the V neckline, sleeveless bodice, tapered legs, in-seam pockets, patch pockets on the back (there is also an option to put the patch pockets on the front of the jumpsuit instead), belt loops and the tie belt.

The instructions were very detailed and easy to follow, with nice clear diagrams. The skill level is rated as 3 out of 5, and I think that's fair. There's nothing that's very tricky, but there are quite a few steps so it might feel a little overwhelming for a beginner. You do also need to be quite accurate to get a nice finish at some points. 

I took my time working through the project and really enjoyed the sewing process. I thought that sewing the bottom of the front button placket might be a bit fiddly, but the instructions made it nice and simple. 

In terms of sizing, I made a 14 at the bust blending out to a 16 at the waist and hips as recommended for my current body measurements. I also used the tall in-seam length. 

The instructions include advice about how to measure yourself to see if you're going to need to lengthen the pattern, which is helpful. I definitely needed to lengthen mine - this is an adjustment I almost always have to make. 

I added 2" to the bodice for my toile and that got the waist to the right place, but I felt like I needed a little extra length in the rise of the trousers so I also added 1" there for my final version. As I'd added extra length, I also used more buttons than the pattern calls for - I think I ended up with eight instead of six.

I'm pretty happy with how the fit turned out. There's enough room for the jumpsuit to be really comfortable to wear, but it's not baggy. 

The fabric that I used is a printed chambray/lightweight denim from Croft Mill. It was a really easy fabric to work with and I like the sweet and simple floral print. I've used other printed chambrays from Croft Mill before (in my Lyra dress last year and my Cassie dress a few months ago) and they've worn really well so I'm hoping the same will be true for this one too!

All in all, I'm really happy with my Durban jumpsuit - the instructions were great so it was a pleasure to sew, and the finished jumpsuit is just what I wanted. I think it'll also work layered with t-shirts underneath, so hopefully I'll still get a bit more wear out of it as the temperatures start to drop - I hope I do anyway because I don't want to leave it sitting in my wardrobe until spring!

Wednesday, 14 September 2022

New Look 6381 Skirt

People who don't sew sometimes seem to think that making your own clothes is cheaper than buying them. Sewing fans know all too well that these days that's rarely the case. The skirt I have to share with you today is an exception to that rule - largely because I found both the fabric and pattern in charity shops so the whole project cost less than £5. Bargain!

The pattern is New Look 6381. It's a pattern for maxi skirts (with the option of a high-low hem), wide leg trousers and shorts, all with an elastic waistband. I made the straight hemmed skirt, but shortened the pattern by 12 inches because I didn't have enough fabric to make the full length.

The size range is somewhat limited with hip sizes from 33.5" to 44" - although if you're slightly above the upper end of that range it might still work because there's a fair bit of ease in the pattern.

The skirt that I made is a really simple pattern. So simple in fact that I wondered if it was even worth writing a blog post about it. It's literally just a front and back piece and a waistband. But I like to document my projects, and hopefully this post may be helpful to someone thinking about making the pattern.

Sewing the skirt was no problem at all. As I mentioned before, it's a really simple pattern so you can't go far wrong. The instructions were clear, although if I make the pattern again I'd probably use a slightly different approach to sewing the waistband/inserting the elastic to avoid hand-sewing. 

If you're thinking of making this pattern, I'd recommend using the finished garment measurements on the pattern paper or measuring the pattern pieces to decide which size to make rather than using the sizing measurements. There's quite a lot of ease in this pattern, especially considering that it's intended for knit fabrics (which obviously stretch as you wear them). 

I ended up making a size 16, which is two sizes smaller than recommended for my current measurements and it's still plenty big enough.

It would also be worth checking the length of the skirt/trousers because the skirt at least is very long. As I mentioned above, I shortened the pattern because of lack of fabric, but if I'd made the full length it would have been pooling on the floor (I shortened the pattern by 12" and my skirt hem is about 10" from the floor). I'm 5'9", so if you're shorter than that it's probably worth thinking about the length of the skirt before cutting out. 

The pattern also says to cut the elastic to your waist measurement plus one inch, whereas I usually find it's better to cut elastic slightly smaller than your waist if you want the garment to sit nicely because obviously elastic stretches. I also find that different elastics have slightly different levels of stretch so I generally do a rough measurement and then see how the elastic feels around my waist before cutting.

The fabric I used is a light to medium weight jersey with good drape. It feels like viscose jersey to me, but as it came from a charity shop that's really just a guess. It works really well for this skirt though, and swishes above beautifully as I walk.

Orange isn't a colour I'd usually go for, but at £3 for just under 2 metres it was too good to resist! I'm happy I took a chance on it because it's a fun print. Although my camera obviously didn't agree as it seemed to have a hard time focussing on it, so I'm sorry if it's a little blurry in some of the photos.

All in all, I really like my finished skirt - even more so considering it was such a bargain project! If you're thinking of making New Look 6381, I'd say it comes together easily and is a nice skirt to wear but it's definitely worth giving some thought to what size to use before you start.

Tuesday, 30 August 2022

French Navy Patterns Vetiver Top

I liked the look of the Vetiver top as soon as I saw the sneak peek photos of it before it was released by French Navy patterns. I added it to my summer sewing plans, but got distracted by making floaty dresses for a while. I'm glad I finally got round to it though - better late than never!


The Vetiver top is a simple princess seamed blouse with a round neckline and narrow buttonstand. The pattern comes with two hem options - a slightly cropped blouse with a ruffle hem, or a longer length with a standard hem. The original top has short sleeves, but there's now also an expansion pack available, which includes long, cuffed sleeves and a cute Peter Pan collar.

The pattern sizing is a bit limited - it's available for bust sizes from 32" to 43.25".


This is the first French Navy pattern that I've made, and I'm happy to report that sewing the Vetiver top was a very enjoyable process. In some ways it's a relatively simple pattern, but the finish that you get if you follow the instructions elevates it a bit I think. All the seams apart from the sleeve seam and hem ruffle (if you're using that option) are French seamed, and that combined with the neckline binding and instructions for mitred corners on the ruffle produce nice neat insides.


I didn't have any problems while I was making my Vetiver top. I felt like the instructions had just the right level of detail, and they were easy to follow. I remember there was one step (I can't remember what now!) that sounded a bit confusing when I looked through the instructions before I started sewing, but it all made perfect sense when I got to that section.


In terms of sizing, my current bust measurement is right between sizes E and F in this pattern. My waist and hip measurements are bang on the size F though, and when I looked at the finished bust measurements it seemed like the F would give me more the fit I was looking for than the E, so I made a straight size F. The only alteration I made was to lengthen the top by an inch (standard for me - I'm 5'9"). 

I'm happy with the fit - it's loose enough to be comfortable, but still with nice shaping.


The fabric I used was sold as a cotton lawn when I bought it, but the weight/drape seems more like poplin to me. I bought it last autumn as a remnant, but sadly the piece I was sent was actually significantly shorter than had been advertised when I bought it - the shop has since closed, but given my experience I wouldn't have particularly recommended it anyway. 


The shorter fabric length meant that I couldn't use it for my original plans, but I had plenty for the Vetiver top. It probably hasn't got as much drape as is recommended for view A, but I wanted to use the fabric so I decided to give it a go. The frill stuck out quite comically when I first finished sewing it, but a good press and a bit of steam sorted that out. The fabric also feels like the kind of cotton that will probably soften up a bit with washing and wear so the drape may improve a bit.


All in all, I'm glad that I finally got around to sewing a Vetiver top. It's a lovely shape to wear, and I enjoyed the sewing process. I'm quite tempted to get the expansion pack and make myself a long-sleeved version for autumn/winter. Watch this space!

Thursday, 11 August 2022

Butterick 5792

As the UK was sweltering in record temperatures in July, I decided that I'd like a light lounge dress/nightie to float about my flat in during hot weather. Thankfully for me, I've managed to make it just in time for another heatwave this week!

When the idea for this project came to me, I had a look through my pattern stash and found Butterick 5792. I bought it during a pattern sale a while ago because I liked the pyjamas (view A/F) but the "gowns" that are also included in the pattern seemed like they would do a good job of fulfilling my vision.

The pattern has gowns in knee and maxi lengths, with long-sleeved or sleeveless options and a number of neckline pleating/trim options. None of the options were quite what I wanted straight out of the packet so I ended up combining the features that I liked. I used the sleeveless option with the plain neckline (view E/D) and the length of view B, but with the addition of the ruffle at the bottom of the skirt from views C/E (although I shortened the ruffle a bit to account for the fact that I'd be gathering it into a smaller skirt circumference than you would be if using views C/E). Hopefully that all makes sense!

The pattern was really easy to sew and came together very quickly. The instructions are fairly standard for a commercial pattern - they're clear, but they do assume to some extent that you have some knowledge of sewing and they don't hold your hand too much. There's nothing very complicated about the views that I combined though, so I didn't have any problems.

The pattern comes in two size ranges (XS to M, and L to XXL) and, annoyingly, my bust measurement is well within the M size, but my waist and hips are more towards the L size. I'd bought the smaller size range because I was originally intending to make the pyjamas and in that case I could easily just use the top from this pattern combined with pyjama trousers from another pattern that I already had if necessary. 

I looked at the finished pattern measurements on the pattern paper, and decided that the M should give me just about enough ease around the hips still, but to be on the safe side I blended out from the bust to add a little extra width (about a centimetre on each seam) around the hips. Thankfully that worked out nicely and I'm happy with the fit.

The fabric that I used is a pretty cotton lawn from Like Sew Amazing. It's a lovely print, and the perfect weight for what I wanted. It also seems to have a magical ability not to crease, or to lose its creases very easily, which is always pleasing. Nobody wants to be spending unnecessary time ironing in a heatwave after all, do they?!

I think I managed to do a good job of putting my idea into practice, and I'm very happy that I got the project finished before the temperatures climbed again. The dress is lovely and light to wear - just what I wanted!

Thursday, 23 June 2022

Itch to Stitch Lemont Top Sewing Pattern Review

Sewing patterns with interesting details always appeal to me, so it's no surprise that I bought and made the Itch to Stitch Lemont top not long after it was released.

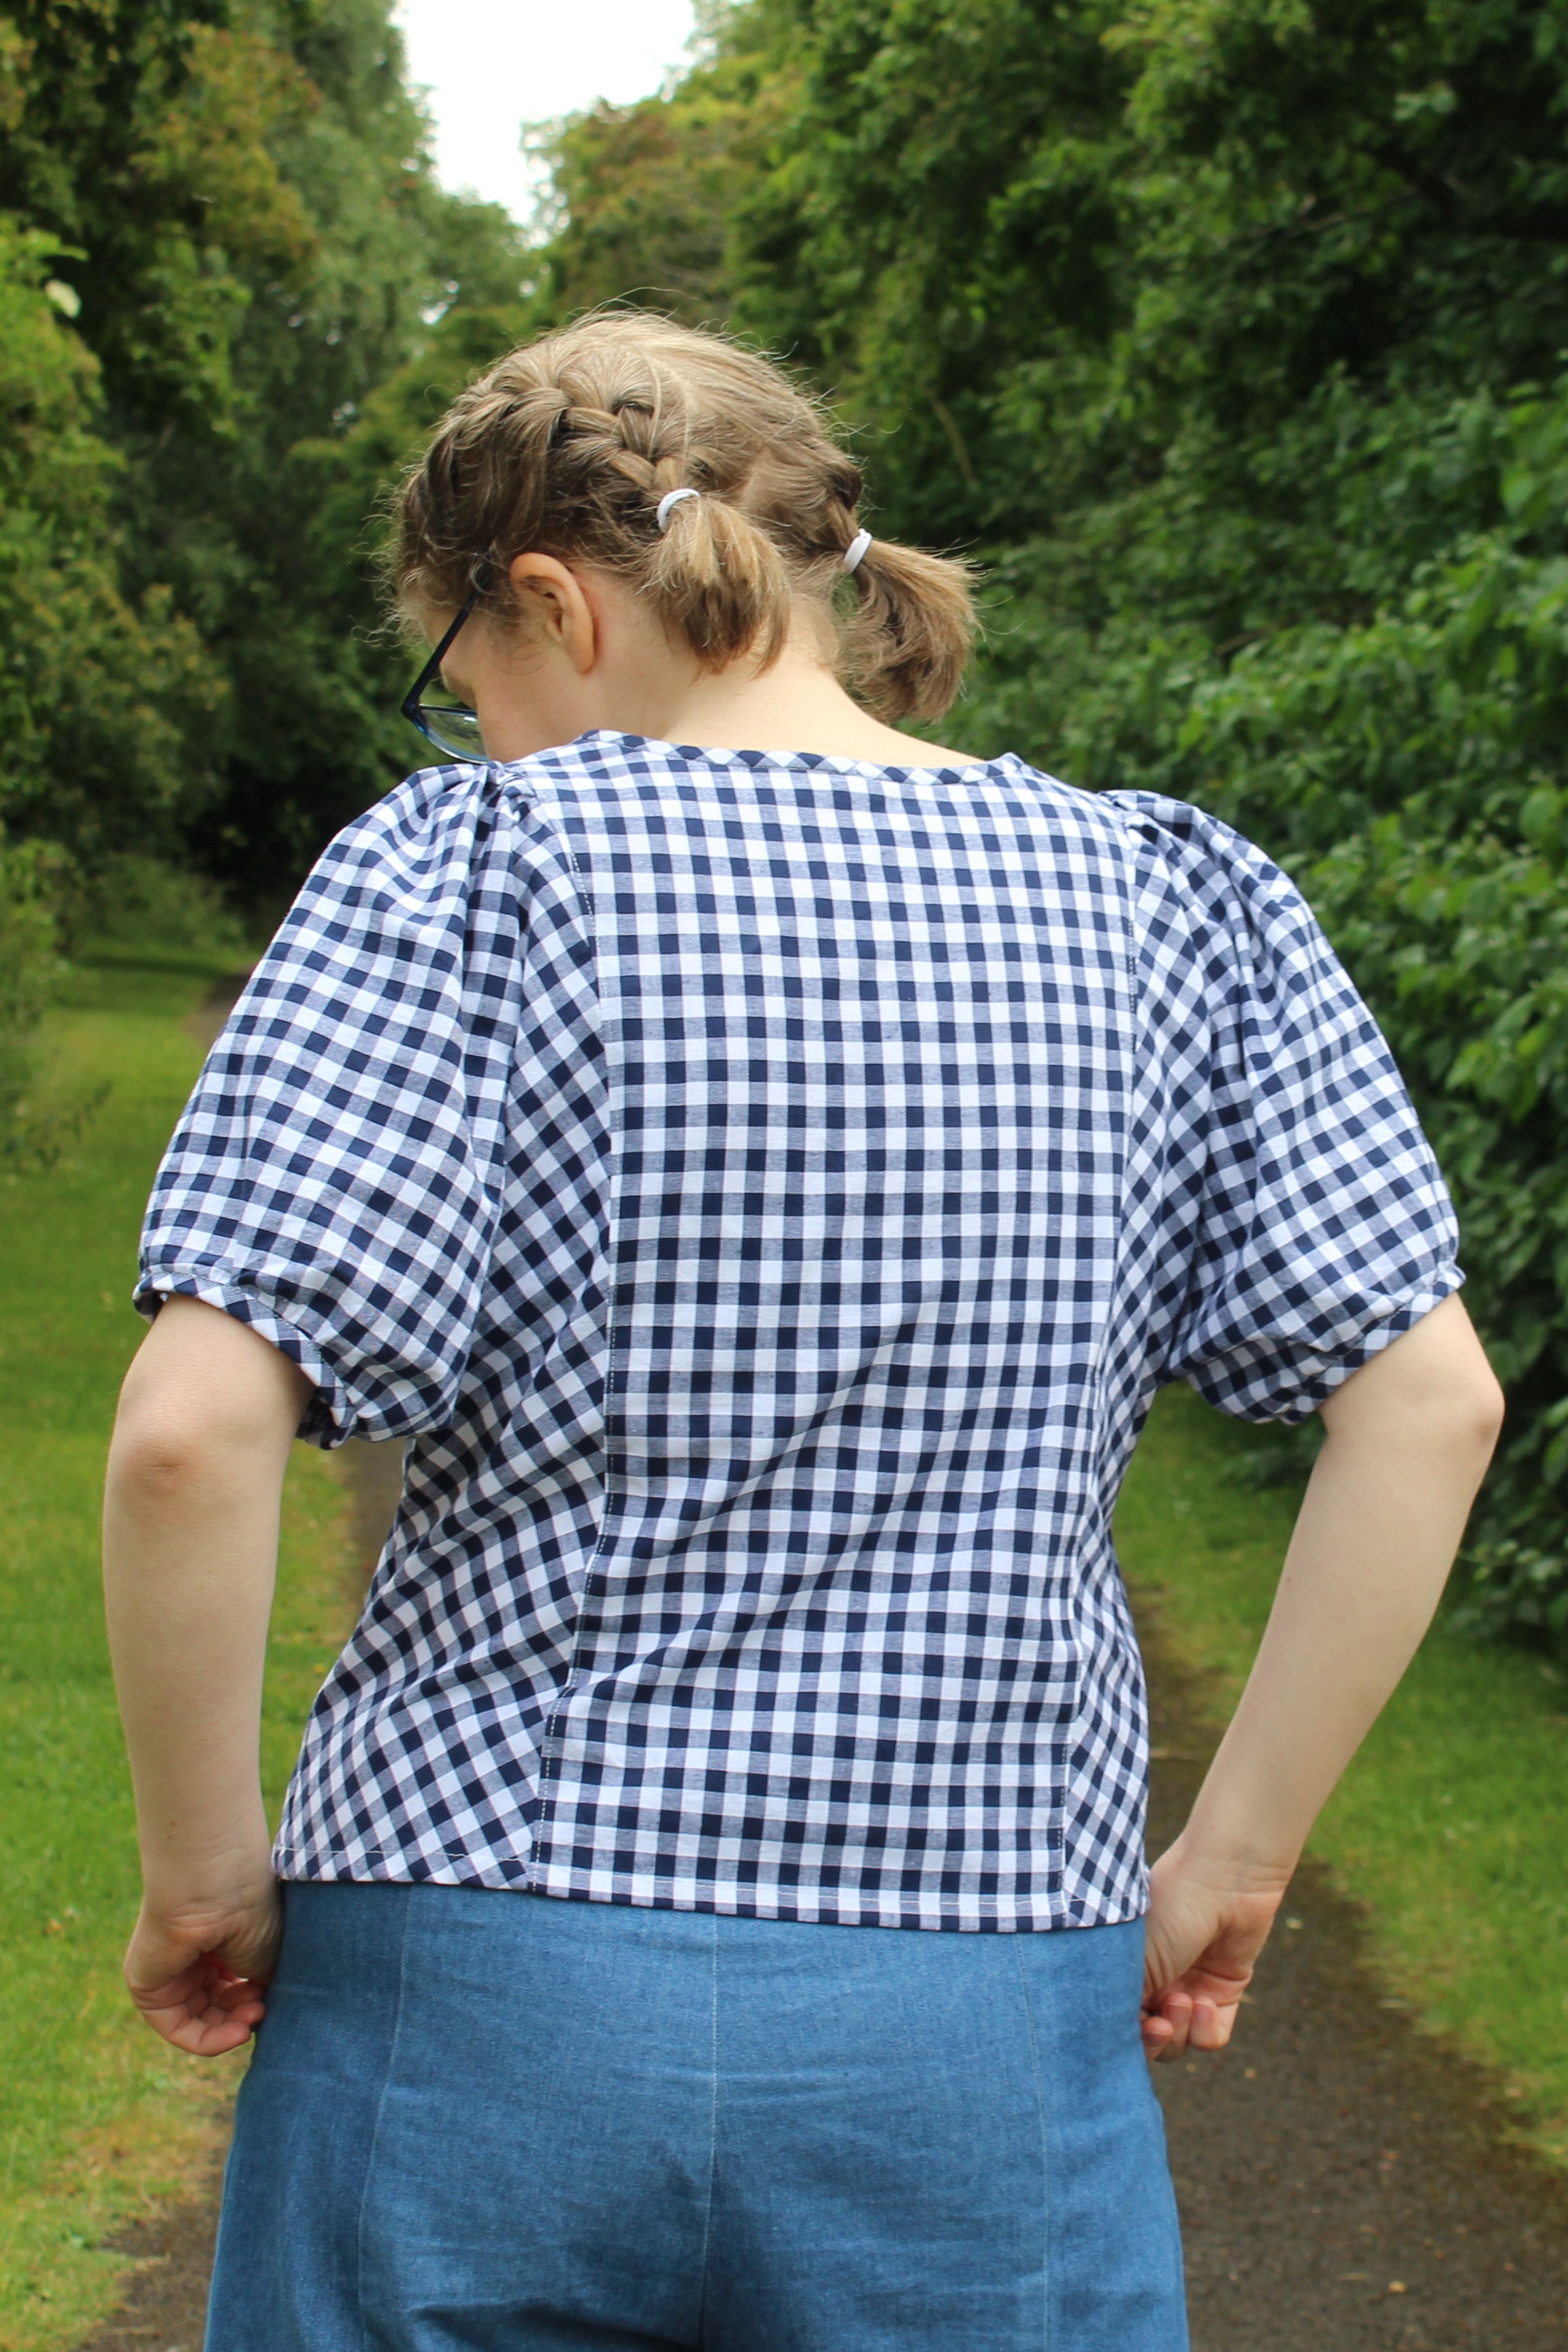
In some fabrics Lemont could look like a fairly ordinary woven top, but hopefully the gingham that I've used here helps show off some of its more interesting features. The top has princess seams and dolman sleeves, with the sides of the front and back bodice and the sleeves all being formed by one single large pattern piece. The sleeves are gently puffed - they're gathered both at the shoulder and into a little bias binding hem band. The neck is also finished with bias binding.

The pattern has regular and full bust pattern pieces, and comes in bust sizes from 3118" (smallest regular bust size) to 63" (largest full bust size).

All the binding and the slip-on style of the top means that you don't need any notions other than thread - there are no fastenings, no interfacing, and there are pattern pieces for cutting the bias binding for the sleeves and neck from the fabric. 

You would need to consider the style of the top when picking your fabric - the way the side panels/sleeves are cut means that you can't use directional prints because either the front or back side panel would end up with the print running upside down. You'd also need to have something that works well on the bias, because the side panels end up being on the bias where they meet the centre front/back panels. I think it's a style that works particularly well in ginghams/plaid/stripes to show off the style lines.

I've made a few Itch to Stitch patterns now (read my Glenelly top review here and my Kalispell dress review here) and the instructions have always been excellent. The same was true for the Lemont top - the instructions are detailed and easy to follow, with clear diagrams to accompany them. I didn't have any problems while I was sewing my top. 

It's rated as a beginner+ pattern, which I think is fair - it's not a complicated pattern, but you might want to have a couple of simple patterns under your belt before you try this because of dealing with fabric on the bias and the gathering into the sleeve hem band.

I made the size recommended for my measurements (size 10, regular bust) with my standard lengthening adjustment (I'm 5'9" and lengthened the top by 1.5"). I think it worked out nicely - the fit is comfortable without feeling oversized.

The fabric I used is a yarn-dyed cotton gingham that I bought from Simple Life Fabrics. It's a lovely quality cotton, and as I mentioned above I think that gingham works really well for this pattern.

All in all, I'm really pleased with my Lemont top - it was a breeze to sew and I think it will be lovely to wear this summer. I'd happily recommend the pattern if you're looking for a simple but interesting project!