Wednesday, 1 February 2017

Love Sewing Magazine Lottie Coat

I'm going to start this post by being honest and saying that I'm in two minds about this project; part of me likes it, part of me really isn't sure. It's not quite my usual style so that perhaps isn't too surprising, but when I saw the Lottie coat in issue 33 of Love Sewing magazine I thought it looked interesting so I'd give it a try.


The Lottie coat is a collarless unlined shell coat, with side seam pockets and three-quarter sleeves. Coats do have a reputation for being a bit tricky to sew, and properly tailored ones do definitely require some skill, but this coat is very simple and would be fine for relative beginners I think.

I didn't make a toile for this project because I decided that the fit was relaxed enough that I'd be able to make any little adjustments that might be needed along the way. I think that worked out fine - the fit on me is pretty much the same as on the models in the magazine anyway.


I did make a few changes to the coat to suit my personal tastes. As I mentioned, the pattern is unlined but I wanted to have some kind of lining, both for a bit of extra warmth and to make the coat easier to put on and take off. Instead of drafting a separate lining, I opted to underline the main pieces with lining fabric. As this would leave the raw edges visible on the inside, I made them a bit prettier and used a Hong Kong finish with bright pink satin bias binding. I think the little flash of pink that this gives on the inside of the coat is probably one of my favourite things about this project!


I did originally use the in-seam pockets from the pattern, but once I'd put them in they made the coat hang really strangely and gaped open in a not particularly attractive fashion. I unpicked them and closed up the side seams, but I think that a coat really needs pockets - I'm sure I'm not alone there am I? Patch pockets seemed like the easiest option to me, particularly being as I have a coat that I love which has patch pockets that I could use as a guide. I think they turned out quite nicely, even if I do say so myself.


The coat is meant to close with a single button at the neckline, but I decided to use a snap fastener instead. I'm pretty sure that I won't ever wear this coat without a scarf, so a pretty button would always be hidden, and using a snap fastener eliminated the worry about whether my machine would handle sewing a buttonhole on this fabric.

Having worn the coat, I'm going to go back and add a couple of extra snap fasteners down the front to help it stay closed a bit better.


I also lengthened the sleeves slightly. I originally lengthened them quite a bit because I thought that I might wear the coat more with full length sleeves, but with the width of the sleeves that just didn't look right. I tried a couple of different options - basting one sleeve so that it was long still but much narrower, and basting the other at three-quarter length - and the shorter, wider sleeve looked much better. In the end, I think my sleeves are 2 inches longer than in the pattern.


My main fabric is a lovely dogtooth coating from Clothspot, and the underlining is an acetate lining fabric that I picked up when it was super cheap in the sale at The Village Haberdashery. I really like both fabrics and how they work together. You can't really see all the colours in the dogtooth in these photos, but they're really pretty and I love how the pink seam binding I used picks out the pink in the fabric.


Overall I'm happy with how the coat turned out as a project, but I'm not completely sold with how it looks on me. I like it much better once I've got a scarf on with it (hence the scarf in most of these photos!), and I'm using that as an excuse to knit myself a bright pink chunky scarf to wear with it. I definitely don't hate the coat, so I think it might just take a bit of time to get used to wearing this different shape. After all, it's good to try new things every now and then, isn't it?

Friday, 20 January 2017

Gertie's Ultimate Dress Book Corduroy Dress

For my first sewing project of the new year, I decided to finally make something from Gertie's Ultimate Dress Book. The book's been sitting waiting on my shelves pretty much since it was released (I was never going to resist a book full of pretty dresses for long!), so I'm not quite sure how it took me so long to get around to making one of the projects, but thankfully I got there in the end.


For those of you that aren't familiar with the book, it features 23 different dress projects with the added bonus that all the bodices, skirts etc. are interchangeable so you can mix and match to suit your taste. My dress is heavily based on the Cherry Corduroy Dress from the book, which uses the princess seam bodice, basic 3/4 sleeve and all-around pleated skirt, but for my version I switched that skirt for the side-pleated skirt. The dress in the book also has a grosgrain ribbon and bow sewn around the waistline, which I omitted. It's the kind of detail that I love on paper and on other people, but always feel slightly self-conscious about wearing myself for some reason.


The process of sewing this dress had a bit of a frustrating start. I made a toile of the bodice based on my measurements and the size chart, but it turned out so small that I couldn't even do it up - in no small part because the sleeves were so constricting that I couldn't reach the zip properly. I went up a size and made another toile, which technically just about fit but only if I didn't really want to move. Not very practical! So I went up another size and finally had a nicely fitting bodice. I've since looked online and I'm definitely not the only one who's had this problem, but I've also seen people saying they got a really good fit with no adjustments - maybe it depends on what size you are or something? Anyway, I'd definitely make a toile if you're sewing a dress from this book.


Once I had my overall size sorted, I made a couple of length adjustments. I added a 1.5 inches to the bodice, which is fairly standard for me, and I also added an inch to the sleeve. Unsurprisingly, I didn't bother hemming the sleeve on my toile and without a hem it was just the length I wanted the sleeve to be, so I added extra for a hem.

I had the opposite problem with the skirt - it came out really long! I chopped 2 inches off the bottom and then also did a 2 inch hem, and it now sits at knee length. Considering that I'm somewhere around 5 ft 8", that's not normal for me - I think the only time when I've had to shorten a skirt before was when I was using a vintage pattern.


Having sorted out the sizing, actually sewing the dress was nice and simple. The instructions accompanying each individual project are fairly brief, with references back to the basic sewing instructions sections at the start of the book for further details. I'm fairly familiar with sewing dresses by now, so the only detailed instructions I looked at were the ones for the lapped zip just as a refresher (it's been ages since I sewed one!).

The instructions both for the individual dress and the general sewing guidelines were clear and easy to understand as far as I could see, although I did notice a couple of typos. Generally nothing too serious, but worth keeping an eye out for (e.g. at one point 1/2" was converted into metric as 6mm, which could cause problems if you were using just the metric measurements).


The fabric I used is a lovely needlecord from My Fabrics. I love the turquoise colour - perfect for brightening up grey January days. And who doesn't love a spotty dress (there are spots there I promise, they're just so small they're difficult to see in these photos).


I'm glad I persevered with getting the bodice to fit because I'm really pleased with how my dress turned out. And the bonus of the book format is that now I've got the bodice right, I can combine it with all the different sleeves and skirts to make a whole range of dresses. Do you have Gertie's Ultimate Dress Book too? Have you made anything from it yet?

Wednesday, 11 January 2017

Sew House Seven Toaster Sweater #1

In between Christmas and New Year I took advantage of a break in all the celebrations and family fun to return to my sewing machine and stitch up the Sew House Seven Toaster sweater. I'd had the pattern and fabric sitting patiently waiting for me for the whole of December while I was creating all my Christmas presents, so I was glad to finally have some time to sew for me.


 The Toaster sweaters are two fairly different high neck tops that are perfect for keeping warm at this time of year. I made #1, which is closer fitting and has "raglan sleeves, a wide waistband, a loose turtleneck, long cuffs and falls between the high and low hip". 

Sweater #2 is much looser fitting and, while I've seen some lovely versions online, I know it's just not my personal style. I think because the styles are quite different it's a really good idea that the option is available to buy the PDF patterns individually, because I imagine there are quite a few people like me who know they wouldn't make one of the two sweaters.


I didn't make any fit changes to the pattern apart from making a size M, whereas I should be a L according to the size chart. Based on the finished garment measurements, I thought the smaller size would give me a fit closer to what I was looking for. 

I didn't have any suitable fabric to make a toile to check, but I did compare the pattern pieces to my traced pieces for the Seamwork Astoria. That showed me that the sweater definitely shouldn't end up being too small, so I went ahead and cut out the size M. Happily my slight gamble worked, and I'm pleased with the fit.


The fabric I used is some lovely brushed French terry from Dragonfly Fabrics. It's a really great quality, and gorgeous to wear. It's not super warm, but it was warm enough that I didn't get cold when taking these photos even though I've only got a short-sleeved cotton dress on underneath. 


A slight word of warning if you're considering this fabric - the brushed inside shed quite a lot after prewashing. I don't think it's had a negative effect on the fabric itself (it steel feels nicely snuggly), but I did have to spend quite a while hoovering little bits of pink fleece up from round my sewing table after I'd finished making it, and the bodice of my dress had a pink haze all over it when I took the sweater off at the end of the day. I think (hope!) it's one of those fabrics that will just shed after the first wash and then will be fine afterwards - we'll have to see! As it stands, it wouldn't put me off buying one of the other colours (I'm very tempted!), I'd just be expecting all the shedding next time.


The pattern is fairly quick to make - I think the actual sewing only took me a couple of hours. The instructions were all clear and easy to follow. I omitted the suggested topstitching, partly because it wasn't the look I wanted this time but also in no small part because I was impatient and wanted to get finished!

I was also glad that the long cuffs and wide waistband mean there's no need for hemming. This is always welcome news to me, because hems are the one area where my machine can occasionally cause problems when it comes to sewing knits.


I'm really pleased with how my Toaster sweater turned out, and I'd definitely make the pattern again. It's a good shape for wearing with all my full skirted dresses, and is a comfy but presentable way to keep warm. What more could you want for these chilly January days?!

Friday, 30 December 2016

Christmas presents

Hello hello! I hope you're all having a happy festive season. Before this nice little in-between period that we're now in turns into 2017, I thought I'd share the Christmas presents that I made this year.


First up is this bag that I made for my Mum. The pattern is the Maker's Tote by Noodlehead which, as the name suggests, is designed to be a project tote bag for makers and creatives. There's plenty of space in the main compartment of the bag, and lots of pockets for keeping bits and pieces safe. Because of all those pockets, this was easily this year's most time-consuming present, but I think it was definitely worth the effort.


The instructions are very detailed and easy to follow so it wasn't a difficult project (I found that the only tricky part was applying the binding around the bottom edges, and even that wasn't as problematic as I'd suspected it might be), it just took a bit of time to sew all the various sections.

The outer fabric is Painterly Wash Art Gallery denim, and the inside pocket fabric is Tulip in Turquoise from the Cloud 9 Vignette collection. The rest of the fabric is a combination of various remnants from my stash.


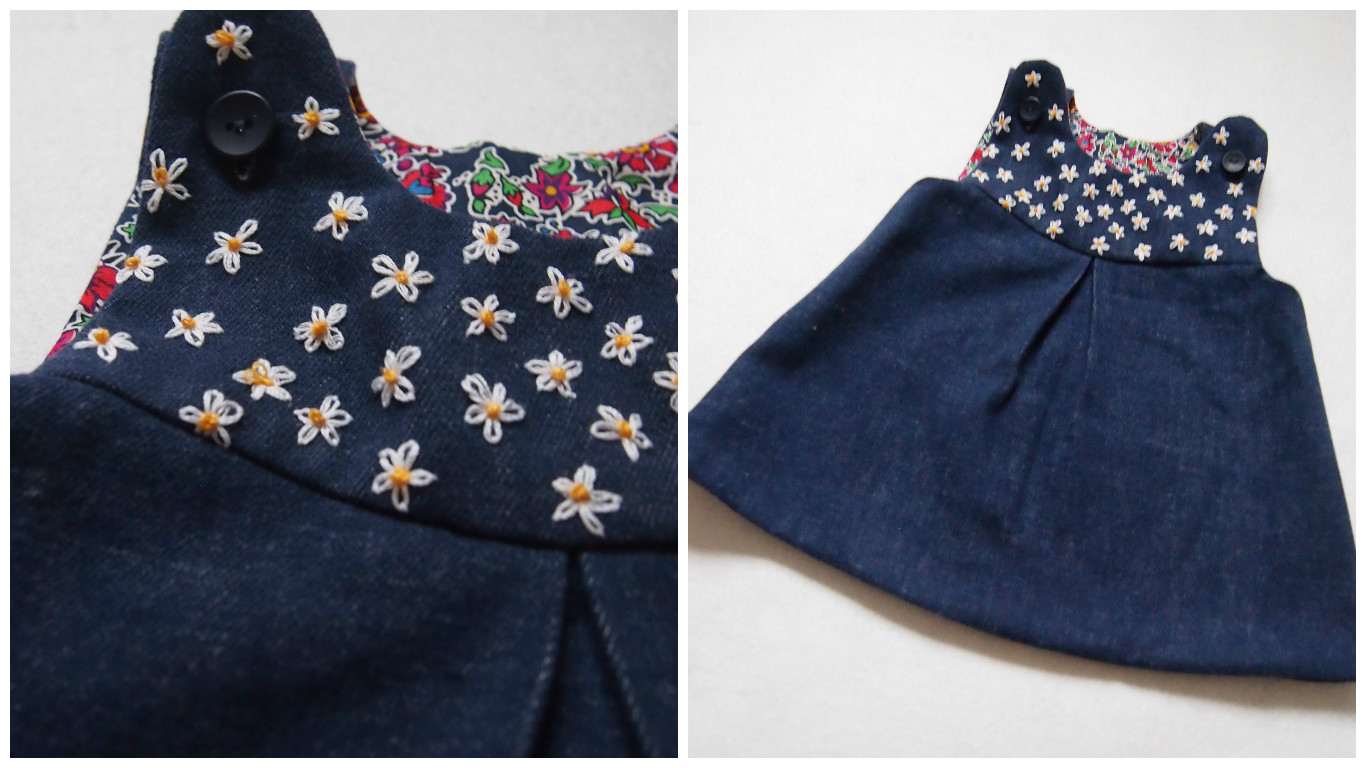
Over the years I've learned that it's better to keep things simple when making presents, so all of my other projects were much quicker. First up is a dress for my niece who was born a couple of months ago. It's a baby pinafore pattern from Puperita - a sweet, simple dress that I sewed up in a couple of hours. The outer fabric is a soft denim repurposed from a skirt, and the inside is left over from my latest Susie blouse. I did make it slightly more complicated by deciding to embroider the yoke with little daisies, but that was a nice relaxing project to work on in front of the TV so it was fine.


Her Christmas present was actually the second version of the pattern I've made for her - I made the red version above for her when she was born. I really like the fact that the dress is reversible, so I could make this red version with Christmas fabric on one side and plain babycord on the reverse so that she'll be able to wear it outside of the Christmas season too.


Next up was an apron/smock for my nephew, which I think will definitely come in useful because he likes 'helping' my sister with cooking and baking but has a tendency to end up covered in half of the ingredients. This is a very simple pattern from the book Sew a Metre. The main fabric is the same denim as my niece's dress, with added red binding and a scrap of fabric from my stash for the 'J'.


Last, but by no means least, I made a five pairs of pyjama trousers for my Dad, siblings and siblings-in-law. I intended to take a photo of them all modelling them, but that got a bit overlooked in the excitement of present opening, so all I have is this picture of the stack of them waiting to be wrapped - sorry about that!


I can show you this photo of my brother sporting another pair of pyjama trousers that I made him earlier this year, using the same pattern (in this spectacular beetle print jersey). There are many basic pyjama patterns, but this particular one is Simplicity 2116. Unsurprisingly, given that pyjama trousers are one of the simplest things to sew, this was a nice easy project. By the end of the fifth pair I was definitely ready to sew something else, but I'd happily use this pattern for pyjamas again the future.

So there we go, that's what's kept me busy for the past few weeks! Did you make any presents? I really enjoyed it, but it's also great to be back sewing for me again now!

Wednesday, 7 December 2016

Handmade Style - review & projects

My sewing machine is as busy as usual at the moment, but it's in full-on Christmas present production so that all needs to be kept secret for another couple of weeks. I'm sure I'm not the only one in that situation, am I? As I can't share my latest creations, I thought I'd talk about a couple of projects that haven't made it to my blog before. They all happen to come from the same book, so I'm going to combine them with a bit of a review.


The book in question is Handmade Style by Anna Graham of Noodlehead. It was released early last year so I'm not exactly quick off the mark with this post, but with a sewing book I prefer to wait until I've used it to make a couple of things so that I know whether or not the projects work before writing a review.

The book includes 23 projects divided into three sections - "To wear", "To carry" and "To use". It includes paper patterns where necessary, but most of the pieces in the projects I've used have been rectangles/squares and in those cases the dimensions are simply provided for cutting.


The first project I made from the book was the carry-all pincushion. Now, a pincushion might not seem like a particularly exciting project, but this is no ordinary pincushion! It's got a range of different pockets all round the sides for all your small sewing essentials, and a strap on the top to hold scissors. I made mine over a year ago, and I haven't lost my seam ripper since!


Next up, I made the double zip wallet. As the name suggests, it has two zippered openings and additional pockets and card holders on the inside. There's plenty of space for holding just about anything you could want to keep in your wallet.


My third project was the gingham tote, so called because in the sample in the book the main outer pocket (which I used the blue floral for in my version) is made in gingham. As you can probably tell, this was a more involved project than the other two but, although there were more steps to go through, the individual processes themselves weren't complicated.


I deviated slightly from the bag in the book by using a purchased leather strap instead of making the fabric strap included in the pattern. This was mainly because I made the bag as a birthday present for my Mum as a replacement for a Cath Kidston one that she'd used  lot, and one of the things I knew she really liked about that bag was the fact that it had a leather strap. My version has the added benefit of the strap being removable for washing, whereas the CK one has a fixed strap, therefore meaning that I can pretend that I make better bags than Cath Kidston!


All three of these projects were really nice to sew. They're a good way to use up remnants/scraps, and a bit of a change from all the dressmaking that usually goes on around these parts.

I think that the instructions and diagrams are the kind that have a tendency to seem a bit confusing if you read them all through before starting, but then make complete sense and are easy to follow once you're actually sewing. Everything fitted together nicely, and I had no problems at all making any of the three projects.


Overall, I really like the general style of the whole book. The samples are made in a lovely range of modern fabrics, and they're beautifully photographed.

I would say that if you're only interested in sewing clothes then I don't think this would be the book for you. Although one of the sections is "To wear", it's definitely the smallest of the three, and the two garments (a simple chambray dress and a tunic) are both perfectly nice, but not anything revolutionary. I was aware of that before I bought the book though, so I'm not at all disappointed; in fact, I think there's a really nice selection of projects. A lot of them would be great to make as gifts as well - always handy at this time of year!


There are plenty more things that I'd like to make from Handmade Style. Top of the list has to be the patchwork bench, but I need to work out where I'd put it in my flat first! Have you made anything from this book?