Having said in my last sewing post that I don't buy sewing magazines that often, I then went straight out and bought another. Today's project is the pattern included with issue 55 of Love Sewing magazine (the current issue as I type) - McCalls 7714.
The McCalls 7714 pattern is for partially-lined dresses, with a fitted princess seam bodice, V-neck or rounded neckline options, and a straight or pleated, full skirt. It also has a separate waistband and the option of making it sleeveless or using short sleeves. I went for view A - sleeveless, V-neck and with the full, pleated skirt.
Based on the finished garment measurements (which are on the pattern tissue), I made a size 14 at the bust, blending out to a 16 at the waist. That's a size below what the pattern suggests for my measurements in both cases, but it's well known that commercial patterns tend to have a lot of ease built in.
The only alterations I made were to lengthen the bodice by an inch, and lengthen the skirt by 2.5 inches. Both of these are fairly standard alterations for me - I'm just over 5 ft 8", so not a giant by any stretch of the imagination, but slightly taller than most patterns are drafted for.
As with most commercial patterns, the instructions are fairly succinct but I found them clear. Although it has to be said that I've sewn a fair few dresses similar to this now so I didn't really need to follow the instructions in any particular detail. I did do my own thing a bit when it came to sewing the invisible zipper and used my preferred method (the one from the Emery dress), which eliminates the need to slipstitch the lining down the centre back.
One thing I found slightly odd is that the sample in Love Sewing magazine doesn't seem to have followed the instructions about stitching down the pleats at the top of the skirt. It doesn't make a major difference I suppose, but I think it would be better for the magazine to show the pattern as written otherwise it could be a bit confusing. I definitely went back and double-checked that I'd done what I was meant to when I noticed that my skirt was different. I actually really like the look created by the stitched down pleats though - it makes this a bit different from some of my other dresses.
The fabric for this one is another piece that's been sitting in my fabric stash for too long. It's a fairly lightweight and soft cotton that I found in a charity shop a couple of years ago. It was the middle of winter when I bought it, so I didn't have any immediate plans for it because it's definitely more of a summer weight, but at £4 for 3 metres, I couldn't say no!
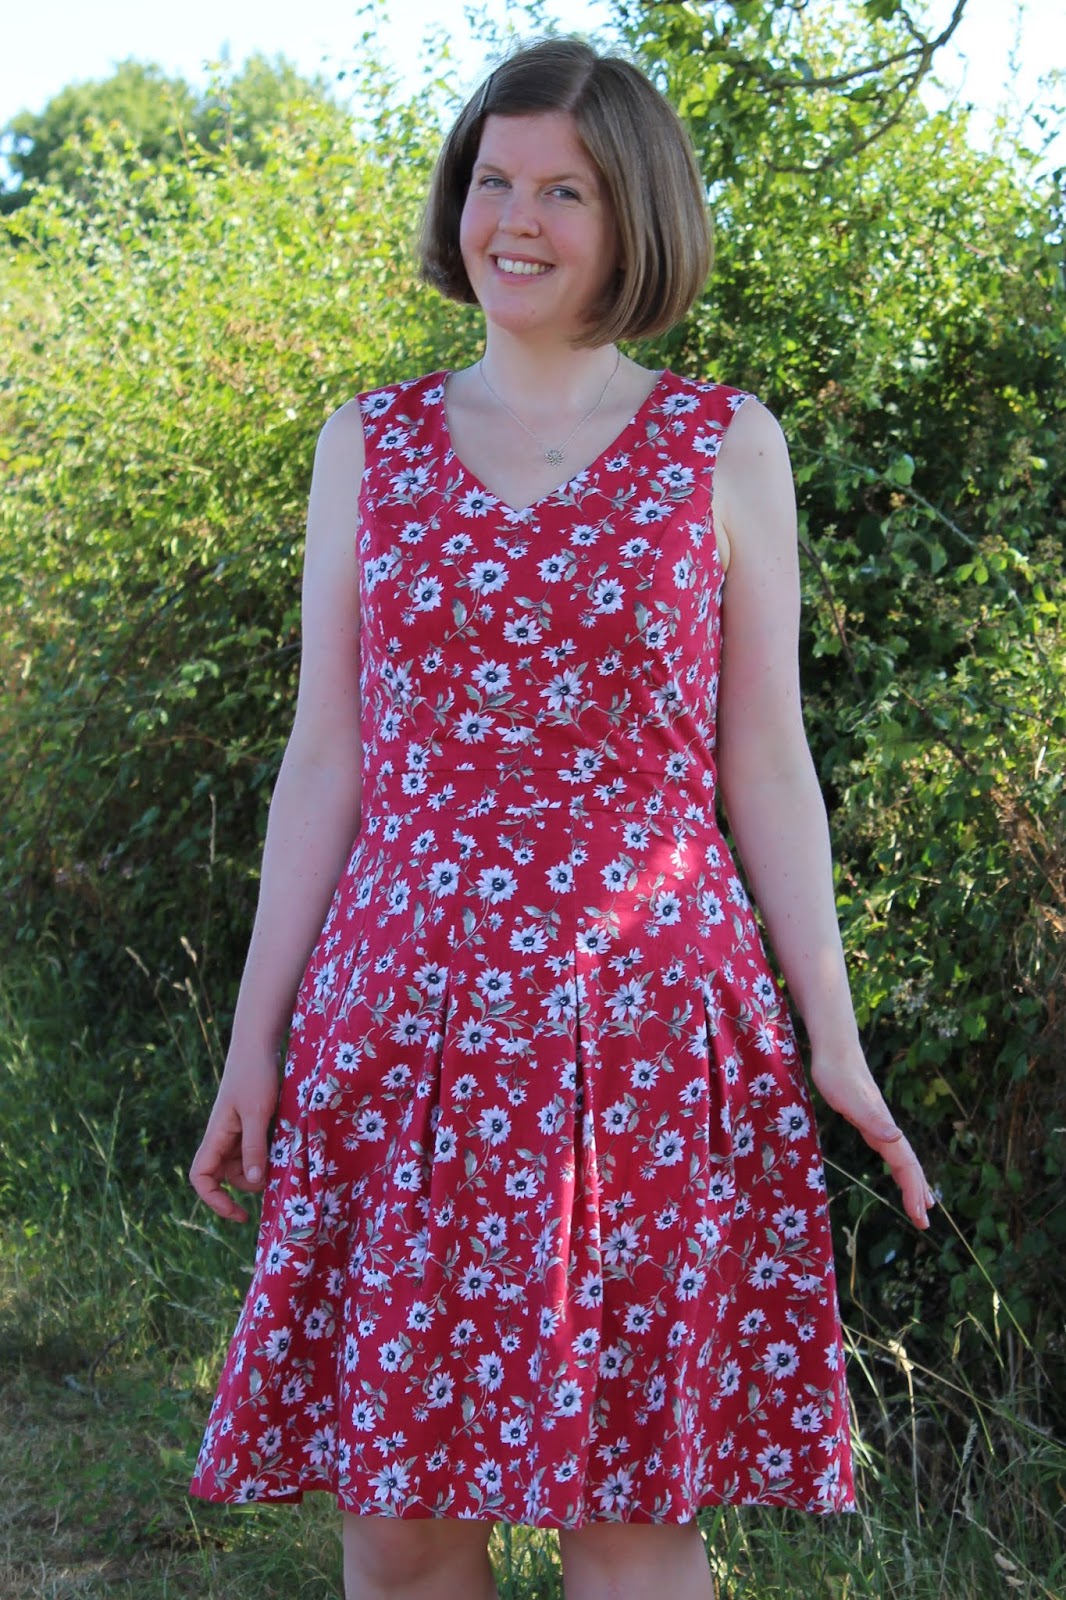
All in all, I'm happy with how this dress turned out. It's fitted, but the lightweight fabric means that it's still breezy enough to wear in this hot weather that shows no sign of stopping. Let's hope it lasts long enough still for me to justify sewing up some more summer dresses!
Showing posts with label Love Sewing. Show all posts
Wednesday, 25 July 2018
Wednesday, 1 February 2017
Love Sewing Magazine Lottie Coat
I'm going to start this post by being honest and saying that I'm in two minds about this project; part of me likes it, part of me really isn't sure. It's not quite my usual style so that perhaps isn't too surprising, but when I saw the Lottie coat in issue 33 of Love Sewing magazine I thought it looked interesting so I'd give it a try.
The Lottie coat is a collarless unlined shell coat, with side seam pockets and three-quarter sleeves. Coats do have a reputation for being a bit tricky to sew, and properly tailored ones do definitely require some skill, but this coat is very simple and would be fine for relative beginners I think.
I didn't make a toile for this project because I decided that the fit was relaxed enough that I'd be able to make any little adjustments that might be needed along the way. I think that worked out fine - the fit on me is pretty much the same as on the models in the magazine anyway.
I did make a few changes to the coat to suit my personal tastes. As I mentioned, the pattern is unlined but I wanted to have some kind of lining, both for a bit of extra warmth and to make the coat easier to put on and take off. Instead of drafting a separate lining, I opted to underline the main pieces with lining fabric. As this would leave the raw edges visible on the inside, I made them a bit prettier and used a Hong Kong finish with bright pink satin bias binding. I think the little flash of pink that this gives on the inside of the coat is probably one of my favourite things about this project!
I did originally use the in-seam pockets from the pattern, but once I'd put them in they made the coat hang really strangely and gaped open in a not particularly attractive fashion. I unpicked them and closed up the side seams, but I think that a coat really needs pockets - I'm sure I'm not alone there am I? Patch pockets seemed like the easiest option to me, particularly being as I have a coat that I love which has patch pockets that I could use as a guide. I think they turned out quite nicely, even if I do say so myself.
The coat is meant to close with a single button at the neckline, but I decided to use a snap fastener instead. I'm pretty sure that I won't ever wear this coat without a scarf, so a pretty button would always be hidden, and using a snap fastener eliminated the worry about whether my machine would handle sewing a buttonhole on this fabric.
Having worn the coat, I'm going to go back and add a couple of extra snap fasteners down the front to help it stay closed a bit better.
I also lengthened the sleeves slightly. I originally lengthened them quite a bit because I thought that I might wear the coat more with full length sleeves, but with the width of the sleeves that just didn't look right. I tried a couple of different options - basting one sleeve so that it was long still but much narrower, and basting the other at three-quarter length - and the shorter, wider sleeve looked much better. In the end, I think my sleeves are 2 inches longer than in the pattern.
My main fabric is a lovely dogtooth coating from Clothspot, and the underlining is an acetate lining fabric that I picked up when it was super cheap in the sale at The Village Haberdashery. I really like both fabrics and how they work together. You can't really see all the colours in the dogtooth in these photos, but they're really pretty and I love how the pink seam binding I used picks out the pink in the fabric.
Overall I'm happy with how the coat turned out as a project, but I'm not completely sold with how it looks on me. I like it much better once I've got a scarf on with it (hence the scarf in most of these photos!), and I'm using that as an excuse to knit myself a bright pink chunky scarf to wear with it. I definitely don't hate the coat, so I think it might just take a bit of time to get used to wearing this different shape. After all, it's good to try new things every now and then, isn't it?
The Lottie coat is a collarless unlined shell coat, with side seam pockets and three-quarter sleeves. Coats do have a reputation for being a bit tricky to sew, and properly tailored ones do definitely require some skill, but this coat is very simple and would be fine for relative beginners I think.
I didn't make a toile for this project because I decided that the fit was relaxed enough that I'd be able to make any little adjustments that might be needed along the way. I think that worked out fine - the fit on me is pretty much the same as on the models in the magazine anyway.
I did make a few changes to the coat to suit my personal tastes. As I mentioned, the pattern is unlined but I wanted to have some kind of lining, both for a bit of extra warmth and to make the coat easier to put on and take off. Instead of drafting a separate lining, I opted to underline the main pieces with lining fabric. As this would leave the raw edges visible on the inside, I made them a bit prettier and used a Hong Kong finish with bright pink satin bias binding. I think the little flash of pink that this gives on the inside of the coat is probably one of my favourite things about this project!
I did originally use the in-seam pockets from the pattern, but once I'd put them in they made the coat hang really strangely and gaped open in a not particularly attractive fashion. I unpicked them and closed up the side seams, but I think that a coat really needs pockets - I'm sure I'm not alone there am I? Patch pockets seemed like the easiest option to me, particularly being as I have a coat that I love which has patch pockets that I could use as a guide. I think they turned out quite nicely, even if I do say so myself.
The coat is meant to close with a single button at the neckline, but I decided to use a snap fastener instead. I'm pretty sure that I won't ever wear this coat without a scarf, so a pretty button would always be hidden, and using a snap fastener eliminated the worry about whether my machine would handle sewing a buttonhole on this fabric.
Having worn the coat, I'm going to go back and add a couple of extra snap fasteners down the front to help it stay closed a bit better.
I also lengthened the sleeves slightly. I originally lengthened them quite a bit because I thought that I might wear the coat more with full length sleeves, but with the width of the sleeves that just didn't look right. I tried a couple of different options - basting one sleeve so that it was long still but much narrower, and basting the other at three-quarter length - and the shorter, wider sleeve looked much better. In the end, I think my sleeves are 2 inches longer than in the pattern.
My main fabric is a lovely dogtooth coating from Clothspot, and the underlining is an acetate lining fabric that I picked up when it was super cheap in the sale at The Village Haberdashery. I really like both fabrics and how they work together. You can't really see all the colours in the dogtooth in these photos, but they're really pretty and I love how the pink seam binding I used picks out the pink in the fabric.
Overall I'm happy with how the coat turned out as a project, but I'm not completely sold with how it looks on me. I like it much better once I've got a scarf on with it (hence the scarf in most of these photos!), and I'm using that as an excuse to knit myself a bright pink chunky scarf to wear with it. I definitely don't hate the coat, so I think it might just take a bit of time to get used to wearing this different shape. After all, it's good to try new things every now and then, isn't it?
Friday, 29 August 2014
Simple Sew Ruby Dress
Two finished garment posts within a few days isn't normal for me, but I had a weekend recently when I did very little other than sew (a good weekend!), so I got through a couple of projects quite quickly, including the dress I have to show you today. This dress wasn't planned. Not that I have a particularly detailed sewing plan, but I had told myself that I'd probably made enough summer dresses already this year. Then this month's copy of Love Sewing magazine arrived through my door with the pattern for the Ruby dress from Simple Sew on the cover. It was just my style, and then I spotted some fabric on ebay that I thought would make a nice Ruby, so really it would have been silly not to put the two together and create a pretty dress wouldn't it? So that's what I did!
In my defence (not that I necessarily need one!), I have been thinking recently that I haven't made nearly enough polka dot items. I love polka dots, and I always tend to be drawn to them when I'm looking for sewing inspiration, but for some reason they seem to have not featured too highly on the list of things I've actually made. And blue and white is always a good combination for me, and fits in well with my cardigan collection so it's all good!
The Ruby dress has a fitted bodice with a bateau neckline and low V-shaped back, and a lovely full skirt. So this may be another fit and flare dress to add to my growing handmade collection, but it had some interesting details to make it different from the others that I've made before.
The pattern is described as being for an adventurous beginner, which I think is probably fairly accurate as it's all pretty simple (as the name of the pattern company would suggest!), as long as you're OK with inserting invisible zips. The instructions are clear and well-illustrated, although there are a couple of details missing that might confuse a complete beginner - the envelope doesn't tell you what type or length of zip you should be using (I used a 16" invisible zip), and I don't think it tells you what seam allowance to use (I used the standard 5/8" which worked fine for me) but maybe I just overlooked that bit! The envelope does promise full email support though, so that should sort out any queries.
The neckline and armholes are finished together with one facing, which I prefer to having a separate neckline facing and armhole binding as it means there's no risk of the facing popping out at the neckline. If I make another Ruby dress though, I might try lining the bodice instead of using the facings, as I really like the lined bodices of my Lilou dresses.
I made a size 14, but added quite a lot of length. From the photos in the magazine, you can tell that this dress has been designed to be quite short, but I always think that dresses this shape look better if they're around knee length. If they're much shorter than that on me, I always feel like they look like they've been shrunk, but maybe that's just me being weird! I added 1.5 inches to the bodice, and 4.5 inches to the skirt. Lengthening the bodice is a standard adjustment for me, and I am probably on the taller side of average at 5 ft 8, but the skirt would have been really short on me without the extra length. I'm fairly happy with it as it is, but I might add an extra inch or two to the skirt next time.
Have any of you read Love Sewing magazine? I always get sucked in by the pretty covers of magazines, so I had to check this one out when it was first released a few months ago. It's a nice magazine, with plenty of modern sewing projects for accessories, home decor and simple clothes. I haven't actually made anything from the magazine itself yet, but I've enjoyed reading it. Plus there's the bonus of having a free pattern every month. If you're only interested in dressmaking, then it might not be the one for you but it's definitely worth keeping an eye out for it just to see if you want the pattern - this month's issue with the Ruby pattern should theoretically still be available, and next month there'll be a trouser pattern on offer.
I'm pretty happy with how this turned out, and even happier now that I've heard that there could be some more heat coming our way next week so I might get more of a chance to show it off. And if the sun doesn't appear again, well then that's what cardigans were made for! But maybe I should think about planning some more autumn-appropriate sewing. Are you sewing for summer still, or planning for autumn already?
In my defence (not that I necessarily need one!), I have been thinking recently that I haven't made nearly enough polka dot items. I love polka dots, and I always tend to be drawn to them when I'm looking for sewing inspiration, but for some reason they seem to have not featured too highly on the list of things I've actually made. And blue and white is always a good combination for me, and fits in well with my cardigan collection so it's all good!
The pattern is described as being for an adventurous beginner, which I think is probably fairly accurate as it's all pretty simple (as the name of the pattern company would suggest!), as long as you're OK with inserting invisible zips. The instructions are clear and well-illustrated, although there are a couple of details missing that might confuse a complete beginner - the envelope doesn't tell you what type or length of zip you should be using (I used a 16" invisible zip), and I don't think it tells you what seam allowance to use (I used the standard 5/8" which worked fine for me) but maybe I just overlooked that bit! The envelope does promise full email support though, so that should sort out any queries.
The neckline and armholes are finished together with one facing, which I prefer to having a separate neckline facing and armhole binding as it means there's no risk of the facing popping out at the neckline. If I make another Ruby dress though, I might try lining the bodice instead of using the facings, as I really like the lined bodices of my Lilou dresses.
I made a size 14, but added quite a lot of length. From the photos in the magazine, you can tell that this dress has been designed to be quite short, but I always think that dresses this shape look better if they're around knee length. If they're much shorter than that on me, I always feel like they look like they've been shrunk, but maybe that's just me being weird! I added 1.5 inches to the bodice, and 4.5 inches to the skirt. Lengthening the bodice is a standard adjustment for me, and I am probably on the taller side of average at 5 ft 8, but the skirt would have been really short on me without the extra length. I'm fairly happy with it as it is, but I might add an extra inch or two to the skirt next time.
Have any of you read Love Sewing magazine? I always get sucked in by the pretty covers of magazines, so I had to check this one out when it was first released a few months ago. It's a nice magazine, with plenty of modern sewing projects for accessories, home decor and simple clothes. I haven't actually made anything from the magazine itself yet, but I've enjoyed reading it. Plus there's the bonus of having a free pattern every month. If you're only interested in dressmaking, then it might not be the one for you but it's definitely worth keeping an eye out for it just to see if you want the pattern - this month's issue with the Ruby pattern should theoretically still be available, and next month there'll be a trouser pattern on offer.
I'm pretty happy with how this turned out, and even happier now that I've heard that there could be some more heat coming our way next week so I might get more of a chance to show it off. And if the sun doesn't appear again, well then that's what cardigans were made for! But maybe I should think about planning some more autumn-appropriate sewing. Are you sewing for summer still, or planning for autumn already?
Subscribe to:
Posts (Atom)