Wednesday, 10 December 2014

Colour-blocked Françoise dress

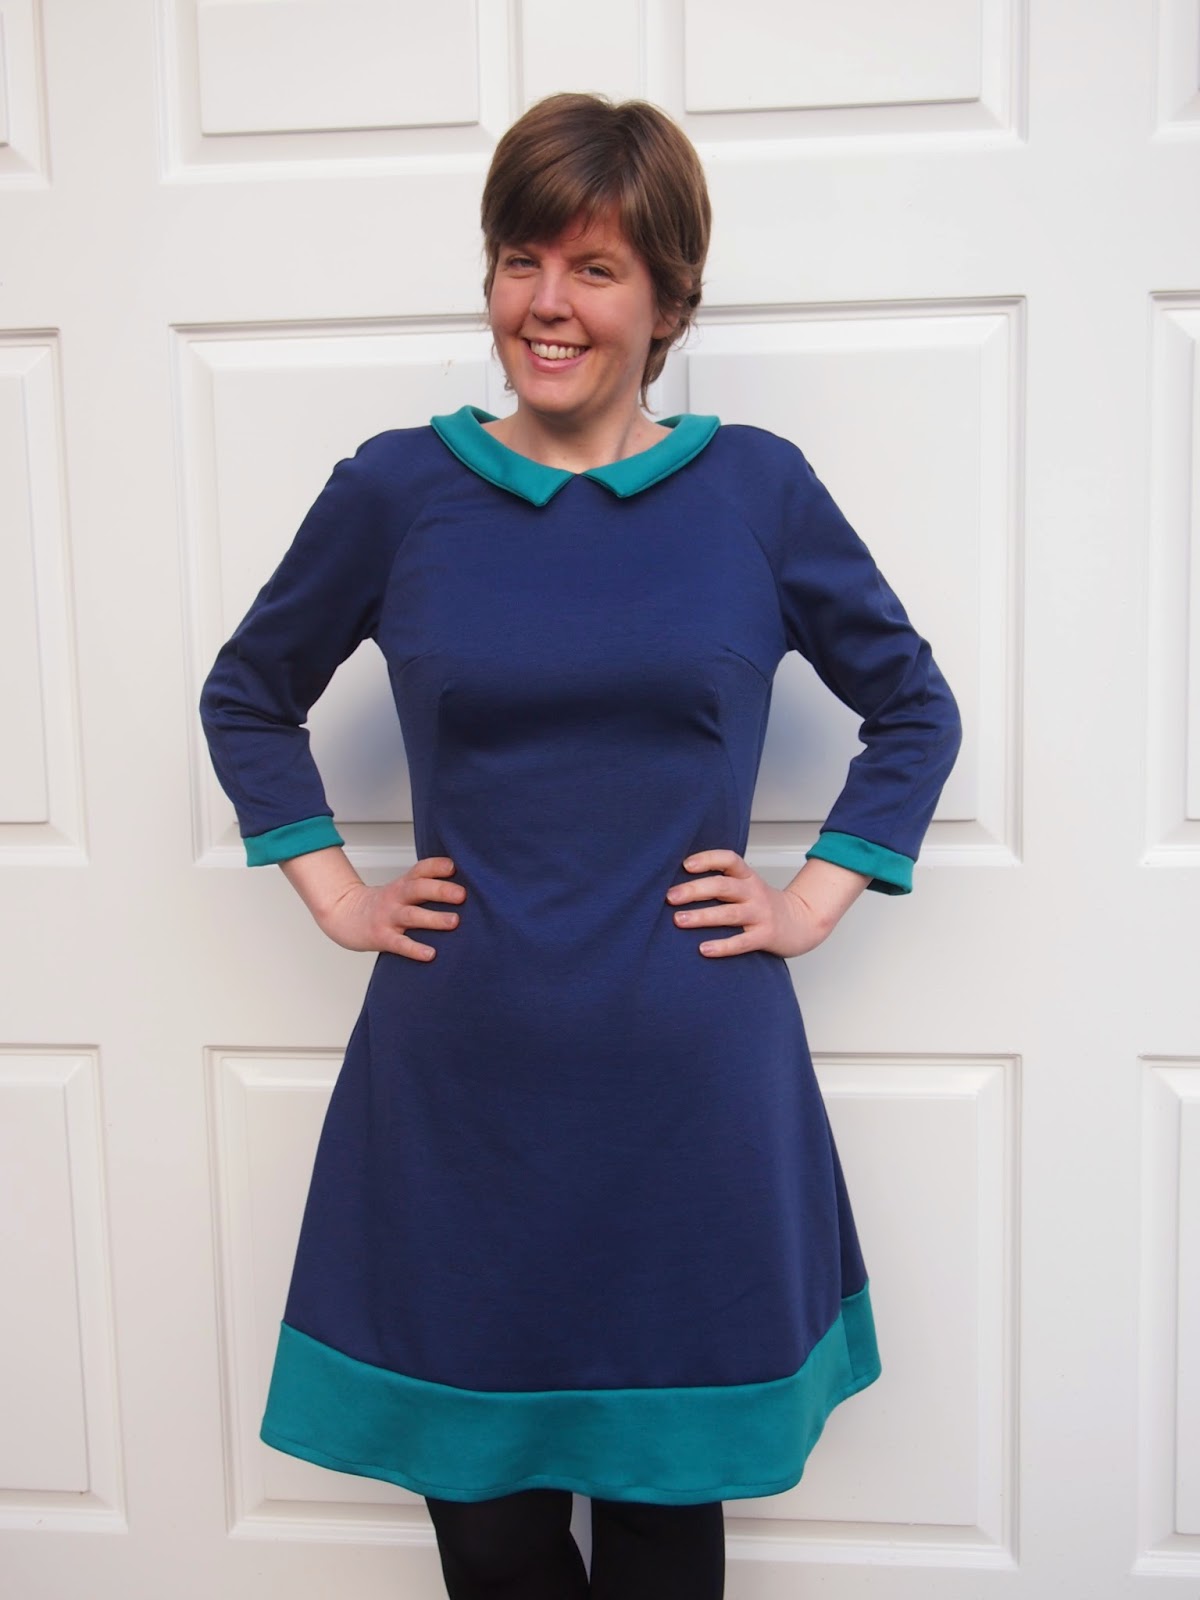
I mentioned in my last post that I'd been trying to stick to my own sewing plan instead of getting distracted by challenges and sewalongs, well here I am again failing to do that and jumping on the sewing bandwagon of a shiny new pattern! Here's my Tilly & The Buttons Françoise dress...


I'll be the first to admit that I wasn't instantly convinced that Françoise would be for me when Tilly released it - I generally prefer fit and flare styles and I'm never really sure whether shift dresses particularly suit me and my pear-shaped frame. But then I saw versions start to pop up around the blogosphere and I realised that the French darts gave the dress a flattering shape around the waist that would probably work for me, and it's always good to step out of your comfort zone every now and then (and, let's face it, Tilly's contest was also quite a good incentive!) so I decided to give it a go. Spoiler alert: I'm really glad I did!

In terms of size, I used a size 5 for the bust and waist, and graded out to a 6 at the hips. I also added quite a bit of length - about 1.5 inches in the bodice section (a standard adjustment for me) and 4 inches in the skirt because I don't feel massively comfortable in mini dresses and prefer skirts to hit nearer to knee length.


There's also the obvious slight change I made of adding the colour-blocked sections at the hem and cuffs. For the skirt hem, I just decided how big I wanted the contrast section to be (4 inches plus the hem allowance in case you're wondering) and marked that onto my pattern piece, cut the main colour at this length and used the bottom section of the pattern piece to draw out the piece for the contrast hem (with seam allowances added to both the main and contrast colour sections).

For the cuffs, I drafted pieces that extended from the sleeve, cut 2 for each sleeve which I then joined together along the bottom edge to form the bottom of the cuff, before joining the cuffs on to the sleeve. I'm probably not doing a very good job of explaining that am I? It's essentially the same method that I was familiar with from making my Cami dress, which you can see in a tutorial here, but omitting the extra opening on the cuff. Hopefully that makes more sense now, if not let me know!
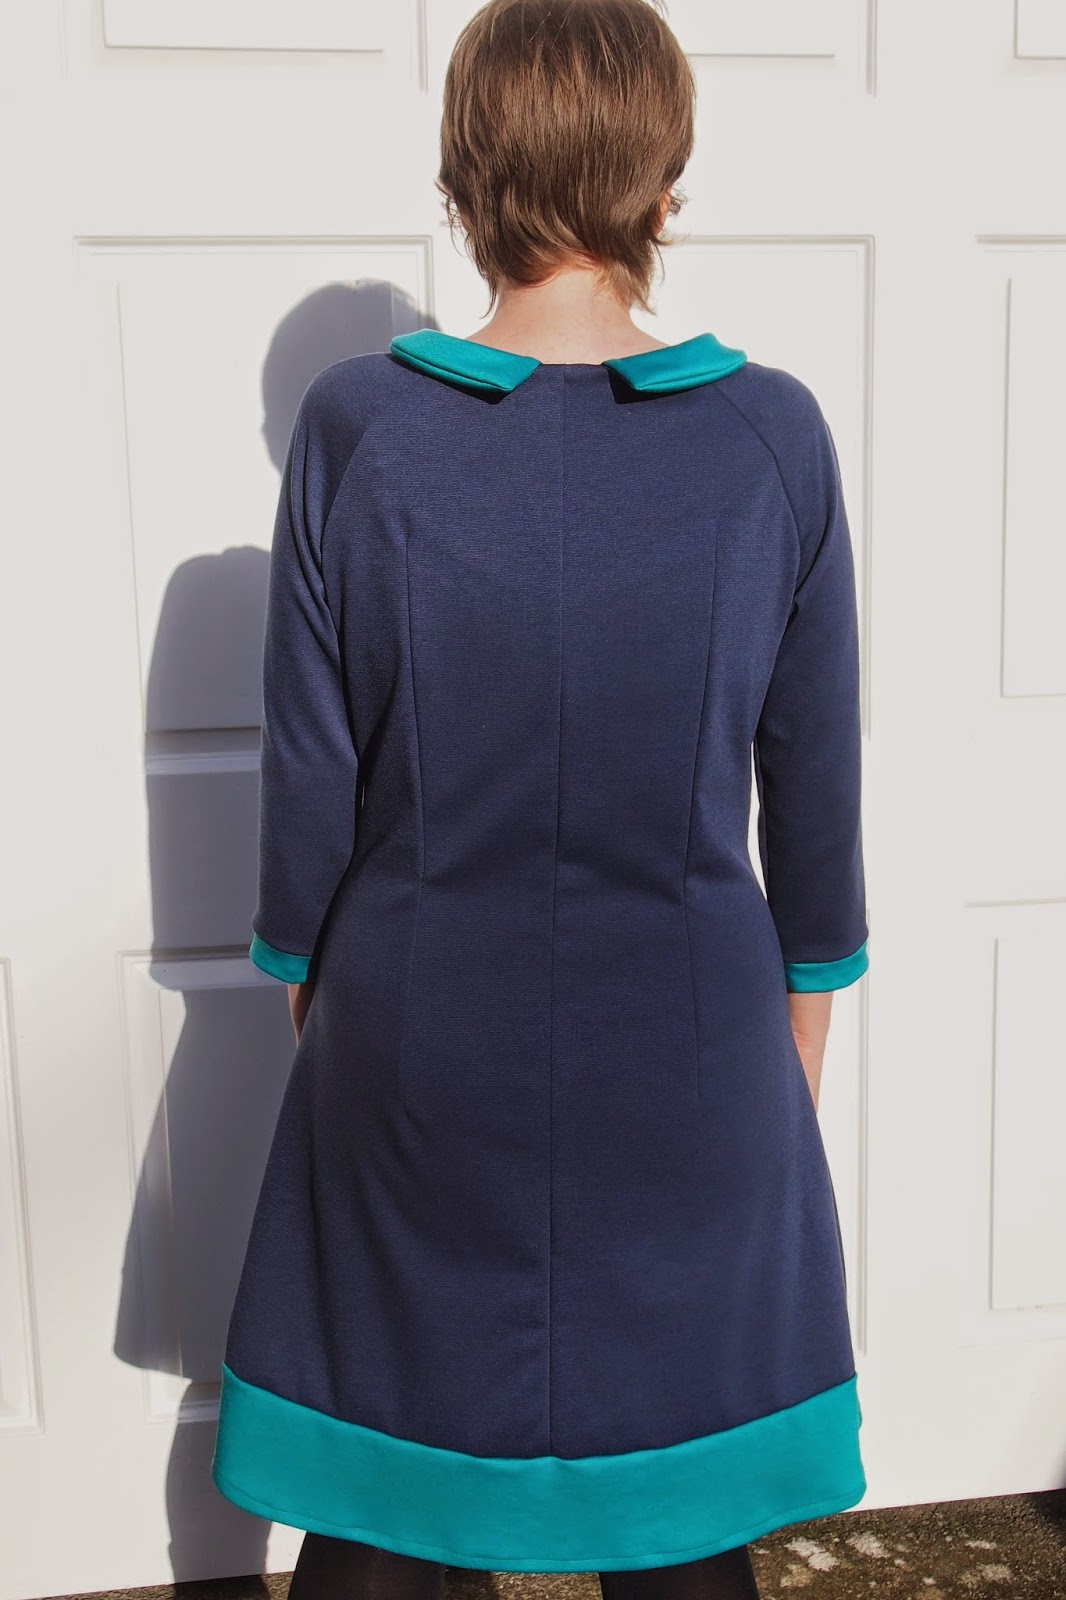

In terms of fabric, as one of Tilly's suggestions was double knit, I decided to use two different colours (navy and turquoise) of Romanit jersey (which I'm pretty sure is also known as ponte) from myfabrics. I think it was a good choice to make, as it's given me a dress that's super comfy and nice and cosy for this time of year, and there's the added bonus that you might have noticed in the photo above that I didn't need to put the zip in because it pulls on easily as it is - never a bad thing! And that helped to make this a pretty speedy dress to put together.


The fabric feels nice to wear and was generally OK to sew with, but it doesn't press that well so it did cause a couple of problems in some areas, mainly in the collar. I originally intended to swap the collar for a Peter Pan one (just because I love Peter Pan collars), but the fact that the fabric didn't press well meant that it just came out looking a mess. Thankfully the pointed collar from the pattern turned out much nicer!

All the layers of fabric that I ended up with around the neckline after adding the collar and facings were also quite bulky and the facing didn't want to turn in and lie flat even after understitching - I should possibly have used a thinner fabric for the facing really but I didn't have anything suitable. Steaming solved some of the problem, and after I'd done that, I secured the facing in place by stitching in the ditch down the sleeve and shoulder seams for a centimetre or two under the collar. Possibly not technically the right solution, but it worked so it's fine by me.


Overall, Françoise is a really great little dress. As you'd expect from Tilly's patterns, the instructions seem really clear and thorough (I say seem, because I mainly used the photos to see what I should be doing and just skim read the instructions), so it would be a good option for beginners but is still a fun pattern if you've got a bit more experience. I'm really pleased I chose to make it in a knit, because I feel like it looks quite smart but at the same time it's SO comfy. Being honest, it's never going to completely cure me of my love for fitted bodies and twirly skirts, but I can definitely see myself making more versions of the Françoise in the future. I'm on the lookout for a pretty patterned double knit for my next version - has anyone seen any? Although that will have to wait until after I've finished quite a few secret projects - is anyone else up to their elbows in making Christmas presents at the moment or it is just me?!

Wednesday, 3 December 2014

Pauline Alice Cami & the Autumn of 1000 Shirtdresses

While I love a sewing challenge or sewalong, I've been trying to stick to my own (admittedly very vague) sewing plan recently without getting distracted by other temptations, but when I saw that Mary from Idle Fancy was hosting the Autumn of 1000 Shirtdresses I knew I wanted to join in as I'd been thinking of sewing myself a shirtdress for a while. I'd been admiring Mary's various iterations of McCall's 6696, but you'll probably notice that what I have to show you today is not that pattern. You see, I'd had my eye on the Pauline Alice Cami dress for a while, and I thought I'd prefer a shirtdress that only buttons halfway, so that's what I went with.


The Cami is a lovely pattern featuring a fitted button-front bodice (which also has a side zip) with a classic shirt collar, full gathered skirt, pockets and two different sleeve options (the 3/4 cuffed sleeve that I made or short sleeves).


Cami is rated 2 out of 3 for difficulty, which I think is probably accurate. Obviously a shirtdress has certain features such as a button band and collar which make it a little more tricky than a basic dress, but the most complicated bit about sewing Cami for me was entirely self-inflicted - my fabric choice. Not that there's anything wrong with the fabric itself, quite the contrary (it's a lovely cosy brushed cotton from Calico Laine), but trying to match up the tartan/plaid/check pattern on all the various pieces that a shirtdress entails did cause me a bit of a headache, and I think it probably took me about three times longer than usual to cut this dress out because I was being so careful about what I cut where! I also found that the layers of material where shifting a bit as I sewed, so I quickly hand basted most of the seams before sewing them, which helped keep things lined up nicely.


I'm glad I took the extra time to make sure everything lined up as I think it makes a massive difference on a project like this and I'm really happy with the end result. On that note, excuse any wrinkles in the photo above - I realised I'd forgotten to take any back shots when taking the rest of the photos but I'm pretty pleased with how the back collar lines up with the back bodice so I had to take this photo when I'd already been wearing the dress for most of the day.


In terms of fit, I made a straight size 44, which is the largest size in the pattern - so not it's not the biggest size range. It fits me nicely, with just the right amount of ease in the bodice for my liking. I don't like shirts or shirtdresses to be too tight or I get paranoid about gaping between the buttons, but I have no worries about that here.

I did add quite a bit of length to the pattern - about 1.5 inches in the bodice and 3 inches in the skirt, which isn't a massive surprise because Pauline Alice patterns are designed for an average height of 5 ft 5, and I'm 3-4 inches taller than that and have to lengthen almost all bodices. As I'd added extra length in the bodice, I also needed to adjust the button placement, and actually ended up adding in an extra button as that was the spacing that seemed best for me.

I toyed with various different button ideas, and spent quite a while one Saturday afternoon sat on the floor of my local wool shop comparing how different blue, red, white and green buttons of varying sizes looked on an offcut of my material, but in the end I opted for some small, plain navy buttons from my stash - sometimes simple is best, don't you think?


I really enjoyed sewing Cami - yes, I may have regretted my fabric choice slightly when I was in the middle of all the pattern matching, but the dress itself sewed up really nicely and the instructions are thorough, clear and easy to follow - and there's a great sewalong if you need a helping hand with any of the steps (I got a bit confused about how the collar was meant to be attached, but a quick consultation of the sewalong soon cleared that up). I think the finished result looks quite professional too, which is always nice!


I'm really pleased with how this one turned out, it was definitely worth the effort I put into the pattern-matching and the dress feels lovely to wear. Plus as an added bonus, it seems that there's a lot of tartan/plaid in the shops at the moment so I may have accidentally sewn something 'fashionable' as well as it being something I like! Now that Mary's extended the Autumn of 1000 Shirtdresses until January, I'm quite tempted to try to sew another Cami. Will you be joining in with the challenge?

Tuesday, 25 November 2014

Simplicity 1325 V-neck pinafore dress

I was wandering aimlessly around Fabricland in Bristol a month or two ago not feeling inspired by any of the fabrics. I always find that place to be a bit hit and miss, and on that particular Saturday nothing seemed to be quite right for the projects that I had in mind. So I was feeling a bit despondent, but then thankfully a random unknown stranger came to my rescue by helpfully leaving one of the pattern catalogues open on the page for Simplicity 1325.


The pinafore dress (or jumper to the Americans) on the pattern cover really caught my eye. It's a bit different to any of the dresses I've made so far, whilst keeping to my general preference for fit and flare styles. Plus I love a bit of layering when the weather gets a bit colder, so a flattering pinafore-style dress was always going to appeal to me. Especially when it was combined with a good basic t-shirt pattern, a jacket that I like the look of (and trousers too, but I probably won't be making them any time soon given my whole not wearing trousers thing) and, best of all, a half price Simplicity sale.


The dress has a flared skirt with pockets, and a lined bodice with a plunging V-neck. As you can see from the photos, this is definitely a pinafore and would be a bit indecent if you didn't have the t-shirt underneath! I'm wearing it with a basic RTW t-shirt here, but I'm planning to try out the t-shirt that comes in the pattern at some point soon.

I made a size 14, with the only alteration being to add 1 inch to the length of the bodice, which is a standard alteration for me. I was a bit worried before making the dress that the deep V neck might make fitting a bit of a pain, but I got lucky and it fit me really nicely straight out of the packet. I think the photos don't entirely do it justice on that front, as they seem to show up every possible tiny little crease which doesn't seem to be there in real life, but I promise it does fit nicely really!


Sewing up the dress was pretty straightforward. The instructions were all nice and clear and fairly well illustrated. I was already familiar with almost all of the techniques, but I sewed my first lapped zip (I'm pretty confident with centered zips, and growing to love invisible zips after a bit of a wobbly start, but I'd somehow unintentionally avoided lapped zips until now!), and that went relatively well. There's room for improvement there, but I'm happy with it for a first attempt.

If you've followed my blog for a little while, you may have noticed that the fabric I used is a different colourway (indigo) of the same chambray that I used for my latest Mortmain dress. I still think it doesn't photograph brilliantly as a finished garment, but really is beautiful fabric - in terms of both how it looks and feels. Here it is in all it's glory when it arrived...


I love how fabric comes tied up with pretty ribbon from Dragonfly Fabrics - it makes it feel like Christmas has come early!

The only thing I might change about this dress would be to think about leaving out the pockets. This is odd for me because I generally prefer dresses/skirts with pockets, but in this case the combination of the skirt being cut on the bias and the chambray I used means that I have to be really careful about keeping the pockets completely smooth under the skirt, otherwise they don't sit particularly nicely and aren't very flattering for my hips. This means I probably won't really be using these pockets, so they might as well not be there really!


That's a fairly minor point though, and other than that I'm pretty pleased with this dress. I'm not sure I'll make another one again instantly, not because I don't like this one but because, compared to most of my other dresses, it's quite a distinctive shape so I think even if you made it in a totally different fabric it would quite obviously be the same dress (if that makes any sense?!), and it's always good to have a bit of variety, don't you think?

Thursday, 13 November 2014

Bronte & Delphine: saved by the buttons

Things have been a bit quiet around here recently - I've been busy making presents for family birthdays and then forgetting to get decent pictures of them, or being too distracted by reading other people's blog posts to actually get round to writing posts of my own. I'm putting that right today though and have a whole handmade outfit to share with you - a Jennifer Lauren Bronte top and a Love at First Stitch Delphine Skirt.


This may be a whole me-made outfit, but both Bronte and Delphine are fairly simple patterns so I finished both projects pretty quickly. I think they took me about one evening each, and I'm not a particularly speedy sewer.


I didn't necessarily intend for them to be worn as an outfit - Delphine was the answer to my yearning for a red skirt to wear with my first Bellini blouse, and I decided to sew the Bronte to boost up the numbers of long-sleeved tops in my wardrobe ready for the cooler weather - but they work well together and I figured that as they're both fairly simple projects I might not have too much to say about them so I might as well put them together in one post.


So, Bronte...I really like the short-sleeved Bronte that I made in the summer, so it was the obvious pattern to choose when I wanted to make a long-sleeved t-shirt. As I'd already made the pattern before, this time it was a nice and speedy project. I made a size 14, with no alterations at all. I mentioned in my post about my first Bronte that I might lower the neckline on future versions, but having worn the top more I actually like the neckline as it is so no changes needed.

The fabric is a cotton/spandex jersey from myfabrics. It's lovely and soft, and I'm definitely tempted to order more jersey from there - they have so many prints! It's the kind of jersey where the print is applied to a white base, so the colour does fade slightly if the material is overstretched but it really has to be stretched a LOT to do that, and it isn't a problem at all for me.


Confession time! I came very close to ruining this project. It was all nicely sewn up, and all I had left to do was stitch down the shoulder overlap. I was trimming the neckband seam allowance and somehow managed to cut a hole into the main fabric of the top - aaaargh! Usually this would send me into a fit of melodrama, but for some reason I was remarkably calm about the situation this time. The hole wasn't that big so I stitched it up, leaving it hardly visible but still far too visible for my liking. Inspiration for a solution suddenly came in the form of my button jar. I had been planning to leave the shoulders plain for this version instead of adding buttons, but I had these oversized buttons that were just the right colour and the perfect size to cover the sewn-up hole. Problem solved, disaster averted, happy Ruth!


Now, Delphine. As this point I should point out that this post could also have been entitled "Red is really difficult to photograph". No matter what I tried, the skirt came out looking almost like a luminous block, but I promise it's not like that in real life. It's actually a nice red corduroy from Calico Lane, and it's lovely to wear.

Delphine is one of the earlier projects in Love at First Stitch, and is a nice simple pattern aimed at beginners, so makes a speedy but very wearable project if you've got a bit of sewing experience. As I'll mainly be wearing this with tights I added a lining using the method in Tilly's tutorial, but even with the extra steps which that involved, this was still finished really quickly. It would have been even quicker if I hadn't, for some inexplicable reason, initially traced and cut the waistband two sizes smaller than I intended to!

As with the other projects I've made from Love at First Stitch, the instructions were all really clear and super easy to follow. I made a size 5 at the waist, grading to a 6 at the hips. Other than that, I made no changes to the pattern - there's no need to!


All in all, I'm pleased with how both of these turned out and they're both really great wearable basics. I've realised I've got some material in my stash that could make a fantastic second Delphine (you only need 1 metre if you've got wide fabric - always good!) so keep an eye out for that at some point this winter, and I'll be making more incarnations of Bronte in the future for sure - but hopefully without nearly destroying them next time. Have you averted any sewing disasters recently?

Thursday, 23 October 2014

Schnittchen Malu Jacket

I knew once summer was coming to an end that I needed to get to work on a new jacket - my old one only just made it through last autumn/winter, and I wanted to try to make a replacement so I started looking around for inspiration. I was almost set to make a winter version of the Anise jacket, but then within a couple of days of each other I spotted the Schnittchen Malu and some lovely coating fabric that I seemed like a brilliant match for the pattern, so I took it as a sign that they were meant to go together and here's the result...


The Malu is a fully-lined coat or jacket (I made the shorter jacket version) with kimono sleeves and welt pockets, and the options of either a collar or hood, and zip or buttons (obviously I went for the hood and buttons), so there are plenty of variations to choose from. 

The pattern is also designed to have hem bands, but when I made up my toile the extra length that the hem bands added made the jacket a bit of a strange length on me, so I left the hem bands off, which gave me a jacket just the length I wanted. 

As I was going to leave the hem bands off, sewing the rest of the pattern as drafted would have meant that the lining might have ended up visible around the hem, so I shortened the lining pieces slightly and drafted hem facings to make sure the lining stays hidden away.


I was surprised by how quickly the jacket came together, but then I realised that I'd been basing my expectations on my experience making my Anise jacket, whereas this is a much simpler pattern. The fit is quite relaxed, so there are no darts or princess seams. The kimono sleeves also mean that there are no sleeves to set in, and finally the lining is bagged and turned through a small hole in the arm seam, so there's not a lot of hand stitching involved (I do quite like a bit of hand stitching, but there's no denying that it does take longer!). I did take my time with the welt pockets to make sure that they turned out nicely, but then I managed to sew up almost all of the rest of the jacket on a Sunday afternoon (and it would have been even quicker if I hadn't had an incident with a broken needle colliding with my finger!).


The instructions were fairly easy to follow, although they are just written instructions without any diagrams to illustrate the steps which might not be great if you like to see things visually instead of doing lots of reading. There is a tutorial online with photos though, so that definitely helps (it's in German, but even if you didn't speak German I think it would be pretty easy to work out which photo goes with which step). 

I had the instructions in English and German, which was interesting for me because I work as a German-English translator so it gave my inner language geek and sewing nerd the opportunity to work together for a change! In general, the translation was fine and it all made sense, although there were odd little things like using "sewing allowance" instead of "seam allowance" which were a bit strange. That's me being a picky translator though, it probably wouldn't bother a normal person!


The fabric is a poly/viscose/wool blend coating from Guthrie & Ghani. I fell slightly in love with it as soon as I saw it online and it didn't disappoint in real life! It's a nice weight for autumn, and it's a lovely shade of blue (it's also actually reversible, and the blue flowers on a grey background look great too, if that's more your style), and I like the fact that the pattern makes it a bit different from normal coats. I thought it would be a good match for the Malu because the lack of darts and everything means that the flower pattern doesn't get broken up too much. 

I did attempt some pattern matching down the centre back seam, but that failed spectacularly - obviously my brain wasn't working properly when I was cutting out my fabric. I got a bit annoyed with myself when I realised it didn't match, but then I told myself that nobody who doesn't sew would ever even think twice about the fact that the pattern doesn't quite match down the back of my jacket so it doesn't matter too much. I succeeded in making sure the lines of flowers matched up across the front, so that's something at least!


For the lining, I used some "superior lining" from Truro Fabrics in silver. It's an acetate and polyamide mix, and it is a lot more expensive than a standard poly lining, but it's breathable, really soft and feels so much nicer so I definitely think it was worth the extra that I paid for it. I wouldn't necessarily start using it to line all of my garments - skirts that I've lined with normal poly lining have seemed fine to me, but I think it's worth paying that bit extra for more special (and hopefully long-lasting!) projects.

I wasn't sure what to do about pre-treating the coating fabric, but in the end I did what the Colette Anise Companion refers to as the "London shrink" - you wash a bed sheet and then lay out the damp sheet and roll the fabric up inside it, then leave it overnight, before unwrapping and leaving to dry completely. I'm not really sure if that's the right thing to do, but I feel better that I've pre-treated it in some way at least!


It took me a while to decide what buttons I wanted to use - I initially had it in my head that it would be good to use some self-cover buttons, but the print was the wrong size for that to work well, then I wanted matching blue, but eventually I found these grey ones in a local wool shop. I really like the fact that they're a bit different but without distracting from the main fabric, if that makes any sense?!

I don't think I'll be rushing to make another Malu, but that's mainly because I can't justify having multiple versions of the same coat in the same way that I can with dresses! As I mentioned before though, the Malu does have a couple of options to choose from so you could make versions that were a bit different. I'm kind of tempted to try an unlined version of the longer coat in fleece and use it more like a long cardigan than a coat, but it's just an idea that's floating around in my head at the moment - it may not go anywhere.


Overall, I'm really happy with how this turned out, and it's the perfect weight for this time of year. The Malu is a nice pattern, and I think it would be a good option to choose if you fancy having a go at making a coat or jacket, but aren't quite ready to commit to lots of tailoring or a more complicated pattern (as long as you're OK with the lack of diagrams in the instructions). Has anybody else been sewing a coat or jacket recently?