Butterick 6446 is a pattern that I've been wanting to make for a while. It was on my list of projects to make last summer, but fell victim to my (as usual!) overly ambitious plans and didn't make it onto my cutting table before the seasons changed. To try to ensure that didn't happen again, I included it on my Make Nine list for this year.
Admittedly I think it's fair to say that I've once again missed the best of the weather with this dress, but as I wear what a lot of people would consider to be summer dresses for most of the year (that's what cardigans and tights are for!) I don't think there's anything wrong with me making it in September.
Butterick 6446 attracted my attention because the pleated wrap bodice is slightly different to any of the dresses I've made before. In addition to the pretty bodice, the pattern features three different skirt options (a flared skirt in knee or maxi lengths, or a pleated midi length skirt), sleeveless options or a flared sleeve, and the option of a sash. And pockets! I made view A - a sleeveless dress, with the knee length skirt.
I made the dress in a size 16 at the bust, blending out to an 18 at the waist. Usually I'd go down a size for a commercial pattern, but these are the sizes recommended for my measurements and it worked out nicely this time. There is a little bit of ease, but just enough to make the dress comfortable without it becoming sack like.
I made my usual adjustment of lengthening the bodice by an inch. At this point the pleats that form the wrap in the front bodice caused me a bit of a problem because they meant that it wasn't as easy as usual to add in a lengthen/shorten line (there isn't one marked on the pattern pieces). In the end, I drew my line perpendicular to the centre front line below the second pleat and that seems to have worked out fine.
I also lengthened the skirt by 2 inches, which has made it the perfect knee length on me (for reference, I'm somewhere around 5 ft 8").
The instructions, as usual for commercial patterns, were succinct but they were still perfectly clear and easy to follow. I did everything as I was told, other than the fact that I used an invisible zip instead of a regular one. That was partly because I prefer the look of an invisible zip, and partly because the fact that I prefer an invisible zip meant that I was on auto-pilot when buying my zip and got an invisible one instead of the regular zip called for in the pattern.
The only thing that I'm not entirely keen on is that bodice feels a bit bulky at times. Because you have the two pieces of the bodice overlapping each other at the side seams, and both bodice pieces are lined, the seams do feel noticeably chunkier than in most other dresses. This is pretty unavoidable in a lined dress of this style though, and I like the fact that the left front bodice (the lower part of the wrap) and the bodice lining pieces are shaped by a large waist dart instead of the pleats used on the right front bodice (the outer part of the wrap) - if all of them had used the pleats then the side seams would have been seriously bulky!
The fabric that I used is a sketched rose cotton print from The Textile Centre, which is a really nice quality especially considering the bargain price. Purple is a colour that's a bit under-represented in my wardrobe too, so it's nice to put that right. For my lining I used a white cotton lawn which I always have around to use for linings.
I'm happy that I finally got around to making Butterick 6446 and crossing another project off my Make Nine list. I'm pleased with how the dress turned out, and it'll definitely still be worn for a while this year (albeit with a cardigan over the top), and it'll also be great for the warmer weather next year. All in all, a successful project!
Showing posts with label Butterick. Show all posts
Wednesday, 19 September 2018
Wednesday, 29 August 2018
Butterick 6563 Shirt
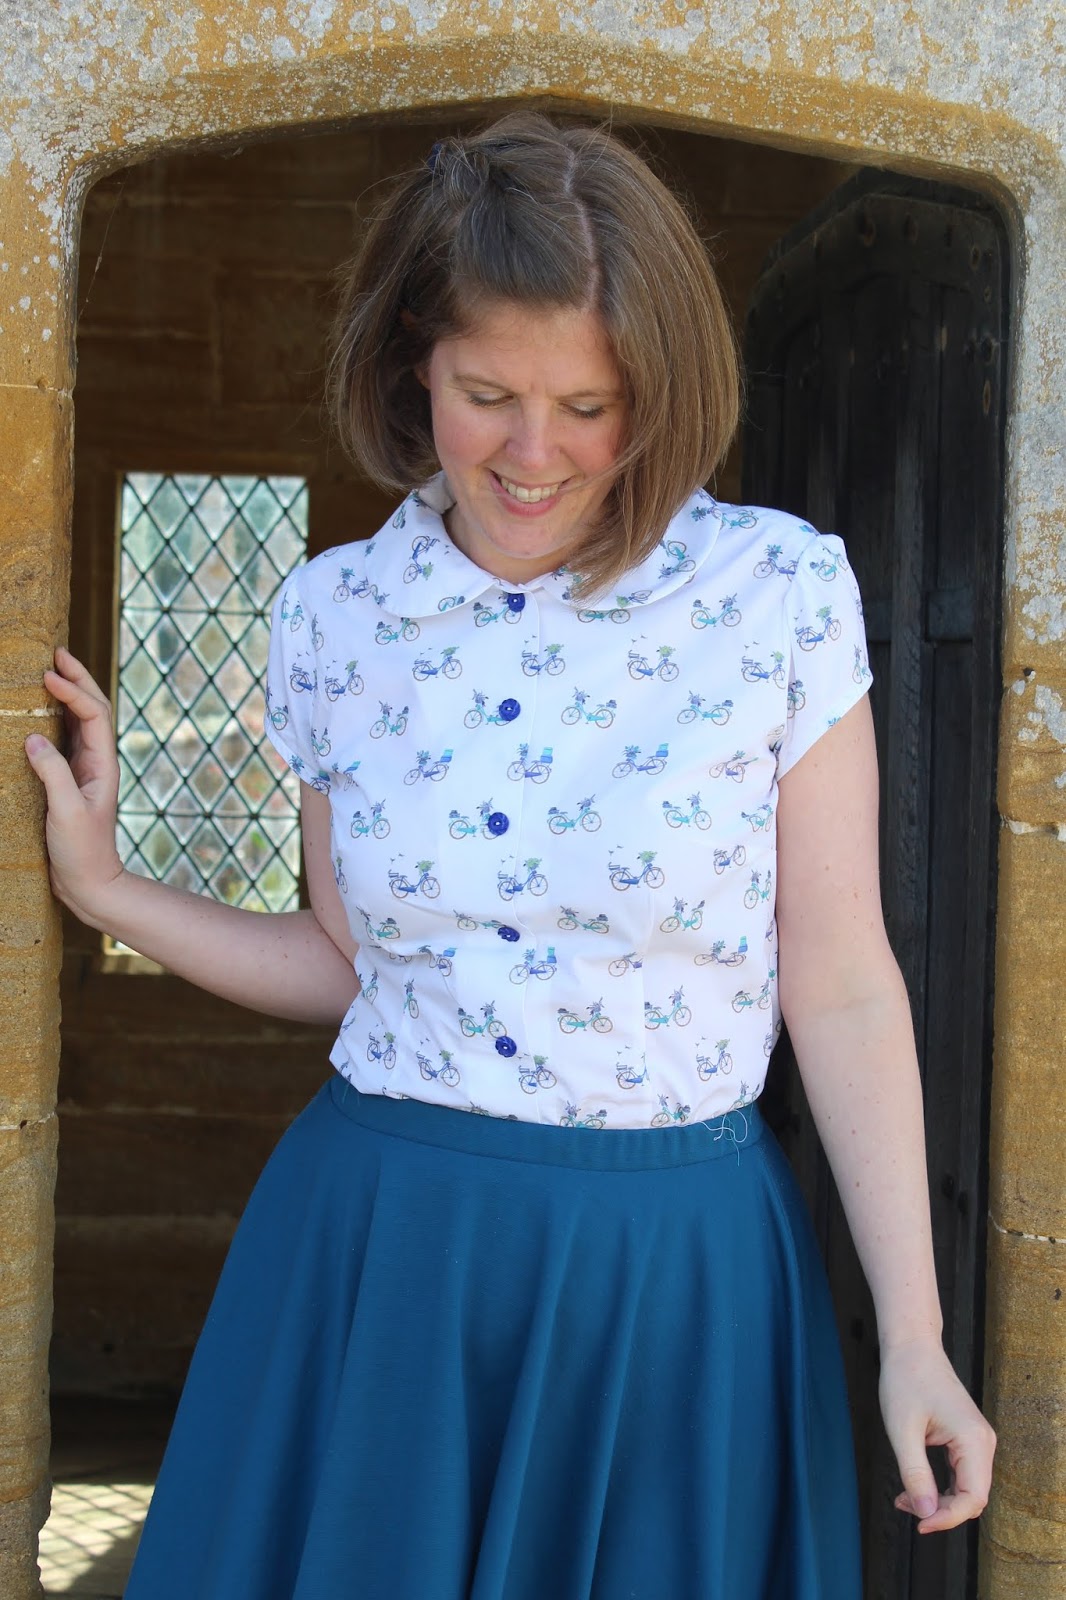
Some projects start with a pattern, and some start with fabric. Today's garments definitely fall into the second category. I've been trying to sew through some stash fabrics recently, but when I saw this cute bicycle print cotton lawn (which now seems to be out of stock, but is available in black) from Fabric Godmother I just had to treat myself to enough to make a top. Butterick 6563 had fairly recently caught my eye, and seemed like it would be the perfect partner for my newly acquired fabric.
Butterick 6563 is from the Patterns by Gertie line, and is for a loose-fitting button front top with shaped hemline featuring collar and sleeve variations. For both of the versions that I made here, I combined the cap sleeves of view B with the Peter Pan collar of view C. While the shirt isn't closely fitted, long waist darts in the front give it a flattering shape.
As the bicycle print lawn was so pretty, I wanted to make sure that I was using it for the right project so I decided to use some fabric from my stash to make a trial version first (thus also partly keeping up my aim of using stash fabric too!). The check shirting I used for my first B6563 came from Sew Loco, and is really lovely. Full disclosure: Lucy from Sew Loco was kind enough to include this as a little extra with some fabric I ordered from her a while back, but it didn't come with any requirement to blog about it attached, and it honestly is great quality fabric.
Based on the finished garment measurements, I made the shirt in a straight size 14. This is a size down from the size recommended for my bust measurement, and two sizes down from my waist/hip measurements. I'd definitely always recommend checking the finished garment measurements to get the fit that you want for commercial patterns in particular. I was happy with how my first version turned out so it was time to cut into the bicycle print.
Thankfully, the pattern was fairly straightforward and I enjoyed sewing the first one, so was only too happy to make another version immediately afterwards. As with most commercial patterns, the instructions were succinct but perfectly clear and I didn't feel the need to do anything differently after sewing my first version. There are some nice features in the pattern such as a sleeve facing (essentially a bias strip), and a self-facing on the front of the shirt which keep the pattern fairly easy to sew whilst giving it a nice finish on the inside.
One thing that I initially wasn't sure about was the size of the Peter Pan collar. I tend to wear shirts with the top button open, and when I did that with B6563 the collar looked comically large, but I think that it looks just fine with the top button done up. And I like the look of the top button done up a lot more than I do on other shirts, so it's all good!
All in all, I'm really happy with these two shirts. They were both fun projects to sew, and will be lovely shirts to wear in warmer weather without being so summery that they can't also be worn under a cardigan when things get cooler. And I managed to buy new fabric whilst still also sticking to my goal of using up my stash, so it's a win all round don't you think?!
As the bicycle print lawn was so pretty, I wanted to make sure that I was using it for the right project so I decided to use some fabric from my stash to make a trial version first (thus also partly keeping up my aim of using stash fabric too!). The check shirting I used for my first B6563 came from Sew Loco, and is really lovely. Full disclosure: Lucy from Sew Loco was kind enough to include this as a little extra with some fabric I ordered from her a while back, but it didn't come with any requirement to blog about it attached, and it honestly is great quality fabric.
Based on the finished garment measurements, I made the shirt in a straight size 14. This is a size down from the size recommended for my bust measurement, and two sizes down from my waist/hip measurements. I'd definitely always recommend checking the finished garment measurements to get the fit that you want for commercial patterns in particular. I was happy with how my first version turned out so it was time to cut into the bicycle print.
Thankfully, the pattern was fairly straightforward and I enjoyed sewing the first one, so was only too happy to make another version immediately afterwards. As with most commercial patterns, the instructions were succinct but perfectly clear and I didn't feel the need to do anything differently after sewing my first version. There are some nice features in the pattern such as a sleeve facing (essentially a bias strip), and a self-facing on the front of the shirt which keep the pattern fairly easy to sew whilst giving it a nice finish on the inside.
One thing that I initially wasn't sure about was the size of the Peter Pan collar. I tend to wear shirts with the top button open, and when I did that with B6563 the collar looked comically large, but I think that it looks just fine with the top button done up. And I like the look of the top button done up a lot more than I do on other shirts, so it's all good!
All in all, I'm really happy with these two shirts. They were both fun projects to sew, and will be lovely shirts to wear in warmer weather without being so summery that they can't also be worn under a cardigan when things get cooler. And I managed to buy new fabric whilst still also sticking to my goal of using up my stash, so it's a win all round don't you think?!
Subscribe to:
Posts (Atom)