Monday, 23 March 2015

Sewaholic Oakridge Blouse

Look! I made something that's not blue! Yes, there's some blue in there, but I think we can agree that it's not the dominant colour. And all those lovely colours combine with Sewaholic's Oakridge pattern to make pretty much the perfect blouse for spring.


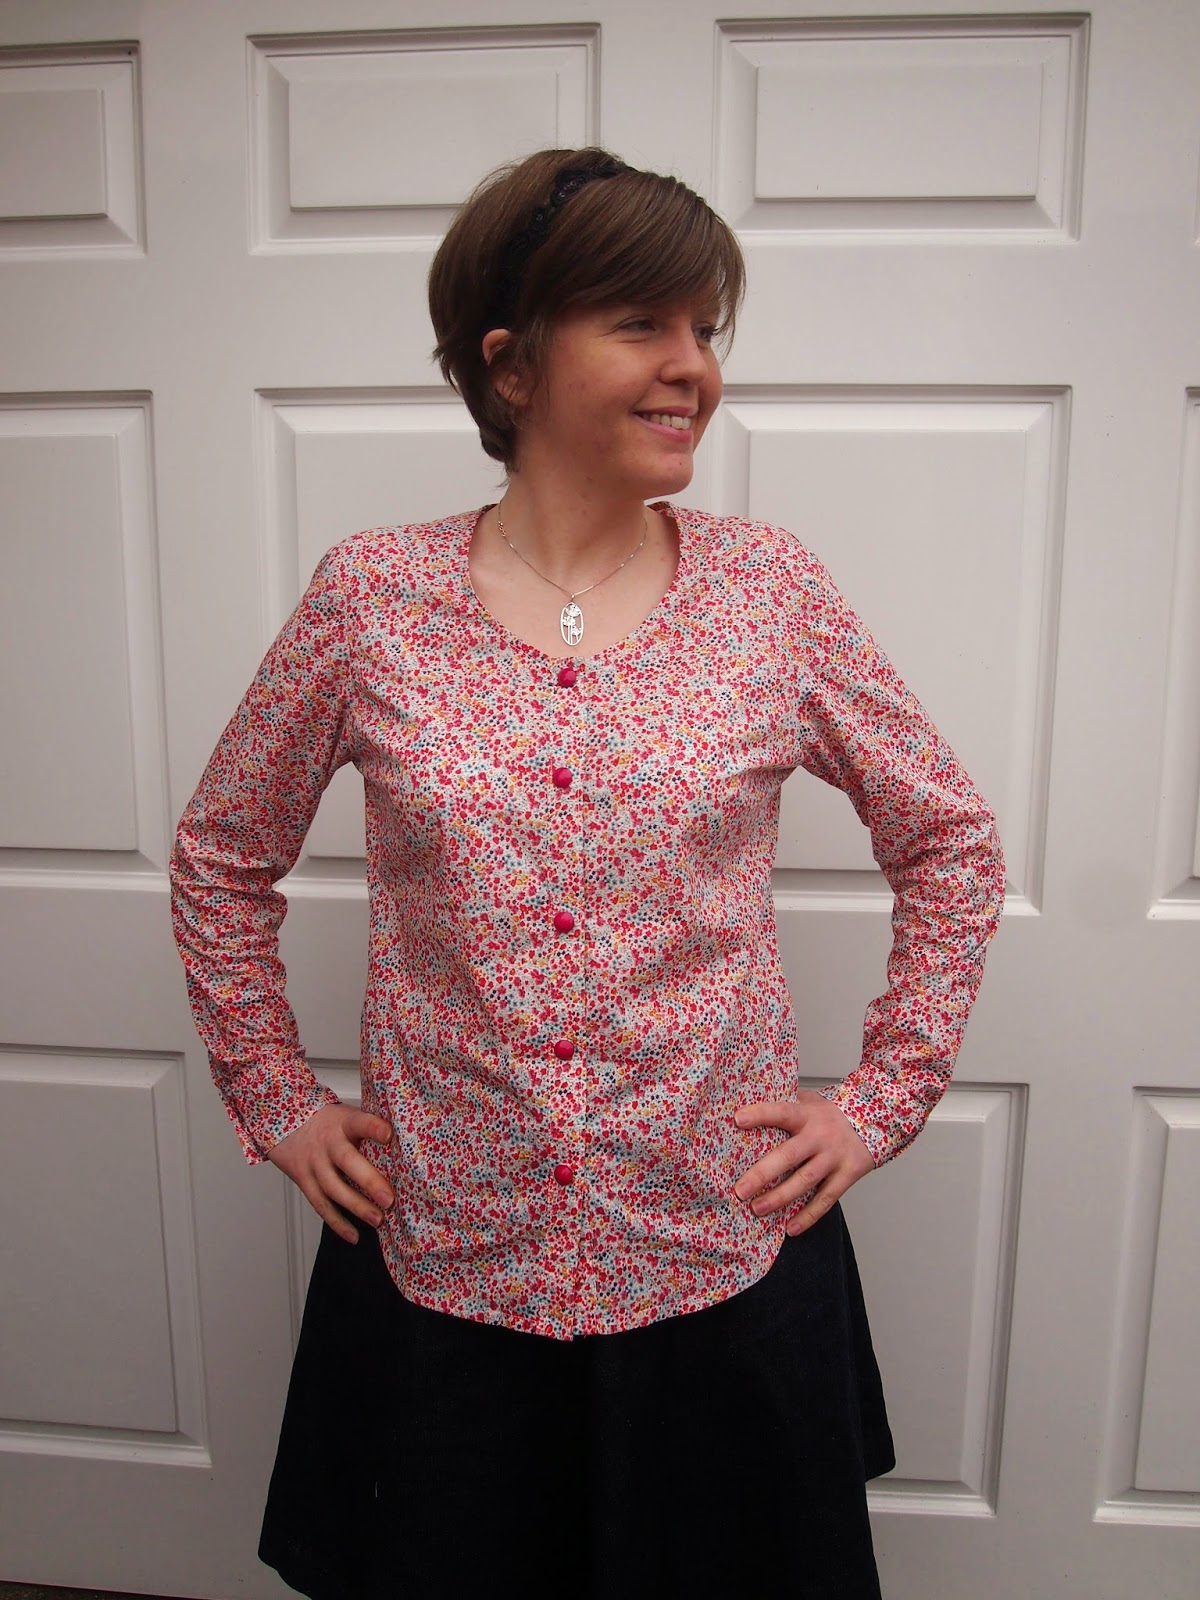
This is view C of the Oakridge. Views A and B have a bow neck and while in principle I'd like to try them, because generally I'm all for a good bow, for some reason bow neck blouses just never feel quite right on me. I loved the simple collarless version of the Oakridge as soon as it was released though so I knew I'd be sewing one before too long.

The pattern is really well designed and the instructions are clear and easy to follow so I enjoyed sewing my Oakridge. As with my Granville shirt, the only thing I found a little bit fiddly was the sleeve placket. Thankfully one of my lovely friends got me The Dressmaking Technique Bible for my birthday at the end of last year, and I consulted that to make sure that what I'd understood from the instructions was actually what I was meant to be doing - thankfully it was so it was all good.

I used French seams throughout so my blouse is nice and neat inside. I do like a good French seam - they do take a bit longer to do than normal seams and zigzag stitching (I don't have an overlocker so that's my usual method of seam finishing) but I think the extra effort does definitely pay off.

(I'll probably always wear the blouse tucked into skirts, but thought I'd leave it untucked here to show the full length)
My measurements all fall right in the middle of a 12 and a 14 for Sewaholic patterns. My Granville is a 14 and I like how that fits, but for my Oakridge I thought I could get away with a slightly smaller size so I made a 12. Also on the basis of my experience with the Granville, I shortened the sleeves on my Oakridge by an inch. I made a toile to check that I was right about the size and sleeve length and everything was fine so I went ahead, and I like how the finished blouse fits.


The fabric is 'Phoebe' Liberty lawn (funnily enough Lauren of GBSB and Guthrie & Ghani fame made an Oakridge in this exact same fabric!), which I got from Kat's Fabrics on ebay. I've seen quite a few bloggers recently who've bought Liberty lawn there - and with good reason! The fabric is factory seconds so is much cheaper, but just as lovely, as 'proper' Liberty. The fabric is listed as having no visible fault but unfortunately mine did have one area where the print was a bit blurry which you can see here...


Obviously this is a very small fault, it was very easy to cut round, and to be honest lots of people probably wouldn't notice it but it was one of those things where once I'd seen it, I knew it would bother me if I didn't make sure I avoided it. It definitely won't stop me from buying Liberty lawn from the same seller again, but I just thought I'd mention that it might be worth having a good look at your fabric if you buy from there to check that there are no faults before you start cutting.


The buttons I chose were some lovely bright pink ones that I found in a local wool shop. I was originally planning to find buttons to pick out the bluey-green of the flower stems in the print, but that didn't work out quite as I planned, and when I saw these buttons in the shop they just seemed to make the print sing and enhance its natural prettiness. Decision made!


So there we go, a pretty successful first version of the Oakridge blouse! It's already been worn a few times and has been perfect for the sunnier spring days we've been having recently. What are you sewing for spring?

Wednesday, 11 March 2015

Roses Are Blue (and so is my wardrobe!) Emery Dress

This is not the most seasonally appropriate dress I could have made at the moment. Don't be deceived by the sunshine and blue skies in these photos, there was a bitter wind to go with them, and I had to run inside for extra layers as soon as possible or I would have turned the same colour as my dress! Sometimes though, you just need to sew what you want to sew and not the "sensible" option, and this, my latest Emery dress, was just such an occasion.


I picked the fabric up from the remnants section of my fabrics a couple of months ago (they have more of it here if you like it). I wasn't sure what it was going to become at the time, but I already had a couple of items in my basket, and spending a bit more would mean I got free delivery so I convinced myself that it actually made financial sense to buy this. Plus, you know, it's pretty!

The fabric sat patiently waiting to see what it would turn into for a month or two and then when I realised that I'd been terribly neglectful and not made a single dress yet this year, its fate was sealed. And I think it's a pretty good fate - like my other Emery dresses (1, 2, 3, 4), it just makes me feel good as soon as I put it on.


This time I lined the bodice with some lovely soft shirting I salvaged from a second-hand man's shirt. The collar was a bit worn but the rest of the fabric was fine and it was great quality so I'm glad it now has a new lease of life. I love how the lining looks with the main fabric too - I might have to restrain myself from unzipping my dress to show off the lining to random people!


It occurred to me recently, and this dress is a case in point, that I sew an awful lot of blue garments. I always have loved wearing blue in all its multifarious shades and hues, so this shouldn't be too much of a surprise, but I was rummaging through my scraps the other day and even I was slightly shocked by just how many of them are blue. Seriously, there are almost no fabrics there that don't feature blue to some degree or another!


How did that happen without me noticing it? And is there anything wrong with it? Part of me thinks that I should put an embargo on buying blue fabric and branch out into other colours, but then another part of me thinks that blue suits me and I like it so there's nothing wrong with my wardrobe having a tendency towards the monochromatic. After all, from navy to turquoise to baby blue, there's a lot of variation within this "one" colour. What do you think?


I suspect that however much I broaden my palette, which won't be hard because I do love colour in general, there'll always be something that brings me back to blue. Similarly, I don't think this will be my last Emery either, as number five is just as much a success as its predecessors. Do you have a colour or pattern that you're always guaranteed to love?

Sunday, 1 March 2015

Knitting: Bow Jumper

Back in January last year, I was whiling away some time in Smiths while I was waiting to catch a train when a little photo on the cover of Knitting magazine (issue 124) caught my eye. It was of a jumper with a colourwork bow on the front, which I thought was just the right level to satisfy my general love of bows, without being twee enough to take it to the point where my sister and mum tell me to step away and leave it alone (which is not an infrequent occurrence!). I bought the magazine, added the jumper to my never-ending list of future knitting projects and little over a year later, here it is!


The jumper is knit flat, and other than the rib at the waistband, wrists and neck, is just all stocking stitch with the bow knitted using intarsia, so it was relatively speedy to knit and was good for evenings in front of the TV when you need something that doesn't require too much concentration. I started it towards the end of October after I finished my polka dot cushion cover, got the back finished fairly quickly, then put the whole thing on hold while I was working on Christmas presents and finished the rest in the first six weeks of this year. That's fairly speedy for me, because I'm not the world's best or quickest knitter. 


However, it does mean that once again I've managed to finish a knitting project just as the season when I want to wear it is coming to an end! Never mind, I've enjoyed wearing it already, spring is only just starting to show its face so I'm sure I'll be wearing it again before the weather warms up more, and it'll be ready and waiting for me next winter. Maybe this year I should try to start winter knits in the middle of summer - but that never seems that appealing! I'm not the only one who suffers from this problem am I?


The jumper is designed to be worn with a bit of positive ease, but I thought I'd prefer a slightly more fitted style so, as my measurements fell between two sizes, I decided to go with the smaller size and I think that worked out fairly well. There's a bit of excess around the waist section, but it's similar to the fit on the model in the magazine so I think that's just the way it's meant to be. At least that's what I'm telling myself, because I'm not confident enough with knitting to start messing around with the shaping of patterns too much. 


I enjoyed knitting the bow section - I really love watching how the pattern gradually emerges as you knit each row. That's not weird is it?! The edges of the different coloured sections aren't entirely faultless, and I did end up with a couple of small holes at the start of the blue sections, but some strategic weaving in of ends soon sorted that out. 

The yarn I used is Hayfield Aran with Wool in shades softmint (741) and navy (995). I saw the navy in a local knitting shop and it felt nice and soft, but was the only shade they had in stock so I switched to an online search. I thought the softmint would be a good match, and I am really happy with how the colours look together, but the softmint doesn't feel quite as nice as the navy. It's not a massive difference, and it's still fine to wear, but it is definitely noticeable. It's interesting how different dyes can have that effect on the same wool. 


Overall, I'm happy with the end result. I do wish I'd managed to get it finished a bit sooner to give me more time to enjoy it this winter, but better late than never! I've already started my next knitting adventure - my first foray into the world of handmade socks. Any tips for me?

Wednesday, 18 February 2015

Seeing stars - Enid sweater

How's your week going? To be honest, mine could've been better so far, but thankfully the thing that's made everything less than ideal (a particularly annoying work project) is now all done and dusted so I've spent tonight destressing by catching up on some blog reading and now I have my latest project to share with you - it's my second version of the Jennifer Lauren Enid sweater...


When I posted my first Enid, I mentioned that I'd seen some sweatshirt fabric that I really liked - this is it! I loved this starry sweatshirting as soon as I saw it on My Fabrics, and it didn't disappoint when it arrived. It feels lovely and the colour is gorgeous, plus I love stars so I was always going to be a fan of this one. I'm also glad I got it when I did because it seems to be sold out now, but they have lots of other sweatshirt material if you're after some. The ribbing is also from My Fabrics - they have lots of different colours of ribbing and both this black one and the pink I used for Enid number one were really nice quality.


As I mentioned when I was talking about my wearable muslin, this time I lengthened the bodice by an inch and that's made it just the right length for a cropped sweater. My first version is pretty much fine, but it's just a teeny bit on the short side and I feel like I end up pulling it down as soon as I move. The extra inch on this version makes all the difference and means that the sweater is still a nice cropped length but doesn't leave me at risk of skin being exposed around my waist! Lengthening bodices is a standard adjustment for me and I probably should have just done it first time around. Never mind, it's all sorted now.


Apart from that, I didn't change anything from my first version (other than succeeding in using my iron properly and not leaving marks on the fabric!) and there's not much else to say. I love the shape of the Enid sweater and it looks great worn with full skirts. The instructions are really thorough and clear, especially for the more complicated steps such as attaching the ribbing round the neckline, so I think most people would be able to sew up an Enid fairly happily, even if you don't have masses of experience sewing knits - I'm still a relative knit newbie and I didn't have any problems.


So this is another great top to add to my wardrobe, and I plan to follow it with the square necked version of Enid at some point, but maybe not till next autumn/winter. At the moment I'm starting to feel like I've made lots of good wardrobe staple/basic/sensible things since the start of the year, which is all well and good and I'm happy with how they've all turned out and integrated into my daily wardrobe, but I'm starting to feel an itch to make a pretty and slightly frivolous dress. Does anyone else get that when you've been focussing on basics for a while? I'm feeling an Emery coming on...

Tuesday, 10 February 2015

Sewaholic Granville Shirt

At the start of the year, I got the urge to sew a shirt. I'm not quite sure where this urge emerged from as I don't wear a massive number of shirts, but emerge it did! It's entirely possible that I was just swayed by the massive number of Grainline Archers that are all over the sewing blogging world. So why didn't I just take the cue from my inspiration and sew an Archer? I was almost ready to do just that, but I had a niggling feeling that actually it might not be the one for me and that I'd prefer a slightly more fitted style. As if by magic, the precise style I was thinking of suddenly appeared when the Sewaholic Granville shirt was launched - Tasia must have read my mind!


I knew I had a weekend on the horizon with no major plans, and that to me always equals a sewing weekend, and I thought that it would be a good opportunity to get my teeth stuck into a slightly more involved sewing project so I snapped up the pattern and got planning!


For the fabric, I chose a white Swiss dot cotton lawn from Fabric Godmother. After all, what could be more classic than a crisp white shirt? Plus because it's a Swiss dot, it's plain and simple but with an added touch of subtle prettiness. The fabric is really soft and feels great to wear, and was a joy to work with. As you can probably tell from the fact that you can sort of see my skirt through the shirt in these photos, it is pretty sheer but wearing a nude-coloured camisole underneath keeps things decent.


When I got down to sewing, almost everything went really smoothly. While you do need to be accurate with any kind of sewing, I think shirtmaking requires an even greater level of precision if you want a nice end result, but other than that there's nothing that's scarily complicated about it. As you'd expect with a Sewaholic pattern, the instructions were clear and easy to follow. As it's an intermediate pattern, they do assume a certain level of knowledge and don't hold your hand and walk you through everything in baby steps, but they have just the right level of detail.


The only bit I found a bit fiddly was the sleeve placket, and that wasn't because the instructions weren't clear but just because you have to press quite small bits of material in a quite exact manner (which I found a little tricky to do without burning my fingers) - but I got there in the end! I'd never sewn a tower placket before so I'm pleased that they turned out neatly.


Another new technique I tried out for the first time here was flat felled seams, which I used for all of the seams on my Granville. I don't know why, but I'd been expecting there to be something really complicated about flat felled seams, but there really isn't! Yes, it does take a bit of extra time but I think it's definitely worth it for the lovely inside finish that you get (I tried to get a photo, but it's really hard to see with the white fabric so you'll just have to take my word for it!). I'm particularly glad that the insides of this shirt look nice, because I think it could make a great cover-up in warm weather worn open over a summer dress with the sleeves rolled up. I'll definitely be testing that theory later in the year anyway. For now, it'll mainly be worn more like this...


The slimmer fit of the Granville means that it's nice for layering without adding too much bulk, which is good because one of my main reasons for making a shirt like this was to be able to wear it under little knitted tank tops (another reason why I don't mind the fabric being slightly sheer). Thankfully for me it looks just like I hoped it would, so mission accomplished!

In terms of size, I made a straight size 14 and it fits well straight out of the packet (part of the reason why I love Sewaholic patterns - they always seem to fit me nicely!). The only thing I might change next time would be the sleeve length. They're pretty much fine as they are, especially when I move my arms, but if I'm just standing with my arms down they do seem a touch long. I suspect this was probably more of an issue for taking blog photos than it will be in daily life so it's all good! I thought it was worth mentioning though because I'm about 5 ft 9, and I don't think I have disproportionately short arms, so some people may need to shorten them.


All in all, I'm really happy with how my Granville turned out, in terms of how it looks but even more so in terms of the finish. I'm so glad I took the time to do the flat felled seams - I was cursing myself for making that decision in the middle of the project when things seemed to be taking ages, but it was definitely worth the extra time and I'd do the same for any possible future Granvilles (although I also want to try out Sewaholic's other new pattern, the Oakridge, so that will probably take precedence over more Granvilles at the moment). If you're thinking of sewing a shirt, I'd definitely recommend the Granville - it's a lovely pattern with great instructions. Give it a go!