Sunday, 20 October 2013

Deer & Doe Sureau Dress

Another completed dressmaking project to show you! This time it's the Sureau dress from Deer & Doe, and here it is...


This is another great beginners' pattern (which is printed on proper paper, not tissue like most patterns - definitely a plus in my book because I'm always worried about ripping patterns!), and the end result is probably my best completed garment so far. The instructions were possibly not quite as thorough as some of the others that I've used, but they were still really clear and easy to follow. The sew-along that Anna from Paunnet ran is also really helpful if you need some pointers and tips on making adjustments.


I lengthened the bodice of my dress by 2 inches (I'm about 5 ft 9 and long in the body), but apart from that I followed the instructions and pattern exactly, and I think the fit turned out quite well. 

As buttonholes are still on the (long) list of skills I need to master, I love the fake button placket - it gives me the opportunity to use pretty buttons and make things look more professional while putting off learning slightly scary new skills until another day!


The fabric I used is cotton and, like the poplin I used for my Pattern Runway dress, was a bargain at half price in the John Lewis sale. I bought the cute little buttons in a little local shop and, although it doesn't look like it in this photo, they match the colour of the spots on the fabric really well.

Another good thing about this dress? It's great with tights and boots, but not so heavy that I won't be able to wear it on slightly warmer days too, as I proved on a day trip to the beach at Lyme Regis yesterday...


Sadly it wasn't that warm (as you can probably tell, it was VERY windy) but, being the slightly crazy person that I am, I still felt the need to go paddling in the sea - here I'm waiting for my legs to dry off so I could return them to the warmth of tights and boots again!


So overall, another success! And the best thing about sewing my own clothes so far? I'm too distracted by choosing my next pattern/fabric combination to be lusting after expensive clothes that I can't afford in the shops/on the Boden website. Does this mean I've officially caught the dressmaking bug?




Monday, 14 October 2013

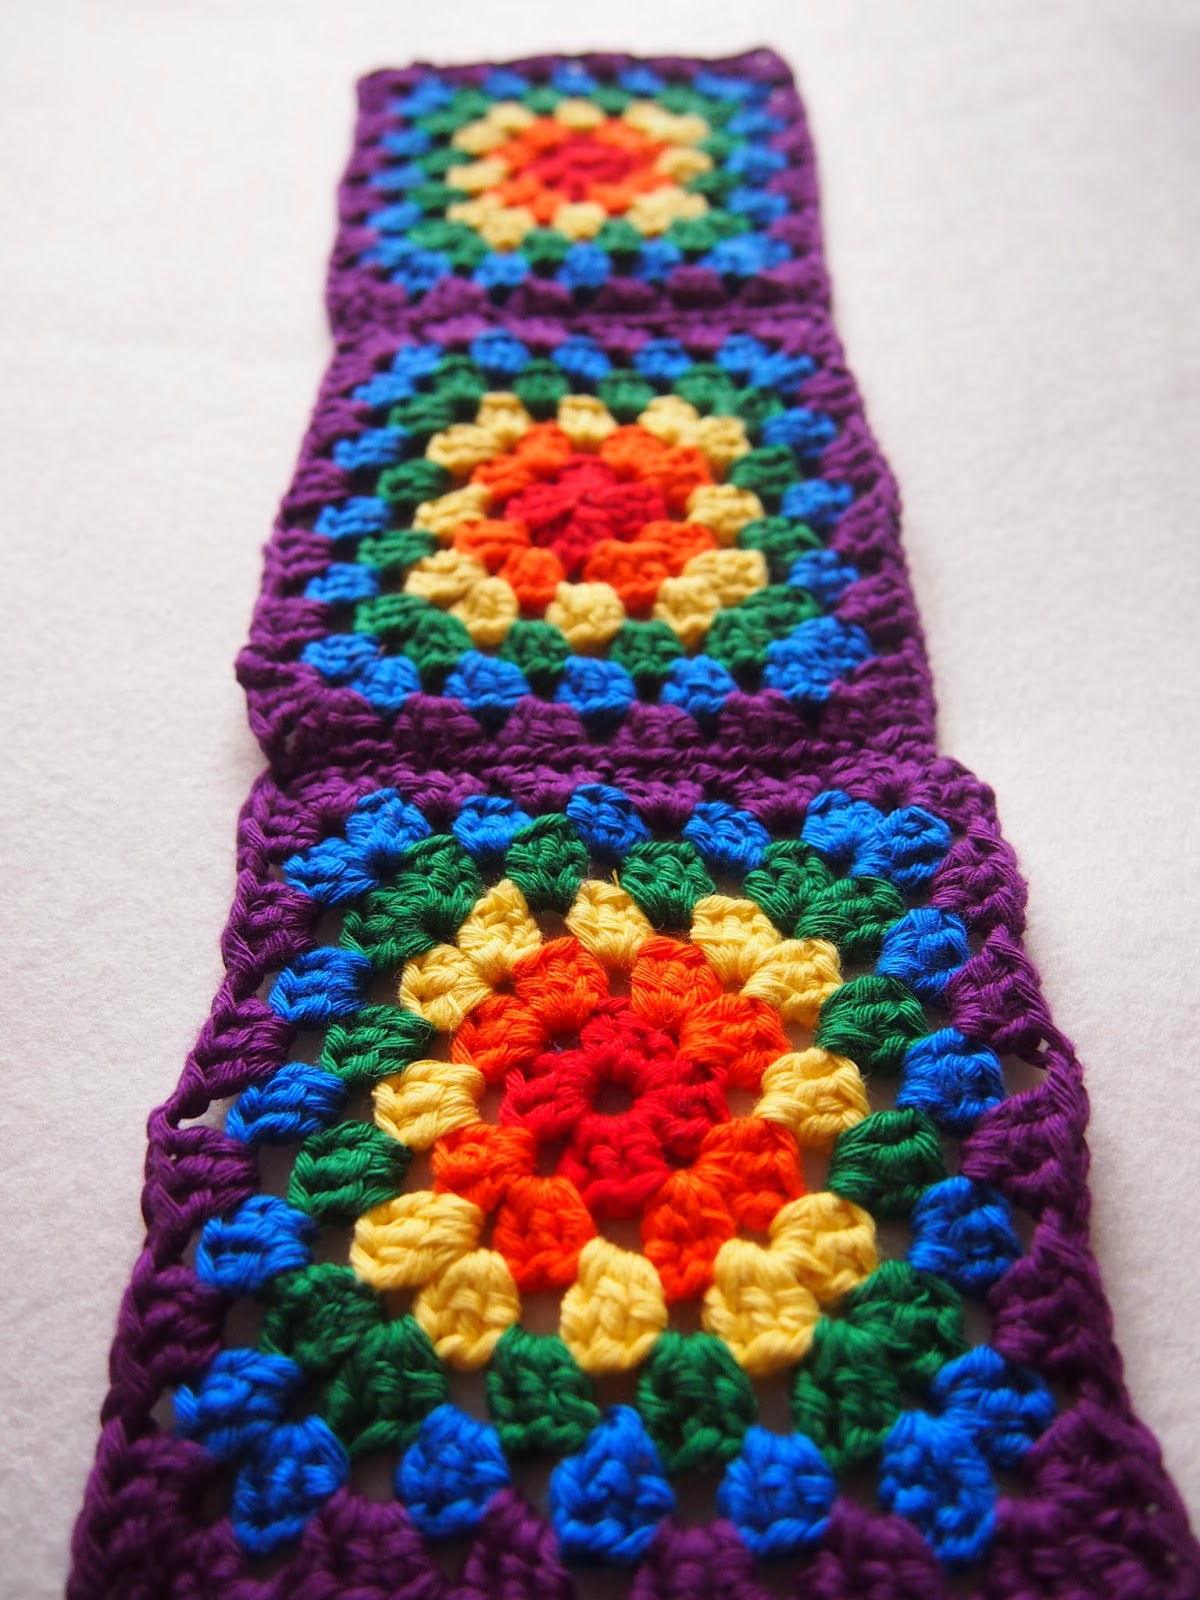
Rainbow Granny Square Crochet Cushion

I had an enforced break from my current dressmaking craze last week while I was waiting for a new pattern to arrive, so I turned my attentions to some crochet instead and finally finished my rainbow-coloured granny square cushion. I first blogged about this project back in August, when it was just one lonely little square. That has now multiplied into 18, which have come together to create this little beauty that is now brightening up my living room...


I made up the 18 squares first (I used Rico Creative Cotton Aran), then spent a very dull evening fastening in all the ends. Lesson learned: for future projects like this, I will sort all the ends out as I go along to spread the boring job out a bit!

I then joined them up into six lines of three...


Then I joined three lines up to make a nine by nine square for the front...


For the back, I joined two lines together to form a two by three rectangle, attached this to bottom of the front and attached the last line of three separately to the top of the front to leave an opening a third of the way down the back of the cover. I popped the cushion pad inside, and threaded ribbon through the holes in the squares to fasten them together...


I finished it just at the right time as well, because the rainbow colours brightened up a very gloomy and rainy Sunday, and it's a lovely snuggly cushion because of it being crocheted. I've got a load of dressmaking plans that I want to put into action at some point, but I think there will be some more knitting and crochet going on too - it's nice to be able to snuggle up on the sofa with some wool now that it's getting a bit colder! I'll leave you with one last blast of colour, and I'll see you again soon...


Sunday, 6 October 2013

Autumnal Colette Laurel Blouse

Here's my latest completed dressmaking project - my second version of the Laurel blouse from Colette Patterns...


After completing my first Colette Laurel top, I was really pleased but then in the bad weather that quickly followed it it felt like it was more a top for spring so I fancied making a slightly more autumnal version. I then remembered that I had a decent-sized piece of this pretty floral fabric that had been sitting in my stash waiting for the right project for a good few months...


When I bought it on ebay, it was advertised as 3 metres of brushed cotton - it was more like a metre and a half and it's not brushed cotton (I'm not 100% sure of what fabric it actually is, it's cotton of some sort but not brushed), but I liked it and I only paid a couple of pounds so I wasn't too worried, and now I'm even less worried because it's turned into a lovely new top!


Excuse the messy hair (it was windy!) and the fact that I seem to have left a big crease down the front of the top when I was ironing - I totally didn't notice that when I was wearing it and nobody felt the need to point it out to me!

I found the top fairly easy to stitch up first time around, and this time was just the same apart from some slight fabric fraying issues at times. I know I'll get a  lot of wear out of this top and I think I did a pretty good job on it - my sister didn't realise I'd made it myself until I said that I needed to take some pictures of it for this post, and she wouldn't be backwards in telling me something didn't look right! Always best to be (tactfully) honest about things like that!


I'm now impatiently waiting for a new sewing pattern to arrive in the post and keeping my hands busy with some simple crochet (which hopefully might be featuring here soon) in the meantime!

Sunday, 29 September 2013

How to make a bow fascinator

One of my favourite things about going to a wedding, aside from getting to catch up with friends or family and generally celebrating the happy occasion of course, is the chance to get dressed up - and for me that has to include some kind of head-wear. I don't know whether it's because I have short hair so can't really experiment with different hairstyles for special occasions, or just because I want to be a bit theatrical sometimes, but a wedding outfit just wouldn't be quite right without a fascinator or hat. They tend to be expensive though, so I've taken to making them myself for the last couple of weddings I've been to, and today I thought I'd share with you how I made this pretty bow fascinator/headband for a wedding that I was at on Friday...


There are probably already other tutorials online for making something similar, but sometimes I find it helps to read things written in a different way, so here's my version:

Start out with 3 rectangles of fabric, one for each bow and one for the 'knot' in the middle. 


My large bow piece measured 35 x 15 cm, the small bow measured 22 x 13 cm, and I ended up cutting the 'knot' down after taking this photo, so in the end it was about 4.5 x 10 cm.

Fold the large bow piece in half, right sides together, and sew down one short edge and down the long edge, then turn right sides out. 


Repeat with the other bow piece and the knot piece.

Take the large bow piece, and fold the ends over so that they meet in the middle, with the finished edge on top:


By hand, sew a loose running stitch down where the two ends join...


Then pull the thread through to gather the material up into a bow shape.


Secure the end of the thread, then repeat the whole process with the smaller bow piece.

Place the two bows on top of each other and secure together with a couple of stitches - this is just to hold them together while you add the 'knot'.


Wrap the 'knot' piece around the middle of the two bows, with the two ends meeting at the back with the finished end on top. You will probably need to cut some length off the raw edge - I prefer to have too much and have to cut some off than not have enough!


Sew the ends of the knot together by hand, and that's the bow finished! Ta da!


Now all you need to do is attach some elastic. I find it's best to just tie the elastic to the right length on your head - that way you can work out just how tight you would like it (and I have a massive head, so if I gave you a measurement based on what I used, it would probably be too big for most people!).

Tie the elastic into a knot, and sew the knot onto the back of the knot on the bow. This doesn't need to be too neat (as you can see, mine definitely isn't!) because you're about to cover it up.


Cut a small piece of felt (other fabric would be fine too, just with felt you don't have to worry about edges fraying) to cover the elastic on the knot and glue on (I used Gutermann creativ HT2)


And you're done!

Here's a picture of me wearing mine at my friend's wedding this weekend.


If you make your own versions, I'd love to see them!


Sunday, 22 September 2013

Pattern Runway Easy Short Sleeved Dress

Here's my latest completed dressmaking project - an Easy Short Sleeved Dress from Pattern Runway.


This project involved a few firsts for me - for a start it's the first dress that I've made. It's also the first time I've used a PDF sewing pattern. I was slightly worried that it would be tricky to get all the pieces together so that they matched up properly but it was so easy, and it's a lot quicker to download a PDF than to go out to a shop and buy a pattern or wait for one to be delivered in the post. 

Having spent the time getting my pattern all nicely sorted, this was also the first time I've altered a pattern. My bust and waist measurements were just the same as the measurements for the large size on the pattern, but my hips were a good few inches bigger (oh the joys of being pear-shaped!) and I didn't want things getting tight in that area, so I drew my own line out from the waist to add just a little bit extra round my hips, like this...


Possibly not the most professional or exact approach but it worked so I'm happy. Other than that, I didn't make any changes to the pattern and it all came together fairly easily - I can't remember anything causing me any major headaches anyway so it must have been OK. Another good project for beginners if anyone else out there is thinking of having a go at making their own clothes.

The material is a cotton poplin that I got half price in John Lewis the other week - bargain! It's peacock blue, which is one of my favourite colours so when I saw it was in the sale I thought it had to be bought.


Looking at the photos, I think maybe it would be better in a fabric with more drape but I still really like it, and I made it to wear out for dinner for a friend's hen party and got plenty of compliments (even from people who didn't know that I'd made it wasn't just my friends being kind!) so it can't be bad.


I'm busy planning what my next garment might be now, there are so many lovely patterns that I want to try - I feel like I'm spoiled for choice at the moment!