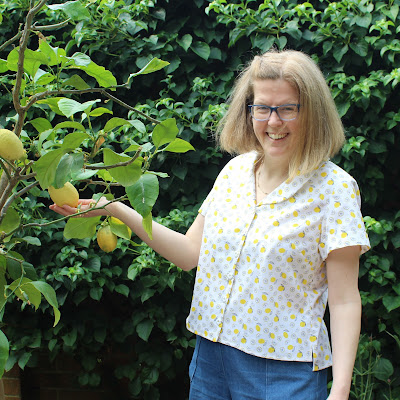
When the Sew Liberated Joanie top was released not long ago, I'd already recently bought a couple of new patterns so I almost passed this one by but the more I saw photos of it on Instagram, the more it appealed to me. Eventually, I caved and bought the pattern and added it to my summer sewing plans.
Joanie is a button front top with a breast pocket and various sleeve, collar and length options. View A has a camp collar, split side seams that finish at high-hip length, and cuffed short sleeves. View B has a shawl collar, is tunic length with a shirt style hem, and has long sleeves with tower plackets. Both views have bust darts, a back yoke and back princess seams.
The pattern is drafted for dressmaker's cup size C and covers bust measurements from 31" to 58.5" and hip sizes from 33.5" to 61".
For my version, I essentially made view A, but used the shawl collar from view B. I also omitted the breast pocket.
I've made a few shirts of various styles in the past and I've always found them to be satisfying projects, and the same was true for the Joanie top. The instructions were detailed and easy to follow, with very clear diagrams to help along the way. Like most collared shirts, it's a slightly more involved project with a few steps to complete. However, none of them are particularly complicated and I enjoyed gradually working through the stages.
I deviated slightly from the instructions when it came to the hem - instead of turning up the whole hem, I first turned the facing right sides together with the front of the shirt and sewed across the bottom to created the hem of that section, then turned it back right sides out. I then folded up the rest of the hem and stitched the whole way around, including top stitching down the facing. It's a technique I've learned from other patterns, and I think it produces a cleaner finish at the centre fronts than simply turning up the whole hem.
I liked the fact that the pattern doesn't include button markings and instead instructs you to position the first buttonhole based on your bust point and then space the rest of the buttonholes evenly working from the bust point buttonhole. I usually do that anyway because I often have to lengthen tops so button placement from the pattern doesn't work, but I also think it helps to prevent gaping.
The sizing of the Joanie top seems good to me. It's intended to have a comfortable fit and I think it achieves that. I made a 14 at the bust and blended out to a 16 at the hips as recommended for my measurements. The only alteration I made was to lengthen the top by 1", which is a very normal adjustment for me. I'm pleased with how the top has turned out - it's comfortable to wear but still has nice shaping from the bust dart and back princess seams.
The fabric I used is a lemon print cotton that I bought from Oh Sew Crafty. It's a nice crisp cotton and was a pleasure to work with. I also got it on sale for £5 which made it even better - it's always good to find a bargain! It was a really nice fabric to use for a shirt as it's very easy to handle.
I would also like to make a Joanie in something lighter like a cotton lawn because there's a tutorial for a cute puff sleeve hack on the Sew Liberated blog that I'd love to try, but I thought this cotton would have too much body.
 |
| Obviously I had to pose with the lemon tree in my lemon print top! |
The Joanie top was a really successful sewing project for me. It was a lovely pattern to make and I'm really pleased with the finished top. What more could you want?!


It looks lovely on you. And the lemon print is so summery.
ReplyDeleteThank you so much!
DeleteIt turned out nicely. A perfect Summer blouse. I made it as well. The fit is astonishing. Sew Liberated is my favorite indie pattern shop.
ReplyDeleteThank you! Yes, it is a really lovely pattern!
Delete